Application is an activity that promotes the all-round development of a child, and tear-off paper applique – this is one of the creative directions. Not only children but also adults can work in this technique using various templates. Preschoolers and schoolchildren will be especially interested in such an applique. It will contribute to the development of fine motor skills, which is important for those who are just preparing or starting to go to school.
Features of tear-off applique
Tear-off paper applique, the templates of which can be ready-made or made independently, refers to simple techniques. It is accessible to children from 3-4 years old. Paper parts do not have to be cut off for a long time. They are simply torn off by hand, without any tools.
Sometimes you can use scissors if the craft requires even strips. These strips can then be torn into pieces.
Operating principle
Paper crafts using the tear-off applique technique are made in 2 main ways.
Simple option
This option is suitable for the youngest children.
The stages of such creativity are as follows:
| No. | Stage | Description |
| 1 | Preparing the template | At the initial stage, an adult (parent or teacher) should select a suitable drawing for the work - an outline, on the basis of which the craft will be made. In this case, you can take a ready-made drawing or draw it yourself. Once there is a background, all that remains is to apply the picture to it. Its elements are torn off from the colored paper and then glued to the main canvas. It is important to keep in mind that a large number of details will be glued to the canvas from above. |
| 2 | Choosing Colored Paper | The paper that serves as a background for this craft should be thick enough, so when choosing, you should pay attention not only to the color of the base, but also to the thickness. You can involve children in the work. Together with them, you can choose the color of the paper that will be used for filling. After this, the child himself begins to tear off pieces of any size. |
| 3 | Gluing paper to the background | You need to take each piece of paper, apply the adhesive to one of its surfaces, and then apply them to the base one by one. It is most convenient to use a glue stick, because with its help you can evenly distribute the adhesive over the surface.
Once the space is filled, the work is finished. The result is a monochrome piece that in many ways resembles a mosaic. |
The option is more complicated
Paper tear-off applique (patterns for products can be classic or abstract) always starts with an idea. After choosing a suitable example, the child begins to do everything independently, but at the same time, an adult should observe his creative process to prevent mistakes.
The stages of the complex version are as follows:
- Take thick colored paper. It can be any color.
- Place the stencil on thick colored paper and trace around it. If desired, you can apply the design to the surface of the paper without using a stencil.
- Select thin paper of the desired color and start tearing off pieces from it.
- Fill the space with torn pieces of paper. To do this, apply an adhesive substance to each fragment, it is best to use a glue stick.
- Once the entire space is filled, the work is considered complete.
Combined application
This type of creativity is notable for the fact that it combines several techniques at once. For example, tear-off applique can be combined with regular applique, in which scissors are used to prepare paper parts. You can also use different drawing techniques.
Autumn tree
To make an autumn applique, you need to prepare the following materials:
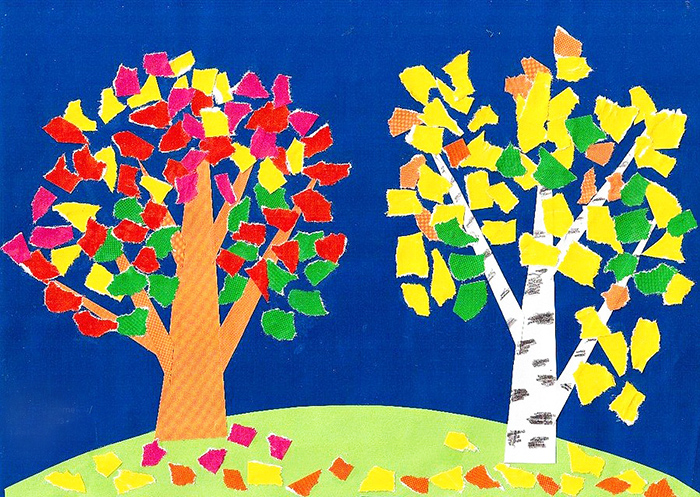
- green cardboard, which will act as a base;
- glue;
- thin paper of 4 colors: yellow, orange, red, brown.
The work takes place in the following stages:
- Start by marking the tree. To do this, you will need a strip of brown paper, which will act as the trunk. The fragment is attached to the green cardboard with glue.
- Prepare leaves for the tree, which should be yellow in autumn, as well as red and orange. Small pieces are torn off from each piece of paper and glued to the section of cardboard where the leaves should be located - above the trunk. They can be glued in a chaotic order, having previously treated the surface of the base with glue.
- Glue some colorful leaves under the brown tree trunk to show that they have already fallen.
Winter landscape
Tear-off paper applique (templates for work can be thematic) To create a "Winter Landscape", you will need to prepare the following materials:
- thick blue cardboard;
- glue;
- colored paper of 2 colors - green and blue;
- a sheet of white paper.
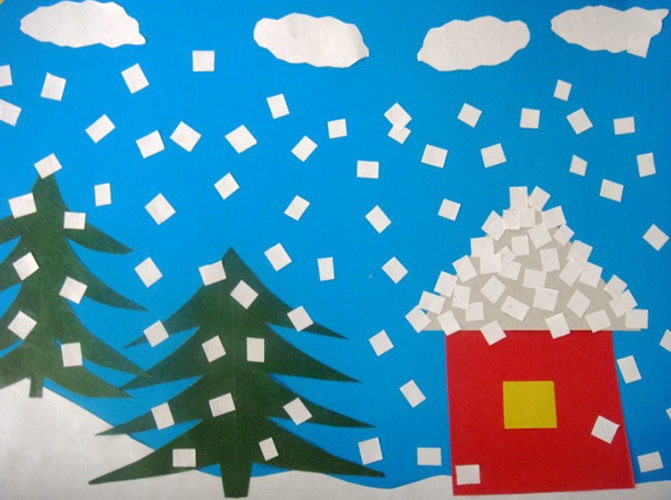
Having prepared the necessary materials, you can proceed directly to the work, which takes place in the following stages:
- Place all the prepared sheets of colored paper and release your individual imagination, tearing them with your hands as you wish: into strips, small pieces, large pieces. The shape of the torn pieces can be any.
- Look at each small piece of paper and think about what it looks like.
- Place the prepared paper fragments on the blue cardboard, trying to make several Christmas trees from green paper and snow under them from white paper.
- When the landscape is ready, start gluing. You should take one piece at a time, apply glue to one of its sides, and then return it to the place that was designated for it on the blue cardboard sheet.
- Add some white snow to the green branches of the trees to make them fluffier and more beautiful.
- Add the moon that rises above this earthly beauty. The night light is made of yellow paper, but it does not necessarily have to be round. You can take any yellow piece of paper of the appropriate size and place it at the top of the cardboard. It will look beautiful if you hide the moon in winter snow clouds.
The resulting painting will be a great decoration for your room, especially on the eve of the New Year holidays.
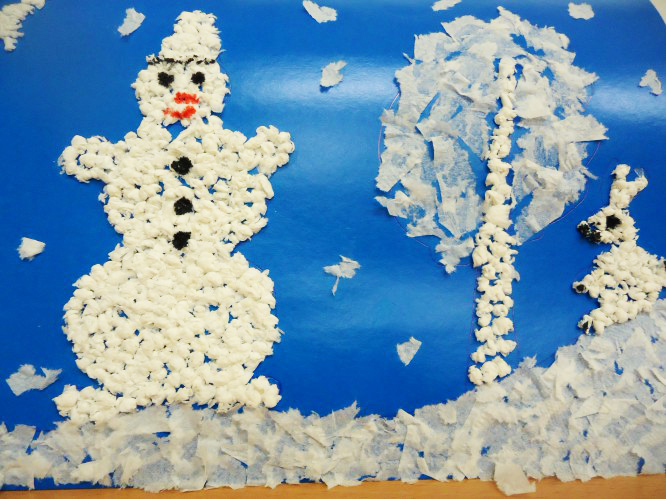
Snowman
Making sculptures out of snow is one of the most favorite winter hobbies for children. For example, you can make a snowman out of scraps of white and colored paper.
For work you will need the following materials:
- colored cardboard;
- colored thin paper;
- simple pencil;
- glue stick;
- ruler;
- several markers;
- figured hole punch.
The process of creating this tear-off applique goes through the following steps:
- Choose suitable colored paper for the background and snowdrifts. The background will be blue cardboard, and the snowdrifts will be white thin paper.
- Using a simple pencil, draw snowdrifts on white paper. To do this, draw several smooth lines at the bottom of the sheet.
- Tear the paper along the marked lines. As a result, the sheet will be divided into 2 pieces - large and small. The smaller one can be put aside for now. These will be snowdrifts, which will be glued to the background at one of the following stages.
- Cut another row of snowdrifts from a large piece of white paper. To do this, draw a straight line from one edge to the other at the bottom (on the side that is torn off). Use a ruler for this. Then cut the 2nd row of snowdrifts along this line.
- Glue both prepared rows of snowdrifts to the blue cardboard background. This is done sequentially: first one, then the other.
- On the remaining white sheet of thin paper, draw the main elements of the future snowman. They can be any size. All these elements will be circles. The largest of them should be the 2 elements of the body. A slightly smaller circle, which will be the head. Draw 2 small circles, which will become the upper limbs.
- Carefully tear off all 5 elements drawn in the previous step. The borders of the elements will be rough, as befits snowballs.
- Attach the finished elements to the blue cardboard sheet. They should be positioned so that the snowman appears to be standing on snowdrifts.
- Cut out a bucket from orange paper. First draw it in the form of a trapezoid, then cut it out.
- Make snowflakes using a figured hole punch.
- Place the prepared orange bucket on your head.
- Design the snowman's face. To do this, simply draw a carrot in the nose area with an orange marker, a mouth with red, and eyes with black.
- Make a broom. The material for it will be brown paper. The broom consists of 2 main elements - a handle and twigs. All this is made of brown paper. The handle will be a long strip about 5 mm wide (1 cell of a school notebook) and a little shorter than the height of the snowman himself. The twigs are a trapezoid with a large number of cuts. The result should be many short strips.
- Glue all the elements that have been prepared. The snowman should have a broom in one of his hands, and snowflakes should be randomly located in the background.
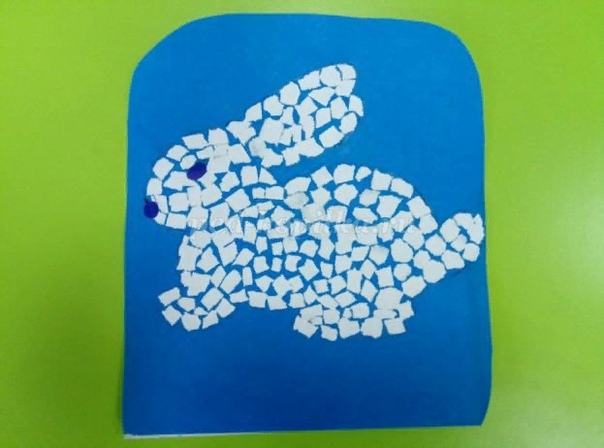
Bunny
A tear-off paper applique in the form of a hare, in addition to its template made of thick material, will require the following:
- blue cardboard;
- white paper;
- scissors;
- PVA glue;
- nose for a hare;
- eye for him;
- simple pencil.
The work proceeds as follows:
- Make a template of a hare.
- Trace the template onto white paper.
- Cut out the figure of a hare.
- Take blue cardboard, place the resulting figure on it and trace the outline with a simple pencil.
- Take a white sheet of paper and tear it into small pieces with your hands. There should be enough of them to fill the entire area of the figure that was formed on the blue cardboard when tracing the template.
- Glue the prepared pieces onto the hare.
- The eye and nose for the hare are made from purple paper. Both should be small ovals. Both of these ovals are glued to the head - respectively, in the places where the eye and nose should be.
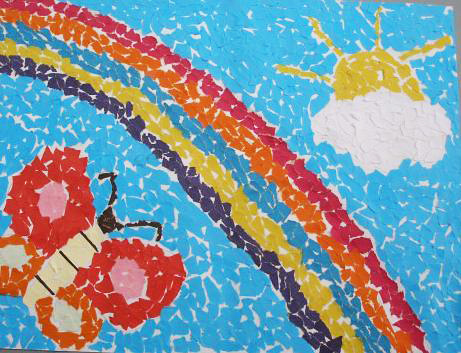
Rainbow
A rainbow made from scraps of colored paper is easy to make.
To do this you will need to prepare:
- 6 or 7 colors of the rainbow (blue can be excluded);
- white cardboard for the background. If desired, you can cut out an arched strip from the cardboard, onto which you will glue pieces of colored paper one by one;
- glue.
The creative process takes place in 2 main stages:
- Preparing the multi-colored pieces.
- Gluing them to a white background.
In this case, when preparing the pieces of paper, you should keep in mind that you will need the most red ones, because they will be used to create the upper and longest part of the rainbow. You will need slightly fewer orange pieces, and then in descending order - yellow, green, light blue, blue and violet.
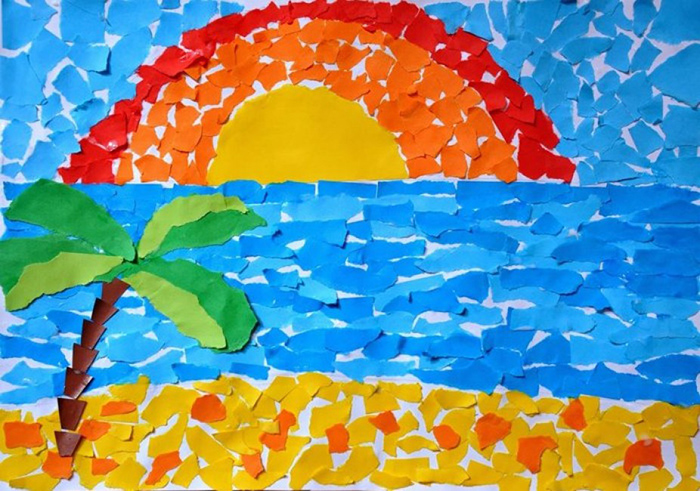
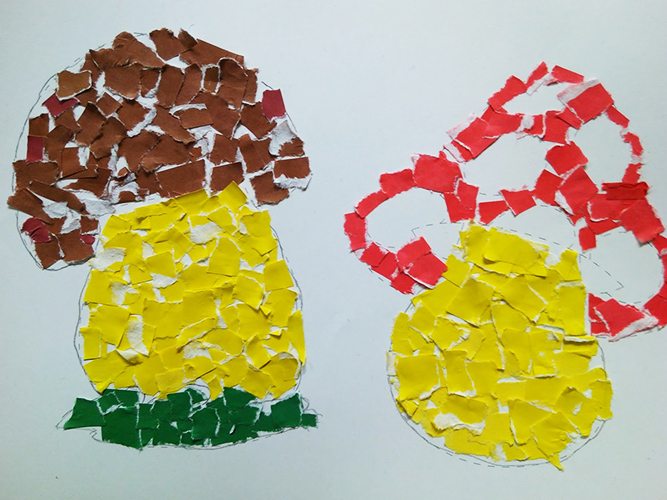
Mushroom in the meadow
To make a beautiful mushroom growing in a clearing, you need to prepare the following materials and tools:
- white cardboard;
- glue;
- simple pencil;
- blue pencil;
- thin colored paper of 4 different colors: yellow for the bright sun, green for the grass, gray for the mushroom stem and brown for its hat.
The work of making the mushroom takes place in the following stages:
- Make a drawing on a piece of cardboard. At the bottom, draw a wavy line with wide waves, thereby marking a clearing.
- In the center of the sheet, above the first line, draw the outline of the mushroom. It consists of two elements: the stem and the cap. First, draw the stem, which is a wide oval. Above the stem, there is a cap, which can be depicted as a large semicircle.
- In the upper left corner of the image, draw a part of the sun. This can be just a small arc line.
- Move on to working with pieces of colored paper. It is easiest to start with green and lay out the grass. Everything that is located below the wavy line that was drawn on the cardboard sheet at the very beginning of the work should be filled with green paper elements.
- Use brown paper to fill the mushroom cap.
- Fill the mushroom stem with pieces of grey paper.
- Fill the sun with yellow colored paper.
- To add brightness to the image, take a blue pencil. It is necessary to paint over all the free space, thereby depicting the sky. When painting, you can leave some areas of the base white, then you will get clouds.
White owl
To create a painting of a white owl on a night background, you need to prepare:
- white paper;
- thick black sheet or cardboard;
- simple pencil;
- eraser;
- colored paper: brown, yellow, bright red or orange, black;
- scissors;
- white paints.
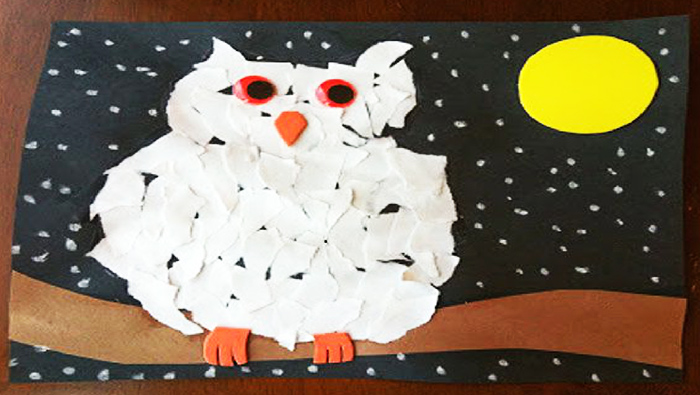
The stages of work will be as follows:
- Prepare white paper for the owl's body by tearing it into small pieces.
- Take a black sheet of cardboard as a base.
- Cut out a random strip from brown paper, which will become a tree branch.
- Cut a circle out of yellow paper and glue it to the right corner of the black background. This will be the moon.
- Use a pencil to draw the outline of an owl above the brown branch.
- Place glue on the owl silhouette and cover it with torn pieces of white paper.
- Cut out a beak, 2 paws and 2 circles for the eyes from red paper. Use black colored paper for the pupils.
- Glue the cut out small parts into place.
- Use white paint to mark the stars in the sky.
Butterfly
Paper tear-off applique (art templates can be used to create landscape versions) in the form of a butterfly is a complex and lengthy process.
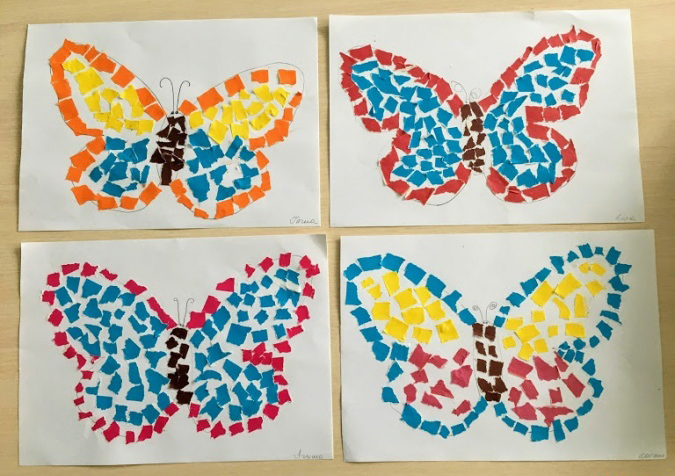
Before starting the creative process, you need to prepare the following materials:
- colored and white paper;
- glue stick;
- colored pencils;
- a printable template that you can make yourself.
The step-by-step creation of the butterfly will be as follows:
- Tear the orange paper into not very wide strips – about 1 cm.
- Chop the strips into small squares.
- In a similar way, make the same small squares from other colors - purple, yellow, light green.
- Before gluing the pieces onto the template, shade the gluing area with a colored pencil in the same tone.
- Apply glue to the shaded area and apply the pieces one by one, trying to place them closer to each other.
- Do the same as in the previous step with the remaining sections of the template. If the child has difficulty gluing the pieces in a strictly defined order, you can mix up all the colors. This will not make the butterfly any less beautiful.
- At the final stage, color the butterfly's body with a pencil.
Tear-off applique uses sheets of colored paper, cardboard, and image templates. The cardboard acts as the main background, and the colored paper is torn, and then each piece is attached to the base with glue.
In addition to paper, you can also use pencils, paints, threads, and various natural materials to create an applique.
Video about the application:
Master class on making a tear-off applique Fish:
Great.