The robot is considered one of the favorite toys that boys like to play with. At the same time, the product can be made with your own hands from paper. Thanks to a large number of different schemes and templates, the appearance of each craft will be varied.
Simple paper robot
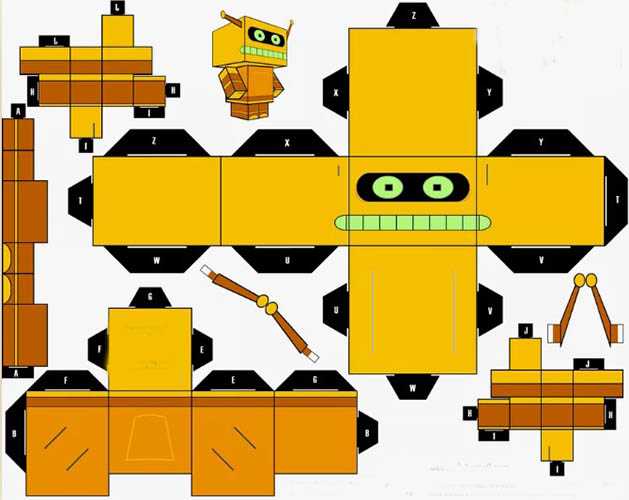
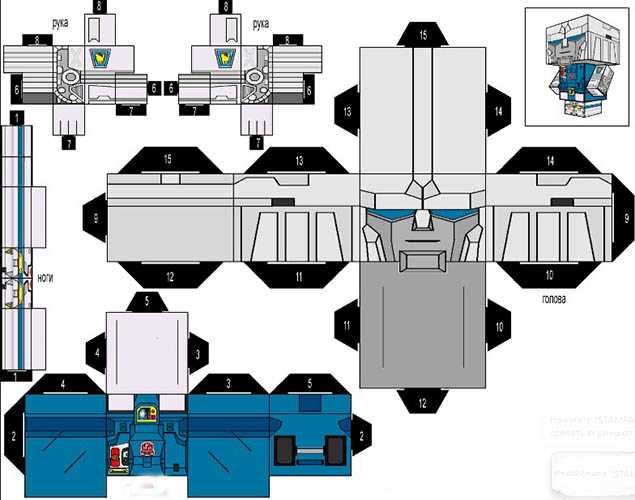
A do-it-yourself paper robot can be made using a ready-made scheme that can be printed out.
Additionally, you need to prepare:
- sheet of paper;
- glue;
- scissors.
Some templates require the preparation of markers, a needle, cardboard and rubber bands to connect the parts. When choosing PVA glue, you need to use a material that has a strong adhesive composition and will not leave stains on the paper.
There are always 2 types of lines on the diagrams:
| Type | What is it for? |
| Solid | You need to cut the paper along this line using scissors. |
| Dotted | In this case, it is necessary to fold the sheet. |
The process of creating a simple robot:
- Cut out the parts along the solid lines on the template.
- Bend the craft parts along the broken line in the necessary places.
- If necessary, make several holes using a stationery knife or needle.
- Connect all parts of the product with glue.
- Put the finished craft aside for about 60 minutes to allow the glue to dry.
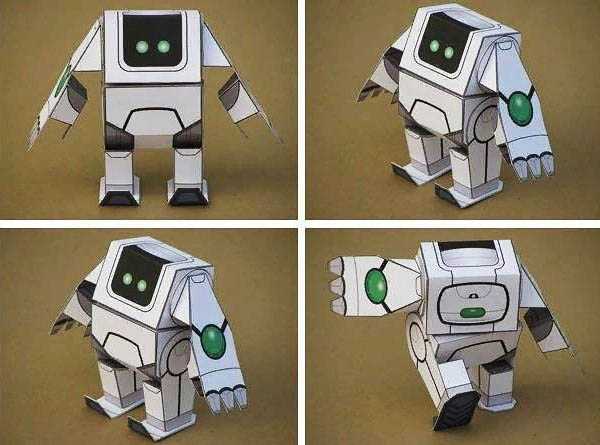
A DIY paper robot can move. In this case, no special electronic devices are required. The robot must be controlled with your hands.
List of necessary tools and materials:
- pencil with a ruler;
- scissors with glue;
- 2 clothespins (can be replaced with culinary skewers);
- scotch;
- colored paper sheet (pigment should be applied to each side).
Step-by-step description of the work:
- Fold a colored sheet of paper in half along the long side. Then make a cut along the fold. To make the line straight, you can additionally draw a line using a pencil and a ruler.
- Fold one of the cut parts in half. Then open the workpiece. Bend each side to the fold line. Open the workpiece again.
- The result should be a rectangular figure, which is divided by lines into 4 equal parts.
- Fold the rectangular shape in half. From the fold line to the next line, draw dotted stripes at the same distance from each other. Make cuts along the dotted line.
- Open the piece so that the uncut sides can be glued together. The result will be a flexible piece that will protrude as the legs of the product.
- On the second half of the colored paper, mark 2 strips measuring 5x21 cm and 1.5x21 cm. Cut off the marked strips.
- Attach the narrow piece to the wide strip using glue. In this case, it is necessary to step back 1.5 cm from the edge of the shortened side.
- Join the bottom of the wide strip to the top side using glue.
- The parts of the narrow strip that protrude from both sides are folded in the form of an accordion. This part will act as the robot's arms.
- Carefully insert the flexible blank into the created part.
- Find the center and glue the two pieces together. The result will be a body with arms and legs.
- Cut a strip of 4x8 cm from colored paper. Fold the blank in half and fix it to the upper side of the body with glue. This part will act as the head of the structure.
- Draw a mouth with eyes on the head. Use felt-tip pens for this.
- Cut out antennas from paper and glue them to the head. Additionally, cut out hooks that will act as the robot's palms.
- Attach the skewers to the legs using tape.
If you don't have culinary skewers, you can use clothespins or simply cut out 2 strips of cardboard so that you can control the toy.
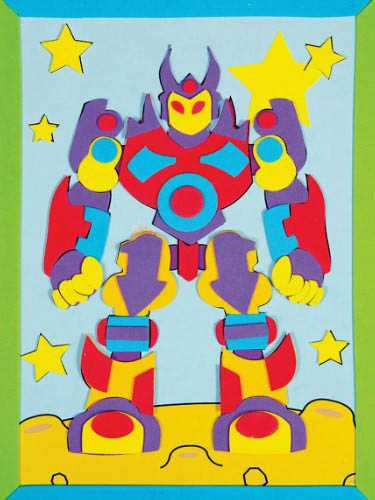
Robot raising hands
A DIY paper robot can be presented as a toy that can raise its arms. For work, it is permissible to print out the necessary template or you can make the parts yourself.
Necessary tools and materials:
- pencil with a ruler;
- glue gun or glue stick;
- scissors;
- colored sheets of paper in yellow and green shades.
Step-by-step description of the work:
- Cut a strip measuring 8x22 cm from a yellow sheet of paper. Apply glue to the edges of the part on each side. Join the sides together to form a cylinder. This will be the robot's body.
- Cut 3 strips of 2.5 x 11 cm from yellow paper. Fold all the pieces at each edge. Glue two pieces to two bases of the cylinder. Fix the folded edges to the inner walls of the body. Glue the last strip perpendicularly over any of the two strips.
- Cut a strip of 8x18 cm from yellow paper. Roll the blank into a cylinder shape and glue it together. This will be the head of the craft.
- Cut out 2 strips of yellow and green shades measuring 3x30 cm. Coat the edge of one part with glue and fasten it to the edge of the other part perpendicularly. Bend the blanks one by one at this angle. Glue the last piece of paper to the blank. As a result, an accordion should form. This will act as the robot's neck.
- Join the resulting accordion with the perpendicularly glued strips on the body.
- Glue the head to the free edge of the accordion. Attach the cylinder with the long side.
- Cut 2 strips of 1.5 x 30 cm from yellow and green paper. Then repeat step 4. As a result, the robot's arms will be created. Attach the blanks to the body on each side.
- Cut a 5x10 cm strip out of green paper and fold it in half. Draw a hook on the blank, then cut it out. The result should be 2 parts. Glue the blanks to the hands.
- Cut out 2 strips of 2x30 cm from green and yellow paper. Then repeat step 4. These will be the legs. Attach the blanks to the lower base of the body using glue.
- The robot is ready. To complete the craft, you can glue the eyes and make antennas.
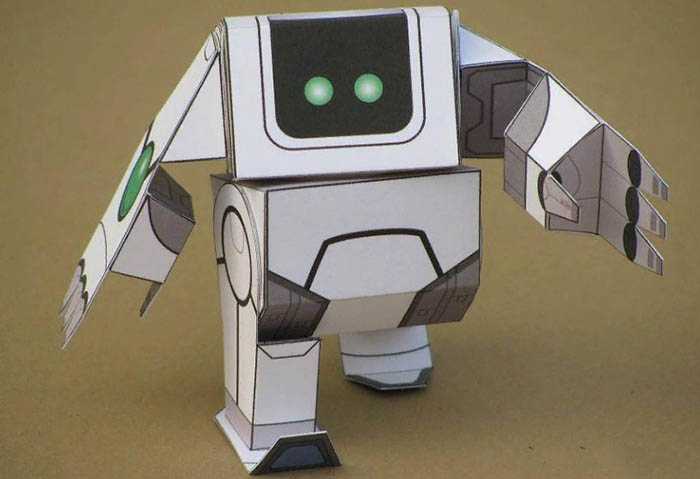
Volumetric robot made of paper
You can make a three-dimensional robot with your own hands, which will stand firmly on the surface. To do this, you need to prepare several thick sheets of paper of different shades with ordinary white sheets.
Additionally, you need to take:
- glue;
- ruler;
- scissors;
- scotch.
Step-by-step description of the work:
- On a thick sheet of paper, draw a square with a side of 5 cm. Each corner of the figure should be right.
- Similarly, draw 3 more additional squares, which should be placed near the first figure.
- In each new figure use the side from the previous square. As a result, 4 figures should be depicted, which are presented in the form of 1 large rectangle.
- Place the outer 2 squares separately from each other, in the second figure on the rectangle. Place 1 square at the same distance on each side of the rectangular figure. As a result, a figure in the form of a cross should be formed.
- Trim the outer edges of the cross. Do not touch the inner part of the figure. Put the paper scraps aside.
- In the upper area of the cross, fold 3 squares. Raise the elongated edge of the figure so that you can bend the top. The result should be a cube.
- To join the edges, use glue or tape. When choosing glue, hold the ends of the parts with your fingers for 30 seconds to ensure a high-quality connection of the blanks.
- On a thick sheet of paper, draw a rectangular figure measuring 5x10 cm. On top of the long side of the figure, draw another rectangle measuring 10x20 cm. The lines of the 2 figures should be joined together.
- On top of the 2nd figure, draw a rectangle measuring 5x10 cm. On top of it, draw a rectangular figure with sides of 10 cm and 20 cm.
- It is important to remember that the sides of the rectangles measuring 5 cm and 20 cm must match the sides of the other figures of similar size.
- On each side of one of the figures measuring 10x20 cm, draw a rectangle with sides of 20 cm and 5 cm. The result should be a figure resembling a cross.
- Cut out the resulting figure. Put together 2 rectangular figures measuring 20x5 cm and 1 rectangle with sides of 5 cm and 10 cm. Then fold the other part to form a rectangular cube. Use glue or tape to secure the ends.
- If you want to give the 2 blanks a bright shade, you can use any acrylic paint. The pigment can be applied with a brush or take an aerosol. In the second case, spray the composition at a distance of 60 cm. The figures must have ribs and sides. Instead of paint, the blanks can be wrapped in foil. You can simply wrap the parts with the material or cut the foil into pieces and glue them.
- Place the cube on one of the rectangular figures measuring 5x10 cm. Place the part in the middle. Use strong glue for strong fixation.
- Cut 2 strips of any shade of paper with sides of 2 cm and 17 cm. Fold the blanks in the form of an accordion. The length of each fold should be equal to 1 cm.
- Glue the folded parts on each side of the body, leaving 2 cm from the head.
- Cut out 2 square figures with a side of 10 cm from a thick sheet of paper. The shade of these parts should match the color of the blanks that act as the robot's arms.
- Roll the resulting squares into tubes with a diameter of 2 cm. To prevent the blanks from unrolling, use tape. These will be the robot's legs.
- Coat one end of the tube with glue and attach it to the lower base of the body. Glue the other part of the leg in the same way. Place the lower limbs at the same distance from each other and in the center of the body.
To complete the craft, you can glue the eyes to the head. Buttons or small objects will do for this purpose. The main thing is that they are shiny. The selected objects must be fixed to the head with glue so that they do not fall off. The eyes should be located at a distance of 2 cm from the lateral borders of the head.
If desired, you can make 2 holes for antennas in the upper part of the head. You can use scissors or a stationery knife to make holes. The holes should be located at a distance of 2 cm from the boundaries of the structure. Thin tubes that need to be slightly bent can be used as antennas.
Various elements can be placed on the robot's body, acting as signal buttons. To do this, you can cut out small squares with a side of 3 cm from thick colored paper. These elements need to be fixed to the front part of the body using glue. If there is no thick paper, you can use foamiran.
This material does not contain toxic substances, so it is completely safe. At the same time, you can cut out parts from it with ordinary scissors, which will not leave sharp edges with burrs. At the same time, you can buy a material that has an adhesive base on one side, which allows you not to use glue when fixing parts to the robot body.
For stability, you can attach 2 circles to the legs, the diameter of which will be equal to 5 cm. For these blanks, you need to use thick paper. If you cannot draw even circles by hand, you can use a compass or any round object of a similar diameter.
The circles should be different in color from the robot's upper and lower limbs. The cut-out parts should be attached to the edges of the legs using a strong, quick-drying glue.
You can make ears for the toy. For these purposes, it is acceptable to use beads of the same shade, for example, gold or silver. The parts should be placed on each side of the head. The blanks can be attached using glue.
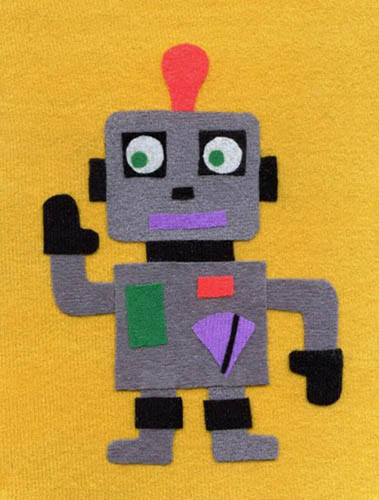
Robot application
A do-it-yourself paper robot can be made in the form of an applique. This type of work promotes the development of fine motor skills of the hands with the cultivation of perseverance and accuracy.
List of necessary materials and tools:
- white sheet of A4 format;
- pencil with a ruler;
- PVA glue with scissors;
- colored sheets of paper.
When choosing paper, you need to give preference to a material that will not slip in your hands. This will allow you to easily cut out the desired part and apply glue to it. For joint work with children, it is best to use coated material, because it is characterized by high density and is easy to hold in your hands.
To prevent the glue from protruding beyond the edges of the parts, you need to take a thick sheet of paper. This material will immediately absorb the adhesive, preventing it from spreading over the surface.
Origami paper has more saturated shades than regular paper. When choosing it, you should give preference to square-shaped material, because it has brighter tones.
Step-by-step description of the work:
- On a yellow sheet of paper, draw a large square measuring 8 cm, 2 small circles measuring 1 cm in diameter, 2 horseshoe-shaped pieces measuring 3 cm, and a square with one side rounded measuring 6 cm. Additionally, draw 2 small squares with a rounded side measuring 2 cm.
- On a green sheet of paper, draw 2 small rectangles measuring 2x3 cm, 2 rounded stripes, 2 stripes measuring 1x5 cm, 3 circles measuring 1 cm in diameter. Additionally, draw a rectangle measuring 1x2 cm and a stripe measuring 1x10 cm.
- From a sheet of white paper, cut out 2 circles with a diameter of 2 cm.
- Place an A4 sheet of paper vertically on the table. Place and glue a 10 cm yellow square in the center of the top of the paper. This will be the head of the craft.
- Glue the neck near the bottom of the square. For this, take a green strip 1x2 cm.
- Then glue the body to the neck in the form of a square with a rounded side.
- Glue 2 rectangular pieces measuring 1x5 cm to the body. These will be the legs.
- Glue 2 yellow pieces in the form of small squares with a rounded side to the legs. These will be the robot's boots.
- Glue 2 rounded green parts to the body on different sides. These will be the arms of the product.
- Glue 2 yellow horseshoe-shaped pieces to the edges of the arms.
- Glue two green rectangles measuring 2x3 cm to the head on different sides. These will be the robot's ears.
- Fold a green strip measuring 1x10 cm in half and cut. Glue two blanks to the top of the head. These will be the antennas.
- Glue 2 yellow circles to the top of the antennas.
- Glue 2 white circles onto the head. Place 2 green circles right in the center.
- Glue 1 green circle and a 1x2 cm strip of the same color onto the robot’s body.
If you like to create various crafts from paper, you can make a toy in the form of a robot. A hand-made product helps not only to develop hand motor skills, but also to show imagination.
Video about the craft