Decoupage (covering plates, jars and other dishes with napkins) is a relatively new activity in the world of modern handicrafts. The technique is not very difficult to perform, but it requires attention, accuracy and diligence, even for beginners.
This method of decoration originated in the 17th century in England and is still popular today. Learning how to make original items can sometimes take a lot of time. For beginners, napkin decoupage can be mastered gradually, working with photographs that show the process step by step.
What is napkin decoupage?
Decoupage is a technique of decorating things by gluing patterns and designs cut out of paper onto them., corresponding to the artistic concept of the master and subsequent varnishing of the finished work to protect it from damage. The completed picture will look like a real painting.
This technique is used to give a second life to old pieces of furniture or household goods and create amazing crafts that can be used to decorate the interior or as gifts to friends and family.
Tools and materials for work
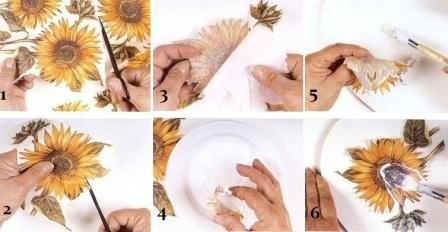
Experts recommend decoupaging napkins using step-by-step instructions with photographs.
To work with simple equipment, you need the following equipment:
- three-layer colored napkins, rice paper or special cards with the required pattern;
- sharply sharpened scissors;
- special glue (for example, PVA, diluted with water 1:1);
- sponges and brushes are best made of natural hair. To smooth out wrinkles, it is worth buying a soft brush.
- object for decoration;
- acrylic primer for good adhesion when painting, and artistic white paint of different colors;
- pencil;
- coarse and fine sandpaper for grinding surfaces;
- acrylic or water-based construction varnish. For coating frequently used items, it is advisable to purchase parquet, marine or furniture synthetic mortar.

This is a standard set. Depending on the working material, it is supplemented with improvised means.
Basic techniques and stages of decoupage of various objects
For those who are just starting to master the decoupage technique and want to learn the step-by-step manufacturing technique, experts recommend starting to make things from napkins using photographs.
Sequence of production on a wooden object:
- Sand the surface with sandpaper to soak in the primer.
- Prime and then sand the workpiece again.
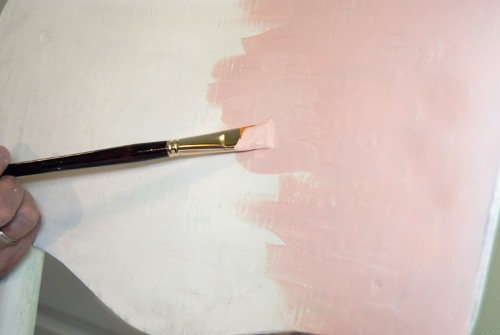
- Apply white acrylic enamel on top.
- Apply the image, cover with several layers of varnish, sanding each one for gloss.
To understand how the materials interact with each other, it is advisable to test on a similar sample. The peculiarity of the technique is not in the ability to draw, but in the possession of accuracy and filigree, since you will have to work with scissors. It is better to use special pictures for decoration, which have optimal print quality, and water- and glue-resistant paints.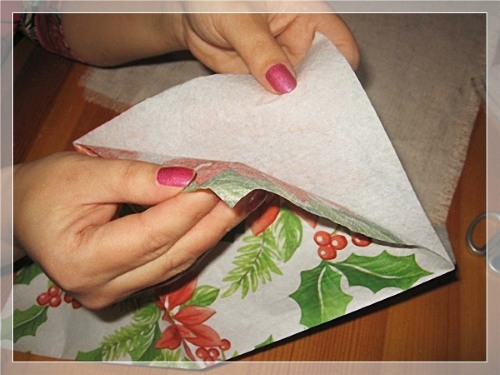
When using napkins, you need to remove the two bottom white paper layers, and the cards are taken into work immediately.
There are the following techniques for attaching illustrations:
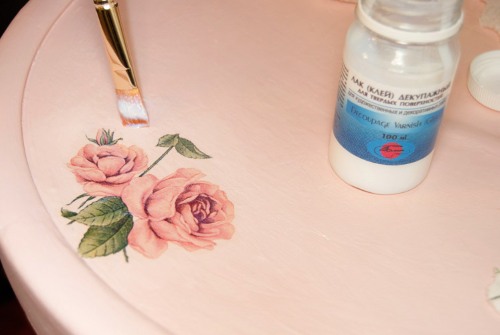
- Glue — the most common method. To do this, place a napkin on the decorated object and apply glue on top with a brush.
- Using a file — suitable for relief base. Place the prepared pattern on a stationery file with the film facing up and spray it with water until the napkin is completely wet. After the paper residue is washed away, paint with the image will remain on the cellophane. Apply the film to the decorated object so that the picture sticks to it.
- With an iron — the hot method is suitable for flat surfaces. First, coat the work area with glue and let it dry. Place the drawing on top and cover with baking parchment. Iron over the paper until the pattern sticks. Apply a layer of varnish.
- Using gelatin. Repeats the gluing technique, only the glue is replaced with gelatin. Suitable for decorating pysankas. To do this, dilute 1 teaspoon of gelatin in 1 cup of boiling water and use as glue.
Creating a pattern from napkins
The following materials are used for decoupage:
- napkins;
- special cards sold in craft stores;
- drawings from the Internet or printed photographs;
- images from wrapping paper, magazine cutouts, postcards.
You can glue any pictures, but not all of them are perfect, and it takes a long time to select the pattern.
The following parameters should be taken into account:
- The main criterion is the size of the image, which should be in harmony with the size of the workpiece. Having mastered the technique of processing printouts, it is easy to change the format of patterns in different graphic editors.
- The second factor is that the source material does not match the color palette. A successful combination of colors of the drawing and the remaining decor is a significant part of the success, which is solved with the help of a graphic program.
- Sometimes illustrations do not match in image and style. Incorrect selection of motif spoils the effect of the work done. It is necessary to choose pictures corresponding to the idea that has arisen.
- Sometimes there are unnecessary elements on the napkins that need to be removed.
The ideal illustration for decoupage looks like this:
- It has no unnecessary components, and is successfully combined in color and size. It is advisable to carefully select the original paper material.
- Bright and distinct, suitable for the image and style. The idea embedded in it should express certain information. Do not combine different artistic techniques, for example, the aging technique with modern photographs.
- Beginners are advised to choose a picture whose motif can be drawn.
- The background should match the individual elements.
Technique for creating textured patterns
To perform volumetric decoupage, it is recommended to prepare several layers of napkin patterns. Then they should be glued together layer by layer and attached to the base using silicone, which gives the property of a three-dimensional effect. In this technique, 3 zones are defined: the front part and the zones of intermediate layers. Before gluing the elements, it is advisable to form the component naturally.
An important condition is the creation of a believable sculpture. After the painting is fully formed, water-based varnish is applied to some sections. These areas reflect light reflections and are visually perceived as more voluminous.
Bottle Decorating Techniques
Decoupage of a bottle from napkins for beginners is done step by step with a photo. For this, it is better to take a glass container, smooth without various bulges. For work, you will need a standard set of tools with the addition of a glass cleaner, which is pre-treated with a bottle clean of stickers. It is advisable to work in gloves so as not to leave fingerprints.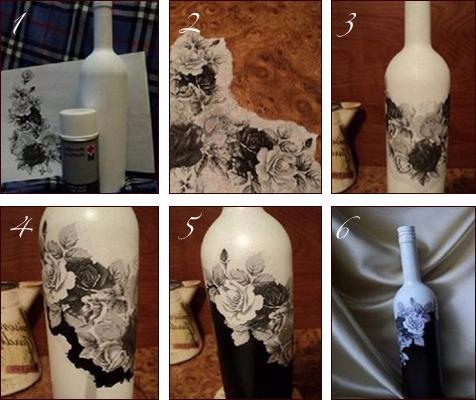
The sequence of execution is as follows:
- prime with varnish or PVA glue, let dry;
- We create a background with acrylic light paint in several layers until the transparency disappears.
- cut out the design with scissors. If it matches the background of the container, you just need to tear off the ends of the napkin;
- soak the image in water and fix it;
- Apply varnish over the top of the design using a soft brush or spray;
- carefully smooth out the folds using a tampon;
- Finally, it is necessary to polish out minor errors;
- After finishing, cover with varnish.
DIY Bottle Decoupage: Master Class
To get a quality glass bottle decor, you need to know a few important nuances. Anyone can make a beautiful glass bottle decoupage. Such a product can decorate any room in the house, for example, the kitchen.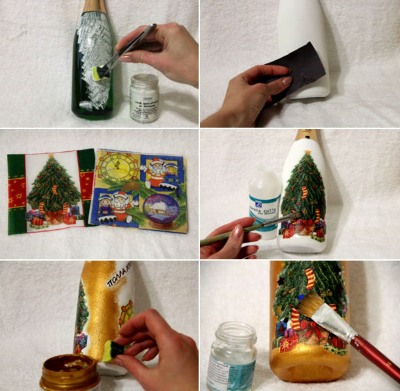
Master class:
- At the first stage, you should prepare all the necessary materials for work. The main material is a bottle. It can be of any shape. However, it is worth noting that decoupage of a glass jar looks much more impressive.
- The material prepared for pasting must be cut. Napkins are first compressed and cut with scissors. Do not make identical cuts, the work will be more beautiful if the napkins are pasted over the container in a chaotic manner.
- Alternatively, the work can use whole pieces of paper rather than cut-outs.
- The master should think about the method of attaching the napkins in advance. The easiest option is to glue them with tape.
- The surface of the container must be prepared. It is important that it is clean and dry. To remove unevenness on the surface of the can, it should be sanded. If desired, the can can be painted.
- The workplace should be protected from contamination. For example, you can cover it with newspapers.
- Next, take the glue and mix it with water. To get a sticky mass, you should mix water and glue in equal quantities.
- Then the prepared adhesive mass should be applied to the surface of the napkins and all paper surfaces that will be used for decoration. While the mixture has not dried on the paper surface, it should be glued to the surface of the jar.
- It is important to coat the edges of the cutouts well. To make the composition look better and more effective, you should glue the napkins in 2 layers.
- Before pasting the jar a second time, you should wait until the first layer is completely dry.
- To secure the work, you need to apply varnish to the surface of the jar.
- After the varnish has dried, you need to wipe the surface of the jar with a damp cloth, and then varnish it again.
Tips for decoupaging a jar with napkins
Scroll:
- The second layer of napkins should be glued only after the first layer has dried.
- It is important to make sure that the design is printed on only one side of the napkins. Why? The reason is that after the glue is applied to it, the napkin may print the design on the other side.
- It is necessary to wait until the glue dries completely. Before varnishing the can, you need to try to tear off a piece of the napkin. If it easily gives in and comes off, then you need to reapply the glue.
- Sometimes napkins do not adhere well to the glass surface if the adhesive solution was prepared incorrectly. It is important to observe the proportions and mix the glue with water in equal quantities. You can also buy ready-made decoupage glue, although its cost is higher than that of regular glue.
- The master should keep a damp cloth at hand. With its help, it is easy to remove the remains of the glue.
- If you glue the napkins in several layers, you can achieve a beautiful 3D effect. Before applying the next layer, the previous one needs to be varnished.
What do you need to prepare for this type of decoupage?
Whatever the craftsman plans to make using this technique: make growths on a bottle, perform reverse decoupage, decorate dishes, he needs to “arm himself” with the necessary tools and materials.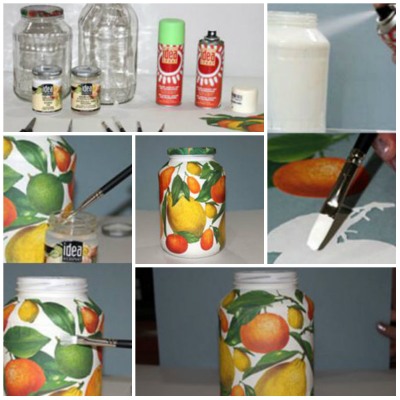
So, he will need:
- The container that will be decorated.
- Glue. Most often, glue needs to be mixed with water, but stores sell special adhesive for decoupage.
- Scissors. You can use them to cut decorative elements, such as paper or ribbons.
- Varnish. Drying oil can replace varnish.
- Decorative elements, i.e. materials for decoupage.
How to get growths on a glass bottle?
Creating volumetric elements in this technique is not uncommon. There are many ways to create growths on a glass container. The best way is considered to be gluing polymer clay to it. Thanks to such clay, any elements that the master wants appear on the bottle.
He can make anything from polymer clay: animals, a sea anchor, or just convex balls.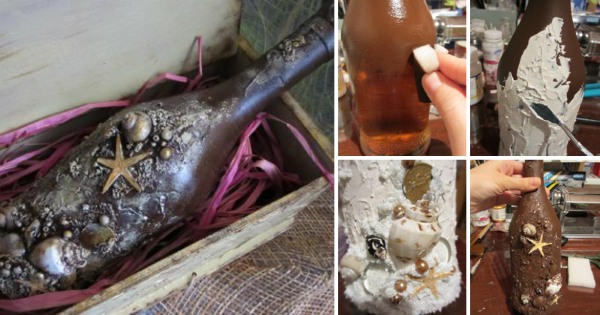
Instructions:
- A glass container, polymer clay and a means for softening it are prepared.
- The master makes with his own hands the growths that he wants to see on the bottle.
- The clay is mixed in advance with a special substance that softens its structure.
- After this, the growths can be attached to the surface of the can by gluing them with Moment glue.
- The material should be baked in the oven. The temperature should not be lower than 130 degrees.
Tip: To make volumetric patterns, you can use putty. It forms the outline of the desired figure, after which you should fill the figure.
Reverse Decoupage of Bottles: Step-by-Step Instructions
The work scheme is described step by step:
- First, you need to wipe the glass surface with alcohol. Instead of alcohol, you can use acetone. This is done to degrease the glass.
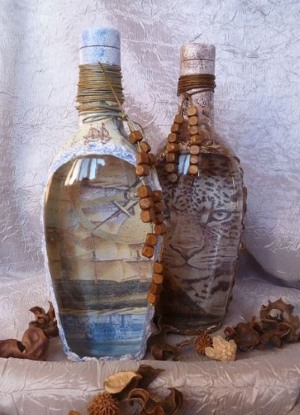
- Take a napkin with a beautiful pattern. The pattern should be cut out.
- Then the drawing is glued with the wrong side forward. Folds will form on the glass, they should be smoothed out with a brush.
- To make the design brighter, paint the napkin white.
- To make the napkin look harmonious on the bottle, you should use paints to give the glass the same background as on it. For example, if the napkin depicts a forest, then the glass is painted in green shades.
- Now, on the other side of the bottle, a viewing window should be made. Its shape depends on the master's wishes. The viewing window should be sealed with tape.
- Next, the bottle should be painted. Its entire surface is painted, except for the window.
- After the paint has completely dried, you can start decorating the window. What can you decorate it with? The material can be anything: eggshells, buttons, ribbons, beads, etc.
- At the last stage the bottle is covered with acrylic varnish. It is advisable to make a second coating after the first one has dried.
How to make a beautiful bottle cap?
To give the composition a finished look, you should think about how the bottle cap will look. A beautifully decorated cork will give the composition a logical conclusion. The easiest option is to glue the cork with knitting yarn. It is desirable that it be the same color as the pattern on the napkin. It is also important that the yarn is bright and noticeable.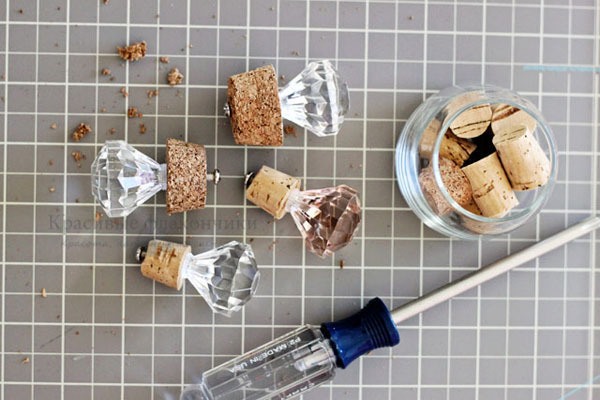
There is no point in using thin acrylic sock thread for this purpose, as it is almost invisible.
You can also glue some decorative insect, such as a ladybug, to the surface of the bottle cap decorated with thread. Don't forget about the possibility of decorating the composition with acrylic paints. The craftsman can depict any picture on the surface of the jar, such as a chamomile or the sun.
Options for final design of works
Let's look at the design of a decorated faceted bottle:
- Take halves of beads in the same color as the main color of the product and glue them with hot glue to the edges to emphasize the unusual shape of the container.
- At the junction of the painted glass and the neck we tie a lace bow.
- We glue small leaves and flowers onto the bow.
- Finally, we paint the edges of the bottle with glue and apply golden sand (use spray or powder) to add shine and shimmer.
Make a border along the edge of the product. To make it even, you need to stick masking tape and spread rubber glue along it. Then remove the tape and carefully roll the glue with your hands after the paint has dried. It is advisable to put a piece of paper under the place where the line will begin to make the line neatly.
Master class on decoupage of a box
A cardboard box with a smooth surface is suitable for decoupage.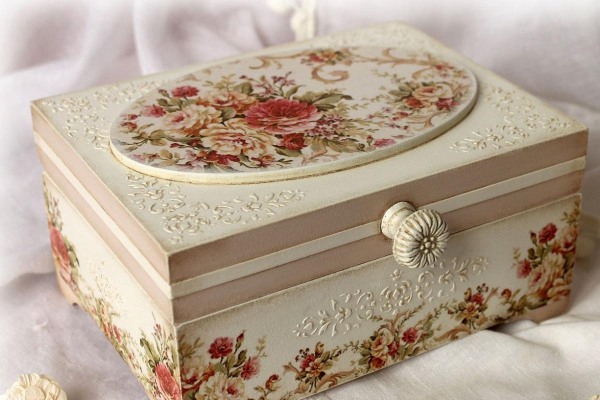
Step-by-step execution technique:
- Secure the corners of the paper box with strips of masking tape, then prime the entire work area with acrylic paint.
- Let it dry and sand the primer with fine sandpaper.
- If the coating is not applied evenly, repeat the procedure.
- Then paint the craft in the shade chosen for the background.
- Apply decoupage glue to the area where the illustration will be placed.
- After complete drying, place the design on top and smooth it out with a hot iron, placing a piece of paper underneath.
- Apply a thin layer of varnish to the image and surface of the product.
- Using a foam sponge, apply the background dye and other tones that match the color palette.
- Use a brush to draw small elements.
- To add a bit of sloppiness, experts recommend using a toothbrush to spray white paint on top.
- Finally, cover with varnish.
Decorating a plate
Decoupage of plates is done in several ways, but for beginners it is better to master this art from napkins step by step, preferably with photos.
Decorating this dish is divided into two methods:
- Direct - the motif is applied to the front side.
- Reverse - the image is superimposed on the back of the dish.
A smooth white plate made of porcelain and without any patterns is suitable for decoration.
Work order:
- Cut out the napkin pattern.
- Degrease the workpiece on both sides with a cotton swab soaked in alcohol.
- Wipe dry to prevent bubbles and creases from appearing during work.
- Carefully place the resulting motifs on the front of the dish.
- Apply glue on top, smoothing the elements with a brush.
- Let the glue dry and varnish the surface of the dish.
To use the plate for everyday purposes, it is better to do the reverse decoration.
The technique of execution is similar to the above, but there are some features:
- The illustration is attached to the back of the tableware, which must be transparent to allow the work to be seen.
- The glue is applied only to the edges of the motif, but do not touch the front of the dish.
- If you want to create an opaque background around the image, paint it with acrylic paint and let it dry.
Chair Decorations
For beginners to create decoupage of a chair from napkins, it is advisable to take a flat chair without large bends and perform the stages step by step, preferably with a photo.
It is recommended to perform the process in the following sequence:
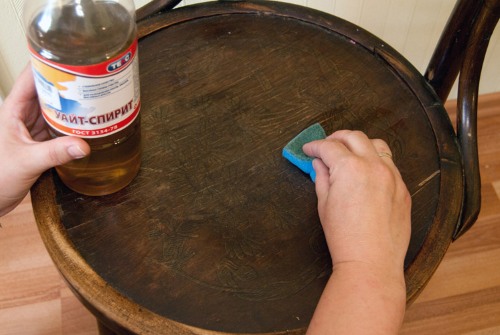
- Preparatory treatment including cleaning, removal of old paint or varnish and degreasing.
- Apply a primer in several layers and dry naturally.
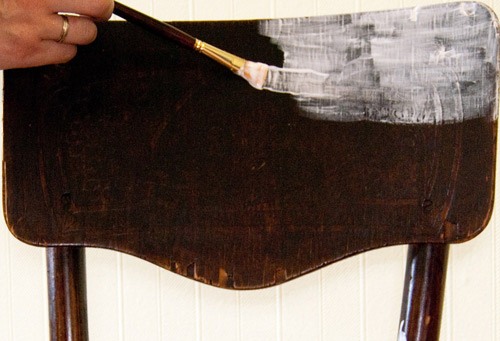
- Paint the chair, applying the main background. It is worth considering that the napkins are translucent, and if the coating is too saturated or dark, the pattern is lost.
- Think carefully about how the intended image will look and start cutting out the pattern.
- Place and glue the pictures. As you work, you can adjust the motif, add paints and markers, and add glitter.
- Cover with varnish in 2-3 layers. Let dry.
Decoupage on wood
Wooden, ready-to-use blanks of various shapes are available for sale. If you have an idea to decorate a household item, you will have to decorate it yourself.
Wooden surfaces are divided into 3 groups:
- Unprocessed workpiece. If there is roughness, it is advisable to process it with fine sandpaper. The recesses are leveled with putty or a special primer. Dry and sand again with sandpaper. Then prime with white acrylic paint.
- With impregnation, which is sanded for better adhesion of the motif to the product. Then wipe off the dust and apply a primer.
- Painted area requiring preliminary inspection. If the paint does not chip, it should be sanded with fine-grained sandpaper. If the coating peels off, remove the old layer of paint with a grinding device or a special solution. The treated surface is cleaned, primed and sanded.
Work order:
- the work area is sanded and primed. If you want to create an antique effect, apply 3 layers of whitewash to the workpiece, each of which must dry. Then sand away any defects with sandpaper or a metal scraper.
- If you come across places eaten away by beetles, treat them with a wire brush tip mounted on a drill and cover with stain.
- Cut out the designs from the top layer of the napkin.
- Place the motifs on the blank and carefully cover with glue on top and dry. Finally, varnish and let dry.
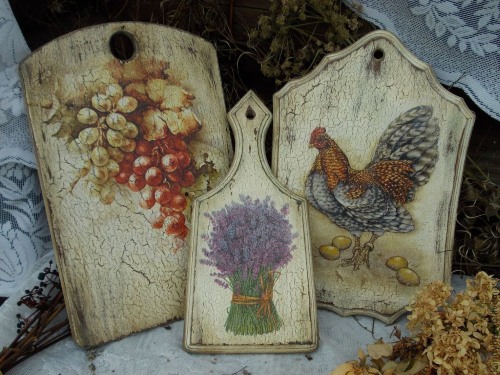
Decorating a cutting board
Making the decoration step by step:
- Select a napkin with the desired picture.
- Using sharp, thin scissors, cut out the design and separate the 2 bottom layers of the original material.
- The place where the image will be located on the board is primed. To do this, outline the outline of the drawing with chalk, fill it with primer inside and let it dry.
- Apply acrylic primer with a brush or foam sponge.
- While the coating is drying, glue the napkin with glue diluted with water. Start connecting gradually from the top of the motif using a brush. Try to avoid the formation of folds and creases.
- When defects form, they are removed with a spoon.
- Finally, apply acrylic varnish with foam rubber.
- After drying, decorate the board along the contour with waves or scales and varnish again.
Create your own original wall design
The main idea of creating such decoupage is to transfer or, so to speak, stick the image on flat and other surfaces, such as walls, floors, ceilings or even cabinet doors. The images are paper applications, which are later varnished, treated with crackle or additional paint, which gives them volume and realism.
Correct decoupage on the walls will definitely bring originality to any room.
Preparing images that are cut out from ready-made templates does not require much time. However, if you are not confident in your design skills, it is best to choose floral and natural patterns, they are quite "unpretentious".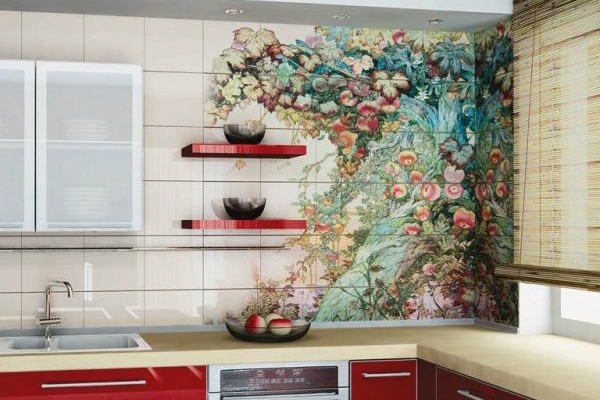
Materials and tools for wall decoupage:
- Emulsion/acrylic paint intended for walls and suitable for interiors.
- Simple pencil.
- Paper cut out templates.
- Wallpaper/PVA glue.
- Cutter/scissors.
- Primer coating.
- Acrylic varnish.
- Level.
In addition, it is advisable to have a hard surface at hand that can be used as a backing while cutting the patterns, and the tone of the paint should not stand out from the overall style of the room.
Instructions for creating wall decoupage
Before starting this type of work, it is advisable to familiarize yourself with the technique of smaller, traditional decoupage: Watch video tutorials or just take a general look at the features of the process.
After reviewing, you should try to put what you saw into practice:
- The surface of the walls should be cleaned with sandpaper, then primed and painted with water-repellent or acrylic paint, preferably in 2-3 layers, and allowed to dry.
- While the wall is drying, you can cut out templates from wallpaper or special napkins.
- On the already dry wall, the center and extreme points of the future composition are marked with a pencil.
- After this stage, the pasting itself begins, each fragment is carefully selected for its place, coated with glue on the back side and applied to the wall, gently pressing with a slightly (!) damp piece of cloth.
- At the corners of the composition or near windows and doorways, the ornaments should be cut out more roundly.
- After each action, it is worth trying to evaluate the work from afar, since the true scale of the work cannot be seen from close up.
After gluing the main drawings, you need to move on to smaller details. It is, of course, desirable to cut out all the templates together at the very beginning. Also, in no case should you forget that the composition must correspond to the idea and it should be checked from afar from time to time.
When the applique dries and all its parts are firmly held, the composition should be gradually covered with acrylic varnish in 2-3 layers. After the last layers dry, the decoupage is ready. If you follow all the above rules, this technique can transform your room for the better.
Pattern Smoothing Technique
It is recommended to glue napkins by ironing with a special composition. The substance is applied to the surface to be decorated, preferably flat, and left to dry a little. Then apply the cut-out pattern and a sheet of paper, on top of which run a slightly damp decor with a slightly hot iron. Make sure that no creases are formed, and the motif is fixed.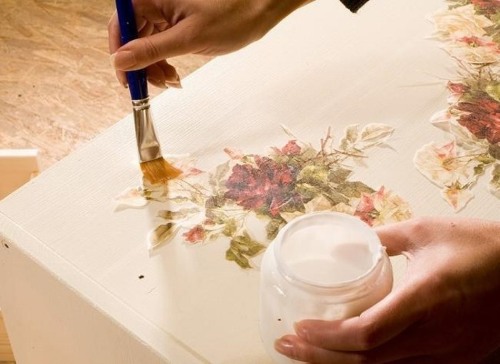
There is a special transparent water-based paint that replaces glue.It is resistant to sunlight, moisture, even when the product is not varnished.
To avoid creases, experts recommend covering the surface with glue, placing a napkin on top, smoothing it thoroughly with your fingers or a brush. Place a paper applique on a dry decorative item and cover with a layer of adhesive.
Secrets from the masters
Decoupage for beginners step by step with photos from napkins can be gradually mastered even by beginners.
Subtleties that beginners should know:
- Each surface (except glass) is treated with sandpaper and degreased. Plastic requires this manipulation to obtain roughness and better adhesion to coating agents. Wood is sanded along the grain for smoothness. Metal objects are sanded to remove previous paint or rust. Glass is finished with alcohol-containing substances or acetone.
- Be sure to prime the work area before painting with several layers of preferably white paint. If the material is porous, the acrylic will not lay down evenly.
- Beginners are advised to do decoupage from small parts. To uniformly stretch the images, when gluing them, start moving the brush from the middle to the edge, while carefully removing any air bubbles that appear.
- Creases and folds must be carefully smoothed out and hidden. If the final product is flawless, it should be fixed with several layers of varnish. The more, the better it will look.
- To ensure that your working tool lasts a long time, it must be washed and cleaned after finishing work. To do this, place a container of water nearby and immediately lower used brushes and sponges into it.
- Each layer must be applied and after gluing the ornament, it must be dried well., and the next stage should be started only on a dry site.
Don't be afraid to experiment!
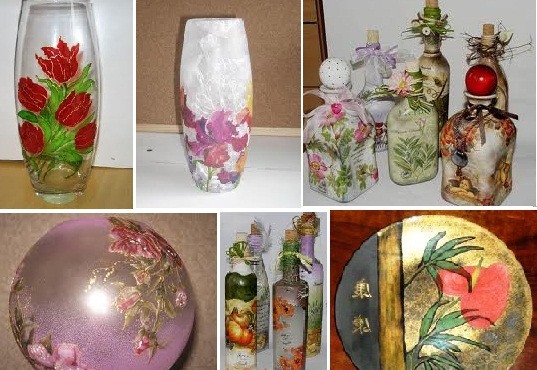
It is very easy to learn how to do decoupage from napkins. For beginners, it is better to use educational material with step-by-step photos. Having mastered this art, they create unique masterpieces that will delight others with their beauty.
Decoupage of jars, bottles, interior items and even walls in the room is an incredibly exciting activity that anyone can handle. The main thing is to want to create a unique and beautiful thing and get the most incredibly interesting ideas!
Video: decoupage for beginners step by step with photos from napkins
The simplest decoupage for beginners, watch the master class in the video:
How to glue a napkin using decoupage technique, find out in the video: