To decorate the interior of the house, any vases will do, which can be hanging, tabletop or floor-standing. A decorative item can be purchased or made by hand using ordinary cardboard.
Using this material, you can put decorative artificial flowers or dried flowers in a vase. Live flowers are not suitable for these purposes, because the cardboard paper will let water through. Further in the article, you can read about several ways to make a decorative structure from cardboard sheets.
Cardboard Floor Vase
A DIY cardboard vase can stand on the floor and be used to store dried flowers or artificial decorative flowers. The height of the decorative item should be determined based on your own wishes. However, it is desirable that the vase is not very low, otherwise it will be inconvenient to bend over the product.
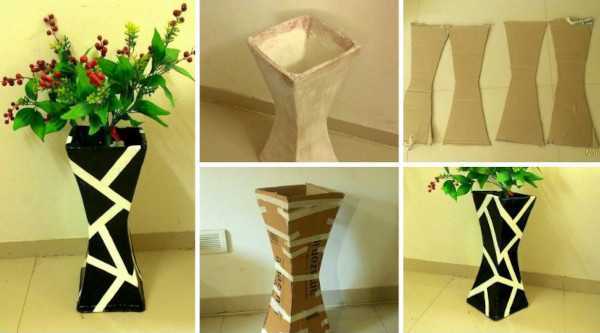
List of materials and tools:
- large-sized corrugated and colored cardboard;
- glue stick or PVA glue;
- scissors with a ruler and a simple pencil;
- decorative elements in the form of beads, sequins or glitter.
Regular cardboard is presented in the form of a dense paper sheet, which consists of coarse fibers in the form of waste paper, sulfate cellulose, semi-cellulose and wood pulp. Corrugated product is presented by several smooth and corrugated sheets that are glued together.
Smooth sheets are the frame, while wavy ones are responsible for cushioning and rigidity.
When making large structures, it is advisable to use corrugated cardboard because it can withstand loads well and is highly durable. This is due to the composition of the paper, which consists of one or more wavy layers that act as stiffening ribs.
At the same time, the corrugated type of cardboard will not delaminate, shrink, be pressed through or tear. Also, this material, unlike regular cardboard, can be placed in a damp room.
Step by step manufacturing process:
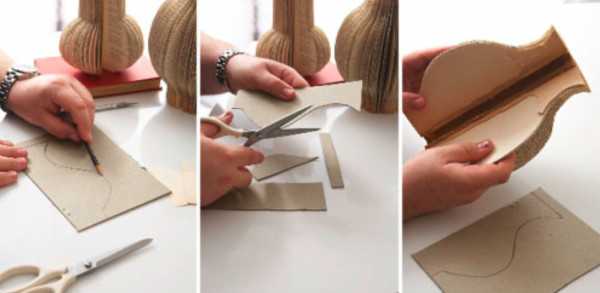
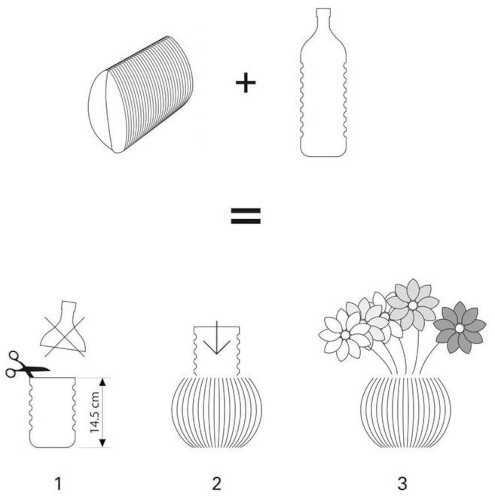
- Initially, take a regular cardboard sheet, from the bottom of which make a 1 cm long fold. If the colored cardboard is one-sided, make the fold on the wrong side.
- On the created hem, make several cuts up to the fold level. It is advisable to place the cuts every 1 cm.
- Coat the side edge of the cardboard sheet with glue to roll the material into a cylinder.
- Additionally, treat the cuts on the lower part of the structure with glue.
- Turn the product over to glue a small piece of cardboard (the colored side should be facing out) to the bottom of the cylinder where there are cuts. Carefully press the structure to firmly fix the parts.
- After gluing the cylindrical structure to the base, carefully cut off the excess material so that the base of the craft has a round shape.
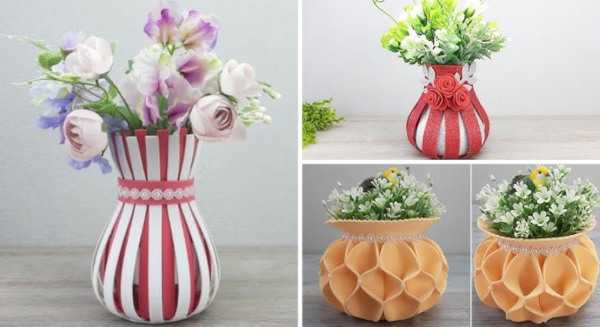
- To decorate the craft, cut out decorative elements from a corrugated cardboard sheet. For decoration, you can make wavy stripes. 2 stripes should be large so that you can glue the bottom of the vase. Additionally, cut out 2 thin even and 2 wide stripes.
- Coat the wide wavy strips with glue on the smooth side and wrap them around the bottom of the cylindrical instructions so that the corrugated side is on the outside.
- Decorate the top of the craft in the same way. Paint the wide, even decorative elements on top in any color that will differ from the lower parts.
- Twist thin strips into a spiral and glue them together. Additionally, cut out parts from corrugated cardboard that resemble petals and stems. The result should be 2 flowers, 10 petals and 2 stems.
- First, glue the stems to the surface of the structure, placing them on different sides. Then fix the petals with glue.
- Place a cardboard flower in the center of each decoration.
- Additionally, use beads, glitter or sequins to decorate the craft. It is advisable to place decorations in free spaces and in small quantities.
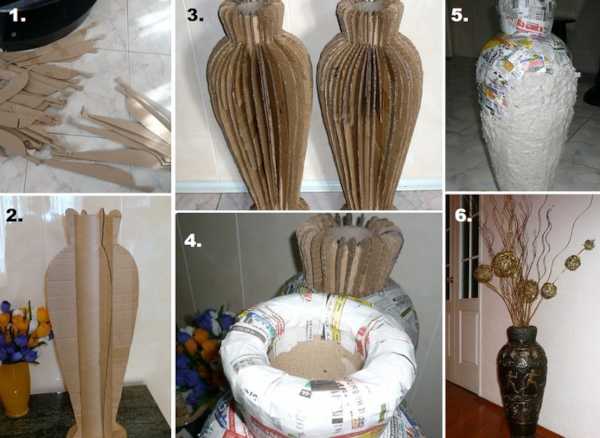
From papier-mâché
A DIY cardboard vase can be made using the papier-mâché technique. Since the main materials are cardboard and paper sheets, the design will only perform a decorative function.
List of materials and tools:
- large bushing;
- newspaper sheets with cardboard;
- PVA glue;
- dye;
- scissors with a pencil.
Step-by-step description of the work:
- Cut out pieces from a cardboard sheet that are identical in height to the bushing. The blanks should be straight on the left side and curved on the right.
- Fix the parts with glue to the side parts of the sleeve at the same distance from each other.
- Cut a circle from a cardboard sheet, the diameter of which matches the size of the sleeve. This part will serve as the base of the craft.
- Cut newspaper sheets into 7 cm long strips and attach them to the side parts of the structure with glue. Then the product should dry for 24 hours.
- After a while, tear the newspaper or thin paper sheets into small pieces. Pour warm water over the parts and leave for a few hours to soak. Sometimes knead the mixture with your fingers. Then grind the mass in a blender and pour in PVA glue.
- Knead the mixture until it doesn’t stick to your fingers.
- Apply the prepared papier-mâché to the surface of the structure and leave for 48-72 hours for high-quality fixation.
- After drying, the product can be painted in any shade.
Instead of a sleeve, you can use a cardboard box, a balloon, or an unnecessary vase. The selected item just needs to be pasted over with papier-mâché and left for a while to dry.
Afterwards, the paper structure must be carefully separated from the base. As a result, the craft will take the shape of the object that was used as the base.
Porcelain flowers can be made as decoration. In this case, you first need to putty the surface of the vase in several layers, and then sand it. Thanks to this, the structure will have a smooth surface. Additionally, you need to apply a primer so that the decorative elements are better fixed.
It is necessary to attach the cold porcelain decor to the sketches previously applied to the surface of the vase using glue. If there is no porcelain, it is acceptable to use papier-mâché, pasta or other objects to create the decoration.
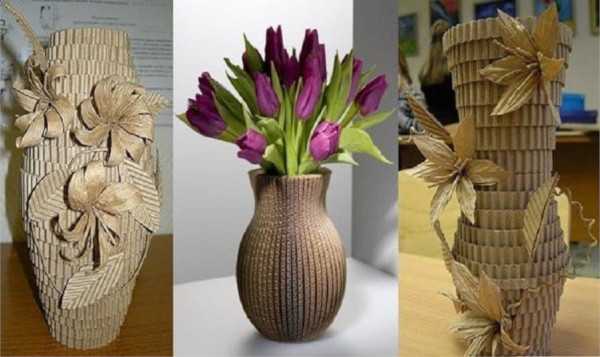
From paper tubes
You can make a vase with your own hands not only from regular cardboard, but also from paper tubes. This type of product is mainly suitable for decorating coffee tables, where you can store various small things.
List of materials and tools:
| What is needed | Features of selection |
| Paper sheets | You can use regular paper or newspaper. In the latter case, the sheets will have the required level of density. This will allow you to quickly and easily roll the paper into tubes. |
| Tools | You need to prepare a glue stick with PVA glue, as well as scissors and a metal hook or knitting needle. Additionally, you need to take brushes for painting the structure. |
| Decorative coating | To decorate the craft, it is recommended to take waterproof acrylic paint of different shades. Additionally, you need to prepare a transparent varnish to protect the decorative coating. Due to this, the paint will stay on the craft for a long period of time. |
Step-by-step description of the work:
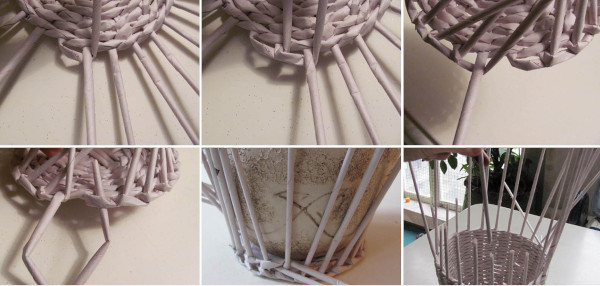
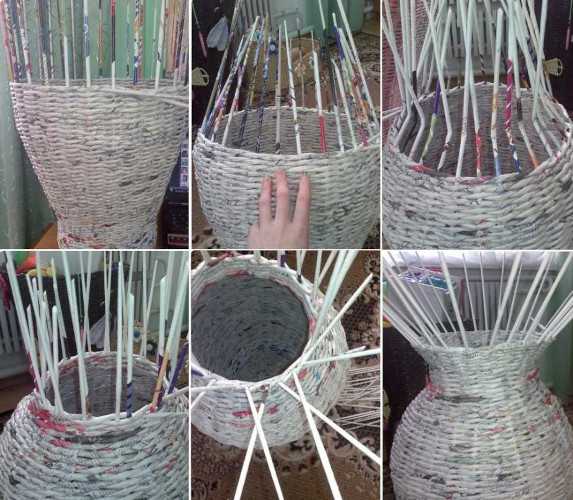
- Roll up the paper sheets into tubes. Use a metal hook or knitting needle to do this. Attach the edge of the paper to one end of the tool and start rolling. Coat the remaining edge of the sheet with glue and secure it to the tube.
- To make the base of the structure, take 12 tubes. Divide this amount into 4 groups, so that each has 3 pieces. Lay the blanks on the table in the form of a snowflake.
- Additionally, take 2 more tubes. Fold one in half to carefully braid 3 tubes with rope. Lightly fix the central area with your hands. In a similar way, make 3 to 5 circles.
- Next, continue weaving the base of the vase. To make the structure large, make at least 10 circles.
- Afterwards, you can proceed to making the main part of the craft. For a smooth and neat transition from the bottom to the main part, slightly lift all the tubes up, placing them under each strip in the neighborhood.
- To give the craft the necessary shape, prepare a strong base. In this case, a deep bowl or another voluminous object will do. Lower the selected item onto the base of the structure and secure it with tight rubber bands.
- To continue braiding the base, start working from the tubes that are raised up. When the product reaches the desired height, make a regular bend.
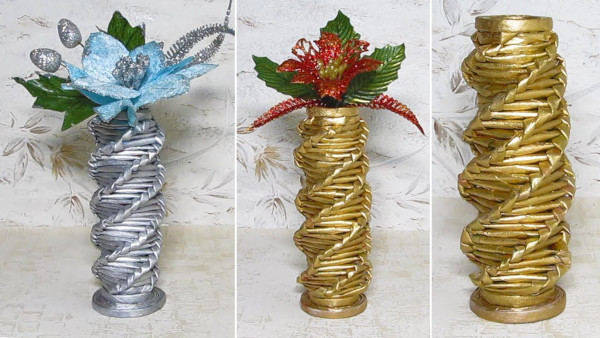
After completing the rough work, it is necessary to proceed to the decorative coating so that the vase looks beautiful. For example, initially the surface of the craft can be coated with PVA glue. When the structure is completely dry, the product must be treated with acrylic paint in 2 layers.
The painted vase should dry for about 40 minutes. After some time, the surface needs to be re-painted. The shade will depend on your own preferences. The surface of the structure should be completely painted so that there are no gaps or uneven areas. After that, the decorative item should dry completely.
Later, the vase can be decorated using decoupage technique or painted with a thin brush. If desired, it is permissible to apply a thin layer of glitter varnish to the surface.
From a glass jar
A DIY cardboard vase can also be made from a glass jar. As a result, you can create an original decoration or decorative composition. For storing small wild flowers, the container volume can be from 500 ml to 1 liter. If the flowers are large, the container volume should be at least 3 liters.

List of tools and materials:
- glass jar;
- cardboard sheets;
- ruler;
- marker or felt-tip pen;
- silicone or white glue.
Step-by-step description of the work:
- Place the glass jar on the surface of the cardboard sheet and outline it with a marker.
- Cut a circle out of cardboard, leaving about 1 cm from the circumference.
- On another sheet of cardboard, draw stripes that should be the same length and thickness. It is recommended to use a ruler for this. The number of lines will depend on the diameter of the container.
- Cut out the details along the stripes shown. Use scissors to do this.
- Coat all the strips with glue and fix them one by one to the allowance that was left near the circle.
- The number of strips should be such that it is possible to completely close the glass jar.
As a result, a decorative structure will be created in which you can store live flowers. To do this, fill the glass container with water. If desired, this craft can serve as a candlestick.
From a plastic bottle
A DIY cardboard vase can use a plastic bottle as a base. The container can be of any shape, so that the design turns out unusual and interesting.
Necessary set of materials and tools:
- paper sheets for creating templates;
- plastic bottle;
- protective varnish;
- pencil with scissors;
- PVA glue and brush;
- paints;
- thick corrugated cardboard;
- paper napkins.

Step by step manufacturing process:
- First draw any decor on a piece of paper. Then cut it out.
- Transfer the prepared templates onto the surface of the cardboard sheet with a pencil. Cut out the details along the contour.
- Using scissors, cut off the neck of the bottle. It is not necessary to make the edge even. It can be embossed.
- Fix the prepared decorative cardboard parts on the surface of the container. You can use glue for this.
- Then cover the entire surface of the container together with the decor with paper napkins. Fix the material with PVA glue in several layers.
- When the structure dries, paint the product in any shade. If desired, the vase can be single-color or multi-colored. In the second option, you can highlight the decorative details of the product with other shades.
- When the paint layer dries, apply varnish to the surface of the structure. Thanks to this, the vase will be protected from moisture and will also have a long service life.
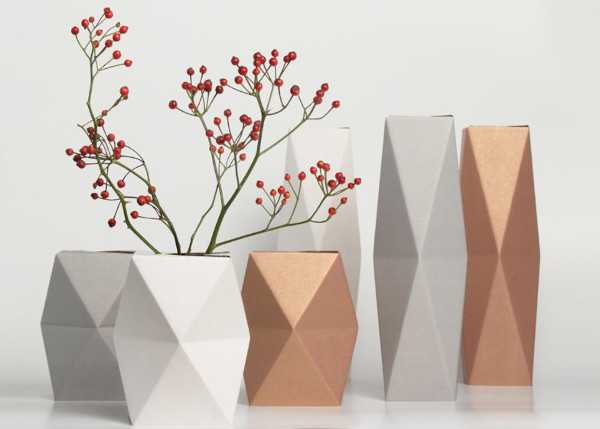
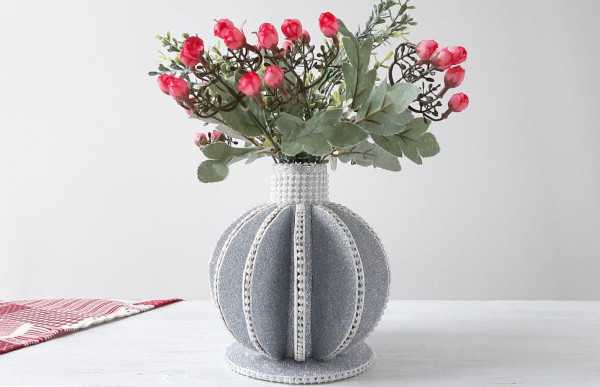
Non-standard shapes
Homemade vases can have non-standard shapes to create an original decorative item that will fit into any interior. For example, the product can be made from cardboard sheets and foamiran.
List of materials and tools:
- a sleeve from under any object;
- corrugated cardboard;
- pencil with scissors and ruler;
- ribbon with beads;
- unwanted CD;
- hot melt glue;
- foamiran.

Step by step manufacturing process:
- Place the disk on a piece of cardboard and trace around the outline. Then cut out the piece with scissors.
- Divide the resulting circle into 2 hemispheres. Make several similar elements in a similar way.
- Apply the disk to the surface of foamiran of any shade to outline the contour. Then cut out the outlined workpiece. Create 2 parts.
- Afterwards, glue the CD on both sides with foamiran blanks. Use hot glue for these purposes. This part will act as the base of the vase.
- Cover each cardboard hemisphere with foamiran on both sides. Hide the uncovered space with a ribbon with beads.
- The base of the structure should also be covered with tape along the contour.
- Cover the sleeve with foamiran. Cut off excess material. Decorate one end of the sleeve with a beaded ribbon along the contour.
- Glue the lower, undecorated part of the cylindrical structure to the base of the craft. Place the bushing in the center.
- Glue the cardboard hemispheres on all sides of the sleeve. Attach them with the flat part so that the side decorated with the ribbon is on the outside. The elements should be near the base of the vase.
- Place the pieces at a small distance from each other, approximately every 1.5 cm.
- Decorate the top of the structure, which remains open, with a ribbon of beads. Measure the height of the top in advance, then cut off the decor. Attach the decoration with hot glue.
A cardboard vase made with your own hands for children will allow you to spend time with your family in an interesting and entertaining way. The created craft can be used as an interior decoration, harmoniously combining with other decorative items. At the same time, there are a large number of options for making the structure, so everyone can choose the method they like.
Video about making a vase from cardboard
DIY Cardboard Vase with Imitation Metal: