This type of knot has a rich history – humanity began to actively use it 2 centuries ago. The knot's name is associated with the method that sailors used to catch monkeys. Nowadays, it is used to secure a ship to a pier and in home decor. Before you begin the step-by-step weaving of the Monkey Fist knot, you need to purchase quality materials: a 1 m long cord and a small ball that will allow you to give the knot a rounded shape.
History of the appearance and purpose of the node
In the 19th century, the knot was used by sailors on sailing ships, and they often used it as a means of self-defense: they used it in battles with pirates or in street fights. To make this tool more convenient, the rope with the knot was tied around the wrist; this helped to put the knot with the load in the pocket and take it with you.
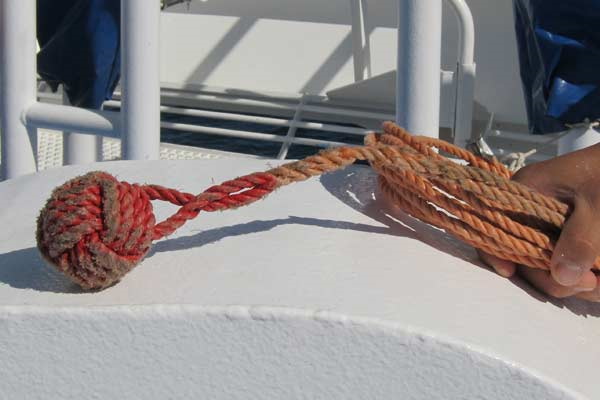
The main use of the knot is to provide weight on a rope. When a ship was in port and needed to be secured somehow, sailors used a rope with this knot. The monkey fist knot was thrown ashore, then attached to another rope and pulled ashore completely. The second rope allows the ship to be more securely secured to the shore - sailors tied it to poles on the banks. This method of fastening is used today.
As mentioned earlier, the knot was used for self-defense in fights, but this method of self-defense is currently prohibited in the Russian Federation and the CIS countries. Its use is permitted in rock climbing: climbers use the Monkey Fist to create insurance during rock climbing by placing knots in cracks. Another option for using the knot is to decorate interior items.
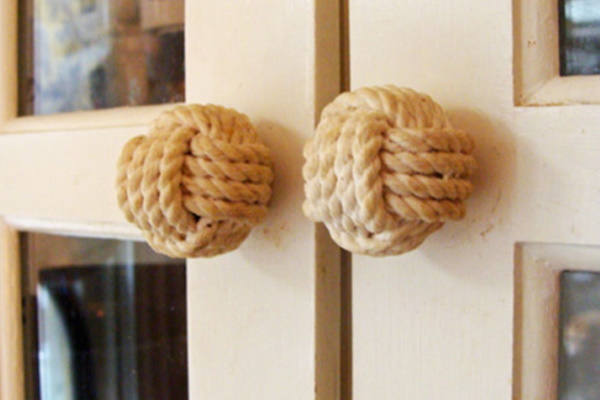
For example, a knot can be a curtain peg, a keychain, a piece of clothing, or a talisman. If you take a strong rope and weave a Monkey Fist knot at both ends, you can make a new toy for your pet.
The Monkey Fist Knot, which is created step by step from rope or cable, can also be used as a means of rescuing those who are drowning in bodies of water. To do this, you need to place a hollow ball at the base of the knot, which will allow the knot to be more buoyant.
Some facts related to this type of node can be placed in the table below:
| Interesting fact about the knot | Detailed description |
| The Monkey Fist Knot is an important symbol for homeless people in the United States. | Americans consider this knot a symbol of solidarity with people who find themselves on the street. Some charities collect donations by selling jewelry with an element resembling a monkey fist. It is noteworthy that a significant portion of the jewelry was created by the wards of these organizations. |
| The use of the knot in New Zealand Poi practice. | A practice performed by Maori people is called Poi and involves a tribesman juggling balls on the ends of short ropes. The practice is considered a very important tradition among Maori and helps develop agility and strength. Europeans use this technique to prepare for fire shows. |
| The Monkey Fist Knot as a container for smugglers. | In order to transport precious stones secretly and safely, smugglers could use this type of node as a container. |
| Use of the knot during rehabilitation after injuries. | If two fist knots are tied at the ends of a short rope, this device becomes a toy, a trainer that should be twisted in the fingers in a special way. Such trainers, begleri, are used to develop motor skills, to restore performance after hand injuries. |
What does the knot look like?
The step-by-step diagram of the Monkey Fist knot shows that it is a knot of a rounded shape. The knot looks like a clenched fist. The knot consists of several turns around a ball, which gives the knot its shape.
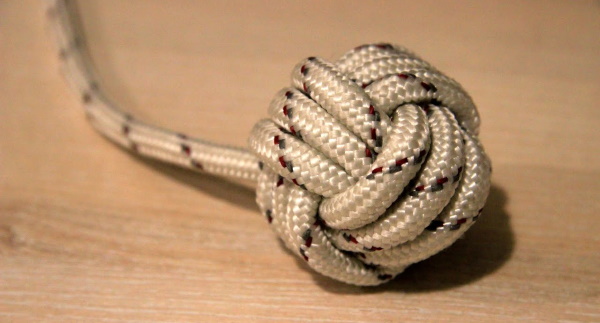
How many times you wrap the Monkey Fist around the base depends on the thickness of the cord or rope and the size of the base.
Pros and cons of the node
The Monkey Fist knot is quite easy to weave step by step – it is suitable for beginners. Its advantage is also its neat appearance – due to the thickness of the rope, the turns lie around the base in the same way. Therefore, as written above, the knot resembles a clenched fist.
To make the knot more voluminous, you can add additional ropes or threads during weaving. The weight of the Monkey Fist is also easily adjusted - you can add additional balls or spheres to the base. Another advantage of the knot is its versatility.
So, the Monkey Fist knot can become:
- An accessory for a car – a replacement for Chinese components that currently adorn car interiors.
- Buttons, bracelet fastenings.
- Curtain holder.
- Decoration of clothes.
- Talisman.
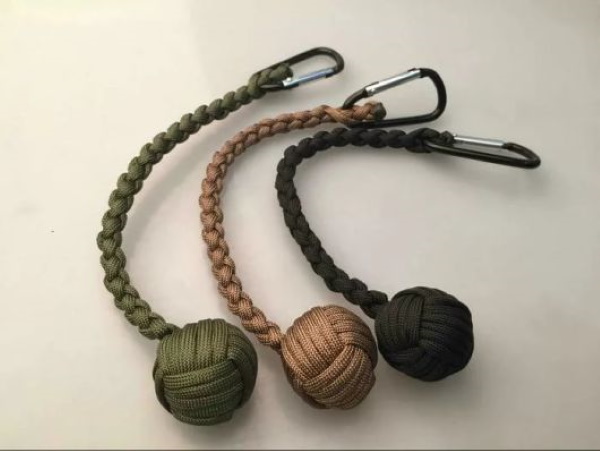
- A keychain, a key pendant, a self-defense weapon.
The Monkey Fist knot is woven step by step quite slowly, despite its simplicity. This is a disadvantage of this knot - it cannot be woven quickly and immediately used in everyday life. Also, if the rope is very thick and stiff, the person tying the knot will have problems creating this type of knot. In addition, the disadvantage of the Monkey Fist is that it cannot be used as a self-defense tool - in a number of countries this method of defense is prohibited.
General knitting pattern
Before starting to weave, it is necessary to determine which hand the knot turns will be wound on. So, if a person is left-handed, then he should wind the knot around his right hand, but if he is right-handed, then the knot should be tied on the left hand. The fingers of this hand should be straightened and tightly squeezed, leaving no free space between them.
The Monkey Fist Knot is woven according to the following pattern:
- Wrap the rope around your fingers 3 times. The turns should be stretched between your fingers. The loops that result from this step are the basis of the knot.
- Pull your fingers out of the knot so that the main loops do not come undone.
- Pull one end of the cord through the finished loops crosswise. It is necessary to hold it. The turns of the cord must be made open so that an object can be threaded through them, giving the knot its shape.
- Insert the ball or any available object into the knot and tighten. Care should be taken to leave room for another layer.
- Pass the other end of the rope between the ball and the loops from above. Then unfold it and pass it through the lower loops.
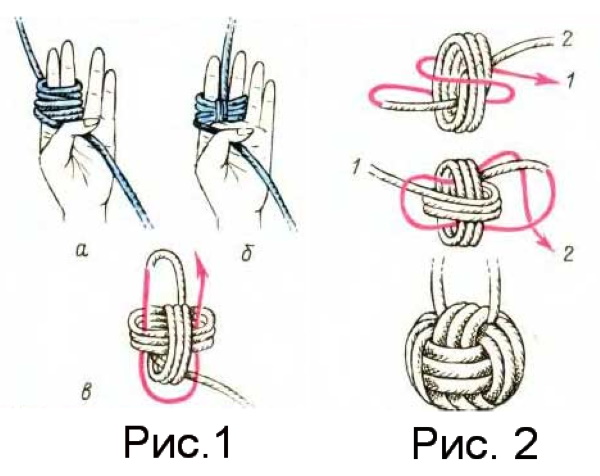
Monkey Fist Knot - How to tie step by step. - Wrap the ball with the remaining part of the rope 3 times and pull the ends. The loops of the knot should fit tightly to the ball at the base of the knot and completely cover it. To prevent the knot from unraveling later, the cord or rope is burned and cut.
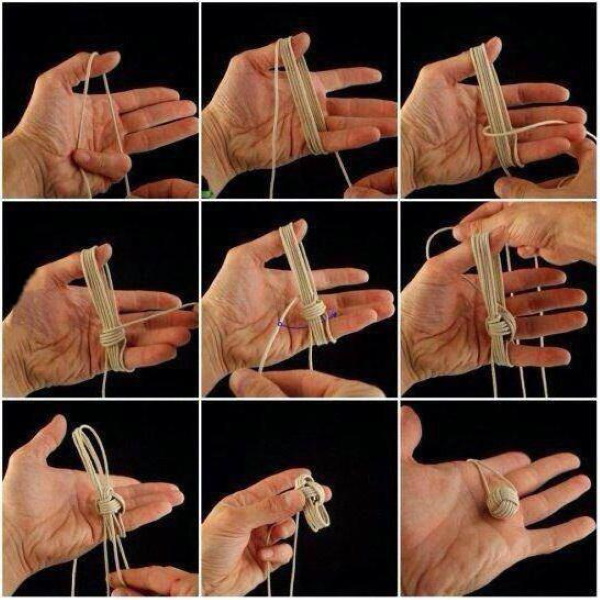
Weaving a knot from one rope
The Monkey Fist knot can be made from a single rope and a ball as a base. The most suitable length of rope or cable for creating the knot is about 1 - 2 m. The element that gives the knot its shape can be a small ball or some square object.
The step-by-step diagram for tying a knot from one rope looks like this:
- Take the rope in your hand, holding its end between your fingers. Make 3-4 turns around your fingers.
- After the last turn is made, wrap the end of the rope across the turns made.
- Wrap the cord around the base 3-4 times, then insert the cord into the initial loops. You can use a hook or a knitting needle for this. The future knot should be removed from the fingers, while holding it.
- Around the loops already made, wind 3-4 turns across the previous loops. This will help to secure the shape of the knot. Also, to make the knot more neat, you can insert a small object, such as a ball, inside the loops.
- To finish the Monkey Fist, tighten the loops one by one until all the loops are tightly wrapped around the base.
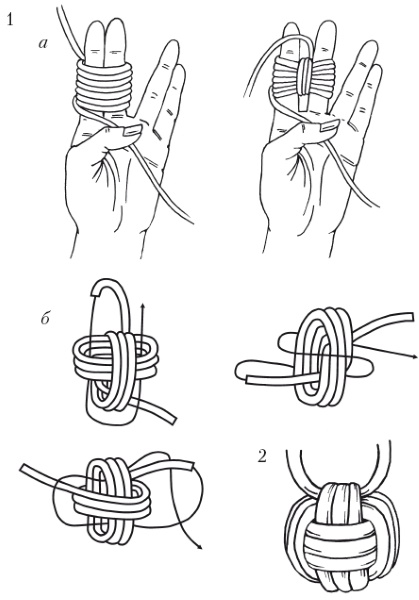
Weaving a knot from two ropes
To weave from 2 ropes, you will need 2 pieces of rope or cord of the same length. The color of the ropes is not important - you can use both pieces of the same color and ropes of different colors. In this case, we will describe weaving with cords of 2 different colors: brown and orange.
How to knit:
- Both cords should be tied together on one side. It is recommended to burn the ends of the ropes with a match beforehand so that they do not fray and do not interfere with the weaving process.
- Weaving begins on the hand. It is necessary to tightly grasp the cords with the index and middle fingers.
- Throw the orange cord to the side, wrap the brown cord 3 times around two fingers of the hand that holds the ends of these cords.
- Pass the orange cord across the brown turns 3 times. Remove the resulting part of the knot from your fingers.
- Turn the knot so that the loops are visible and pass the orange cord first over the orange turns, then under the turns of the same color. Repeat this action 2 more times. At this stage, 6 orange and 3 brown turns should be made.
- When finishing the weaving, tighten all the threads one by one, making sure that the knot does not unravel and looks neat. You can also place a small ball or any other object at the base of the knot to add weight.
Weaving knots from ropes and cords has survived to this day. To weave the Monkey Fist knot step by step, you will not need a large amount of materials. The most important thing that any master should remember is accuracy and attentiveness. Following the instructions, you can weave a knot that will become either a decorative item or a piece of clothing, such as a button on a shirt.
Video on how to make a Monkey Fist Knot
How to make a Monkey Fist Knot: