Men's knitted pullovers always remain in trend. They emphasize individuality, sense of taste, and are also very comfortable and practical to wear. A pullover differs from a sweater in that it has a V-shaped or deep collar, and the traditional version has no buttons or fasteners.
A men's knitted pullover (examples of patterns are presented below) is not only a nice gift, but also a great opportunity to experiment with pattern, color and design.
There are several recommendations when choosing a model for knitting a men's pullover with knitting needles:
- classic types are preferable for mature men;
- bright knitwear is worth knitting for young people;
- business style in pastel colors is suitable for businessmen;
- For guys with an athletic figure, tight-fitting models are suitable.
- For overweight men, it is better to choose looser models.
- men's pullover.
Knitting patterns for men's pullover
Men's pullovers are presented in a variety of styles: classic, tight and cropped sweaters, voluminous and elongated models. Thousands of pattern options, a wide range of colors, a large selection of styles allow men to wear knitted pullovers at any age and in any season. Prints, large braids, checks and stripes, jacquard, relief and shadow decor are very popular among patterns.
The variety of patterns and styles of pullovers is very wide. You can try to come up with something yourself, but it is better to start with known examples.
The best of them are considered to be:
- English elastic band;
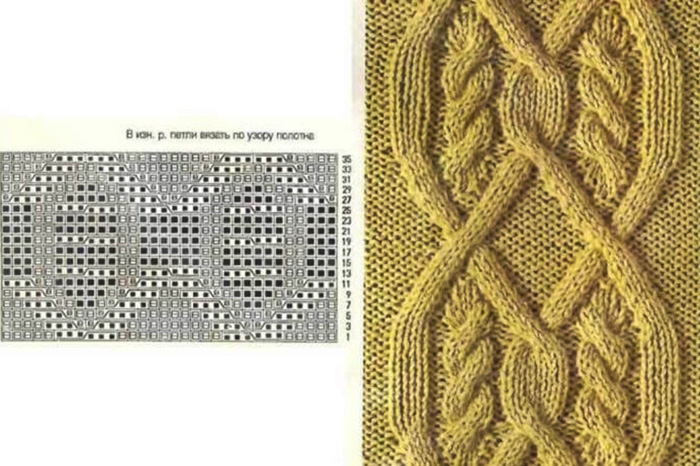
- arans and braids;
- alternating change of external and internal loops;
- knitted in the form of a scarf or stocking;
- jacquard patterns;
- checkerboard pattern.
There are 2 main knitting methods: detailed assembly and solid knitting. The quality of the item does not depend on the choice, it’s just that the first option is a bit easier and allows you to combine different patterns.
Detailed assembly
It differs from the whole knitting in that all parts of the pullover are knitted separately and then sewn together. If you want the sweater to fit tightly, you should knit the lower rim of the sweater and the collar with a rib. The sizes are calculated from the proportions of 1:1. For knitting in the shoulder area, it is better to use a pearl pattern. It is easy and simple to do.
The first 2 rows are knitted as a rib by alternating front and back loops, then the pattern is shifted by 1 row. Thus, the back and front rows will be located opposite each other. The back can be knitted by repeating the same loops, since there is often no pattern there. The front side is at your discretion, the easiest option is to make a satin stitch from front loops.
Solid knitting
This method is more complex and painstaking, but the result is a finished model, not parts that still need to be skillfully connected. You can knit a pullover using the raglan technique. For solid knitting, you will need circular knitting needles, since there will be a lot of loops. Work begins with the collar. With a stand-up collar and proportions of 1:1, dial 72 loops and knit 4 cm with an elastic band.
If the neck is smaller or larger, the number of loops and rows will change accordingly.
To form a raglan, distribute the points from which the sleeves will be knitted, make marks, dividing the loops into several groups. Put the 1st mark, count 40 loops and put the 2nd, then another 14 loops and the third mark, continue in the same order with the remaining marks.
The next step is working on the front part (choose any pattern). Form 40 loops, then make a yarn over in the raglan place and move on to the shoulder loops (14 pcs.). Move in a circular direction, making a raglan between the loops using the yarn over method on both sides.
Thus, it is necessary to complete approximately 30 cm. Then knit the main parts, they can be knitted separately or in a circle. The sleeves are formed last, on average 40 cm in length. The above methods can be used to create any designs and styles you like.
Here are some examples of interesting patterns for men's pullovers:
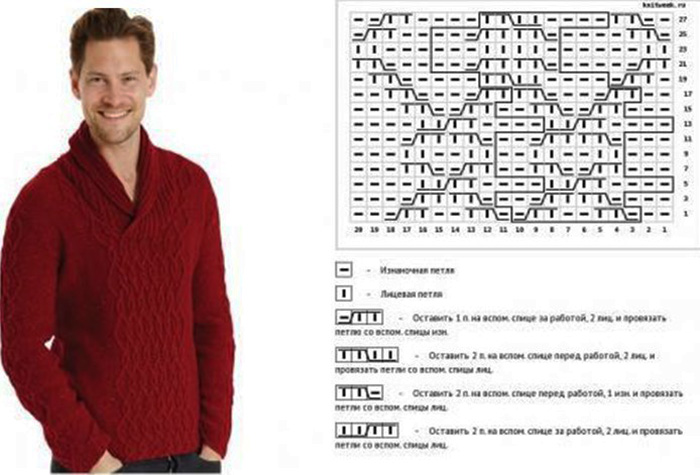
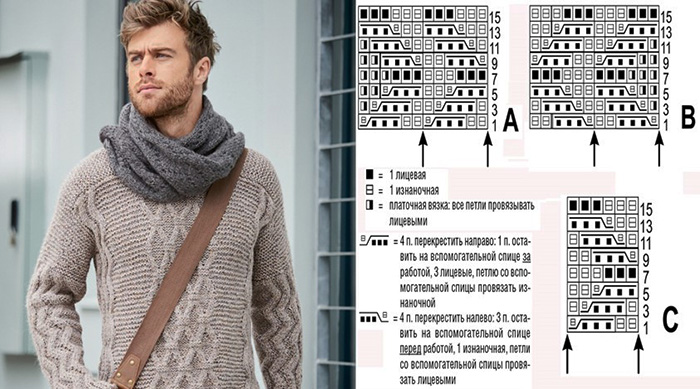
- Pullover with cable pattern and shawl collar;
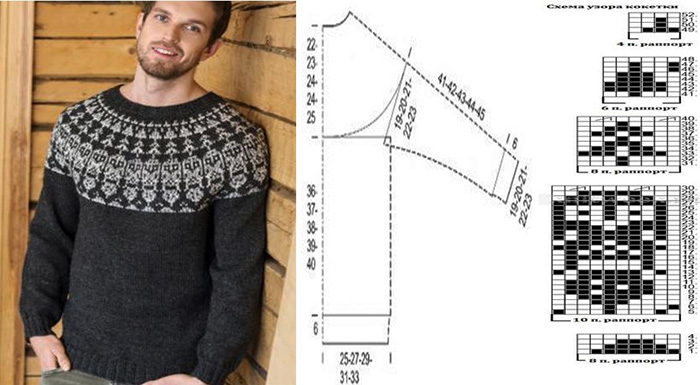
- Pullover with jacquard pattern and round yoke;
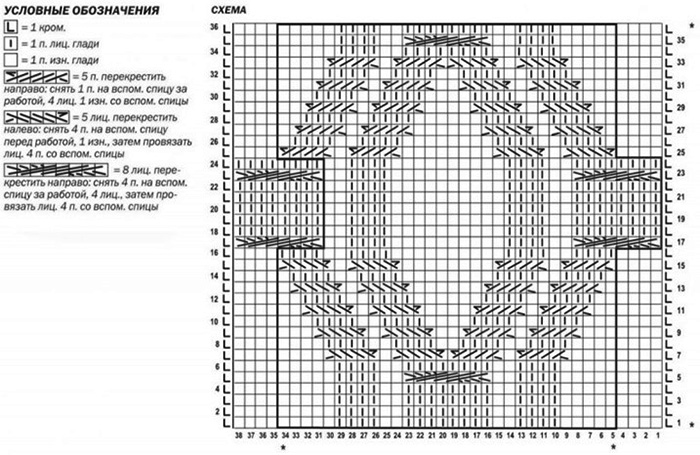
- Pullover with zigzags and diamonds;
- Pullover with a pattern of "nautical knots" and cables;
- Pullover with relief pattern.
Master classes on knitting men's pullovers of different styles
A men's pullover with knitting needles (the diagram is the most visual and convenient example of how to knit a sweater) goes well with trousers and jeans, and voluminous models look good even with sweatpants. The versatility of the pullover also lies in the fact that it is appropriate almost all year round.
For summer and spring, items with a V-neck made of thin yarn are suitable; in the autumn-winter period, models made of thick wool with a shawl neck, a stand-up collar, and elongated sweaters are relevant.
If you remain true to the traditional version of a pullover, where a collar is not expected, then in cold weather you can use a stylish scarf instead.
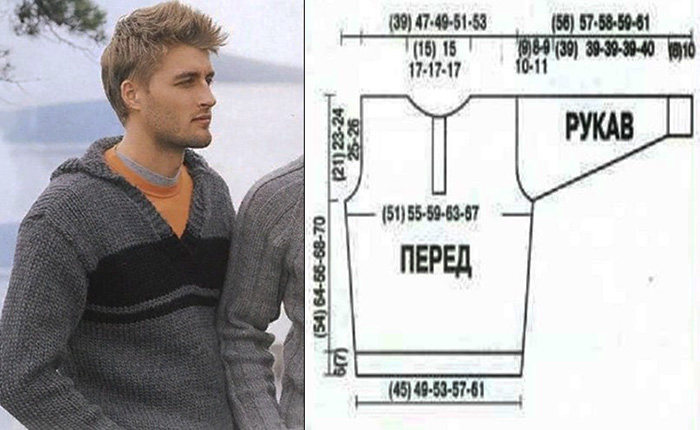
Men's Polo Collar Pullover
Men's clothing with a polo collar became widespread after the popularity of the sport of the same name. It was polo players who wore T-shirts with such a neckline. The peculiarity of knitting is that the neckline turns into a strip with buttons.
The polo pullover looks great with zippers, buttons, and other details. Below is a lightweight polo neck pullover with a textured pattern that is perfect for work or casual wear.
What you will need
For knitting you will need:
- circular knitting needles No. 3;
- knitting needles No. 3 and 3.5;
- grey yarn – 700 g;
- 2 medium size buttons.
Knitting pattern, design
Size: 50, 52
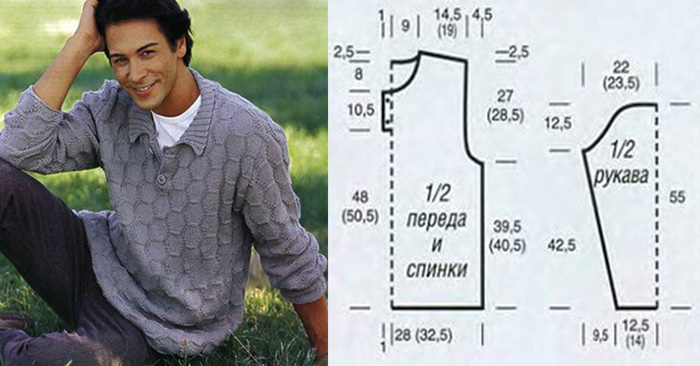

Knitting density is 22 sts and 34 rows = 10x10 cm.
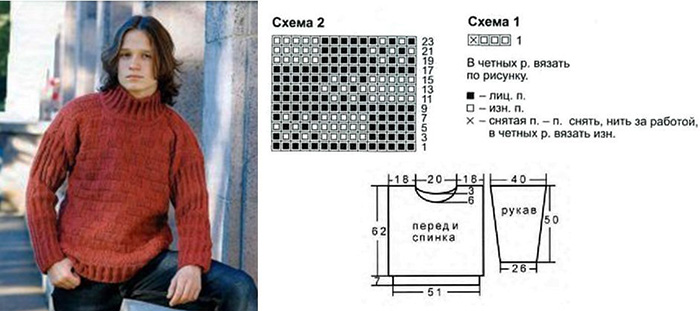
The elastic of the sweater is knitted with 2 front and 2 back loops alternately. The relief pattern implies 20 sts and 3 edge loops. The pattern shows front rows, back rows are made as in the picture. Start with 1 edge loop, make a rapport, finish with a loop and 1 edge loop. So knit 16 rows.
Step by step knitting instructions
Knitting should be done in several stages:
- Back. 123 sts are threaded onto knitting needles No. 3 and 1 purl row is formed with front loops. This row is not taken into account in the following calculations. The relief pattern is made with tools No. 3.5. After 134 rows (39.5 cm) of knitting, 3 loops are closed for the armholes, as well as 2 x 2 and 3 x 3 loops for every second row. After 226 rows (66.5 cm), 6 loops are closed on the left and right for the shoulder bevel, and 2 x 6 and 2 x 7 loops (every 2nd row). For the neckline, the central 31 sts are closed together with the first decrease in the shoulder part. For rounding, 2 x 2 loops are closed from the inside (every 2nd row). After 69 cm (234 rows), all loops are closed.
- The front part is knitted in the same way as the back., not forgetting to make a polo neckline. First of all, after 48 cm (164 rows), finish the left side from the front part on 1-54 loops, and put aside the remaining 49 loops. The upper bar is formed by 5 outer loops. To make holes for the fittings, you need to close the 3rd and 4th loops from the edge after 8 rows from the division, and string them again in the next row. Make the second hole after 30 rows from the division. After 58.5 cm (200 rows), close 10 loops on the left, 1 x 3, 2 x 2 and 5 x 1 loops for the neck (every second row). The right shoulder bevel is formed by analogy with the back. Then use the set aside 49 loops, picking up 5 other loops on the right for the lower bar. All 54 loops are made according to the pattern.
- Sleeves. It is necessary to place 55 loops on tools No. 3 and form 1 purl row with front loops. The relief pattern is knitted with tools No. 3.5. To make a sleeve bevel, 6 x 1 loops are added on every 8th row from 2 sides, and 15 x 1 loops on every 6th row = 97 sts. On the sleeves, the armhole is made after 144 rows (42.5 cm) by closing 8 sts and 1 x 5, 1 x 3, 1 x 2, 16 x 1, 1 x 3 and 1 x 4 sts (every 2nd row). The remaining 15 loops are closed after 55 cm = 188 rows.
- The final stage is the assembly of the parts. First, you need to make seams in the shoulder area. Using circular tools, string 108 loops along the neckline, without using 5 loops of the strips. Then work with an elastic band, starting and ending with 2 front loops between the edge loops. For the shape, add 8 x 1 loops from the 6th row (every 2nd row). From the transverse thread, add 1 loop after the 3rd to the 3rd loop from the end = 124 sts, using the added loops. Close the collar loops at the level of the 24th row. String 21 sts along the edges of the collar, and knit 1 purl row with front loops. Sew on the short side of the bottom strip and fittings. Sew in the sleeves, also make seams on them and on the sides.
Polo Neck Pullover Number 2
What you need for knitting
A beginner knitter would be better off choosing a solid-color model with a simple pattern, for example, a blue pullover with a stockinette stitch and elastic at the bottom and along the edges of the sleeves.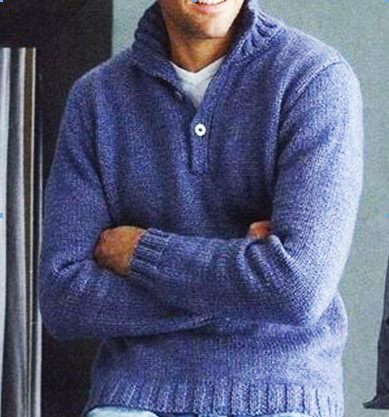
For this polo neck sweater you will need:
- Select a scheme.
- Take measurements.
- Draw a pattern.
- Decide on the knitting method.
- Select yarn.
- Buy 3-4 buttons, main knitting needles No. 4.5 and No. 5.
Taking measurements
You can stop at the size given in the description. But to understand it better, you need to go through all the stages.
Once the model is selected, you need to decide on the size of the pullover. To do this, take a measuring tape called a "centimeter". Its length is usually 1 m.
Using a centimeter, you need to take measurements along the following lines:
- girth of the hips, waist, chest and neck;
- back height;
- length of shoulders, sleeves;
- arm circumference at the wrist and between the elbow and shoulder.
First, you need to determine by eye where the future owner of the pullover has the lines along which the girth of the hips and chest will be the largest. Record this result with a tape measure. The size for the neck is taken at its lower border with the body.
Next, you need to measure the height of the pullover along the back. To do this, measure the distance between the lower and upper marking lines (from the hips to the neck).
The shoulder and sleeve measurements are taken in a similar manner. Only the arm should be bent at the elbow during the measurement. Two distances are recorded - to the beginning of the shoulder and to the neck. The arm volume is taken approximately in the middle of the biceps.
Selecting yarn
Almost any pattern with a description requires an indication of the type of yarn and its volume. But not in all cases it is possible to purchase exactly that option.
When purchasing thread, you should adhere to the following principles:
- the thickness should be the same as stated in the description;
- the thread must contain wool, alpaca, mohair and admixtures of acrylic or alpaca;
- the volume should exceed the specified one by 10-20%.
Knitting pattern, design
With this information, you can begin to draw out the pattern for the sweater on paper.
This will require
For knitting you will need:
- 3 sheets of large graph paper;
- pencil HB;
- ruler, template;
- soft eraser.
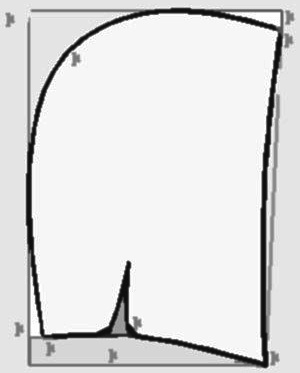
To begin, vertical and horizontal axial lines are drawn in the center of a sheet of graph paper. The main rectangle is applied. For this, half the height of the back is measured from the top and bottom of the horizontal axial line.
Then, on the upper edge, to the right and to the left of the vertical axis line, measure a quarter of the chest circumference. And on the lower edge, to both sides, measure a quarter of the hip circumference. Connect the resulting points. This drawing will become the back of the pullover.
The back cut is formed as follows:
- From the intersection point of the axial vertical and the upper horizontal line, a quarter of the neck circumference is set aside in both directions. From the resulting points, perpendiculars are raised by 2 cm. The three resulting points are connected to form a semi-ellipse.
- The upper horizontal line is divided into four parts so that a point can be placed in the middle of its left and right sides.
- A straight line is drawn from the left side of the apex of the semi-ellipse through the established midpoint. The length of the entire segment should be the length of the arm.
- A vertical line is drawn downwards from the left edge of the resulting segment. It ends at the intersection with the chest girth line.
- The rounding of the obtained right angle is built. The radius of the rounding is equal to the distance between the two left vertical lines.
- A symmetrical pattern is drawn on the right side.
At this stage, the pattern of the men's pullover is the same for the back and the front. Therefore, the first drawing is copied on the second sheet. To indicate the polo collar, you will need to indicate the bar on the front diagram. As a rule, its length is the distance between the neck and the chest. The width is 1 cm.
On the third sheet, the pattern for the collar and sleeve is drawn.
Step by step knitting instructions
Knitting the entire sweater is divided into several stages:
- back;
- before;
- sleeves;
- collar with a cutout;
- assembly.
The back, front and sleeves consist of two patterns - 1/1 elastic and stockinette stitch. For the first, alternately embroider 2 front and 2 back loops. For the second - alternately 1 front row and 1 back row.
- Back.The embroidery is done from the bottom up. 94 loops are cast on to knitting needles No. 4.5 and 12 rows or 4 cm are knitted with an elastic band. After this, knitting needles No. 5 are inserted and the embroidery is done with the front surface. After 116 rows or 43 cm, start closing the loops for the armholes on both sides. The place for the sleeve is prepared.
The armholes are made as follows:
- In the first row, 3 loops are closed.
- Each next 2nd row is closed on 2 loops. Do this twice.
- To the top, every fourth row decreases by 1.
23 cm up from the beginning of the armhole, the neckline begins to appear. The middle loop will be 22. To do this, from the middle, first 2 loops are closed in every 2 rows, and after two passes, 1 loop every second row. At the same time as the neckline, the shoulder bevels are formed. To do this, from the edge of the armhole, first 7 loops are closed every 2 rows, and then 8 loops through each row. As a result, all the loops around should be closed.
- Before. It is knitted similarly to the back. Only a deeper neckline is prepared. To do this, after 43 cm from the start of sewing with the front surface, close two loops in the middle. Then finish sewing the two parts separately. After 21 cm, begin preparing the neckline. After every second row, close 6 loops.
- Sleeves.Work begins in the same way as with the back. On knitting needles No. 4.5, 44 loops are cast on and 12 rows are knitted with a 2/2 elastic band. Then knitting needles No. 5 are inserted and the front surface is knitted. In this case, every 8th row is increased by 1 loop, after 20 cm in every 6th row. After 48 cm from the beginning, an oval is formed for the armhole. To do this, the rows are narrowed. First, 2 times every 2nd row by 3 loops, then 2 times every 2nd row by 2 loops, then the same amount every 9th row by 1 loop, every 2nd row by 2 loops and the 2nd row by 3 loops. After 63 cm from the cast-on row, close the remaining loops exactly.
- Assembly.It is performed in the following sequence:
- The shoulder seams are sewn.
- The collar with the placket is attached to the neckline.
- The sleeves are sewn in.
- The remaining seams are connected.
- Buttons are sewn on.
Features and nuances
The peculiarity of this model is the polo collar. Special attention should be paid to its knitting.
Cast on 98 stitches on knitting needles #4.5. Then cast on 6 stitches from each edge of the 2nd row using a 1/1 elastic band. Cast on the remaining 86 middle stitches using a 2/2 elastic band for 9 cm. Add strips to the outer 6 stitches one by one using a 1/1 elastic band for 21 cm. At the same time, make 4 equally spaced holes on the left side, 1 stitch wide and 3 rows high.
The collar is ready to be joined with the rest of the piece.
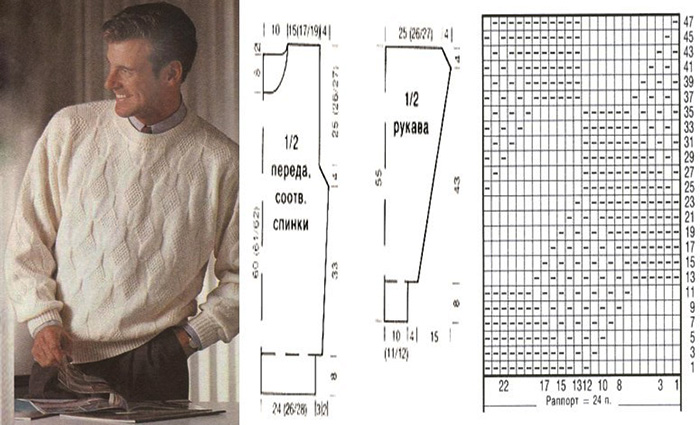
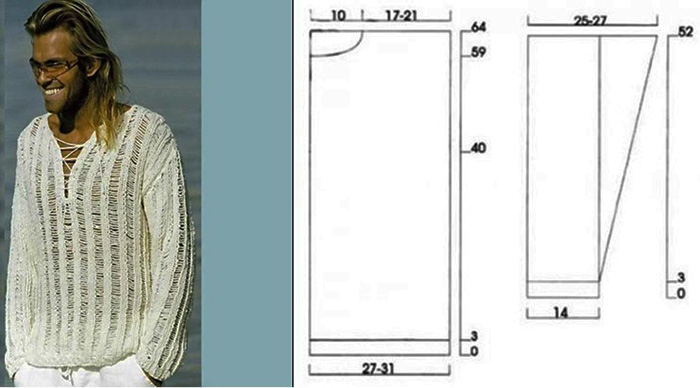
Men's V-Neck Pullover
A men's knitted pullover (the diagram is presented below) with a V-neck is a classic option. Usually, such a model is not complemented with fasteners and buttons, you can experiment with the style and color. It looks good both in a tight and loose cut.
What you need for knitting
To work on such a product you will need:
- knitting needles No. 3.5;
- cotton yarn – 700 g.
Knitting pattern, design
Size: 52
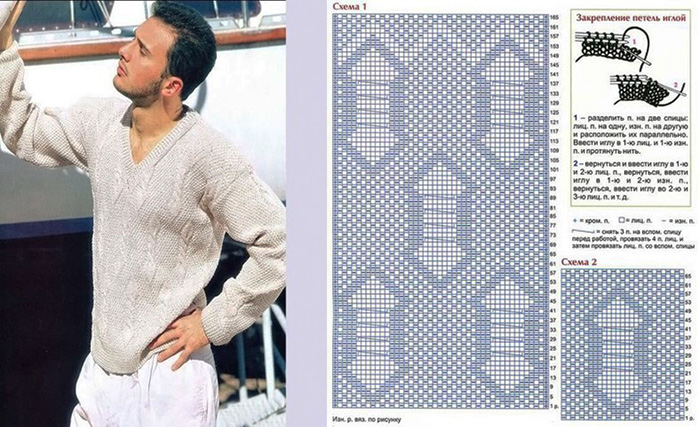
Density: 10 x 10 cm = 30 sts x 32 rows. Patterns are formed according to the presented diagrams.
Front surface. The pearl pattern is made by transversely casting on front and back loops, shifting in every 2nd row. The 1x1 elastic is formed by alternating crossed front and back loops. The back rows are created according to the pattern.
A double elastic band is knitted with 1x1 elastic, the front loops are worked in the purl and front rows, and the purl loops are removed, leaving the yarn in front of the main work.
Step by step knitting instructions
Knitting consists of several stages:
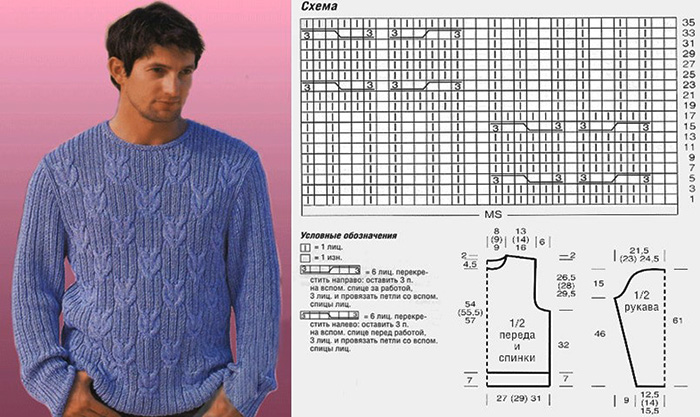
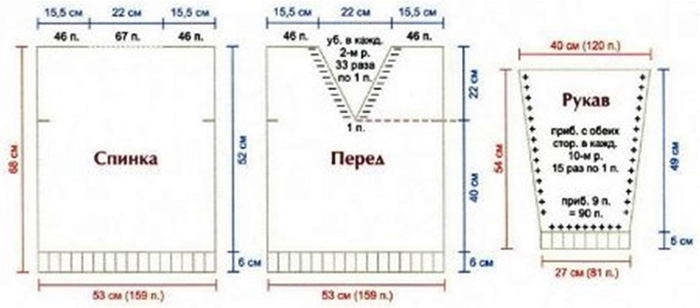
- Back. For double elastic, cast on 159 sts (=80 sts) and knit 6 cm. Knit the pattern according to diagram #1 for 166 rows, then work on the pearl pattern. For each shoulder section, close 46 sts at a height of 68 cm, leave the central 67 sts on an additional knitting needle.
- Front side knit according to the same principle as the back. To make a V-neck, at a height of 46 cm, leave the central loop on an additional knitting needle and remove 1 st for every 2nd row (do this 33 times) on both sides. At a height of 68 cm, close 46 sts for both shoulders.
- Sleeves. For double elastic, cast on 81 sts (=81 sts) and form 5 cm. Add 9 sts = 90 sts in the outer row. Then work on the pearl pattern, place the pattern from diagram #2 in the central part. While knitting, add 1 loop on both sides in every 10th row 15 times. Finish the work at a height of 54 cm.
- Assembling parts. First of all, form the seams in the shoulders. Along the edge of the collar, dial 198 sts, also using loops from additional knitting needles. From the wrong side, form the purl st. 1 row, from the front side, work with an elastic band. You need to knit 2 sts together from the central loop, using each row. So you need to complete 2 cm. Then make 3 rows with a double elastic band and close as shown in the diagram. Form the seams, sew on the sleeves.
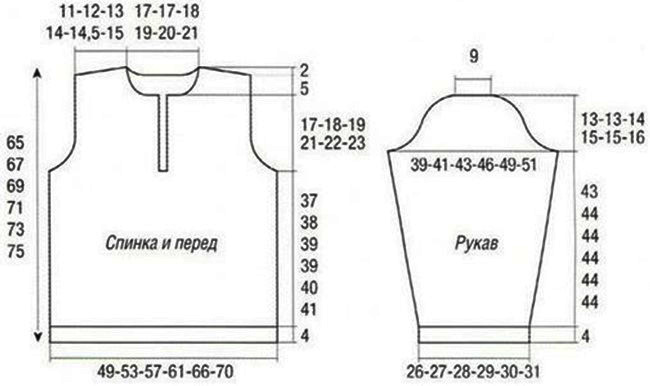
V-neck pullover #2
A neckline that looks like a sharp angle from the front is called a V-neck. This type of collar will lengthen the face and improve freedom of head movement.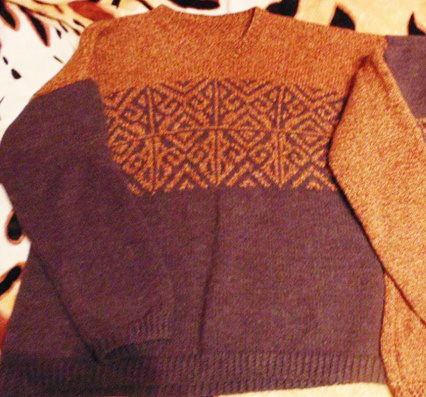
Suitable for people with plump square faces. A good option for a gift and improving your skills would be a two-color men's pullover with a jacquard pattern.
What you need for knitting
To work on such a product you will need:
- Understand the diagram with description.
- Take measurements.
- Buy 500 g of blue, 250 g of white and 150 g of light blue yarn.
- Take straight and circular knitting needles No. 4.5.
Knitting pattern, design
This style of men's pullover has the following pattern and description for knitting.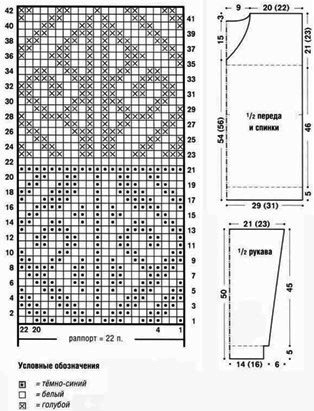
From the diagram it is clear that 3 main patterns are used for this model:
- rubber;
- stockinette stitch;
- jacquard pattern.
A 1/1 elastic band is used. When knitting, 1 front loop and 1 back loop are alternately replaced.
The stocking stitch is knitted by alternating 1 row of front loops and 1 row of back loops. The density of the stocking stitch is 26 rows of 18 loops per 100 sq. cm.
The jacquard pattern is knitted using a counting scheme. In this case, the loops of the rapport are repeated. To change the color of the thread, connect the yarn from the back side, without the appearance of holes. The density of the ornament is 19 cm 42 rows.
Step by step knitting instructions
Similar to the first model, knitting is divided into four stages:
- Back. The pullover is knitted from the bottom up. First, 102 loops are knitted with a 5 cm elastic band. In the last row, symmetrically add 5 loops. Next, the item is knitted with the front surface for 27 cm. After that, jacquard patterns are embroidered. The width of the rapport is 22 loops, and the height is 42 rows. At 27 cm, an edge knotted purl row is created and 5 pattern rapports are sewn in. After the 42nd row of the ornament, the front surface is knitted with white thread up to 69 cm from the cast-on row. To form the neckline at this level, the middle 19 loops are closed and the shoulders are formed separately. In this case, in each 2nd row, close 4 loops once and 2 loops once. At 72 cm, close the last 38 loops.
- Before. The front is knitted in the same way as the back. With the exception of forming the V-neck. To do this, at 54 cm from the cast-on row, the central 54th loop is transferred to a pin. Then both sides are knitted separately. At the same time, from the central loop, 1 loop is decreased every other row. And so on 9 times. After every three rows, decrease by 1 loop. So on 6 times. At a height of 72 cm, close the last 76 loops on the left and right.
- Sleeves. The sleeves are knitted with dark blue thread from the bottom up. 44 loops are cast on and knitted with a 5 cm elastic band. Then another 45 cm are knitted with the front surface. At the same time, to create the sleeve bevels, in each 12th, 6th and 4th row it is increased by 1 loop. At the end, close all the loops.
- Assembly. First, the shoulder edges are sewn together. Now, circular knitting needles are used. 126 loops are cast on with white thread along the neck and knitted with a 1/1 elastic band. At the same time, the middle front loop is knitted and 1 loop is decreased on both sides of it. After 3 cm, the loops are closed. The sleeves are sewn in and all the side seams are done.
Features and nuances
It is worth paying attention to the creation of a V-neck and approaching this element responsibly. People form a stereotype about the owner of a pullover based on the top of their clothes. Therefore, the correct choice of modification plays an important role.
When creating a neckline, it may be impossible to clearly divide the number of loops. In this case, it is worth separating the extra loop onto an additional knitting needle. Then play with it using the chosen pattern. This must be done carefully so that the flaws are not noticeable externally.
Men's Hooded Pullover
A men's knitted pullover (the pattern is easy to read, you only need to figure it out once) is in demand among modern youth. The model with a hood, complemented by a V-neck, perfectly complements the sporty look that Generation Z loves so much. Such a sweater also goes well with jeans.
What you need for knitting
To work on such a product you will need:
- grey wool yarn – 650 g;
- black yarn – 150 g;
- knitting needles No. 8 and 9;
- circular knitting needles No. 9.
Knitting pattern, design
Size: 54.
Knitting density: 10 sts and 14 rows = 10x10 cm.
The elastic band is formed by alternately knitting 1 front loop, 1 back loop.
Step by step knitting instructions
Knitting consists of several stages:
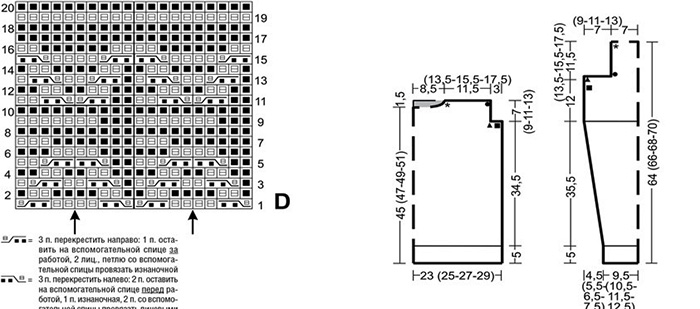
- Front side. Place 53 sts of grey wool on knitting needles No. 8, knit with a rib pattern 7 cm. Make 2 rows of garter stitch using knitting needles No. 9, decreasing or increasing loops in the first row to 51 pcs. Continue knitting with the front surface. At a height of 11 cm, it is necessary to add 3 rows of 1 st every 12 cm (on each side) = 57 sts. At a height of 35 cm, form 3 rows with black yarn, 2 rows with gray and 15 rows with black. Then continue working with gray yarn. For armholes at a height of 41 cm (on both sides), close 3 loops once, twice 1 loop (for every 2nd row). At a level of 46 cm, knit the neckline in the following way: on an additional knitting needle, pick up the remaining loops from the right side and 5 central ones. As a result, on the auxiliary tool, the number of loops comes out to 5 pcs. more than at work.
- Left side: for the strip, cast on 5 sts from the neckline. Knit with the front surface, and make another 5 sts for the strip with garter stitch. At a height of 64 cm, close the outermost 16 sts for the shoulder. The remaining 10 sts are strung on an auxiliary tool.
- Right side. The loops from the additional knitting needle are moved to the working needle and the front surface is continued. Knit 5 sts in garter stitch from the neckline side. The outermost 14 sts for the shoulder are closed at a height of 64 cm. The remaining 10 sts are placed on the additional knitting needle.
- Back are made in the same way as the front side. At the level of 52 cm, the central 13 loops are strung on an additional knitting needle to form the neck. In the next row, 1 loop is removed from each side = 16 loops. They are closed at the level of 64 cm.
- Sleeves. Thread 26 loops of grey thread onto tool #8 and knit with a rib pattern for 10 cm. Use #9 knitting needles to make a garter stitch (10 cm), adjusting the number of loops in one row to 26 pcs. Work with the front surface again. Add 1 loop every 4 cm at 13 cm = a total of 44 sts for both sides. Do this 33 times. To make the sleeve cap, close 3 loops at 49 cm, 2 loops three times and one more (for every 2nd row). Close 2 loops to 56 cm, and also 3 loops 1 time. Close the remaining loops at 57 cm.
- To assemble the pullover, sew the shoulder seams.
- Hood. It is necessary to pick up 45 loops of gray wool on knitting needles No. 9 along the collar, then knit straight (purl loops 1 row). Form 2 rows (a row of purl, a row of front loops). Then work with the front surface, knitting 5 loops using garter stitch on each side. After 2 rows, add 10 sts. (55 sts). Continue knitting to the level of the hood (34 cm). Divide the loops on 2 knitting needles, fold the hood in half. Then you should buckle the loops of the upper part together. Sew the edge of the left strip behind the right one, sew in the sleeves. Make seams on the sides and sleeves.
Men's Hooded Pullover
For young people, a model with a hood is suitable. In addition to being a fashionable option, it is practical in the cold season. If a man forgets a hat and the wind picks up outside, he can use a knitted hood. It will always warm and protect from light rain.
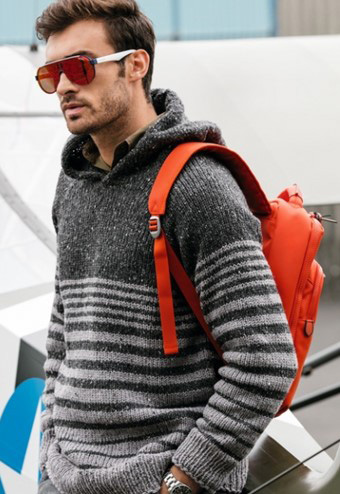
A grey pullover with light stripes from the chest to the bottom, embroidered with a rib band, is suitable as an example for knitting.
What you need for knitting
To work on such a product you will need:
- Understand the diagram with description.
- Take measurements.
- Buy 800 g of grey and 200 g of black wool yarn.
- Take straight knitting needles No. 8 and 9 and circular knitting needles No. 9.
Knitting pattern, design
As you can see from the diagram, this model uses the "rib", "front surface" and "garter stitch" patterns. The rib is knitted alternately 1 front loop and 1 back loop. Front surface is knitted first the front row, then the back row.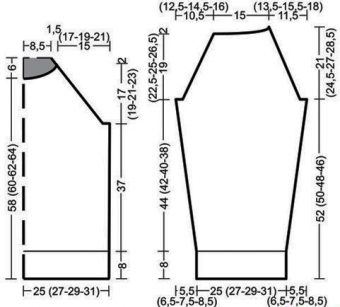
The density of the ornament per 100 sq. cm. 10 loops and 14 rows. Garter stitch is made only with face loops. In this case, when knitting a new loop, the yarn must be grabbed by the front wall. An edge loop is made from each edge of the garter stitch row.
Step by step knitting instructions
For this model, knitting occurs from the bottom up in the following stages:
- Before. First, use knitting needles No. 8. Cast on 56 loops with gray yarn. Knit with an elastic band up to 7 cm. Now you need to switch to knitting needles No. 9. Knit 2 rows with garter stitch. In this case, you need to symmetrically decrease the number of loops to 55. Then knit with the front surface. After 11 cm, start adding 1 loop on both sides every 12 cm, 3 times in total. Upon reaching 37 cm, start knitting with black yarn. Knit 3 rows and switch to gray, make 2 rows and return to black. Knit 15 rows. Then use gray yarn until the end. At 42 cm, start creating armholes for the sleeves. In every second row, close 3 loops 1 time, then 1 loop 3 times. Upon reaching 47 cm, start preparing the neckline. The number of loops is divided equally. The left and right sides are knitted separately. Next, the front surface continues, but from the neckline side, 5 loops are knitted in garter stitch. At a height of 66 cm, 16 shoulder loops are closed.
- Back. The back is knitted in the same way as the front up to 64 cm. In this place, prepare a neck opening. Leave 15 central loops as is or place them on an additional knitting needle. Each next row decrease 1 loop on each side. At a height of 66 cm, close 16 shoulder loops.
- Assembly. At this stage, the front is sewn to the back.
- Hood. Now lift the hood from the formed neck. Cast on 45 loops with grey yarn on circular knitting needles #9. Next, knit back and forth 1 row of purl loops, 1 row of knit loops and 1 row of purl. Next, use the front surface. Do not forget that a strip 5 loops wide is made along the edges with garter stitch. When the hood reaches 34 cm in height, divide the loops in half and place them on additional knitting needles. Bend the ligature and connect the loops of the top. Sew the cast-on edge of the left strip to the back of the right one.
- Sleeves. Cast on 26 stitches of grey yarn on #8 knitting needles. Knit with a 10 cm elastic band. Next, use #9 knitting needles to make 2 rows of garter stitch and switch to the front surface. Having knitted 13 cm of the sleeve, add 1 stitch on both sides. Do the same every 3-4 cm 10 times. As a result, there should be 46 stitches on a sleeve length of 49 cm. When this value is reached, start decreasing the stitches to attach to the armhole. In every 2nd row, decrease by 3 stitches once, 2 twice and 1 once. Then close 2 stitches. At a height of 58 cm, close the remaining stitches.
- Assembly. Sew the sleeves into the armhole and join the remaining seams.
Features and nuances
A hood is a rather complex product. This diagram shows the simplest method. But there are others. In any case, when making this part with knitting needles, it is important to accurately measure the vertical and horizontal circumference of the head. At the same time, you need to make a small allowance so that the person feels comfortable in it.
Pullover with dropped loops
A men's pullover with knitting needles (the diagram with the description is presented further in the article) is also knitted for the warm season. The model with dropped loops looks beautiful and attractive. It is ideal for a sporty, fit figure.
What you need for knitting
For knitting you will need:
- cotton yarn with nylon and acrylic – 650 g;
- knitting needles No. 6;
- hook number 5.
Knitting pattern, design
Size range: 50 - 56.
Density: 10 sts and 18 rows = 10 x 10 cm. To create the pattern, alternate LP over LP, IP over IP.
Forming the first front row: 1 edge st, * IP, LP, add 1 st from uncrossed yarn over the yarn overs, 2 LP together, repeat from *. Finish the row with 1 IP and edge st.
Step by step knitting instructions
Knitting consists of several stages:
- Back. Cast on 54 or 62 sts (depending on size) and knit with a rib for 3 cm. Work on the main pattern, close the loops after 64 cm of knitting. Remove the loops that were added in the 1st row and unravel to the rib. Knit and close the upper loops.
- Front part are formed in the same way as the back. To make the neck opening, close after 40 cm 1 x 4 sts, 1 x 3 sts, 1 x 2 sts and 1 x 1 st (on every second row), the added loops are unraveled. The loops in the shoulder area are also closed.
- Sleeves. Cast on 30 stitches and knit 3 cm with a rib pattern, remove 2 stitches in the last row. Perform the main pattern. To form the bevels on the sides, add 1 st 13 times for every 6th row. Knit alternately front and back stitches on the added stitches. Close the stitches after 52 cm.
- Assembly. Make seams in the shoulders. Crochet the cut and rounding of the neck 1 row with a single crochet. Sew in the sleeves, make sleeve seams and on the sides. Insert the cord along the cut.
Explanation of abbreviations
It is difficult to knit a men's pullover with knitting needles if you do not know the abbreviations used in the patterns and descriptions.
To make things easier for beginners, below is a table with common abbreviations and their meanings:
| Abbreviation | Transcript |
| LP | face loop |
| IP | purl stitch |
| z. n. | thread capture |
| chrome p. | edge loop |
| Art. w/o n | single crochet |
| st. s/n | double crochet |
| r. | row |
| p. | loop |
| from * to * | rapport (repeating pattern) |
| M.S. | rapport |
| red row | circular row |
Tips for Beginners on Preparing for Knitting
Beginners will find it easier in their endeavors if they follow these recommendations:
- It is better to choose simple patterns, which use, for example, garter or stocking stitch. For variety, it is worth experimenting with shades and knitting needles of different sizes.
- Take lightweight patterns (no collar or elastic, straight armhole, no hood).
- Take precise measurements first.
- Knit the sleeves at the same time.
- Maintain the ratio of needles to thread (needles are usually 2 times thicker).
- Choose the most even thread without any thickening. The knitted item from such yarn will look neater.
- Knit the front side last.
A gift made with your own hands will be pleasant for any man. A win-win option is undoubtedly a men's pullover knitted with knitting needles. This is a universal, stylish thing and a must-have in every man's wardrobe. All you need is a pattern, knitting needles and yarn, and you can implement the most extraordinary ideas.
Video about knitting a men's sweater with knitting needles
Sweater "Gentle Viking":