You can draw with a simple pencil not only realistic images (landscapes, still lifes, portraits, etc.), but also cartoon characters. Most often, children want to learn how to create drawings of Mickey Mouse, the main character of the Disney cartoon of the same name.
Following the basic stages of the work process recommended by professional artists, drawing a cartoon mouse will take no more than 60 minutes, even for a young artist who has no previous experience in fine art.
How to draw Mickey Mouse with a simple pencil
Mickey Mouse (the pencil drawing should be the basis for all other variations of similar images of this character) is drawn like this:
| Image variant | Workflow algorithm (main stages) |
|
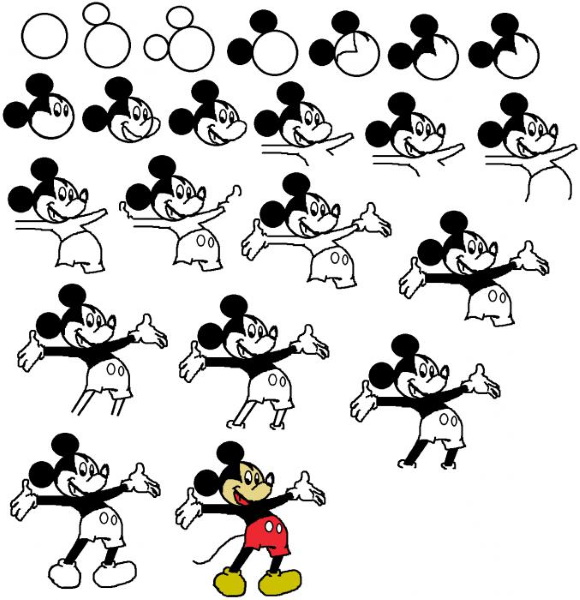
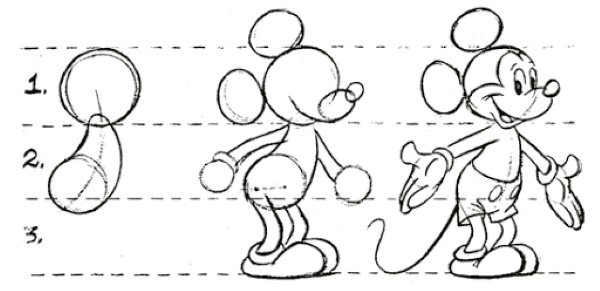
| 1. Determine the approximate middle of the working plane.
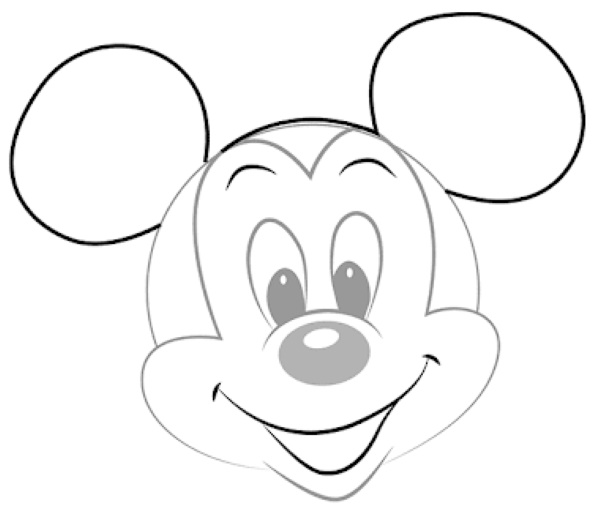
2. In the indicated area, draw 2 identical ovals, the inner part of which must be colored. 3. From the lower borders of the depicted figures, draw 1 semicircle upwards, thus creating the outline of Mickey Mouse’s eyes. 4. Between the eyes depicted earlier, stepping back 1 cm downwards, draw a semicircle to the right, then extend it towards the left border of the working plane (the face of the cartoon character). 5. In the area of the smooth bend of the drawn semicircle, draw another black oval, placing it slightly diagonally (nose). 6. From the extreme point of the curve (the contour of the muzzle), draw a semicircle downwards. 7. Duplicate the semicircle outline (Mickey Mouse's mouth). 8. Detail the oral cavity by drawing the tongue. 9. Draw a semicircle above Mickey’s eyes, the outline of which should be curved in the area between the eyes. 10. Extend the previously drawn line, connecting it with a semicircle to the duplicated outline of the mouth. 11. On the left side of the drawing of Mickey Mouse’s head, draw a rounded line, thus creating the outline of his head. 12. Color the space between the main outline of the image and the contours of the cartoon mouse's face. 13. Finish drawing the ears with semicircles, taking them out of the main outline. |
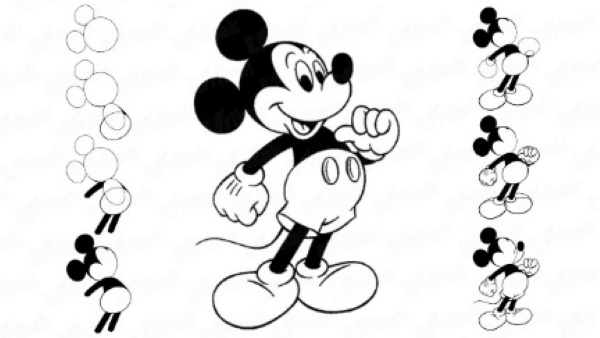
 | 1. Determine the center of the surface of the sheet of paper you are using, and then draw an even circle in this area.
2. Divide the inner part of the circle into 2 parts using a smoothly curved diagonal. 3. Draw 2 lines, with the help of which the outline of the ears of the cartoon character will be built. One of the lines should be directed to the left and be a continuation of the dividing semicircle inside the circle, and the second should be taken out from the center of the main figure, and then directed to the upper left corner of the working plane. 4. Draw perpendicular lines at the extreme points of the lines. 5. Using the forming lines as a guide, draw 2 semicircles (ears) to the main outline of the cartoon mouse’s head. 6. In the area of the lower right corner, draw an oval from the main outline, placing it diagonally. 7. Draw another oval at the top point, half the size of the first one. 8. Detail the image of the mouse by drawing the outlines of the muzzle, eyes and mouth inside the contour of the head. 9. If desired, color the image. |
Black and white drawing
Mickey Mouse (a pencil drawing in the vast majority of cases is created in black and white tones) can also be drawn in other, more complex ways.
Namely:
| Image variant | Workflow algorithm (main stages) |
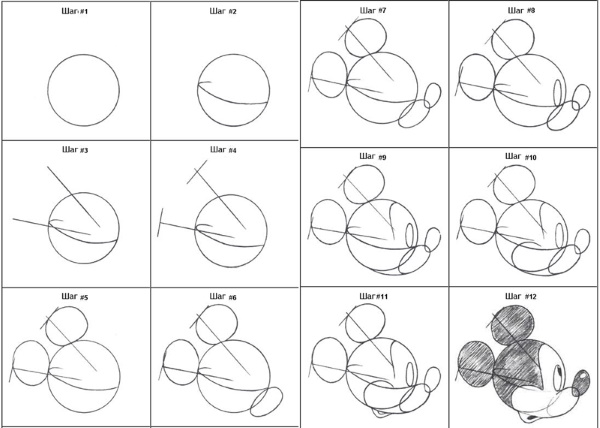
 | 1. In the center of the working plane, draw an even circle (the outline of Mickey Mouse’s head). 2. Inside the circle, at the left border, draw 2 small ovals, placing them close to each other. 3. At the right border of the main figure, draw a curve that bends towards the left edge (the outline of the cartoon mouse’s muzzle). 4. Draw 2 small circles (Mickey Mouse ears) to the right of the main outline. 5. In the lower left corner of the working plane, draw a semicircle with a small black circle on the protruding area (the mouse's face) to the outline of the main image. 6. Draw a small semicircle curved downwards at the bottom of the head (mouth). 7. From the mouth outline, draw a strongly curved downward semicircle, adjusting it so that it resembles Mickey’s body. 8. From the left border of the body, draw 2 parallel diagonals, connecting them with each other with a semicircle with short lines coming out of it (Mickey's arm). 9. Draw the second arm to the right of the body. 10. Draw 2 legs at the bottom, at the base of which semicircles (legs) should be drawn. 11. Add detail to the image by drawing Mickey's face and clothing items on him. 12. Color individual sections of the picture (part of the head, ears, some items of clothing) black, leave the rest uncolored. |
 | 1. Determine the center of the working plane, and then draw an even circle on the indicated part of the surface of the sheet of paper.
2. From the side edge of the circle, draw 2 equal semicircles (Mickey's ears). Paint them black. 3. From the lower part of the original figure, draw a deformed semicircle downwards so that its part located at the base is 3-4 times narrower than the lower part (the body). 4. Divide the inside of the body into 2 parts using a smoothly curved line. Color the upper half black. 5. Finish drawing Mickey’s arms and legs by drawing straight parallels from the outline of the main figures, directed towards the left and lower borders of the working plane. 6. Paint the limbs black. 7. To the right of the body, draw Mickey’s hand using a semicircle and smoothly curved lines drawn from its outline inward. 8. Add detail to the picture by drawing the eyes, mouth, nose, tail and details of the cartoon character’s clothing. 9. Paint some of the completed objects black (for example, pupils, nose, buttons on pants, etc.). |
Color
Mickey Mouse (a pencil drawing can be a basic outline, which implies coloring the inner part of the image) is drawn in color like this.
Table:
| Image variant | Workflow algorithm (main stages) |
 | 1. Draw an even circle (Mickey's head) in the center of the working plane. 2. Draw 2 identical semicircles from the main outline of the drawing, placing them at the top and left. Color the resulting figures (ears). 3. Inside the circle, at the left border, draw a curve (the outline of the cartoon character’s face). 4. Color the area between the left border of the main figure and the curve drawn inside it. 5. In the upper part of the remaining unpainted half, draw 2 identical small ovals with 2 black circles inside (eyes). 6. At the bottom, finish drawing the mouth, adding detail to it by drawing the tongue inside. 7. From the left side border of the main figure, draw a smoothly curved line inward towards the left edge (the outline of the lower part of the muzzle). 8. At the most convex point on the outside, draw a small circle (nose). 9. Under the lower border of the main contour, draw 4 parallel horizontal lines, grouped in 2, pointing them in opposite directions (arms). 10. At the end points of the horizontals located close to each other, draw 2 vertical lines, directing them towards the lower boundary of the working plane (torso). 11. Divide the inner part of the drawn body into 2 parts, painting the upper one black. 12. Adjust the lower part of the body so that it resembles the borders of the shorts, and then color it red. 13. Draw 4 vertical lines at the bottom, grouping them into 2, and at the ends of which draw semicircles (legs). 14. Color the picture, having first detailed its individual parts. |
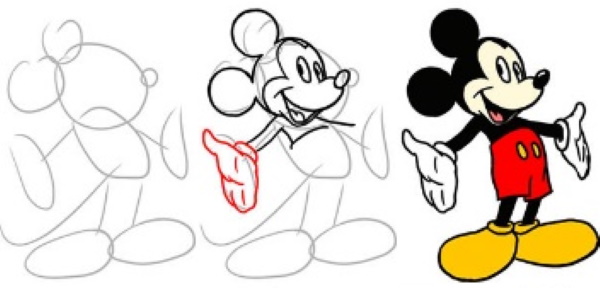 | 1. Draw a rounded oval at the top of the sheet of paper you are using.
2. Draw a small circle (nose) to the right border of the main figure’s outline. 3. Draw 2 medium-sized circles on the left (ears). 4. Draw an oval at the bottom of the head, placing it slightly diagonally. 5. Draw 1 straight line to the right and left of the oval, directing them diagonally to the lower right and left corners. 6. Draw small ovals of the same size at the extreme points of the lines. 7. From the bottom of the oval, draw 2 parallel vertical lines, at the extreme points of which draw a large oval of the same size. 8. Correct the outline of the head, drawing the contours of Mickey's muzzle, eyes, mouth and tongue, while making the transitions between the border parts of the body (for example, the head and ears) invisible. 9. Adjust the semicircles at the top lines so that they look like the palms of a cartoon character. 10. Add detail to the drawing by adding Mickey Mouse's clothing items, then color the picture using red, black and yellow. |
With a pen
Mickey Mouse images created with gel or ballpoint pens should consist of the simplest elements. This is because such drawings cannot be corrected, which means the risk of making a mistake in the work process must be minimized.
Table:
| Image variant | Workflow algorithm (main stages) |
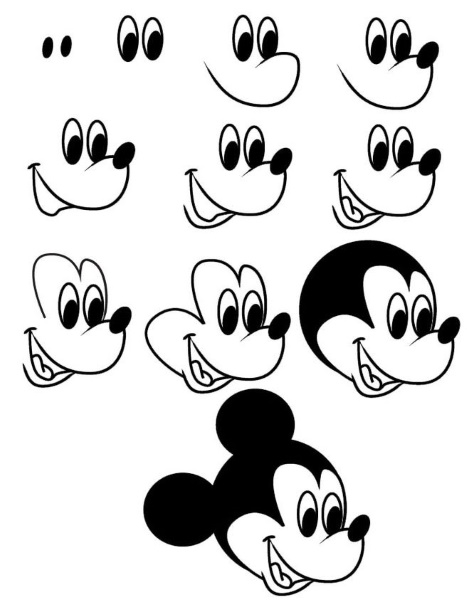
 | 1. In the central part of the surface of the sheet of paper used, draw an oval, the upper border of which should be curved downwards exactly in the middle (the outline of Mickey Mouse's muzzle). 2. From the extreme points of the semicircle, draw another semicircle on each side, placing them horizontally and connecting them at the lower points with a rounded line. 3. Connect the most protruding points of the semicircles, located vertically, with a semicircle, drawing it on top (the outline of the cartoon character’s head). 4. From the upper border of the main contour, draw 2 identical semicircles of medium size (ears). 5. Inside the outline of the cartoon character's face, in the upper part, draw 2 short semicircles, slightly curved upwards. 6. Stepping back 2-3 cm from the semicircles down, draw 2 identical ovals, located vertically. The inner part of the oval must be divided into 2 halves, one of which (at the bottom) should be colored. 7. The lower borders of the ovals should be connected by a semicircle, under which a medium-sized oval (the nose) should be drawn. 8. Step back 3-4 cm from the nose down, and then draw Mickey Mouse’s mouth in the indicated area using a semicircle curved downwards, from the edges of which another semicircle emerges, more strongly curved downwards. |
 | 1. In the middle of the working plane, draw a medium-sized circle (head).
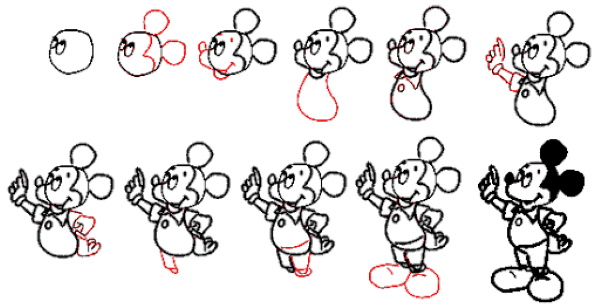
2. From the right border, draw 2 more medium-sized circles (ears). 3. Inside the head, draw 2 identical ovals with black dots inside (eyes). 4. At the bottom of the main figure, draw a mouth (a semicircle curved downwards), the outline of the mouse's muzzle and a nose at the most protruding point on the outside. 5. From the lower border of the head, draw the body, outlining its outline using 2 smoothly curved lines directed downwards. 6. Draw curves (arms) to the right and left of the body. 7. From the lower border of the body, draw the tail (a smoothly curved line), as well as Mickey Mouse’s legs. 8. If desired, add detail to the picture by depicting clothing items for the mouse from the Disney cartoon. |
With balls
Mickey Mouse (the pencil drawing must be done step by step), holding balloons in his hands, can be drawn like this:
| Image variant | Workflow algorithm (main stages) |
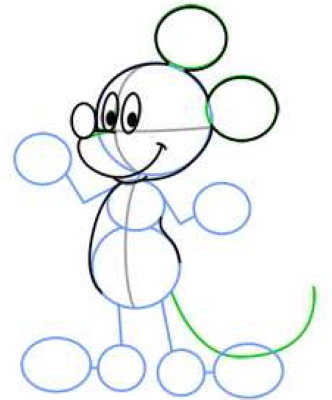
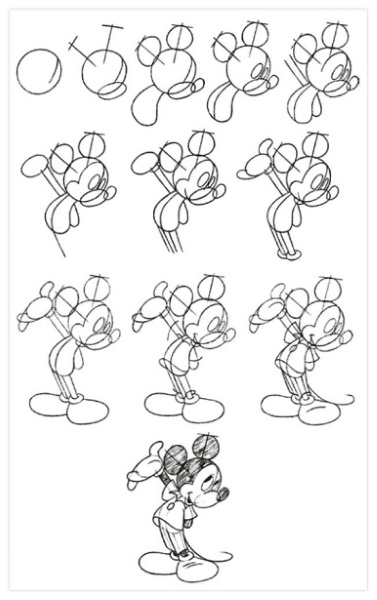
 | 1. The surface of the sheet of paper used must be divided into 3 main parts using 4 horizontal lines located at the same distance from each other. 2. Between the first and second lines, draw an even circle so that its borders touch both lines. 3. From the lower edge of the circle, draw an oval, thus filling the distance between the second and third lines. Adjust the oval so that its upper part is 2 times narrower than the lower one. 4. Divide the inner part of the body into 2 parts using a horizontal line, slightly curved upwards. 5. From the lower edge of the body, draw 4 vertical lines down, grouped in 2 (Mickey Mouse’s legs). 6. Draw 2 parallel lines to the right and left of the body, and draw small circles at the ends (the arms of the cartoon character). 7. From the left side border of the head, draw 2 identical semicircles (ears). 8. Add detail to the drawing by drawing Mickey Mouse’s face, eyes, nose, mouth, hands, fingers and clothing. 9. From one of the mouse hands drawn earlier, draw 3 vertical lines upwards. 10. Draw ovals of the same size (balloons) at the extreme points of the lines. Draw small triangles (balloon tails) at the bases of the ovals. |
 | 1. Draw an even circle at the top of the sheet of paper.
2. Draw a straight line inside the circle at the right border. 3. Draw 2 straight lines from the inner plane of the circle, pointing them upwards. Draw perpendicular lines at the extreme points of the lines. 4. Using the vertical lines as a guide, draw 2 semicircles (Mickey Mouse ears). 5. Draw an oval and a small circle on it (the cartoon character’s face) onto the main figure. 6. Inside the head, draw the outline of Mickey Mouse’s muzzle, eyes and mouth. 7. From the lower border of the main figure, draw a deformed oval downwards so that it looks like the body of a mouse from a cartoon. 8. From the body, bring Mickey's arms and legs out so that one of the arms is pointing towards the upper left corner. 9. From Mickey’s raised hand, draw 3-5 vertical lines, slightly bending them in any areas (threads). 10. Draw ovals (balloons) at the ends of the verticals. 11. Draw small triangles (tails of the balls) at the lower edges of the ovals. 12. Add detail to the image and, if desired, color it. |
With flowers
It is recommended to use a pencil to create complex multi-component drawings that require periodic correction of previously drawn lines.
For example, you can depict Mickey Mouse with flowers like this:
| Image variant | Workflow algorithm (main stages) |
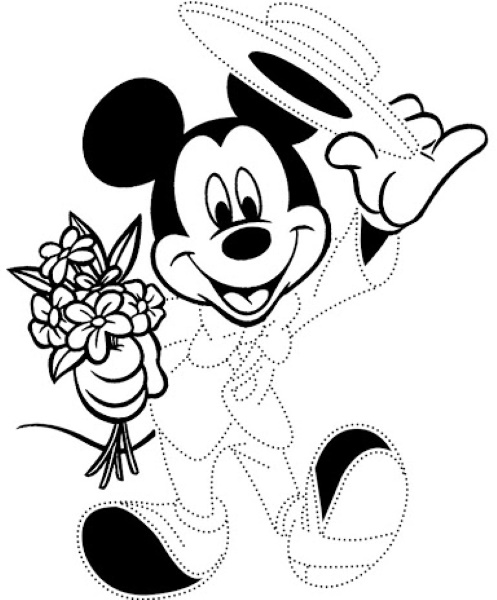 | 1. Draw an oval (Mickey's head) at the top of the working plane. 2. From the upper border of the main figure, draw 2 equal semicircles (ears). 3. In the inner part of the circle, draw a semicircle, the outline of which must be curved exactly in the middle. 4. In the middle of the main figure, draw 2 identical ovals with semicircles inside (eyes). 5. Connect the lower borders of the ovals with a semicircle curved upwards, and under it, stepping back 1-2 cm downwards, draw a small oval (nose). 6. Step back 3-4 cm from the nose, and then depict the mouth in the indicated part using two downward curved semicircles, the extreme points of which are common. 7. From the lower border of the head, draw the body, adding detail if desired, adding a bow tie, suit and shirt of the cartoon mouse. 8. Draw Mickey's arms on the right and left sides of the body. 9. Draw flowers in the left hand so that the buds are located above the fingers of the hand, and the stems are below them. The middle of the stem must be covered with schematically drawn fingers of the cartoon character (semicircles). 10. The second hand should be drawn pointing upwards, holding the hat. 11. Finish drawing Mickey Mouse's legs. 12. Detail the image and then color it if desired. |
 | 1. Draw a circle (the outline of the mouse head) at the top of the working plane.
2. Draw 2 equal semicircles (ears) on top. 3. Inside the main figure, draw a semicircle, the outline of which should be curved downwards exactly in the center. 4. Inside the semicircle, draw 2 small, slightly curved semicircles (eyebrows), 2 identical ovals with semicircles inside (eyes). The distance from the lower border of the oval to the semicircle must be colored (pupils). 5. Connect the lower borders of the ovals with a smoothly curved line. 6. Step back 1-2 cm down, then draw a small oval, placing it horizontally (nose). 7. Under the nose, at a distance of 4-5 cm, depict the mouth using 2 semicircles, the extreme points of which are located in one place. 8. From the lower border of the head, draw an oval (body), detailing it later. 9. Draw Mickey Mouse's legs at the bottom using 4 vertical lines grouped in twos. 10. Draw ovals (feet) at the bottom. 11. Draw arms behind the back on the right and left sides of the body using curved lines. 12. On the right side, from behind the back, draw 5 diagonal lines coming out from one point. At the ends of the lines, schematically depict flower buds. 13. Add detail to the drawing by depicting Mickey Mouse’s tail and clothing. 14. Color the drawing as the young artist wishes. |
By the cells
Older children (7-9 years old) can be given the task of drawing Mickey Mouse on the squares under dictation. To organize such an activity, you will need a sheet of paper, lined in a square, a simple pencil and an eraser. At the end of the working process, the resulting drawing can be colored.
 | 1. Find the starting point, stepping back 2 cells from the top and 4 cells from the left. 2. Draw Mickey Mouse according to the instructions: 1 key down, 1 key left, 1 key down, 1 key left, 5 keys down, 1 key right, 1 key down, 4 keys right, 1 key down, 1 key left, 6 keys down, 1 key right, 1 key down, 1 key right, 1 key down, 1 key right, 1 key down, 2 keys left, 1 key down, 2 keys left, 3 keys down, 1 key right, 1 key down, 3 keys right, 1 key up, 1 key right, 1 key up, 1 key right, 2 keys down, 1 key left, 2 keys down, 1 key right, 2 keys left, 1 key down, 1 key left, 2 keys down, 2 keys right, 1 key down, 4 keys right, 1 key up, 1 key right, 1 key down, 4 keys right, 1 key up, 2 keys right, 2 keys up, 1 key left, 1 key up, 2 keys left, 1 key up 1 key right, 2 keys up, 1 key left, 2 keys up, 1 key right, 1 key down, 1 key right, 1 key down, 3 keys right, 1 key up, 1 key right, 3 keys up, 2 keys left, 1 key up, 2 keys left, 1 key up, 1 key right, 1 key up, 1 key to the right, 6 keys up, 1 key to the left, 1 key up, 4 keys to the right, 1 key up, 1 key to the right, 5 keys up, 1 key to the left, 1 key up, 1 key to the left, 1 key up, 1 key to the left, 1 key up, 3 keys to the left, 1 key down, 1 key to the left, 1 key down, 1 key to the left, 2 keys down, 2 keys left, 1 key up, 5 keys left, 1 key down, 2 keys left, 2 keys up, 1 key to the left, 1 key up, 1 key to the left, 1 key up, 3 keys to the left. 3. Detail the drawing inside the outline and, if desired, color it. |
Being one of the most famous Disney cartoon characters, Mickey Mouse is most often depicted by children in drawing classes. Beginning artists are recommended to create such drawings with a simple pencil, eventually moving on to using a pen, paints or markers.
This approach to the creative process will help the young artist gradually master basic skills and, after 2-3 months of regular practice, begin to draw more complex pictures in a realistic style.
Video about drawing Mickey Mouse
How to draw Mickey Mouse easily: