Modeling using soft and elastic materials is one of the types of creative leisure activities for children. It is more convenient to replace expensive store-bought plasticine with a budget option - salted modeling dough. There are many recipes that can be followed to easily prepare plastic mass and create real masterpieces from it.
Benefits of modeling for children
| Mental development | Regular modeling exercises have a positive effect on the child's mental and emotional state. Such creative pastime activates the activity of both hemispheres of the brain. Perseverance, patience, accuracy appear, and the skill of completing what has been started is reinforced. Imagination also develops when the child himself comes up with crafts and recreates them. |
| Fine motor skills, logic | In the process of making figures and parts from plastic material, fine motor skills are developed - this makes a significant contribution to the formation of abstract thinking, good memory, and the ability to think logically. |
| Perception of the environment | Small children, working with plastic materials, begin to learn colors and shapes. Visual perception of surrounding objects develops, and aesthetic taste is born. |
| Emotional stability | During modeling classes, the emotional state is leveled, which is especially important for children with an easily excitable nervous system. Increased mobility, activity and irritability are temporarily reduced. Internal fears and contradictions are not kept inside, but find an outlet thanks to creative activity. |
Why is it better to use salt dough for modeling?
One of the advantages of salt dough is its naturalness. The elastic mass created by your own hands is harmless even for children under 2 years old - it does not provoke allergic reactions, does not repel with an unnatural smell. Dough with the addition of salt is more pliable, softer than regular plasticine - it will be easier for children's hands to create the intended details.

Once the piece is sculpted and dried, it is given a decorative finish using varnish and paint.
Simple DIY Salt Dough Recipes
Salt dough (a recipe for modeling for children is given below) is easy to prepare, does not require expensive components. The classic recipe is convenient because the necessary components can always be found at home.
Based on creative preferences, traditional ingredients are combined:
- with food colors;
- glycerin;
- soda;
- wallpaper glue;
- vitamin B;
- natural flavors;
- essential oils.
After which the environmentally friendly material acquires unique characteristics.
Classic recipe
The dough according to the classic recipe does not have any additional components, which is why small children are allowed to work with such material. Traditional preparation involves the use of wheat flour, salt without additives (the finer the salt, the better it dissolves), warm or cool water.
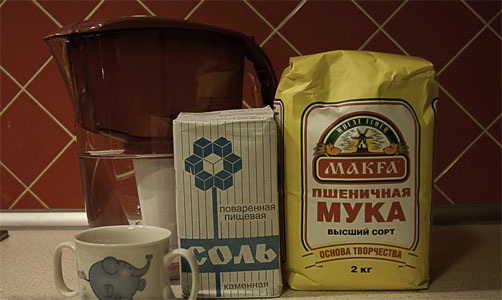
Pour salt (1 cup) and flour (2 cups) into a deep bowl. Slowly add water (¾ cup). Knead the dough until it becomes homogeneous and does not stick to your hands. It is allowed to add oil (any vegetable oil) – at least 1 tbsp.
Salt dough in the microwave
An unconventional way to create plastic dough is in the microwave. The main ingredients are: water and flour (half a glass of each component), salt (1/4 glass). Additional additives that are added to the main ones: 1 teaspoon of vegetable oil and cream of tartar.
Those who want to get the dough colored a certain color can add safe food coloring to the mixture. From the listed components, prepare a mass, which is placed in a microwave-safe dish. Set the power to medium, and leave the mixture in the oven for 5 minutes. Then cool it and knead it with your hands.
Coarse salt dough
Dough in which fine salt is replaced by coarse-grained salt is a variation of the traditional recipe. This mass is suitable for children under 2 years old. Combine coarse salt (300 g) and a glass of water in a container. Mix well so that the salt crystals dissolve.
Flour in the amount of 300 g is gradually added to the salt solution.
With PVA glue
Sometimes salted dough contains PVA glue – it is included in the usual composition to increase the strength of future products (small children should not work with such dough). A glass of flour is mixed with a glass of salt. Glue (1 tbsp) is diluted in 120-130 g of water.
This liquid is slowly poured into the container with dry ingredients. The dough is kneaded for a long time - until it stops sticking to your hands. The mass should become homogeneous. The finished lump is covered with a cloth and put into the refrigerator for 15 minutes., after which you can start sculpting.
With added starch
There are ways to make dough from starch. Starch is a substitute for flour, and soda acts as a substitute for salt. Mix 2 cups of soda with a cup of starch, stirring. Slowly pour in half a cup of water, continuing to stir the ingredients. Start heating the mixture slowly on the stove. The dough should turn into a lump. Cool it and knead it with your hands until done.
https://www.youtube.com/watch?v=zxsZI3L9_JU
The recipe uses potato starch, but you can replace it with corn starch.
With food coloring
Salt dough, colored in bright colors with food coloring, is especially fun for children and allows you to skip the stage of coloring the finished product. When mixing the ingredients, you can add food coloring. Or you can pour it into the finished dough, then thoroughly knead the lump so that the color is distributed evenly.
One option for dyeing brown is to use cocoa powder and instant coffee (they are diluted in water).
Dough with rye flour
The recipe for modeling for children has other variations - for example, salted dough, to which rye flour is added. It must be mixed with wheat flour, otherwise the material will be unruly due to its hardness. Products made from rye flour have a characteristic brown tint.
Dissolve a glass of salt in ¾ of a glass of water, add wheat (one and a half glasses) and rye (half a glass) flour. Mix the mixture with your hands.
Glowing dough
Salt dough (modeling recipe for children over 2 years old) can glow under an ultraviolet lamp. The glowing effect occurs due to the presence of vitamin B. The main components will be: a glass of flour and ¾ glass of salt. Additional components: cream of tartar (2 tsp), vegetable oil (1 tbsp). If you don’t have cream of tartar on hand, it is recommended to use apple cider vinegar.
An important component – vitamin B – is easy to buy at a pharmacy. For the test, 2 tablets or 1 ampoule are enough.

Flour and tablets ground into powder (or liquid vitamin) are poured into a saucepan. Salt and cream of tartar are also added there. Water and vegetable oil are added. The resulting mixture is put on minimum heat. As a result of heating, a lump should form, it is taken out and cooled. Mix it manually until it is ready.
Analogue of Play-Doh plasticine
Play-Doh is a bright and beautiful plasticine that has long been loved by children. But it is considered an expensive material for creativity. Plastic multi-colored mass with similar characteristics is created at home. Salt dough (a modeling recipe for older children who will not taste the material) is an analogue of imported plasticine - it is colored during mixing.
It is convenient to cook several pieces of different colors at once.
In a saucepan, combine half a glass of salt, 2 teaspoons of citric acid, and 1 glass of flour. Add 1 tablespoon of sunflower oil and 1 teaspoon of glycerin to the mixed dry mixture. Heat the pan slowly on the stove. To dilute the food coloring, take half a glass of water, and pour the colored solution into the future dough. Stir the mass continuously - it will gradually acquire thickness and homogeneity.
The result should be a lump. The mass is removed from the container, placed on the table, where it is mixed to the desired consistency.
How to properly store ready dough?
Prolonged exposure to air has a negative effect on salt dough. The plastic mass begins to dry out and become covered with a crust, which leads to the loss of its properties. Therefore, the material remaining after creative manipulations is placed in the refrigerator - wrapped in polyethylene film or placed in a container with a tight lid.
Easy Crafts Master Classes for Kids
There are endless options for creative works from salt dough. They are chosen based on the child's skills and age. Most crafts are based on sausages and balls. A child, starting to learn how to model, tries to recreate these details. And over time, he gets better at it.
After mastering the techniques of rolling soft material into balls, sausages and flattening parts, they move on to making simple crafts.
Video of a master class on sculpting a turtle:
Examples of simple crafts:
- fungus;
- hedgehog;
- caterpillar;
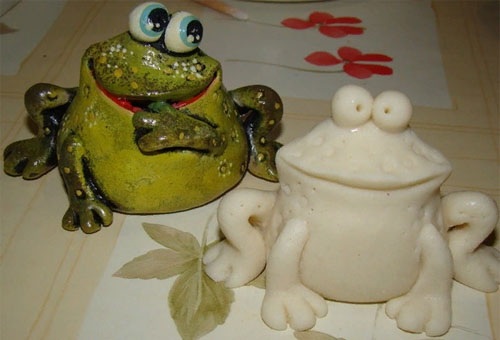
- flat animal faces;
- flowers.
Fungus
To make the mushroom, you need to mold a cap and a stem. For the cap, roll a ball and press it down on one side. For the stem, roll out a small sausage, thickening it on the bottom side. Attach the cap and stem to each other. To prevent the mushroom from falling apart, you can fasten the parts with a toothpick. The craft is painted after making sure that it is completely dry.
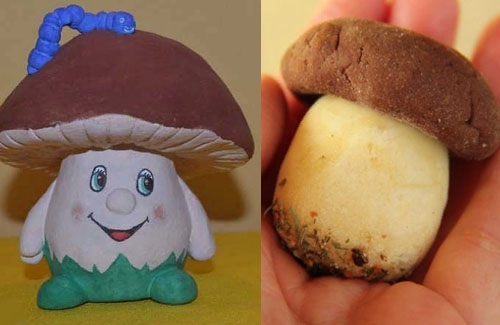
You can complicate the task a little and make a large mushroom with arms, a voluminous cap and a drawn face.
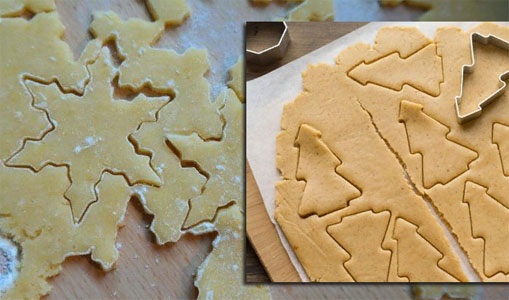
Christmas tree decorations
The dough is rolled out on the table, turning it into a smooth layer. Cookie cutters are used to cut out figures. A small round hole is made in these Christmas tree decorations. The crafts are dried, then painted. A ribbon or thread is threaded through the hole.
Rose
Roses from salt dough are molded in different ways. Beautiful flowers are obtained from already colored material, but you can also get by with colorless dough.
Methods of sculpting roses:
- First, a small cone is formed – it serves as a base on which the petals are attached. Pieces are pinched off from the dough and balls are rolled out of them. Then the balls are flattened so that each of them is shaped like a petal. The petals are attached to the cone in a circle – a bud should be formed. The outer petals are made a little differently: They are also rolled out, made flat, but the edges on the top side are slightly bent outward.
- The second method allows you to create many miniature roses and make them part of an artistic composition, combining them with leaves or other flowers. To make several small roses, roll balls of the same size from the dough. Each ball is turned into a smooth sausage, which should be the same thickness along its entire length. The sausage is flattened – it resembles a strip. The strips begin to be carefully rolled into rolls. The bottom of the roll will be narrowed and the top will be widened (forming petals).
Puzzles
A large cardboard stencil is made. It can be an animal, a car, an airplane. The dough is rolled out on a flat surface, the stencil is placed on top and the figure is cut out along the contour. The dough blank is left to dry (8-10 hours). Then it is cut into pieces with a knife. Before painting, the cut pieces must be completely dry.
After painting, the homemade toy is varnished to extend its service life.
Drying salt dough at home
Particular attention is paid to drying the molded crafts.
From the existing methods, everyone will choose the one that is convenient for them:
- in the oven;
- on the balcony, in a warm room with active air circulation, in the country;
- on the heating device.
Immediately after production, the product is not sent to the oven - it is kept in the open air for 2 days. Before drying, preheat the oven to 50 °C. Place a sheet of foil on the baking tray. Place the crafts on top. Sprinkle the foil with a little flour before laying them out.
The dough figures will dry for 3 hours at the original oven temperature.
The temperature can be gradually increased to 140 °C. Under these conditions, the dough will need about 40-50 minutes to dry. But it is important to keep in mind that items with voluminous and thick parts will require more time to dry completely.
Rapid drying with increased temperature may cause cracks to appear on the surface of the dough.. Therefore, it is better to choose gradual and leisurely drying. Crafts are taken out of the oven after cooling. The simplest, most natural and time-consuming method of drying is in the fresh air or in the apartment on the windowsill.
The product dries faster in the summer in warm sunny weather. But you don’t need to place it directly under the hot rays of the sun. A well-lit and warm place will do, as well as a smooth surface so that the crafts do not deform. Another way is to dry it on a radiator. – used during cold seasons.
The finished product is not simply placed on a hot radiator. First, a flat surface is prepared, covered with foil, and the dough is placed on top. The resulting structure is placed on the heating radiator. The completely dry craft makes a ringing sound when tapped.
A product that is damp inside will sound dull.
Do I need to varnish my crafts?
You can apply varnish to the created and dried crafts. Painted and colorless dough creations are covered with a varnish layer. It protects the figures from moisture and prolongs their life. For varnishing, you can buy an aerosol - the varnish is sprayed in one or several layers.
Before applying a new layer, the previous layer is thoroughly dried.
There are varnishes on sale with added decorative elements - they will add originality to your crafts. The use of nail polish is permitted. Salt dough (the recipe for modeling is not suitable for children) can shine even without a varnish coating - the shiny effect is caused by the presence of glycerin in the material.
The dough, which will contain glycerin, is prepared by mixing a glass of salt, undiluted wallpaper glue (2 tablespoons) and flour (1.5 cups). Add 2 tablespoons of glycerin to the resulting dry mixture. Little by little, add water (you will need about half a glass), creating an elastic lump.
If the dough was prepared without adding dyes, the figures can be covered with acrylic paints or gouache.
Small children can color their crafts themselves using felt-tip pens or permanent markers. Watercolor paints are not very suitable, but if they are available, they are used to color: slightly dampen the brush and thickly coat it with paint.
Gouache is suitable for both painting items and dough. It is put into the dough and the lump is kneaded with hands so that the paint is distributed.
Homemade salted dough for modeling does not lose popularity. Experimenting with the main and auxiliary ingredients, you can choose a recipe for creating a plastic material that is suitable for children of any age.
Article formatting: E. Chaikina
Useful video about salt dough for modeling
A simple video recipe for making your own dough for creative activities with children:
And how does moisture affect the finished crafts? Let's say they dry out and then get under water, what will happen to them, won't they fall apart?