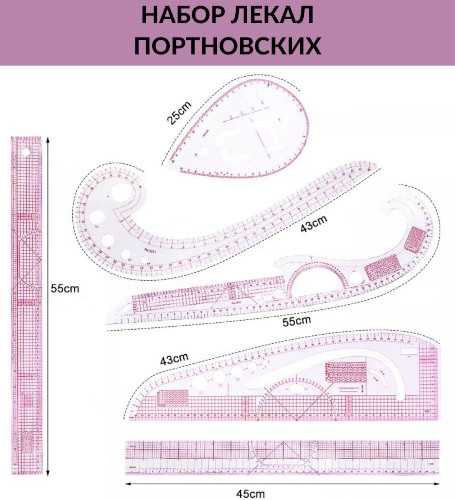
A tailor's pattern is a tool used for cutting when creating patterns for sewing clothes. It is a template made of fabric or paper that shows all the necessary measurements and lines for cutting out fabric pieces.
Properties and purpose
A tailor's pattern is the basis for creating templates for cutting clothes of different sizes. The pattern helps to determine the correct proportions and shape of the parts, making the work of cutting easier and reducing errors in sewing.
Tailoring patterns allow you to:
- Simplify the process of creating patterns. Instead of drawing complex shapes on paper, a tailor can use ready-made patterns that already correspond to standard sizes and shapes of clothing. This simplifies and speeds up the process of creating patterns.
- Ensure precision and accuracy of cutting. Patterns have clear contours and dimensions, which allows the tailor to follow them precisely when cutting the fabric. This helps to avoid mistakes and inaccuracies in the cut, which can lead to poor-quality clothing.
- Create a variety of models. Tailors can use different patterns to create different types of clothing. This allows them to experiment with designs and create unique pieces.
A tailor's pattern for cutting is made according to certain standards and can be used by both professionals and people who sew at home. To create a pattern, tailors use different types of patterns in combination with each other. This allows them to create complex shapes and details of clothing.
Types and forms
They can be of different types and shapes, depending on the type of product and its design features.
By appointment
In tailoring, different types of patterns are used, which differ in purpose.
"Angle" (universal)
This is a tool used by tailors and seamstresses to create and measure angles in clothing. It is a flat figure with two straight sides joined at a certain angle. The angle between the sides can vary, depending on the tailor's needs.
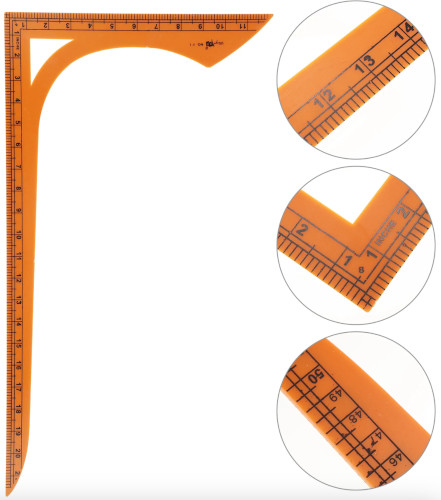
This allows you to create different shapes and sizes of corners in clothing, such as:
- collars;
- cuffs;
- pockets and so on.
The tailor's pattern "Angle" is an important tool for tailors and seamstresses, as it helps them create precise and accurate angles in clothing. This simplifies the sewing process and makes it more efficient.
Using the tailor's pattern "Angle" requires certain skills and experience. The tailor must be able to correctly measure the angle between the sides of the pattern and transfer it to the fabric. This requires precision and accuracy to ensure the correct placement of the angle in the garment.

The tailor's pattern "Corner" can be made of various materials, such as wood, plastic or metal. The choice of material depends on the tailor's preferences and the requirements for the tool.
To use the tailor's pattern "Corner", you need to follow these steps:
- Preparing the fabric. Before you begin, make sure that the fabric is laid out on a flat surface and has no folds or distortions.
- Selecting an angle. Determine the angle you want to create on the fabric. This can be a right angle, an acute angle, or an angle close to 90°.
- Installation of the pattern. Place the base of the pattern on the fabric so that it is positioned exactly at the point where the corner is to be created.
- Removing the pattern. After overcasting, carefully remove the pattern from the fabric.
- Checking the angle. You need to make sure that the angle on the fabric matches the one you have chosen.
"Armhole" (French)
This is a tool used by tailors to create patterns for shoulder garments. It is a flat shape with a section cut out to match the shape of the armhole.
An armhole is a cutout in clothing that is used to put your arm through. It can be of different shapes and sizes, depending on the style and cut of the clothing.
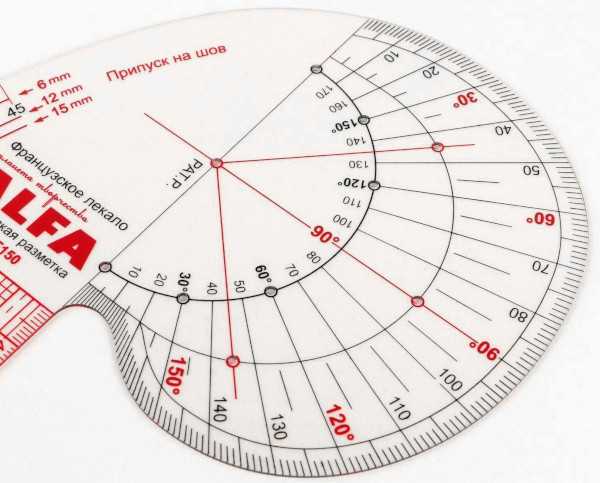
The tailor's pattern "Armhole" helps tailors to accurately determine the size and shape of the armhole to ensure the correct fit of the sleeve and comfort when wearing clothes. This is especially important when sewing clothes, where sleeves are one of the main design elements.
There are several main lines on the pattern that help determine the size and shape of the armhole:
- Base line of the neck. Runs along the base of the neck. It helps determine where the armhole begins.
- Shoulder line. It passes through the middle of the shoulder. It helps determine the width of the armhole.
- Chest line. It runs through the center of the chest. It helps determine the depth of the armhole.
To use the Armhole pattern, follow these steps:
- Prepare the fabric. It should be even and smooth.
- Place the pattern on the fabric. It should lie so that the base line of the neck is parallel to the edge of the fabric, and the shoulder line is perpendicular to the edge of the fabric.
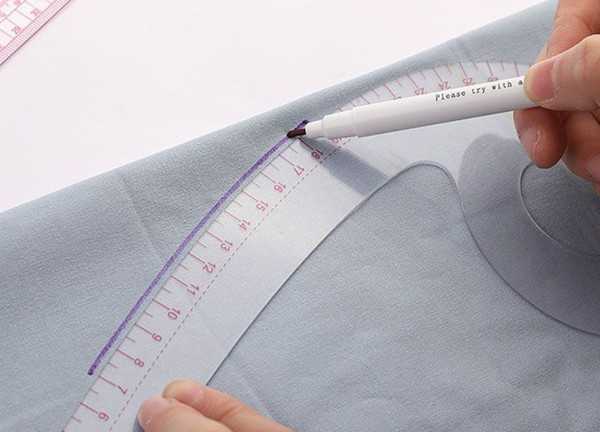
- Trace the pattern. You can use chalk or a tailor's pen with disappearing ink.
The “Armhole” pattern has several modifications, which may differ in shape and size.
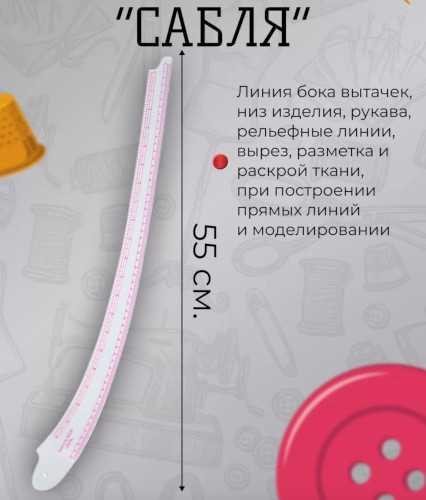
"Barrel" ("barrel", "saber")
This is a tool used by tailors to create patterns and design clothing. It is a curved metal or plastic profile with several holes that allow you to adjust the size and shape of the pattern.
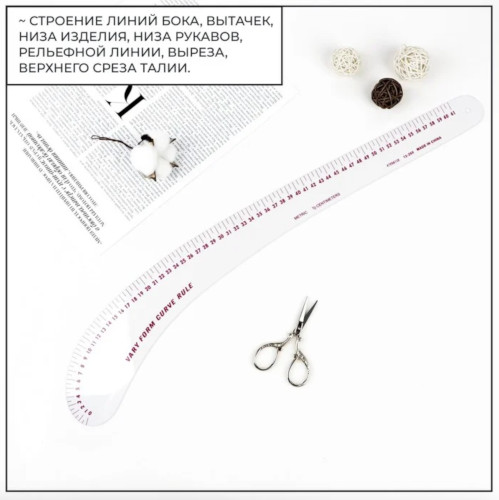
"Barrel" has several characteristic features:
- curved shape that allows you to easily trace the contours of the figure and create complex silhouettes;
- holes for adjusting the size and shape of the pattern;
- markings in centimeters that help the tailor accurately determine the dimensions of the pattern pieces.
The tailor's pattern "Barrel" is used to create various types of clothing, such as
- dresses;
- skirts;
- trousers;
- blouses.
It allows the tailor to quickly and accurately create patterns that match the individual features of the client's figure.
To work with a pattern, a tailor uses the following steps:
- Selecting the pattern size. Selects a pattern that matches the client's size.
- Adjustable size and shape. Adjusts the size and shape of the pattern using holes.
- Outline the outline of a figure. Traces the outlines of the template to create a pattern.
- Creating pattern details. Creates pattern pieces based on a traced outline.
- Transferring the pattern onto the fabric. Transfers the pattern onto the fabric using chalk or a special pencil.
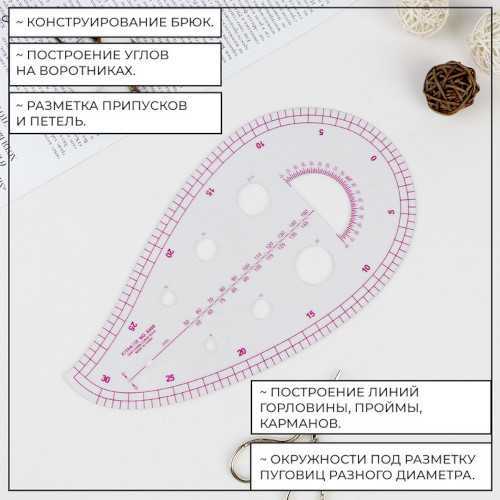
"Drop"
The pattern has a drop shape with a pointed end and a wide base. It is used for modeling conical skirts, trousers and other items where a smooth transition from a narrow part to a wide one is required.
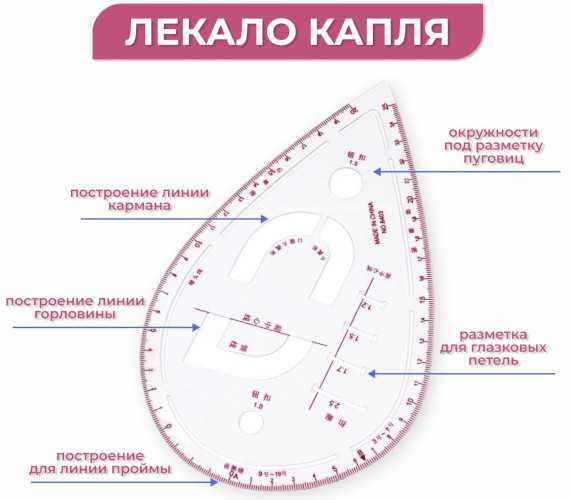
The tailor's pattern "Drop" is made from various materials such as plastic, wood or metal. It can be made in various sizes to suit different styles of clothing.
The use of the "Drop" tailoring pattern allows tailors and clothing designers to create complex and elegant styles that require precise conformity to the contours of the figure. This pattern is an indispensable tool for professional tailors and clothing designers.
Advantages of the tailor's pattern "Drop":
- ease of use;
- versatility;
- accuracy;
- the ability to create complex designs.
Using the tailor's pattern "Drop" includes several stages:
- Preparation. Before you start working, you need to make sure that the pattern is not damaged. You should also prepare the fabric, scissors and other necessary tools.
- Measurement. It is necessary to measure the parameters of the product for which the pattern will be used. Record the obtained values.
- Transfer. Place the pattern on the fabric so that its shape corresponds to the desired line. Secure with pins or other fasteners.
- Examination. Check whether the finished part corresponds to the desired shape and size. Make adjustments if necessary.
Flexible
This is a tool used by tailors to create patterns and check the fit of garment parts. It is a flexible plate made of rubber, silicone or plastic.
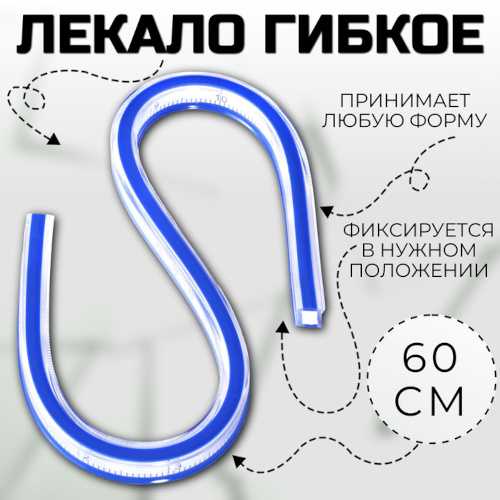
A flexible tailor's pattern has a number of advantages over other pattern-making tools, such as paper or cardboard:
- High precision. The flexible template allows you to create shapes with high precision, making it an indispensable tool for creating complex objects.
- Flexibility. It can take various shapes, making it a versatile tool.
- Ease of use. The process of using flexible template is relatively simple, making it an accessible tool for engineers and designers.
Basic steps of use:
- Preparation of material. Before you start using the pattern, you need to select the fabric to create the pattern and prepare it for work. You will need scissors and pins to secure the fabric in place.
- Attaching the pattern. Place the flexible tailor's pattern on the cut fabric. Make sure the lines match the grain of the fabric.
- Determination of sizes. Using a ruler or measuring tape, determine the required dimensions of the pattern pieces. Carefully measure the length, width and other parameters, marking them.
- Transferring the shape to the fabric. Using a special pencil or soap, transfer the shape and contours of the pattern pieces onto the cut fabric.
- Cutting out parts. After checking, you can cut out all the necessary pattern elements.
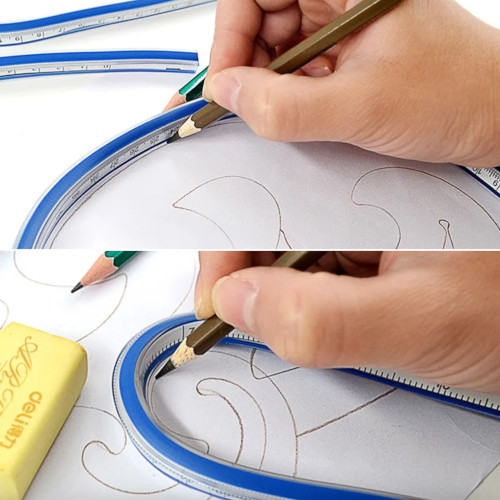
When using a flexible tailor's pattern, the following rules must be observed:
- Do not bend the pattern too much, as this may cause it to become deformed.
- Do not use to cut fabric as this may damage it.
- Store the pattern in a dry place: this will help prevent damage.
By sewing stage
- Working patterns. These are the basic templates that are used to construct pattern drawings. They can be made of paper, cardboard or plastic. Working patterns must be accurate and correspond to the dimensions of the product.
- Control patterns. They are used to check the correctness of the fabric cutting. They can be made of a denser material, such as wood or metal. They must correspond to the working patterns.
- Fitting patterns. These templates are used to try on the garment on the figure. They can be made of a softer material, such as felt or felt. The fitting patterns must exactly match the measurements of the figure.
By form
- Rectangular patterns. Used for cutting straight pieces of clothing such as trousers, skirts, etc.
- Round patterns. Used for cutting round parts such as sleeves, collars, etc.
- Oval patterns. Used for cutting oval shaped pieces such as pockets, flaps and the like.
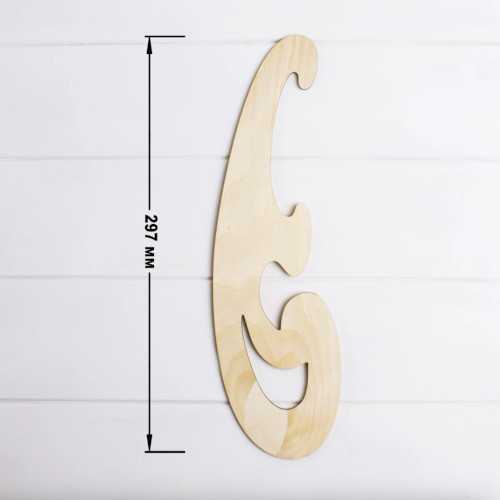
- Figured patterns. They can have any shape depending on the design of the product. Figured patterns are used to cut out complex details such as stand-up collars, scalloped cuffs and similar.
Creation of tailor's patterns
A tailor's pattern can be created for various elements and parts of a pattern, such as:
- pockets;
- darts;
- collars;
- sleeves and others.
What materials are they made of?
Dressmaking patterns can be made from a variety of materials, each of which has its own unique properties and characteristics.
| Name of material | Brief description |
| Paper | This is the most common material for tailoring patterns. Paper can be of different thickness and quality. It is easy to process and allows you to create complex shapes. However, the paper is not very durable and can deform when wet. |
| Plastic | Plastic patterns are stronger and more durable than paper ones. They do not deform when wet and do not tear. However, plastic patterns can be more expensive than paper ones. |
| Metal | Metal patterns are the strongest and most durable. They do not deform or rust. However, metal patterns can be very heavy and expensive. |
| Cardboard | One of the most common materials for making tailoring patterns. It is affordable, easy to process, and can be used to create patterns of various shapes and sizes. However, cardboard has some disadvantages: it can be fragile and prone to deformation when used. |
| Tree | Another popular material for tailoring patterns, wood is strong and durable, making it an ideal choice for creating patterns that will be used over and over again. However, wood can be heavy and difficult to work with, making it difficult to use for creating complex shapes. |
| Styrofoam | A lightweight, inexpensive material that is often used to make tailoring patterns. Foam is easy to work with and can be used to create patterns of various shapes. However, it can be less durable than other materials and is prone to warping. |
Depending on the properties of the material, tailoring patterns can have different characteristics. For example, metal patterns are highly durable and long-lasting, but they are also the most expensive. Plastic patterns are also highly durable and long-lasting, but they are cheaper than metal ones.
The choice of material for tailor's patterns depends on their purpose and requirements. For example, to create patterns from thin fabrics, it is better to use paper or plastic, and to create patterns from thick fabrics, metal or plastic.
Paper patterns are the most accessible, but they are less durable and long-lasting.
When choosing a material for tailoring patterns, it is necessary to consider not only its strength and durability, but also its ability to retain its shape and size when used. This will allow you to create accurate and reliable patterns that will serve as the basis for creating high-quality clothing.
How to make it yourself
To do this, you need to follow these steps:
- Selecting a model. Select a clothing model for which you need to create patterns. It can be something simple, like a T-shirt.
- Taking measurements. Measure the figure of the person for whom the clothes will be made. This will allow you to determine the size of the patterns.
- Creating a drawing. Create a pattern drawing based on the measurements and the selected model. Use a ruler, pencil and paper to create clear lines and angles.
- Making a pattern. Transfer the drawing onto fabric or paper intended for tailor's patterns. Use sharp scissors and a ruler to create precise lines.
- Checking the pattern. Try the pattern on your figure to make sure it matches the size and shape. Make any necessary adjustments if necessary.
- Using a pattern for cutting. Transfer the pattern onto the fabric using chalk or a tailor's pencil. Cut out the clothing pieces along the pattern's contours.
Pocket template
This is a tool used by tailors to create pocket patterns on clothing. It is a flat piece of cardboard, plastic or other material that is shaped like a pocket.
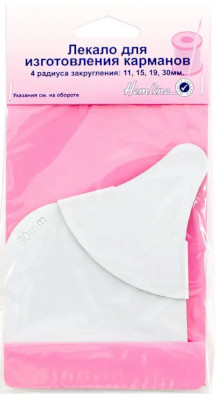
The pattern can have different shapes and sizes, depending on the type of pocket that needs to be created. For example, for patch pockets, tailors use patterns with straight or rounded edges, and for slit pockets, patterns with curved edges.
Tailors use a pattern to accurately determine the size and shape of a pocket and to transfer these measurements onto fabric. This allows them to create pockets that fit the garment perfectly and provide comfort when used.
To create tailor's patterns for pockets, you need to follow these steps:
- Determine the shape and size of the pocket.
- Take measurements of your figure to determine the location of the pocket.
- Create a pocket design on paper or fabric.
- Transfer the drawing onto the fabric intended for the pocket.
- Once the pocket pattern has been created, it can be used to cut out the pocket from fabric.
Tailoring patterns are special templates that are used to create clothing patterns. They help tailors create precise and accurate patterns that ensure high quality of finished clothing. Using them allows tailors to save time and effort, and also ensures high quality of finished products.
Video about tailoring patterns
What types of tailoring patterns are there and what are they used for: