The construction of the armhole affects the correct fit of the shoulder seam, the cut and freedom of fit of the chest section, as well as the correct execution of the sleeve section. The shoulder garment is made based on width and length., which form a neckline of the desired shape. It is necessary for a person to feel comfortable in clothes.
Measuring the parameters is important for subsequent sewing and sewing in the sleeve or forming a neckline for sleeveless clothing models.
Sleeve cutout parameters
The armhole width parameters are the size of the cutout where the sleeve is inserted. The product is limited by two folds along the front and back walls and is supplemented by the parameters of the armpit depth. The size must correspond to the measurements and size of the clothing, and also be parallel to the floor relative to the size of the vertical product.
The armhole width (measured with a ruler) is the width of the sleeve opening down from the armpit point, where the diagonal of the vertical lines from the front and back patterns of the garment is taken into account. The length or height is also indicated by the measurement along the back.
Peculiarities:
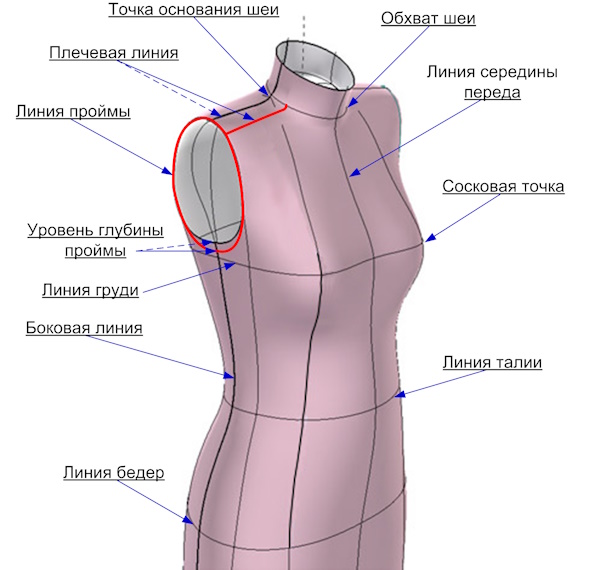
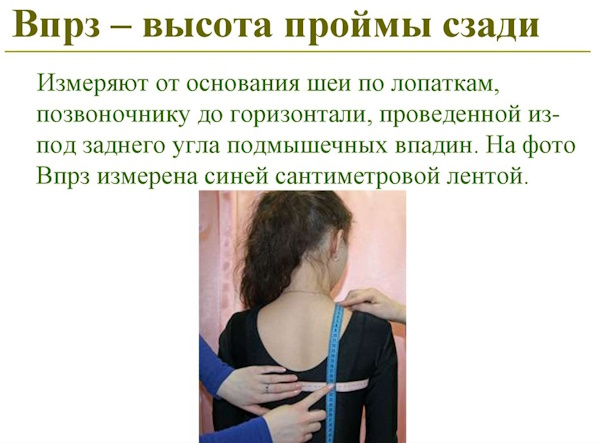
- The armhole starts from the edge of the shoulder cut at the base of the arm.
- You need to measure the armhole to the lower edge of the armpit.
- Relative to the vertical at the base of the neck, the line is drawn horizontally in a straight line to the top point of the armpit at the base of the hollows.
- A horizontal line is drawn with sewing tape along the level of the axillary points.

The parameters of the sleeve cut are measured by several calculation methods, but all of them involve the following actions:
- measuring the armhole size in 2 ways (main and verification);
- sleeve measurements;
- using formulas based on measurements taken.
After receiving the data, all parameters are transferred to the pattern.
Necessary measurements
To calculate the armhole, you need to know the basic parameters of the depth and height of the armhole.
To obtain them, you need to take the following measurements:
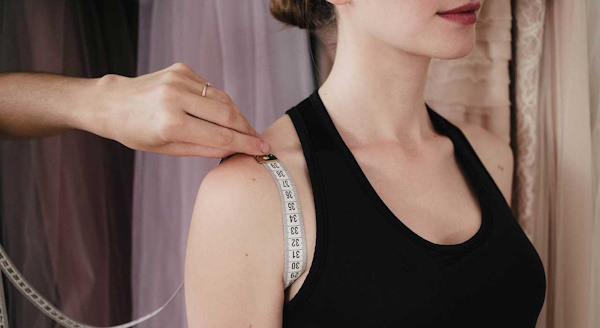
| Armhole width | To measure you need: 1. Clamp a paper strip under your armpit and lower your arms along your body. 2. Use a pencil to mark vertical marks on both sides of the hand. 3. The resulting segment must be measured with a ruler. |
| Armhole depth | To measure you need: 1. Place a paper strip under your armpit so that it reaches your spine. 2. From the 7th cervical vertebra, you need to draw a visual line to the horizontal level of the armhole line. 3. The depth must be measured from the edge of the paper tape to the formed point. |
| Armhole length | Measurements should be taken with a tape measure along the edge of the following areas: ● DP of the upper part of the back; ● DP armholes along the lower section of the back; ● DP of the upper part of the front; ● DP armholes of the lower section of the front.
|
| Vertical diameter | Dpr. can be obtained using the following parameters: 1. The points on the shoulder cuts must be connected with a straight line along the back and front. 2. The segment should be divided into 2 parts. 3. From the center of the division, you need to go down vertically to the level of the armhole. |
| Height of closed armhole | To measure you will need a flexible ruler: 1. First, you need to find the sum of all the lengths along the upper sections of the armhole - DP st. and DP pv. 2. Having placed the ruler at the division point, you need to bend it so that the value of the sum of DP st. and DP pv. is set to the armhole point on the back. 3. Use a pencil to mark the resulting point, and then measure the distance from it to the top point of the arc I to the closed armhole along the line of the beginning of the armhole from the bottom along the back. |
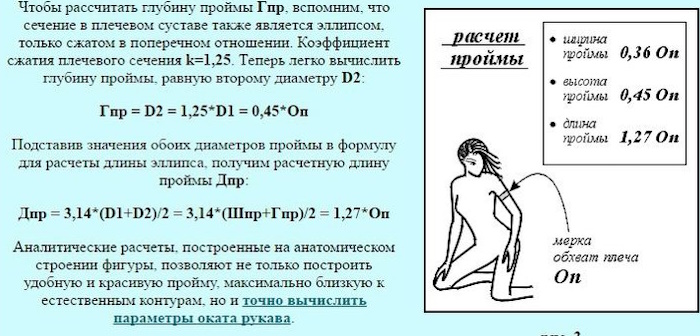
The height of the armhole is another parameter that needs to be measured using the obtained Dpr.
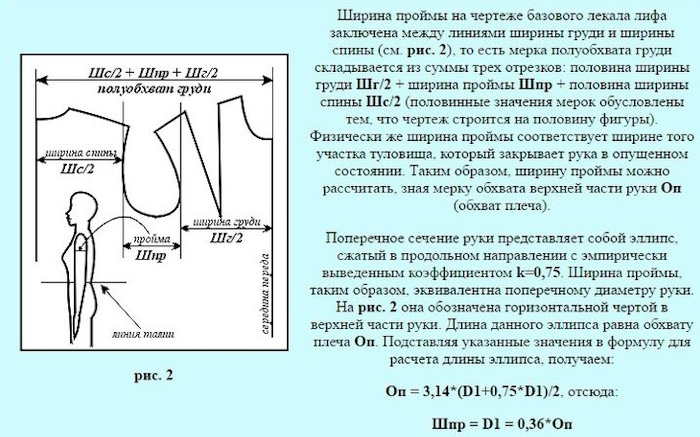
The armhole width (the parameter can be measured using a ruler, after which formulas can be used for more accurate calculations) can be obtained using other calculation methods.
According to generally accepted values, any sleeve width is the sum of two values (the diametrical measurement of the front and back of the arm). It is also important to consider allowances - this is a visual construction of the pattern of the main mesh drawing of the shoulder. The drawing grid is needed only when precise and individual measurements of the sleeve are required.
If the values in the measurement tables differ, it is necessary to use the calculation formulas:
- From the starting point, you need to draw a line to the right along the width of the back.
- Then draw a line from the shoulder construction to the front piece.
- The resulting armhole width should be checked by trying on.
- The sleeve diameter may differ from the specified parameters, but cannot be less than the required value.
It is necessary to take into account the table values in constructing the sleeve pattern, the features of the set-in shoulder, the measurements for the cut, the features of the neckline and the types of sleeves. Modeling patterns allows you to get more accurate and detailed data that will help collect marks for the successful creation of the armhole of the shoulder product.
Rules for taking basic measurements
To correctly take all measurements for cutting and constructing shoulder garments, a number of conditions must be met:
- The person being measured must maintain their usual body position, without trying to maintain posture or change body position only at the moment of taking measurements.
- The arms should be lowered along the body, relaxed.
- The distance between the feet should be kept within 20-25 cm.
- During measurements, the model must be dressed in underwear or thin cotton fabric.
- The chest line should be parallel to the floor level.
- The shoulder direction should be horizontal or strictly vertical.
- The neck mark should be measured in a calm position.
- The distance between the shoulder blades is also measured in a free position without tightening clothing around the body.
- All circumference measurements must be divided in half.
- The free fit parameter is not taken into account, as are the spare cm.
- The circumference of the wrist, shin and knee are measured in full without division.
When measuring armhole length and width, it is important to remember the features of the human body constitution. All measurements are individual and do not always coincide with generally accepted table standards.
Calculation of parameters
You can measure the base of the shoulder product for any type of clothing by constructing a drawing grid. For example, a loose-fitting dress with a standard sleeve will be taken. The armhole width must be calculated using the base grid so that the sleeve fits different sizes of the product. The design calculations include basic parameters that will be needed for a specific garment.
| Plot design | Separation of the measurement of the SgSh by segments | Increases in Pg by segments | Formula | Calculation | Output, cm |
| Width AoA1 | SgSh | Pg | SgSh + Pg + offset parameter for the back line of the average value at the point of the armhole depth ⅓ TT1 | ||
| Back width AoA | Shs | Pshh | Shs + Pshs | ||
| Shelf width A1A2 | Shg + difference Cg2-Cg1 | Pshp | Shg + difference (Sg2-Sg1) + Pshp | ||
| Armhole width AA2 | Сгш — Шс — (Шг + difference Сг2-Сг1) | Pg - Pshs - Pshp | AoA1 - the sum of AoA and A1A2 or Crsh - the sum of Shs and Pshs | Control fitting | |
| AA2 + A1A2 + AoA |
In the preliminary calculation, you can see whether all the design features of the product are built correctly, taking into account the measurements, increases and decreases. There is also a standard data table, which indicates the parameters of the armhole width for different types of products, as well as the armhole size relative to each chest circumference OgSh.
| Type of clothing | Bust girth | |||
| 84 | 88 | 92 | 96 | |
| Dress | 10.8 | 11.9 | 12.2 | 13.4 |
| Jacket | 11.8 | 12.5 | 12.9 | 13.5 |
| Coat without lining | 12.4 | 12.8 | 13.7 | 14.2 |
The table shows the minimum values for taking into account the armhole width. For standard figure types, items with set-in sleeves belong to the 2nd density group. For other sizes, each previous value should be increased by 4 units. For larger items, the armhole width should be increased by 2 cm.
If the product belongs to the 1st density group, the armhole width should be reduced by 0.3 cm. For non-standard figures, the value should be increased for each subsequent size by 0.5 cm relative to the shoulder circumference Op.
For set-in sleeves
The armhole width (the parameter can be measured and adjusted only after trying it on) for a set-in sleeve is determined by the features of the construction of a shoulder garment with a low collar. To do this, you need to adjust the values of all measurements - a third of the armhole height and ½ of its length are required.
| Dimensional feature | Designation | Parameter |
| Armhole height | Vpr | 39.5 |
| Armhole length | DPR | 46.2 |
| Sleeve length | Dr. | 21 |
| Armhole width | Shp | 11.8 |
| Sleeve width at bottom | Shrn | 31.1 |
To construct a drawing with a set-in sleeve, you need to complete the following steps:
- From the main point O, a line should be drawn to point K with a length of ⅓ from Bpr, and then 1.5 cm should be subtracted from the result.
- From point K, a segment must be drawn down to point Ndruk if the structure includes a cuff. The resulting value must be set aside.
- Next, from point H, you need to draw a line to point H1, 1 cm long. Point H1 is an adjustment for cutting the bottom, which may be needed.
- Next, from point H1, you need to measure the Shrn measurements in both directions by ½ of the value. Consequently, you will get points H2 and H3.
- From point K, lines need to be drawn to the right and left for a reserve of an arbitrary value. Points K1 and K2 will become auxiliary. In the pattern base, their length reaches 19-21 cm.
- From point O, you need to lay ½ the length from the value of Dpr diagonally to the intersection point of lines KK1 and KK2. You need to get an additional 2 lengths on both sides.
- The original points K1 and K2 can be erased or adjusted to the new points obtained from the previous step.
- Next, you need to connect K1 and K2 with H2 and H3 to get slanted side lines for the sleeve.
- The segments K1O and K2O should be divided into 4 parts. As a result, k1-k5 will appear. Then you need to put off another 0.7-0.9 cm diagonally inside the drawing to get point P.
- From k1, a line should be drawn upward to point k2 with a length of 0.6-0.9 cm to form P1.
- From k2 it is necessary to draw a line up to P3 with a length of 1.6 cm.
- From point k3, a line 2.3 cm long should be drawn up to P4.
- From k4 you need to draw a line again to point P5 with a length of 1.4 cm.
- Through points K1, P, P1, P3, O, P4, P5, k5, K2 you need to draw a line to design the armhole of the set-in sleeve.
- Line H2H3 should be divided into 6 equal parts to obtain points H4-H7. From H4, a 0.6 cm long segment should be drawn inside the sleeve and point H1 should be marked.
- From H5, you should measure a distance of 0.6 cm down.
- From H6 down, draw a line to point H2, 1.3 cm long.
- From H7 you need to draw a 1.1 cm line to mark H3.
- The sleeve line will be drawn through points H2, H2, H, H2, H3, H3.
The armhole width (the distance can be measured using ready-made designs and individual changes can be made) is obtained without allowances. If the ready drawing has bold lines, this means that the design is given taking into account all allowances and reserves. The remaining parameters must be supplemented individually. The angle of the side lines will also depend on the initial width of the sleeve at the bottom. The diagonal of the armhole for the lower cut can change due to the built-up lines at points p-p5 and h-h4.
Measuring the armhole parameters for dresses, coats, cardigans and other types of clothing allows you to accurately determine the fit of the shoulder garment. Basic patterns may provide additional calculations for changing the direction of the sewn-in sleeve. The depth and width values can be calculated independently or taken from a table of ready-made values if the garment is sewn exactly according to the design measurements.
Video on how to measure armhole shin
All about armhole width: