Drawings on the theme “The beauty of the native land” will help children not only develop artistic skills, but also broaden their horizons. To conduct the lesson, adults must prepare all the necessary materials and tools, as well as select an image to copy and read several step-by-step master classes.
How to display an idea in a drawing
Before conducting classes with children, adults should tell how the nature of their native land differs from other regions and countries. The child needs to be shown what trees can be found in local forests, and also to examine the most common types of grass, flowers, birds and animals. It is also important to introduce the child to the features that exist in their native land, for example, waterfalls, large lakes or rivers, or nature reserves.
After getting acquainted with nature, it is advisable to offer the child to draw the beauty of his native land as he imagines it, taking into account the knowledge he has acquired. If the child has difficulty in setting up a composition, for example, he can be offered photographs depicting landscapes similar to the local ones, or together you can select pictures to copy.
What you need for drawing
Artists create a pencil drawing, whether in color or black and white, in 3 stages:
- sketch;
- drawing details;
- shading (coloring).
The table shows the types of pencils that are suitable for drawing beautiful landscapes:
| Pencils | Description |
| Simple | To create sketches, you can use a hard or hard-soft pencil. To draw a landscape in black and white, you will need a set of tools with different degrees of lead hardness (hard, hard-soft, soft, very soft). |
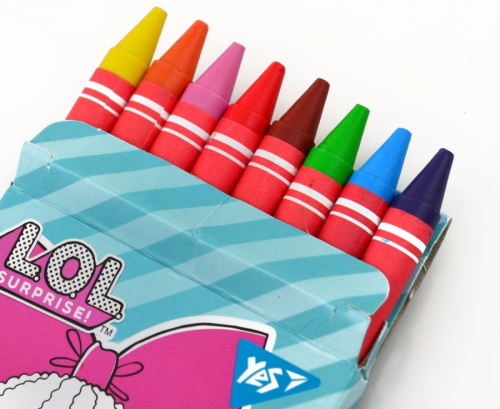
| Colored | Regular colored pencils will help your child master the technique of applying strokes. Small and large sets of tools are sold in craft stores. The more colored pencils in the package, the more colorful the picture will be. |
| Acrylic | The lead of these tools is much softer than that of ordinary colored pencils. The strokes are easily shaded, which allows you to achieve smooth transitions from one color to another. |
| Pastel | The lead of these pencils resembles chalk. The lines are well shaded, but the shades are delicate and translucent. Pastel pencils can be used to draw meadows flooded with sunlight or gloomy night landscapes. |
| Wax | Leaves bright and bold lines. Suitable for creating colorful drawings. |
Pastel and wax pencils often have a larger diameter than regular tools. Therefore, it is advisable to purchase a universal sharpener, which will have several holes of different sizes. You will also need white paper with a smooth surface for work. You can use album sheets, printer paper or sheets for drawing.
It is also important to pay attention to the quality of the eraser. It should not rub the graphite on the paper and crumble too much. Further in the article, you can consider step-by-step instructions for drawing landscapes using different types of pencils.
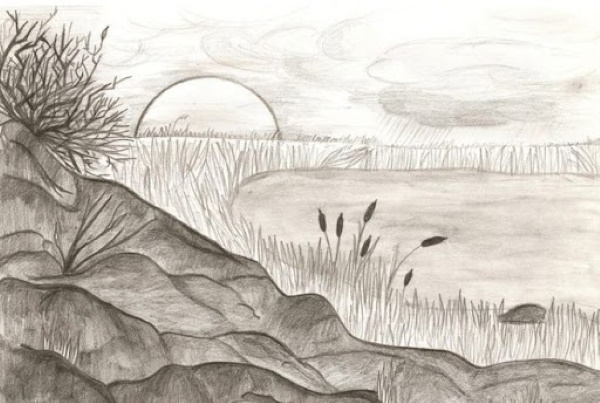
Black and white landscape with simple pencils
The beauty of the native land (pictures for older children should be more detailed) can be reflected in the picture not only in color, but also in the features of the relief, as well as in the recognizable silhouettes of plants. This picture shows the sunrise over a lake, around which reeds and low-growing bushes grow. If this landscape is similar to the nature in your native land, then you can safely get to work!
How to draw:
- Place a sheet of A4 paper horizontally on the table.
- Find the center of the sheet. Visually divide it in half. With a hard pencil, draw a thin horizontal line. This will be the horizon line.
- Place a dot on the left edge of the sheet, slightly above the horizon line.
- From the lower right corner of the sheet, move up about 2 cm. Connect this mark with the previous smooth line.
- Draw the bumps and lumps in the foreground of the drawing.
- Draw the shape of the lake.
- Draw the rising sun beyond the horizon.
- Draw clouds without pressing on the pencil.
- Draw the branches of the bushes.
- Use an eraser to erase extra lines.
- Use a hard-soft pencil to darken the edges of the lake. Blend the strokes.
- Add some reeds.
- Draw tall grass.
- Without pressing on the pencil, shade the clouds. Blend the strokes well.
- Darken the sun outline slightly. Blend the stroke. For convenience, you can use cotton swabs.
- Shade the bumps and lumps on the front of the drawing. The strokes should be applied in a chaotic manner, and the shading should not be dense.
- Use a soft pencil to outline all the bumps and lumps. Highlight the shadows.
- Highlight shadows. Blend strokes.
- Draw all the branches of the bushes.
- Paint the reeds.
- Use a few light strokes to highlight the solar circle.
Using a very soft pencil, outline the contour of the reed head and also highlight the large branches of all the bushes.
Simple drawing with colored pencils
The beauty of your native land can be depicted in a drawing, having at hand a minimal set of pencils consisting of 6 colors.

How to draw:
- Place a sheet of A4 paper vertically on the table.
- Using a simple pencil, draw a winding river with two smooth lines. In the background, the river should narrow.
- Draw 2 large birches along the edges, as well as 2 bushes, a small spruce and grass on the hummocks. All objects should evenly fill the empty space. There should be no large gaps in the drawing.
- Use an eraser to remove excess lines.
- Use a blue pencil to shade the sky tightly. The strokes should be applied horizontally.
- Shade the middle of the river in the same way.
- Use a blue pencil to outline the contours of the river and shade the remaining gaps.
- Use a brown pencil to highlight the shadows on the clearing. Draw the branches of the bushes.
- Use a black pencil to outline the branches and trunks of the birches. Highlight the patterns on the trunks.
- Use a green pencil to draw the leaves on the trees and bushes. Draw the branches on the spruce.
- Draw the grass, color the meadow.
- Use a blue pencil to draw dark leaves on the bushes and trees. Highlight the large branches of the spruce.
- Use a brown pencil to outline the contours of the river and also draw in the trunk of the spruce.
Use a black pencil to highlight the shadows under the birches and bushes.
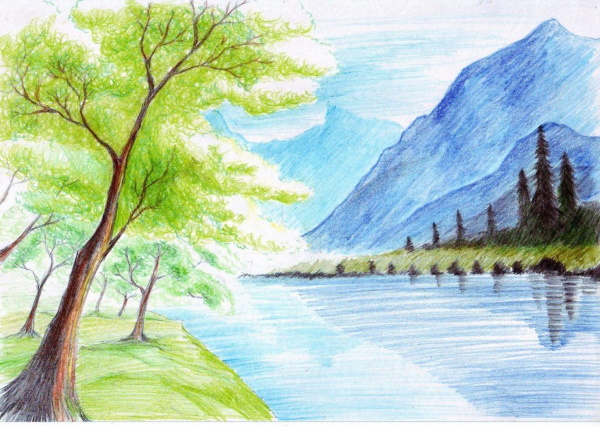
Landscape with mountains, drawing with colored pencils
To create such a drawing you need a large set of colored pencils (12 colors or more).
How to draw:
- Place a sheet of A4 paper horizontally on the table.
- Use a simple pencil to mark the horizon line.
- On the left side of the sheet, draw 1 large tree.
- Draw the shape of the shore.
- Add some trees in the background.
- Draw the shapes of the mountains.
- Mark the location of the tall spruce trees on the opposite bank.
- Use an eraser to erase extra lines.
- Using a dark brown pencil, shade the left side of the trunk of the largest tree.
- Draw large branches.
- Paint over the branches and trunks of the trees visible in the background.
- Use a light brown pencil to color the right side of the trunk of a large tree. The shading should be loose.
- Use an orange pencil to paint over the gaps on the trunk.
- Color the shore with a light green pencil.
- Use a dark green pencil to highlight the shadows on the grass.
- Use a light green pencil to draw the crown of a large tree. The strokes can be in the form of curls or half-arcs.
- Add a few strokes to the crowns of the small trees as well.
- Paint the crowns of the plants in the background completely with dark green. Highlight the shadows on the crown of a large tree. It is not necessary to paint the entire crown. In the picture, you can see large gaps in the upper part of the foliage. These light areas will help highlight the tree against the sky.
- Using a blue pencil, shade the farthest mountain tightly.
- Without pressing the pencil, paint the sky. The strokes should be long.
- Color the centers of the remaining mountains.
- Use a dark blue pencil to show shadows on the nearby mountains.
- Using a light green pencil, loosely paint over the foot of the mountains.
- Shade the gaps with a dark green pencil. Draw the outline of the tall fir trees.
- Use a black pencil to darken the silhouettes of the fir trees. Highlight the shadows on the cliff.
- Without pressing on the pencil, draw the reflection of the fir trees in the water.
- Shade the water with a blue pencil. The strokes should be rare but long. The left part of the water should remain unpainted.
- Use a blue pencil to color the remaining water.
Use a dark green pencil to highlight the shadows at the foot of the mountains. You can add a few black strokes.
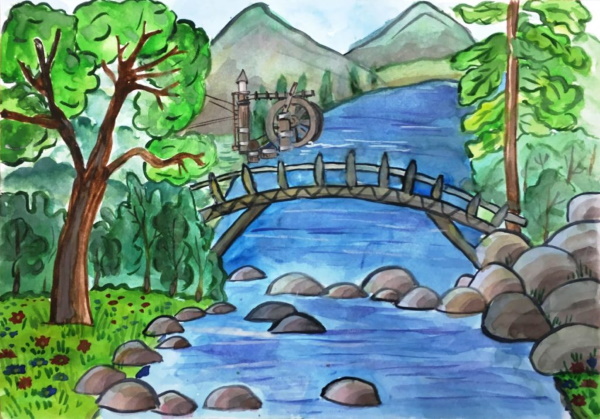
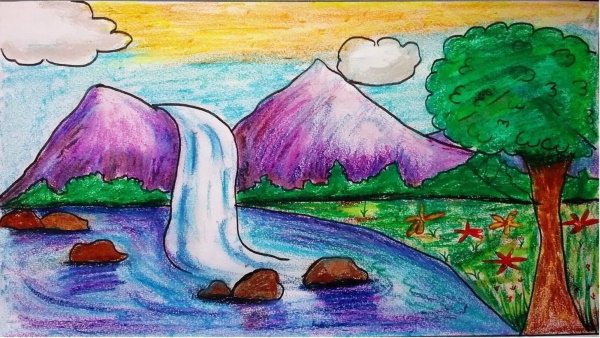
Landscape with a waterfall, drawing with wax crayons
The beauty of the native land (drawings made with wax crayons, you can outline the outline with a black felt-tip pen to make the picture clearer), in the picture, can be depicted as a landscape saturated with bright colors. You can draw such a picture using a large set of wax crayons.
How to draw:
- Place a sheet of A4 paper horizontally on the table.
- Use a simple pencil to mark the horizon line.
- Draw the lake.
- Draw a tree on the right side of the sheet.
- Add mountains.
- Add some bushes at the foot of the mountains.
- Draw 2 clouds in the sky.
- Between the mountains, draw a waterfall that flows into the lake.
- Draw some stones in the water.
- Use a yellow pencil to shade the upper part of the sky. The shading should be loose.
- Use an orange pencil to fill in the gaps.
- Use a blue pencil to color the rest of the sky.
- Use a white pencil to color the edges of the clouds.
- Use a light pink pencil to color the mountains.
- Highlight the shadows with purple.
- Add some dark blue strokes.
- Use a dark green pencil to color the bushes at the foot of the mountains, as well as the crown of the tree.
- Paint the gaps on the tree crown with light green.
- Using a red and yellow pencil, draw several flowers on the meadow and color them in.
- Paint the clearing dark green and add a few blades of grass.
- Color the lake with a blue pencil.
- Use dark blue to highlight the shadows under the stones.
- Add some purple strokes.
- Use a brown pencil to color the rocks and tree trunk.
- Fill in the gaps on the tree trunk with orange.
- Draw waves on the waterfall in blue.
- Use a black pencil to highlight the shadow under the bushes and also under the stones.
Trace the outline of the drawing with a black marker.
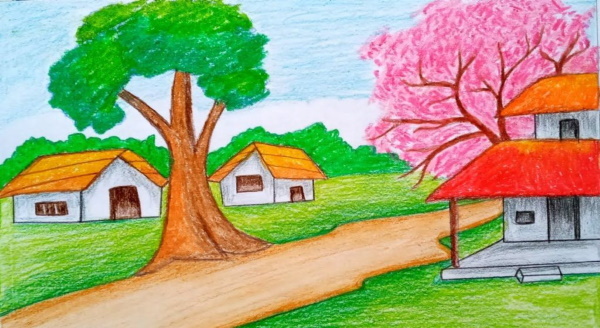
Countryside landscape, wax pencil drawing
The beauty of the native land (drawings can be done looking at a photograph of a real landscape) in the drawing can be depicted not only in the form of a natural landscape. You can depict your street or a village alley.
How to draw a picture like this:
- Use a simple pencil to mark the horizon line.
- Draw the outline of the road.
- On the right side of the sheet, draw a two-story house.
- Draw a tree behind the house and sketch out the shape of its crown.
- Draw a large tree with a thick trunk and large branches near the road.
- Draw a schematic representation of the crown of this tree.
- Draw the rest of the houses.
- Draw windows and doors.
- Draw bushes behind the houses.
- Use a blue pencil to insure the sky, leaving a small space above the bushes unpainted.
- Use a light brown pencil to color the road and the tree trunk.
- Pressing a little harder on the pencil, draw the outline of the road.
- Paint the left side of the trunk of the large tree with orange.
- Highlight the shadows on the tree trunk with a dark brown pencil.
- Trace the outline of the branch trunk.
- Draw the branches of the tree located behind the house, on the right side of the drawing.
- Use an orange pencil to color the roofs of the two houses drawn on the left side of the sheet.
- Color the roof of the second floor of the house located on the right side of the drawing.
- Paint the top of the first floor roof. Shade the rest of the roof with a red pencil.
- Shade the clearings with a light green pencil.
- Use dark green to highlight the shadows along the side of the road, and also to paint over the bushes and the crown of the large tree.
- Use a grey pencil to highlight the shadows on the houses (under the roofs, on the porch).
- Using a light pink pencil, draw the crown of the second tree.
- Using dark pink color, sketch out the flowers.
- Use a black pencil to color the windows and doors in the house on the right side. Outline the walls and porch.
- Outline the walls of the houses located on the left.
Use a dark brown pencil to outline the roofs of all the houses and paint over the windows and doors.
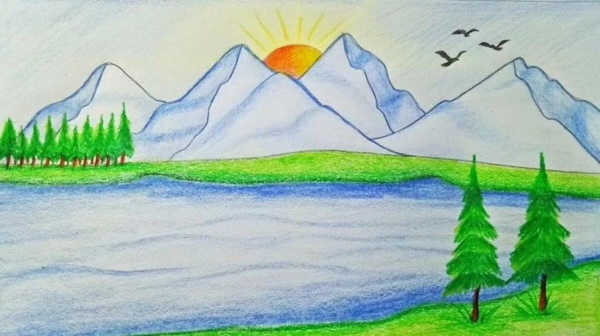
Drawing with watercolor pencils
Using watercolor pencils you can draw a beautiful bright picture.
Step by step instructions:
- Use a simple pencil to mark the horizon line.
- Draw mountains.
- Depict the lake and the fir trees standing on both banks.
- Depict the rising sun between the mountains.
- Draw three birds in the sky.
- Shade the sky with a blue pencil. The strokes should be applied at an angle.
- Use a blue pencil to highlight the shadows on the mountains. Outline the mountains with a dark blue pencil.
- Without pressing the pencil, shade the lake. The strokes should be applied horizontally.
- Pressing a little harder on the pencil, highlight the shadows near the banks.
- Draw waves on the water.
- Color the banks with a light green pencil.
- Highlight the shadows with dark green.
- Draw the branches of the fir trees.
- Draw grass under the fir trees, which are located on the right side of the drawing.
- Use a brown pencil to color the tree trunks.
- Use a yellow pencil to shade the right side of the solar circle and draw in the rays.
- Paint the other part of the sun with orange.
Use a black pencil to highlight the shadows on the tree trunks located on the right side of the drawing, and also paint over the silhouettes of the birds.
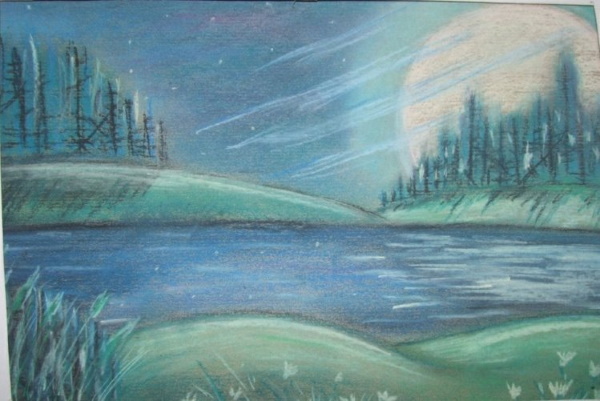
Drawing with pastel pencils
The beauty of the native land (drawings made with pastel pencils must be sprayed with a fixative or hairspray so that the coloring pigment does not stain your hands and does not crumble) in the drawing can be reflected in the night landscape. With the help of pastel pencils, you can convey the beauty of the night forest.
How to draw a picture like this:
- Use a grey pastel pencil to mark the horizon line.
- Draw the distant shores of the lake.
- Outline the shape of the shore in the foreground of the drawing.
- Shade the banks with a green pencil. Blend the strokes thoroughly.
- Using a dark blue pencil, draw the moon on the right side of the drawing.
- Paint the sky and water dark blue. Blend the strokes carefully.
- Using a bright blue pencil, draw the forest located on the distant shores of the lake. The strokes should be applied vertically. Lightly shade the lines.
- Draw blades of grass on the left side of the picture.
- Use a dark green pencil to highlight the shadows on the banks and blend the lines.
- Use a black pencil to sketch out the tree trunks and branches.
- Highlight them on the banks, slightly blend the strokes.
- Show the shadow under the banks.
- Add a few strokes between the blades of grass drawn in the foreground of the picture. Blend these lines.
- Use a dark green pencil to draw the reeds and flower stems.
- Use a grey pencil to draw craters on the Moon.
- Spray the design with varnish or fixative spray. Wait until it dries completely.
- Use a white pencil to draw a few strokes between the trees.
- Draw flowers in the foreground.
- Add a few fine strokes between the large blades of grass and reeds.
- Use horizontal strokes to highlight the highlights on the water. Blend the lines.
- Draw the answer from the Moon.
- Use a light blue pencil to outline the moon and shade these lines away from it.
- Using a bright blue pencil, apply a few strokes to the sky.
- Add a few more strokes with a light blue pencil.
- Use a white pencil to draw a few dots to imitate the starry sky.
Spray the design with varnish and let it dry.
Tips for Beginning Artists
To make your drawings beautiful, you need to know a few secrets:
- It is not recommended to shade lines from simple and pastel pencils with your fingers. It is better to use cotton pads or cotton buds.
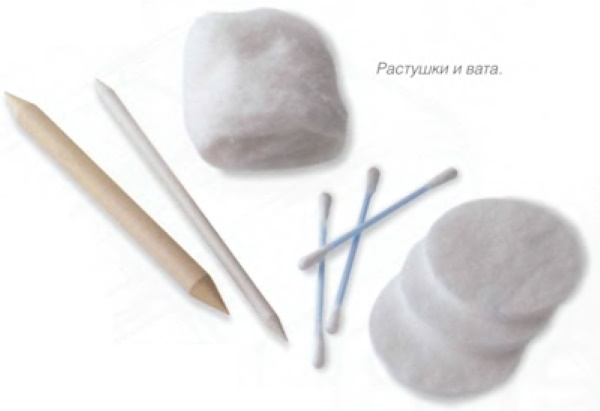
- To get an even tone for the background, such as the sky, you can carefully sharpen the pencil lead with a knife and then rub the crumbs over the drawing with a cotton pad.
- Wax crayons overlap easily, so you don't have to worry about painting the background and then drawing in fine details.
- To draw with white pencil on a dark background, you need to paint the drawing with varnish and wait for it to dry, otherwise the white color will be pale and almost invisible.
It is not difficult to teach a child to depict the beauty of his native land in a drawing. The main thing is to describe to the child the features of the local nature, as well as to think over the composition and select an image for copying.
Video on how to draw your native land
How to draw nature and landscape: