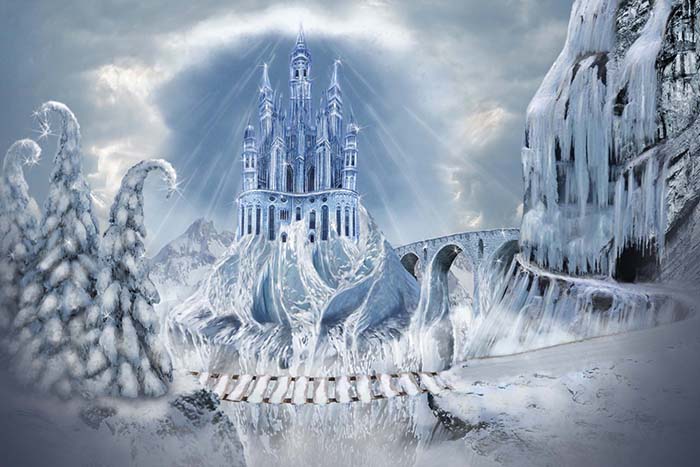
To draw the Snow Queen's castle beautifully, first of all, you need to remember the fairy tale itself. Her palace should be completely saturated with cold, severity and indifference, just like its mistress. Since the castle is located in a hard-to-reach place according to the plot of the fairy tale, it is most often depicted in drawings against the background of impregnable high cliffs.
The style of the drawing should be strict, and the lines should be straight and orderly. The colors are selected accordingly - blue and purple shades, you can also add a little yellow to depict shadows on the snow and light in the windows of the castle.
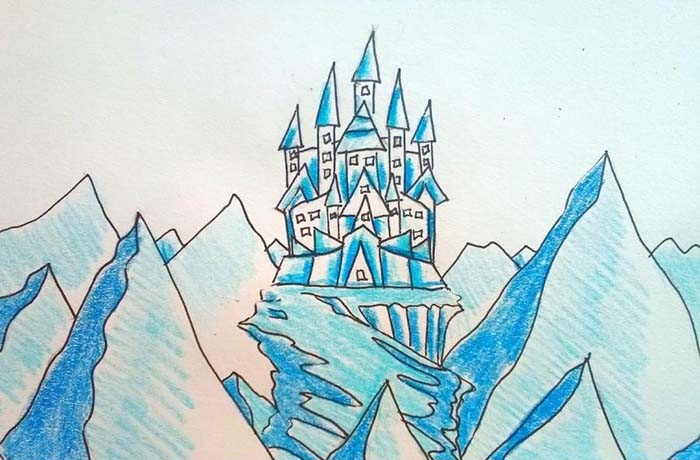
Easy drawing with a simple pencil
The Snow Queen's castle, the drawing of which is considered in this example, is made using simple geometric shapes - rectangular towers and triangular roofs. For younger children, it can be simplified - reduce the number of buildings or remove the detail of the path leading to the palace, depicting it simply on a hill.
To work you will need a simple pencil, a sheet of paper, an eraser, 2 colored pencils - blue and dark blue, a black pen (or a soft black pencil) for outlining the contours.
Below is a step-by-step process for creating such a drawing:
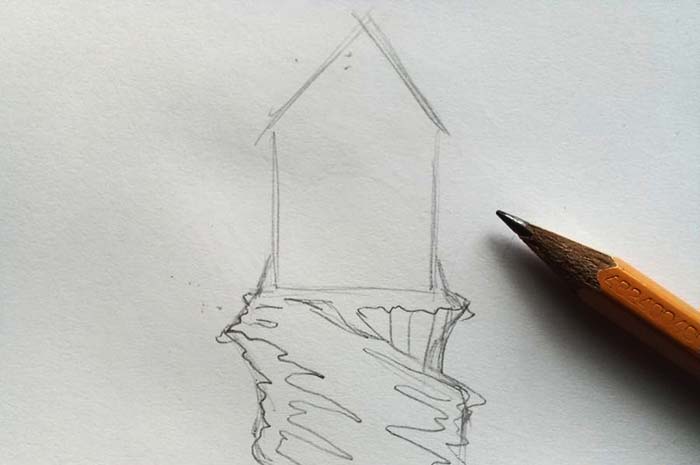
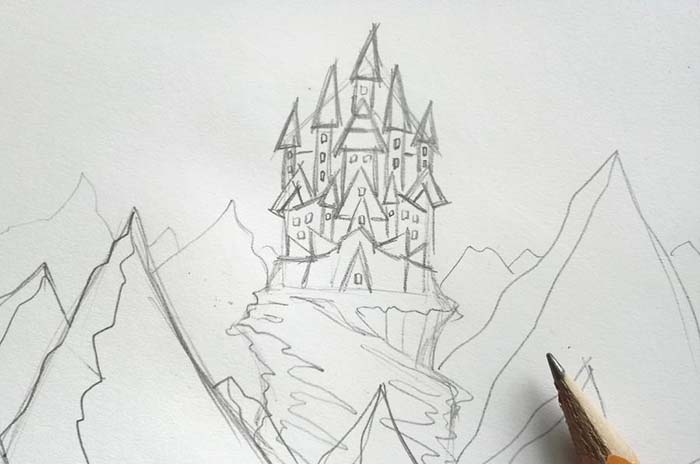
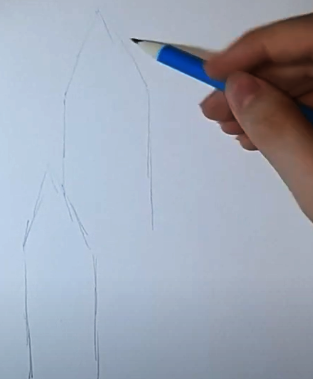
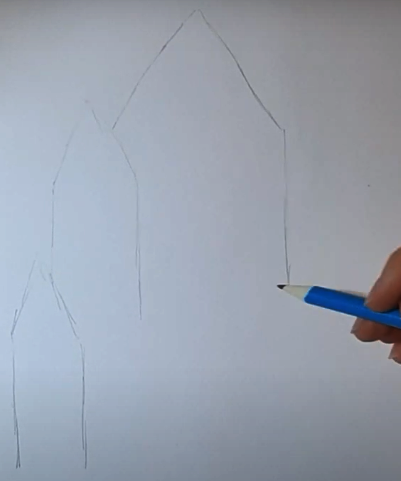
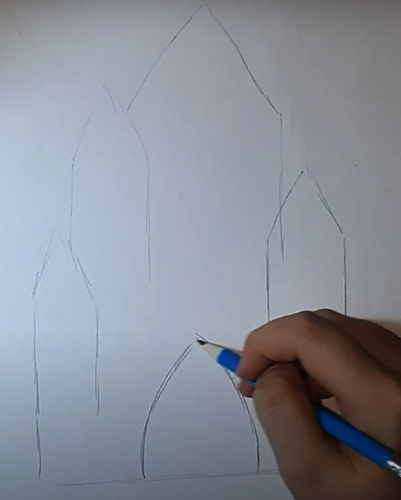
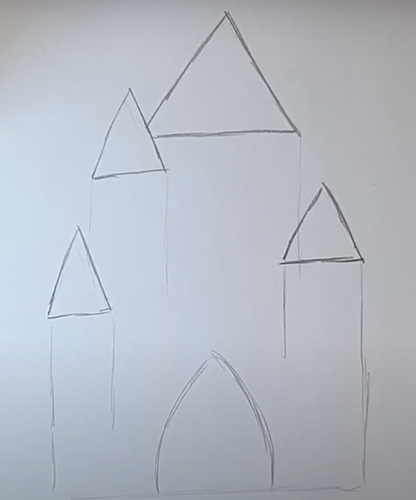
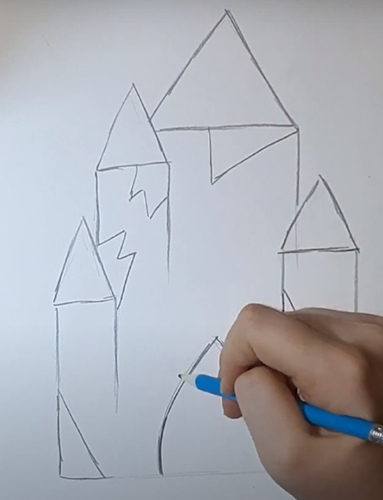
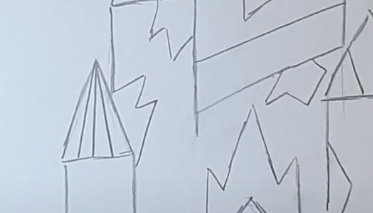
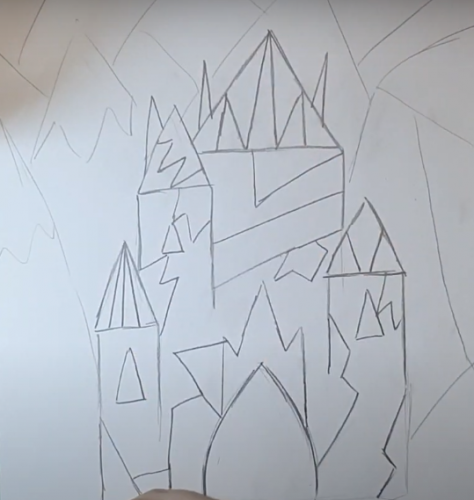
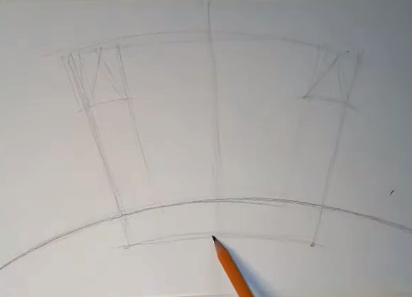
- First, you need to outline the general outline of the ice palace, rectangular at the bottom and tapering at the top. Two curving parallel lines depict the road leading to the castle.

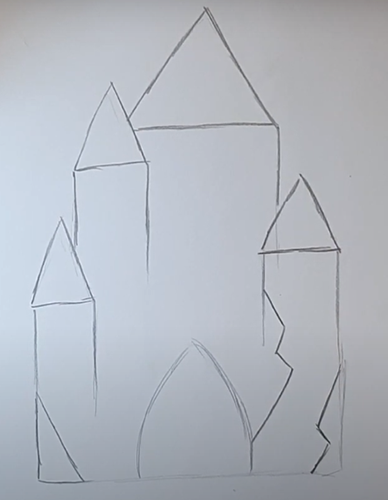
- Then they draw the elements of the road in more detail - they give it volume with zigzag lines, and on the part where the castle itself is located, they draw vertical segments depicting a steep cliff.
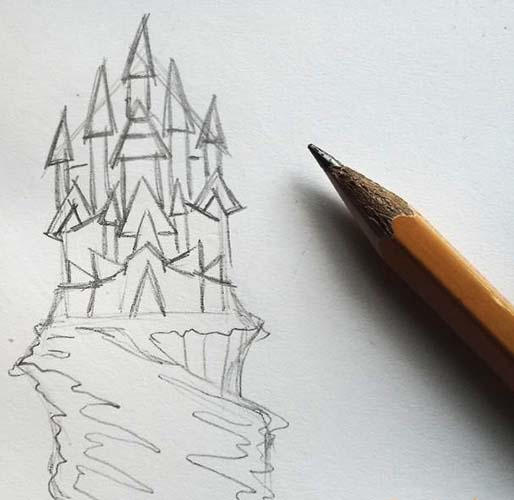
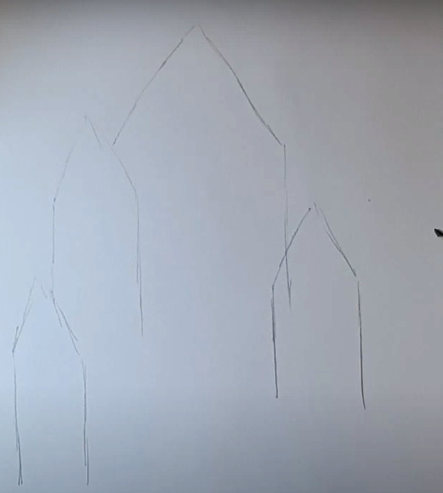
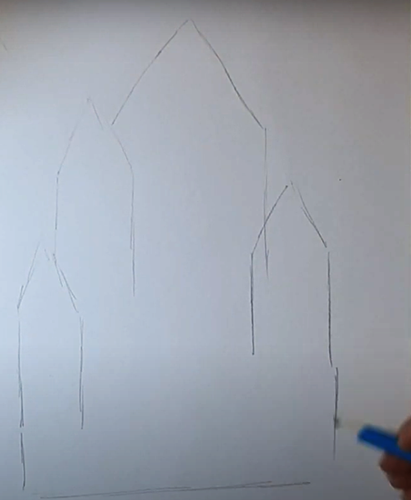
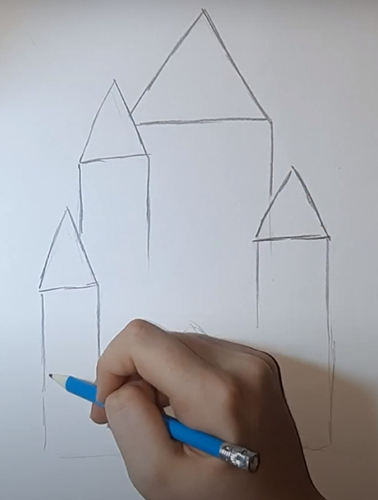
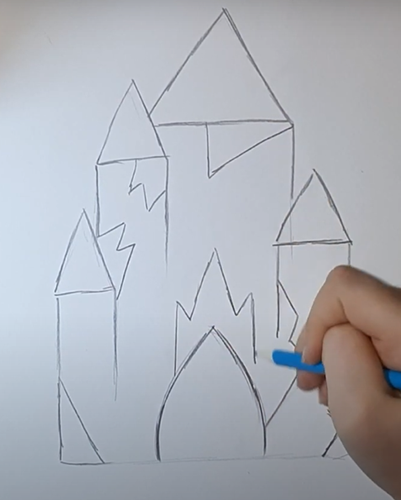
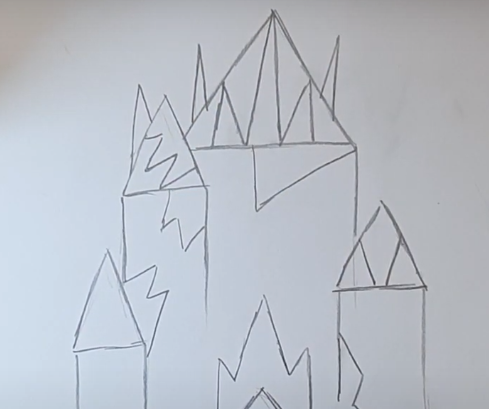
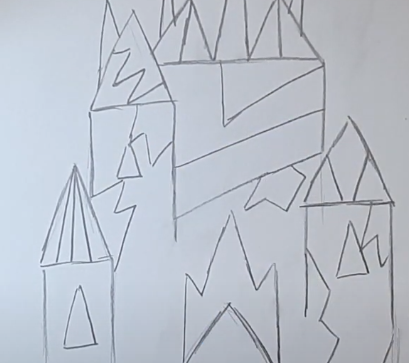
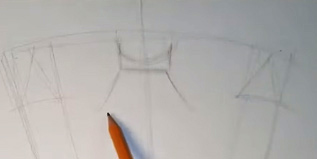
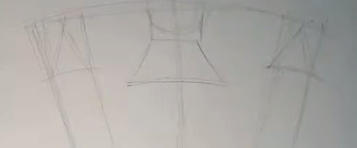
- After this, it is necessary to draw the towers of the ice castle - several small towers are depicted in front, and in the background - high pointed towers, aligned with the previously marked contour. The gate is drawn in the form of a triangle. In order for the structure to acquire a more strict, Gothic style, additional triangular elements can be added.
- The next step is to draw pointed hills to the left and right of the palace. To make them more realistic, the lines should not be completely smooth. On the left side of the hills in the foreground, you need to draw additional edges in the form of broken lines descending from the peaks. These edges will be used to apply shadows and add volume.
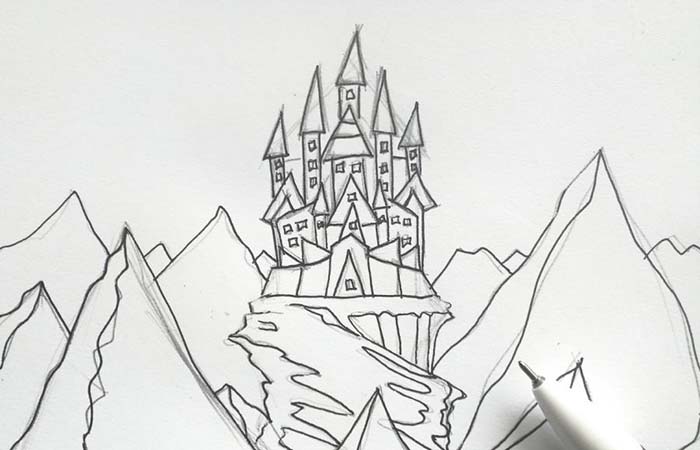
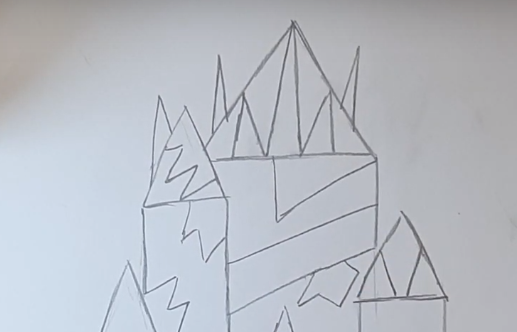
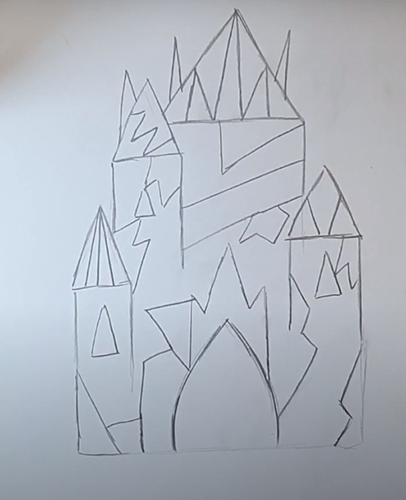
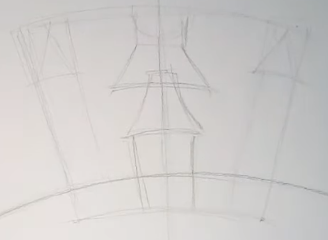
- To make the drawn contours look more geometric and brighter, they need to be outlined with a black pen along the contours.
- At the next stage of work, the drawing is colored with light blue and blue pencil. A darker color is used for the left edges (the lighting falls from the right). The extreme right areas are left unpainted, since the ice and snow sparkle white in the sun.
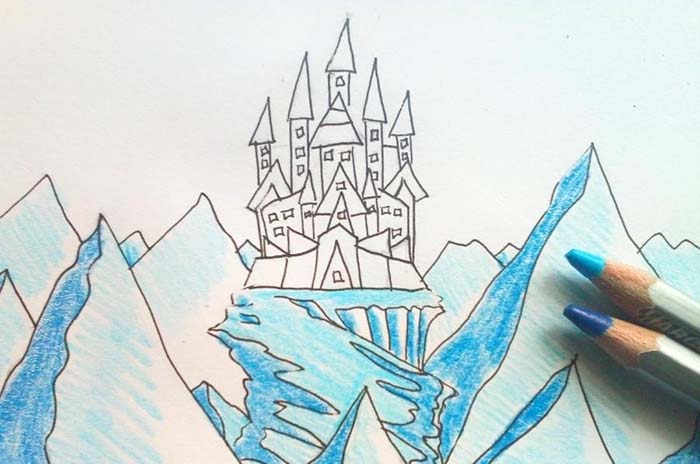

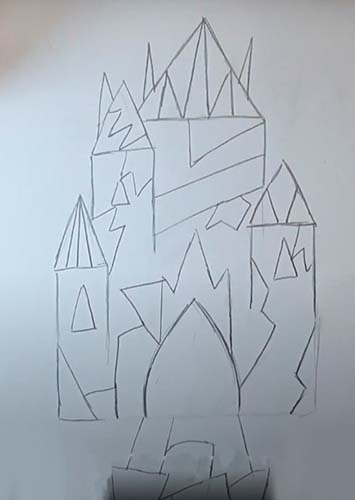
- Now it remains to color the palace itself using the same principle, using a blue pencil to create a volumetric effect and depict shadows.
Drawing with water-based paints
The Snow Queen's castle, the drawing of which will be considered in this example, must first be done in the form of a pencil sketch.
Since the Snow Queen's character is evil, gloomy and cruel, her home should be depicted using "sharp" triangles, rectangles and squares, and cold colors are used for coloring - blue, light blue and violet, which will help convey the mood in her icy world.
For the drawing you will need watercolor, a simple (graphite) pencil of hardness T or TM, an eraser and a jar of water. It is recommended to choose special paper intended for watercolors (it is denser in structure), since the use of this paint implies the use of a large amount of water. Ordinary album sheets will warp a lot.
Step-by-step process of drawing:
- First, you need to outline the general outline of the castle using a pencil. To do this, draw a rectangular tower with a pointed roof in the form of a triangle in the left area of the album sheet. Since the main part of the drawing will be the castle, the figures need to be drawn quite large. It is not recommended to use a pencil that is too soft, since later, when applying watercolors, it can smear and the drawing will become "dirty". Also, do not press hard on the pencil, since in case of a mistake it will be difficult to erase with an eraser. Intensive erasing will damage the top layer of the paper.
- Then you need to draw the same tower nearby, but higher.
- We draw the central chamber of the Snow Queen wider, also with a pointed roof.
- A little lower and to the left you need to draw another tower. This whole composition looks like crystals, the tops of which look up.
- Now we move on to the lower part of the palace – we draw a horizontal line – the base of the structure, and align the vertical walls along it.
- After this, you need to draw the central entrance to the palace in the form of an arch.
- Next, you need to give the castle additional features using sharp angles. First, outline the roofs of the towers.
- Then the walls of the castle are highlighted.
- The Snow Queen's Castle (the design must be geometric) must have zigzag lines on the left and right turrets. It is not necessary to do them exactly as shown in the picture, you can do it your own way.
- Additionally, it is necessary to draw broken lines with sharp angles on the turret on the left and on the central chamber.
- Above the entrance to the palace we will also make a pointed figure, reminiscent of the back of a throne.
- On the central roof, you should draw sharp, long “spikes” of ice.

- Let's add "spikes" to the side turrets.
- On the central tower you also need to draw 2 parallel stripes that will represent a flat ice surface, and a “shard” in the form of a zigzag line.
- On the lower left turret, draw 3 lines from the top to the base of its roof.
- We will also add triangular windows in the center of the narrow towers.
- To the left of the arch, depict “blocks” of ice by drawing several segments.

- The result will be an outline drawing as shown below.
- Then secondary details are drawn - the road to the castle, the mountains and the sky. The road from the arch is depicted in the form of figures with straight sides. They are drawn in random order.
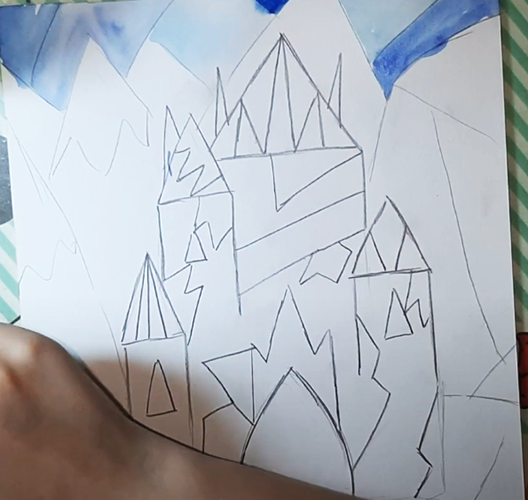
- In the background, pointed mountains are drawn at the top, and the peaks are indicated using zigzag lines.
- Now we begin to paint with watercolors. Before this, you can erase the pencil lines a little with an eraser so that the graphite does not stain the drawing. You need to use "cold" colors - blue, light blue, dark blue, violet. First, paint the background with light blue.
- Directly next to the outline of the castle, you need to paint the background in darker shades of blue.
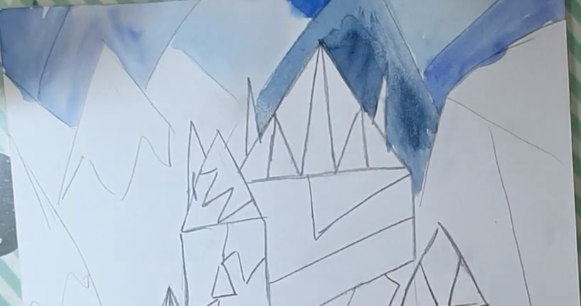
- The tops of the mountains are painted light blue, and below them – blue. In order to get pure shades, you need to change the water in the jar more often. It is recommended to do this every time there is a transition to a new shade, for example, from purple to blue.
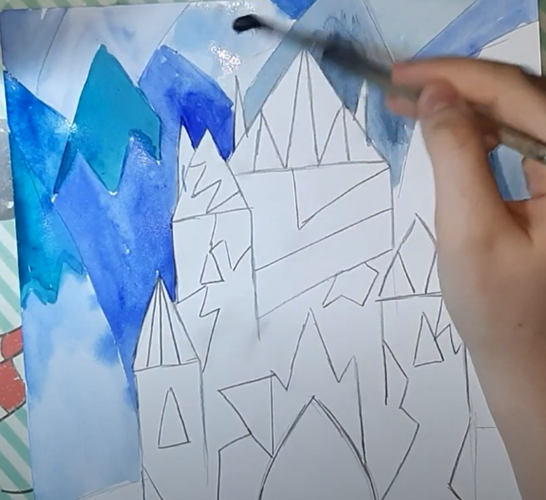
- Next, they begin painting the castle. The roof of the central chamber is made dark blue, and the spikes are blue and purple. Mixing paints on the palette, they get different shades for the castle details.
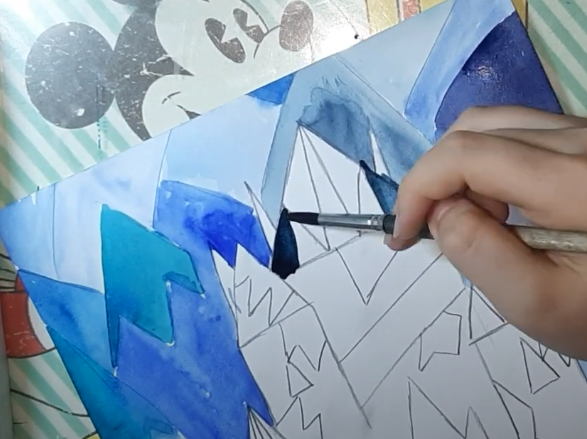
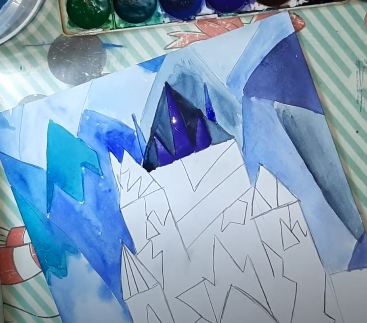
- For the side towers, choose darker and more saturated colors. Since watercolor paint requires a lot of water, you need to try to ensure that the brush does not "rub" the same place on the paper, as this will lead to its peeling and the formation of pellets, spoiling the appearance of the drawing. The same effect occurs when working with a dry brush, so you need to add a sufficient amount of water to the paper.
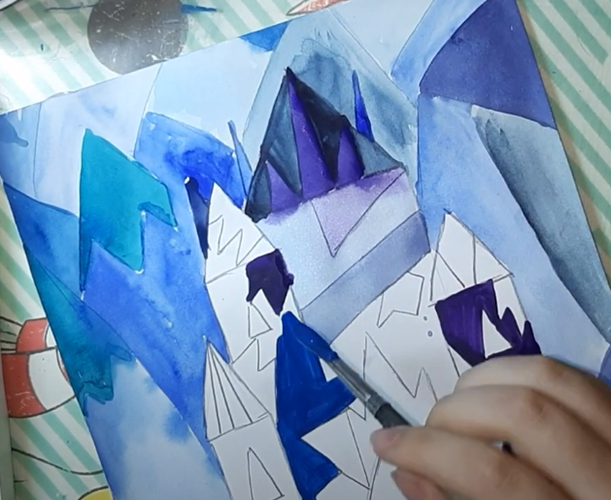
- The spikes on the turrets and above the entrance to the castle are painted light purple. You can also choose your own shades. To prevent the paints from spreading and mixing with each other, you should let them dry for a few minutes on the painted area. To get an even color, the paint should be distributed over the area quickly enough. Otherwise, you will have to blur it with additional water. You can also add more water in advance, then the paint on the paper will dry more slowly, and the artist will have more time to distribute it.
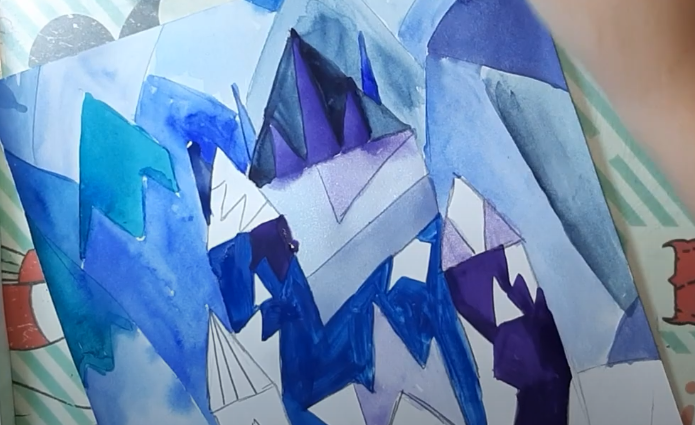
- The "shards" on the towers and windows need to be painted blue, and the roof of the left turret - blue and purple.
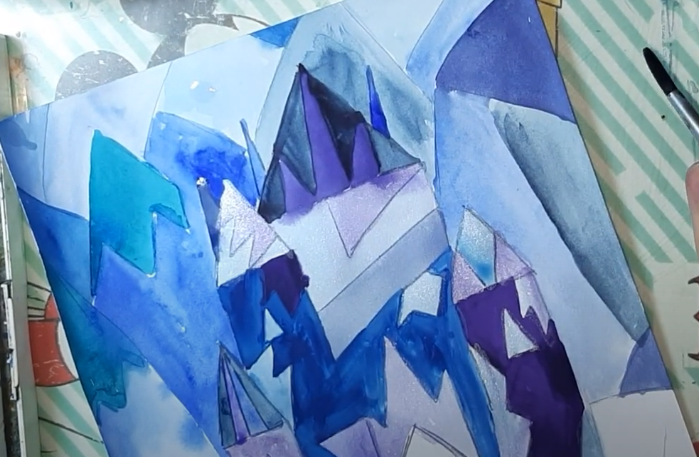
- We will also use blue shades in the foreground.
- At the final stage, the contours are outlined with a black marker.

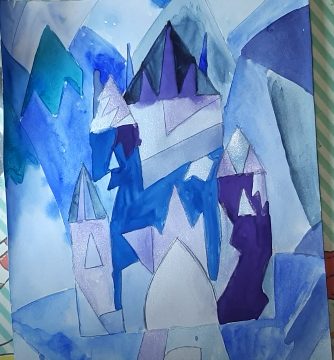
The Snow Queen's Castle, done as a watercolor painting, conveys the "icy" character of the Snow Queen's palace, since such paint is by definition created to be transparent. The white color in this case is the paper, which should shine through the layer of paint. You should not try to make a thick, opaque layer of watercolor, since this gives the drawing a heavy look.
Gouache
The Snow Queen's Castle, the drawing of which is considered in this example, is painted using gouache. The peculiarity of such paints is that the paper does not shine through them as much as when using watercolors. They can be used for both oil painting and watercolor painting (with strong dilution with water).
Gouache is brighter than watercolor, so children like it. However, it is used not only for children's drawings, but also for professional ones.
For work you will need gouache, brushes, a jar of water, a simple pencil, an eraser and thick paper. For drawing with gouache it is best to choose brushes made of synthetic materials. As a reference you can use a printout of this picture or take another ready-made illustration from the Internet.
Before you start working, you can fix the drawing on the table with sticky paper tape. After removing it at the end of the drawing, you will get a ready-made white frame.
So, here is the step-by-step process of creating a castle:
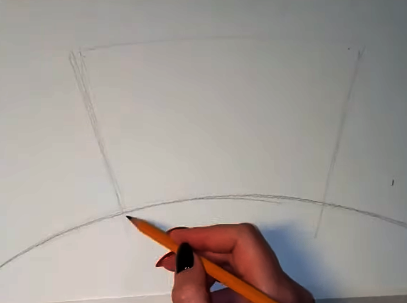
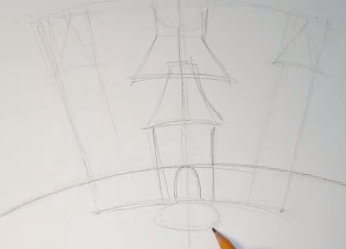
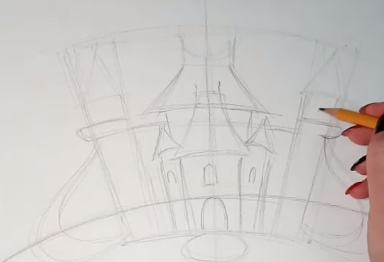
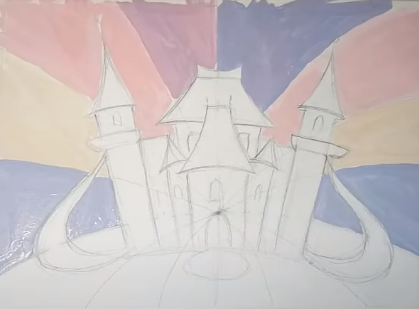
- First, you need to mark the upper and lower borders of the castle outline with a simple pencil.

- Next, we will draw a spherical horizon line to give the drawing a “magic” effect.

- The side contours of the castle will also be slightly beveled in accordance with the spherical perspective. In the drawing, you need to draw 2 inclined lines on the left and right. You will get a figure in the form of a trapezoid.
- After this, narrow turrets and their triangular roofs are outlined on the left and right with a simple pencil.
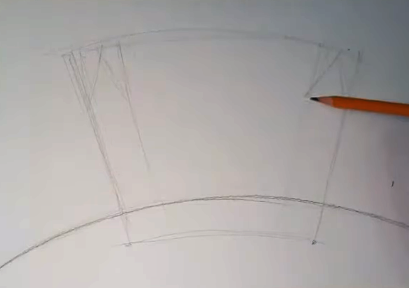
- For ease of drawing and to obtain symmetrical contours, you can also mark a vertical line in the middle of the composition.
- Next, in the upper central part of the drawing, you need to draw an arc directed downwards (this will be the balcony in the castle) and outline the roof using two inclined segments. The lower part of the roof needs to be drawn in the form of an arc, like the shape of the hill on which the palace stands.
- Then draw the lower central turret with a roof, as shown in the photo below.
- The entrance to the palace will be located in this tower. Next to the entrance, you need to draw a porch in the form of an oval.
- Above the entrance to the castle they draw a window of an elongated shape, and on the left and right sides there are extensions in the form of narrow towers with triangular roofs.
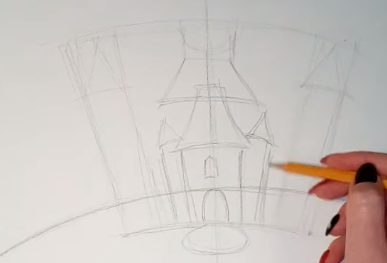
- We will also draw smaller windows on them.
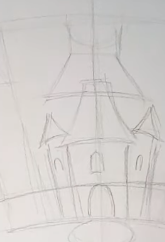
- Outside the castle, on the left and right sides, you need to draw large arcs that will represent the stairs. The top of the stairs does not reach the roofs of the towers. You should also try to draw them symmetrically relative to the central axis.
- Next, balconies are drawn on the side towers, to which stairs will lead.
- Slightly above the balconies drawn in the previous stage, windows are depicted, and the roofs of the towers are made more pointed.
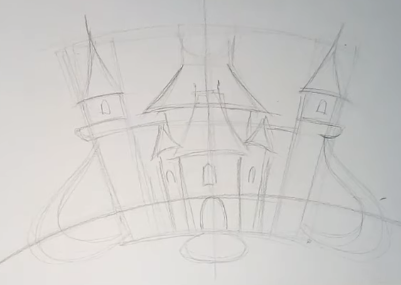
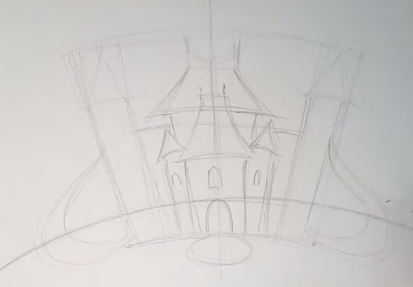
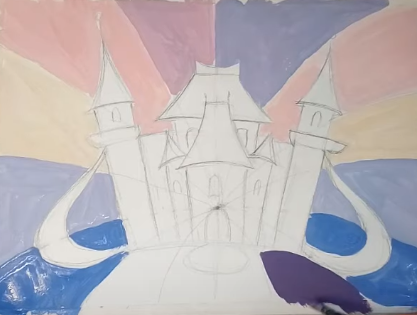
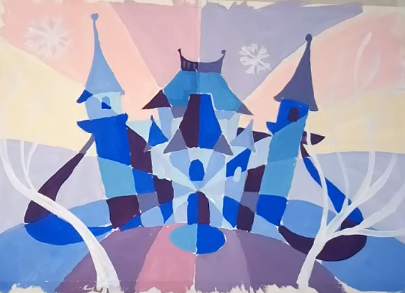
- The extra pencil lines that cover the lock are erased with an eraser. From the top point of entry to the lock, you need to draw several large arcs to the edges of the sheet. The resulting stripes will be painted in different colors.
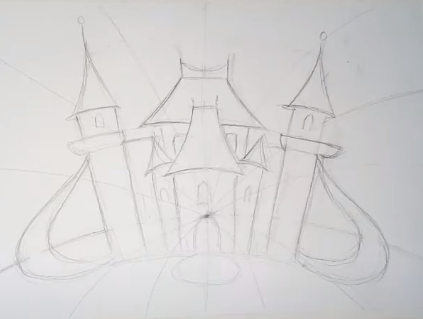
- The central side stripes need to be painted light yellow. To do this, mix white gouache with a small amount of yellow on the palette.
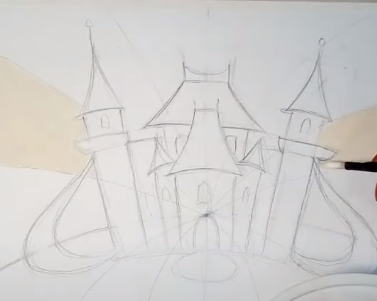
- The next 2 stripes are painted light pink, the remaining 3 stripes are painted blue and the last one is painted dark pink. You can also follow the recommendations given in the previous example and paint all the stripes in cold shades of blue and purple.
- Next, paint the hill on which the castle stands in a cool blue color, and the front part of the drawing in dark purple.
- The castle needs to be painted in shades of blue, breaking its surface into "pieces". For this, a thinner brush is used so that small details can be worked out without difficulty. The color of the painted parts can be repeated and alternated with others.
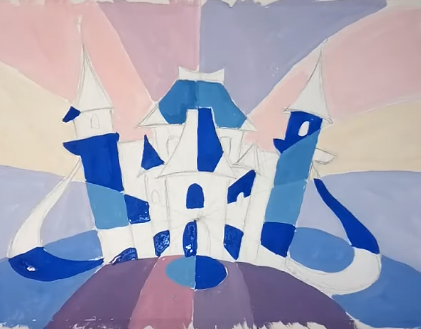
- For the remaining details we will use blue and purple colors:
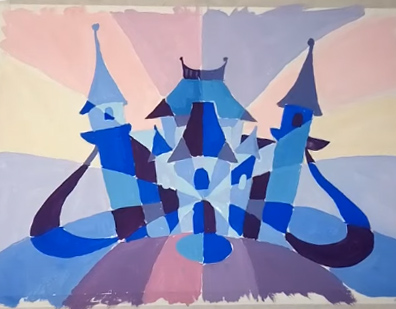
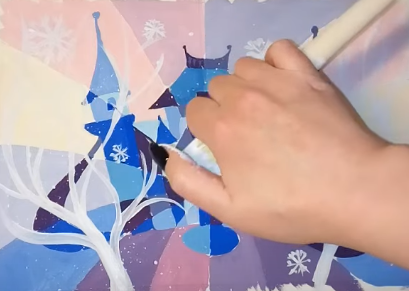
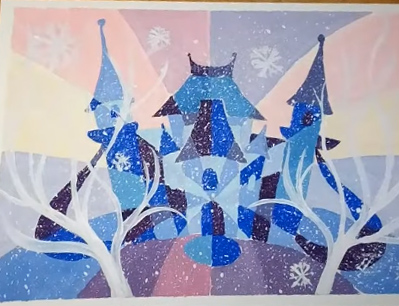
- As finishing touches, trees are painted in the form of curved lines in front of the castle with white gouache, and snowflakes of different sizes are painted in the background.
- Falling snow can also be depicted as spots of white gouache. For this, you will need a bristle (wide brush) or an old toothbrush. It is recommended to try splashing on a separate sheet of paper first, so as not to spoil the finished drawing. The paint for this should not be too thick. Splashing is done with your fingers, bending and releasing the bristles, moistened with paint. In order not to get your hands dirty, you can put on gloves.
- The result will be a decorative design like this:
If you apply gouache on paper in a thin layer, it will “work” like watercolor.
To dilute the paint, it is convenient to use a flat porcelain plate, onto which gouache is first applied, and then add water and get the desired translucent shade:
- To get a pale blue color, you can also use another technique - first wet the paper with water, then apply gouache to it and distribute it.
- Since gouache is a more opaque material than watercolor, it is easy to correct mistakes with these paints. To do this, you need to apply another layer.
- When working with gouache, you need a palette, which serves not only to obtain shades, but also to mix the paint itself with water.
- Another advantage of gouache is that white paint can be laid on top of the colored layers, which will be opaque. This may be necessary for depicting snow.
- If you want to achieve a soft transition between colors, you need to work quickly when applying layers on paper.
- It is recommended to ensure that small children do not dip the entire brush into the jar of gouache, but only its tip. Otherwise, the paint consumption increases and the hands become very dirty.

The Snow Queen's castle can also be drawn against the background of the night sky with the moon and stars. In this case, darker shades of purple and blue should be used for coloring. Snow and hanging icicles in the form of white stripes are additionally drawn on the roofs of the palace towers. For younger children, simple drawing techniques using rectangular and triangular shapes are used.
Video about drawing
Master class on drawing the Snow Queen's castle: