Knitting a raglan crochet from top to bottom is similar to knitting technique. Outerwear models are knitted from the neckline to the lower edge of the armholes.
To work, first draw a diagram of the neck, mark 4 raglan lines: 2 in front and 2 in the back. With their help, loops are added to expand the fabric of the front and back parts of the product. Upon reaching the required width of the raglan, the front part, back and sleeves of the garment are knitted separately.
Conventional symbols in diagrams and instructions
In the patterns of raglan models, crocheted from the top, the following symbols are used:
- R – row;
- P – loop;
- VP - air loop;
- SC - single crochet;
- ССН — double crochet;
- ССН2 — double crochet
- PR - addition;
- UB – decrease.
Principles and features of knitting raglan
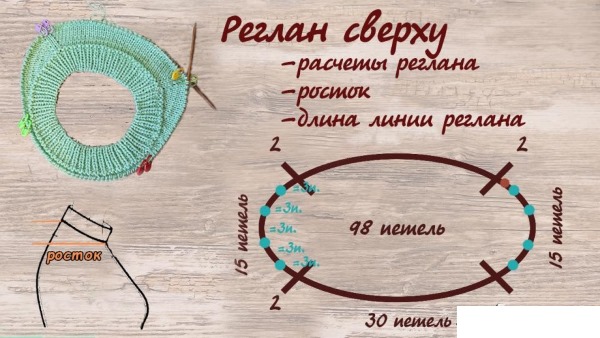
At the beginning of work, you need to determine the perimeter of the neck. It is used to calculate the number of loops that need to be cast on. You need to cast on a long chain of VP and try it on, without pulling or tightening it too much. If necessary, you can immediately adjust the length of the chain: unravel or add the missing loops.
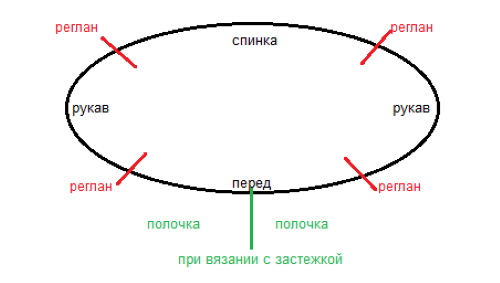
Next, you need to divide all the loops into 4 parts, mark the raglan lines with markers. Having calculated the total number of loops, you can substitute the necessary numbers for the pattern rapport.
Raglan lines are always visible on a knitted garment, regardless of the presence of a pattern or knitting with a satin stitch. In the place where they lie, loops are added to expand the upper part of the garment. If the garment is openwork, knitted with a pattern, then the number of added loops in a row should be equal to the number of loops used in the pattern rapport.
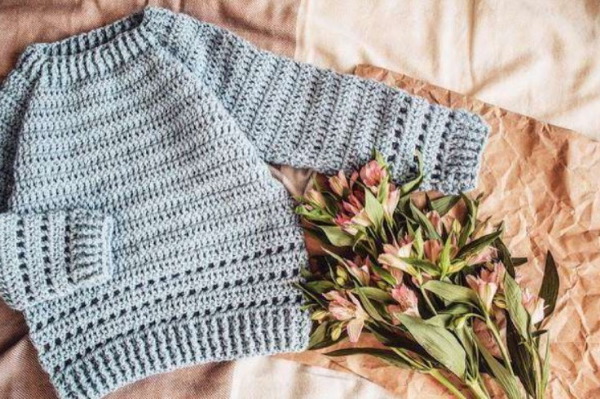
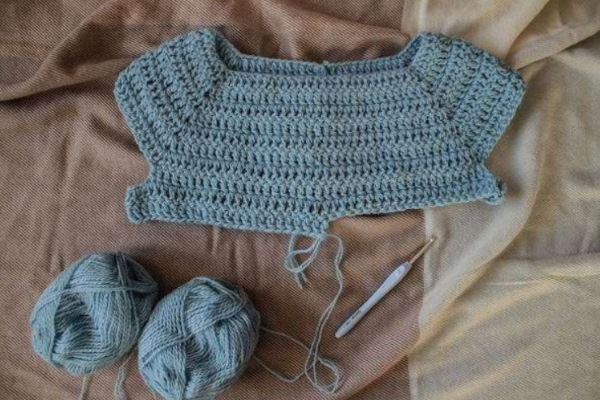
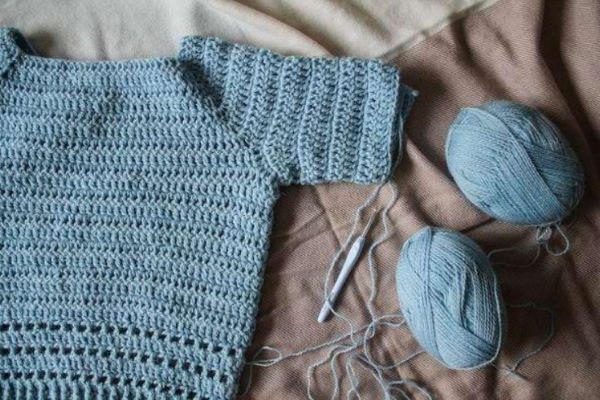
Master class on knitting a sweater for children and adults using a square raglan
Raglan crochet from above, models with patterns of which can be chosen at will, is knitted with a square, wedge or round neck. The master class will describe knitting a sweater with a square yoke.
What you need for knitting
In the knitting process you will need:
- yarn;
- hook;
- centimeter;
- scissors;
- markers for marking raglan lines at the beginning of knitting.
A hook of a suitable diameter is selected for the yarn. The thread should fit completely into the loop of the tool. There should be no free space left in the hook, but the thread should not be thicker than the gap. The master class uses 100% wool yarn. The sweater is knitted in 2 threads, 250/100. The hook has a diameter of 4 mm.
Calculation of loops
To calculate the knitting density and the number of loops required, you need to knit a sample from the yarn that will be used in the work:
- You need to make a chain of 10 VP and an additional 2 P for lifting.
- Next, you should knit several rows using the pattern that was chosen for the product.
- The sample is measured in length with a measuring tape. Based on this, it is determined how many centimeters 10 loops take up.
To determine the required neckline perimeter, add 5 cm to the head circumference for adult clothing or 3-4 cm for children's clothing.
Next, you need to determine the number of loops in the raglan:
- The width of the neck is divided by the number of centimeters in the sample.
- The resulting number is multiplied by the number of loops in the sample (according to the conditions, there are 10).
- 4 raglan loops are subtracted from the derivative.
- The remaining number is divided by 3 (front, back and the total number of loops in 2 sleeves).
- The resulting 1/3 is divided by 2 again to determine the number of loops for 1 sleeve.
To check, add up all the numbers you get. You should get the original number of loops. If you get fractional numbers when dividing, you should round them to the even side.
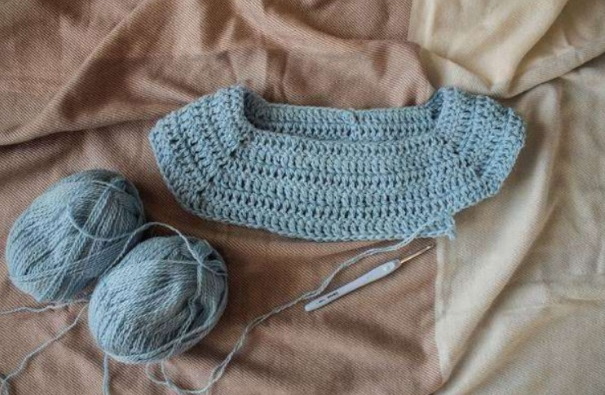
Knitting the neck and the main part of the sweater
Raglan crochet from above, models with patterns of which may differ visually, always begin to knit the same way:
- You need to knit a chain of VP, the number of which was obtained when calculating the diameter of the neck.
- Next, make 2 VP for lifting. To prevent the knitting from slipping, it is better to place them in the center of the back.
- Knit a row of DC. In raglan loops, previously marked with a marker, make 2 DC, between which make 1 VP.
- Then knit according to the same algorithm until you reach the required raglan length.
- Having reached the armpit level, knit the front and back 2 cm further in turning rows so that the sweater sits evenly without distortions.
- Next, connect the front and back using a chain of VP. Their number is calculated taking into account the knitting density.
You need to measure the width of the armhole and calculate using the sample how many loops are needed for each side. The row starts from the center of the back. You need to knit a DC to the VP of the raglan. Knit 1 DC into it. Then knit a chain of VP and connect it to the front of the sweater using 1 DC.
- Having knitted the front, repeat the steps with the VP set on the other side. Continue knitting the CCH to the end of the row.
- Knitting continues in repeated rows until the product reaches the required length.
It is better to tie the bottom of the sweater (5-7 cm) with an elastic band so that it does not rise up while wearing, and its edges do not curl.
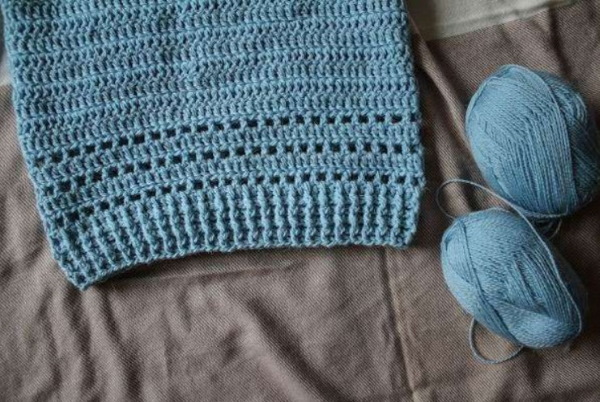
To do this, all the loops in a row are performed alternately behind the back and front walls, forming relief columns.
Sleeves
Each sleeve is knitted starting from the central part of the armpits so that the connecting posts are not visible from above. They are knitted according to the principle of the main part of the sweater, making all the loops of the CCH.
While knitting, you need to try on the product and make UB if necessary.
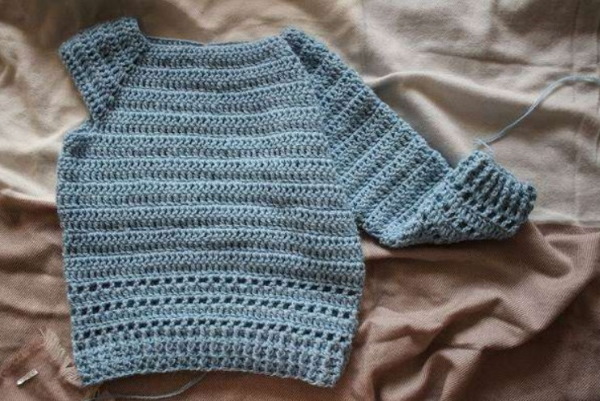
The sleeves are finished with an elastic band of the same thickness as the base.
Sprout
The neckline is the top part of the garment, thanks to which the sweater will fit comfortably and not slip back.
It is not necessary to knit it if the width of the raglan was small and corresponded to the head circumference:
- Start knitting the sprout from the center of the shoulder, capturing the entire back of the sweater. It is made from a row of CCH.
- Continue knitting in the round with an elastic band.
- Having reached the required length of the sprout, the thread is cut and its end is hidden inside the product.
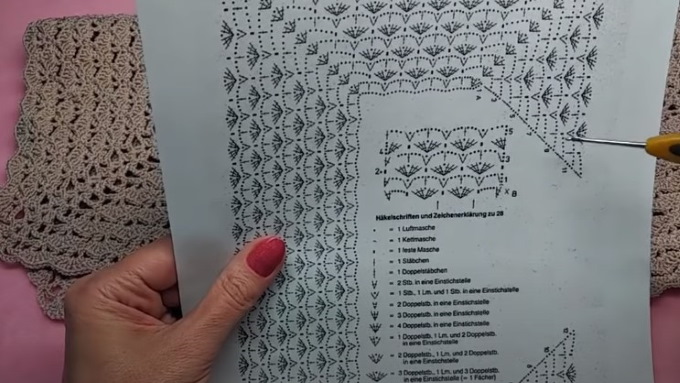
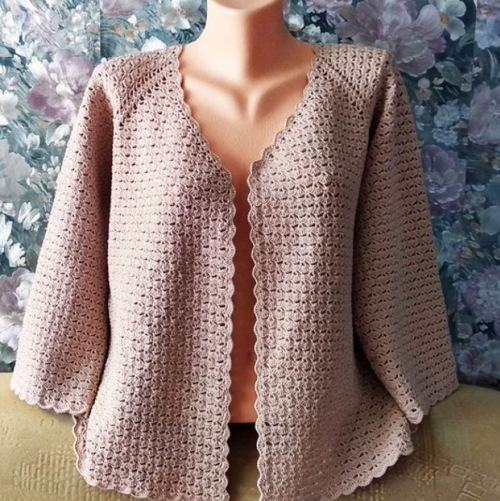
Openwork tunic jacket
The master class provides calculations for knitting a size 50 jacket. The work uses a hook No. 1.75, Alize Diva Strech yarn No. 382. Thread composition: 92% microfiber, 8% elastic. 100 g of yarn contains 400 m of thread. For a product length of 56 cm with loose knitting, you will need 580 g of yarn - 6 skeins. The work will require a measuring tape, scissors, markers for marking raglan lines.
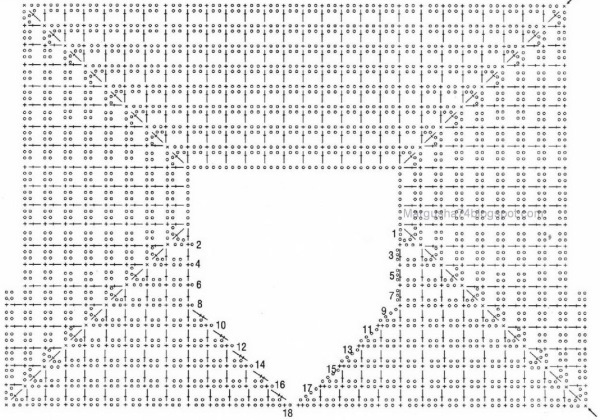
Raglan
Knitting begins with a set of cells. There should be 29 of them in total (when changing the size of the jacket, the number of cells is reduced so that there is an odd number). There are 15 cells (15 cm) for the back and 5 (5 cm) for the sleeves. Between them, there is 1 cell for the raglan lines.
How to knit cells:
- Cast on 1 VP.
- Knit 4 VP and make 2 yarn overs on the hook and knit 1 CCH2 into the first loop.
- The remaining 28 cells are knitted in the same way: 4 VP and 1 CCH2 in the last loop of the previous cell.
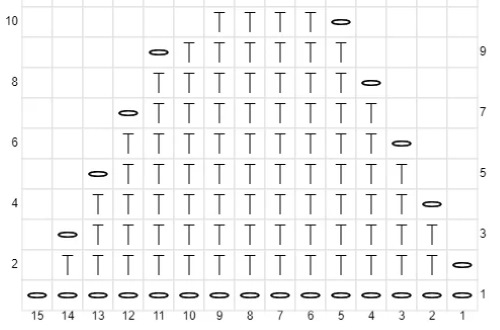
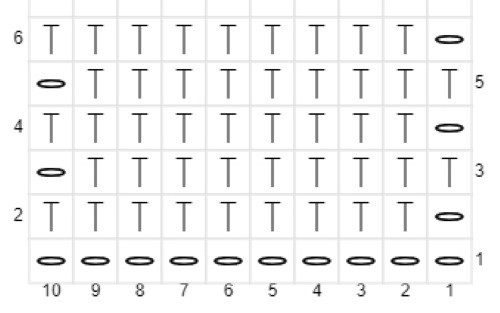
Knitting raglan:
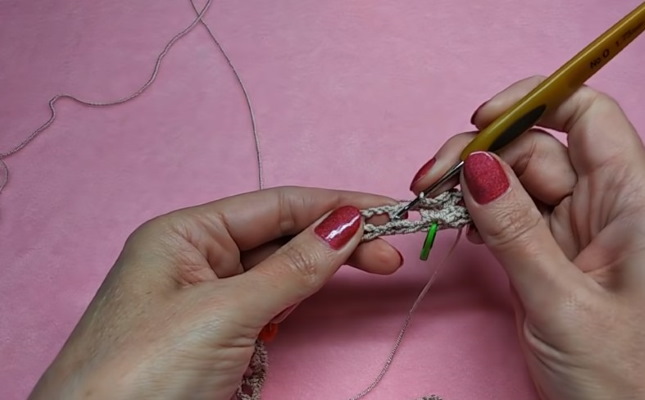
- 1 R: turn the chain with cells and knit in the opposite direction. Make 3 VP, and knit 1 CCH into the loop from which they came out. In the first cell with a marker (the first raglan line will pass here) knit 2 CCH, 1 VP and 2 more CCH.
The next 5 cells are knitted alternately as follows: in odd 3 VP, 1 dc, 3 VP, in even 1 dc, 1 VP, 1 dc. In the raglan cell, 2 dc, 1 VP and 2 more dc are also knitted and the rapport is repeated again for ordinary even and odd cells. At the end of the row, the last loop (where the loop with the tail from the thread) is knitted 2 dc.
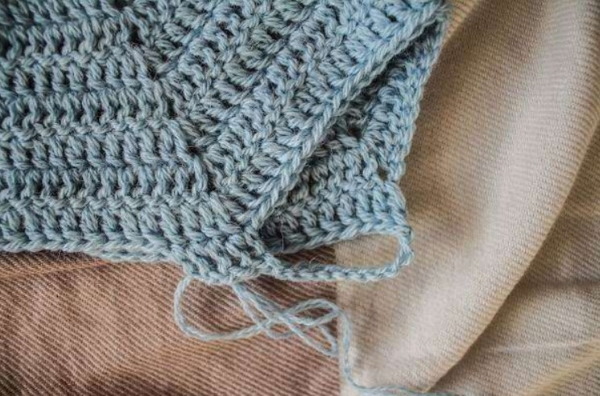
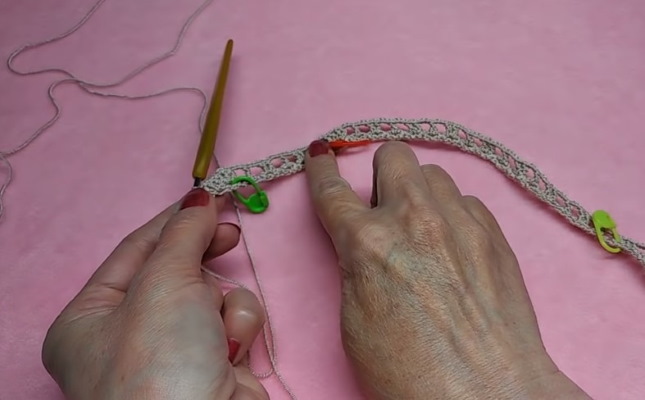
- 2 R: make 3 lifting VP, turn the knitting and knit 1 dc in the next loop. Before the raglan line, knit 3 VP. In the raglan cell, make a similar pattern in the air loop as in the first row: 2 dc, 1 VP and 2 more dc. After the raglan, knit 5 VP, knit 1 sc in the column of the previous row (as in the photo below).
In the next column, knit a fan: 3 dc, 1 ch, 3 dc. In the next column of the previous row, knit 1 dc and so on to the end of the row, alternating the pattern. Before and after the raglan lines, make 5 ch. At the end of the row, after the raglan, knit 3 ch instead of 5. Then make 1 dc in the penultimate and last loop of the row.
- 3 R: make 3 VP, turn the knitting, make 1 dc in the same loop from which the VP comes out. Next, knit 3 VP, 1 dc in the last VP of the cell and 3 VP.
Next, make a raglan fan, 3 VP, 1 dc in the second VP of the cell, 3 VP and then knit the row identically to the first. After the last raglan fan, knit 3 VP, 1 dc in the first VP after the raglan of the previous row, 3 VP. The last 2 P are knitted with 1 dc.
- 4 R: make 3 VP, turn the knitting, knit 1 dc into the next loop of the row. In the same loop, knit half of the fan from 3 dc. Then make a row similar to the second: 1 sc. 5 VP before the raglan, raglan fan, 5 VP and then according to the pattern.
Subsequently, the knitting patterns will be identical to the previous ones (even and odd rows are knitted with the corresponding patterns) with the exception of the beginning and end of each row, where you need to add loops to the shelves of the front part of the jacket.
When the last raglan fan is knitted, make 5 VP, 1 SC in the last cell of the row, in the penultimate loop knit half of the fan from 3 CCH and 1 CCH, and in the last P of the row make 1 CCH.
- 5-8 R: similarly alternate even and odd rows, taking into account the addition of loops at the beginning and end of the rows.
- 9 R: in the pattern, the addition of loops at the edges of the row and the raglan fan are changed, and everything else is knitted without changes in accordance with the pattern of odd rows. At the beginning of the row, make 3 VP, turn the knitting and make 1 dc in the next P. Make 3 VP, 1 sc in the VP of the fan of the previous row, 3 VP. Up to the raglan line, knit the pattern in the usual way for odd rows.
Before the raglan, add 1 column: after 3 VP before the raglan, make 1 CCH in the second VP of the cell of the previous row. Then make 3 VP and make the raglan fan pattern.
Next, after the raglan, also add 1 column: 3 VP, 1 CCH in the second VP of the cell of the previous row, 3 VP and then according to the main pattern. In all raglan lines, identical addition of columns is made before and after. At the end of the row, in the 3rd loop from the end, make 1 SC, 3 VP, and in the last 2 P, 1 CCH.
- 10 R: in this row, before and after the raglan lines, knit 5 VP instead of 3 VP, the rest of the pattern is knitted as in even rows. At the beginning of the row, make 3 lifting VP, 1 dc in the next P, 5 VP and 1 sc in the column of the previous row. Then knit according to the usual pattern. Finish the row similarly to the beginning, only in reverse order.
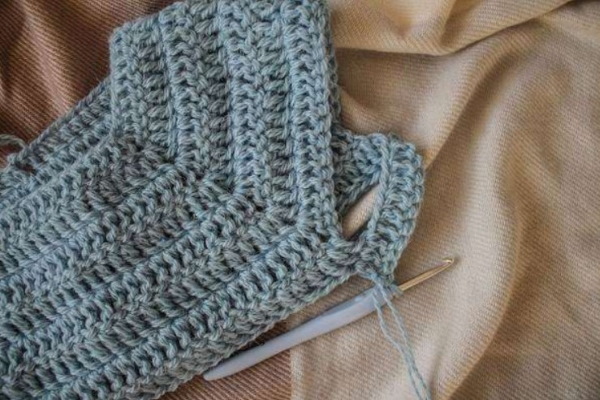
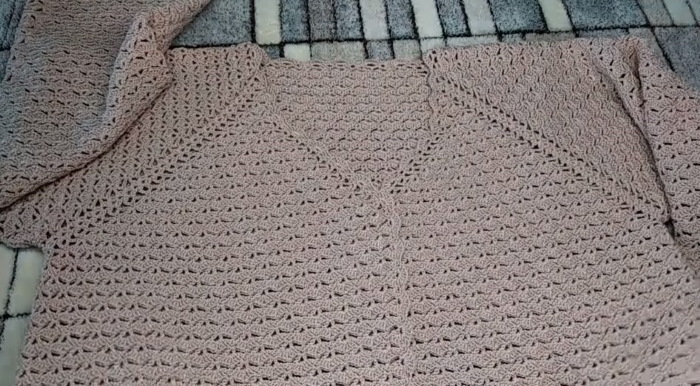
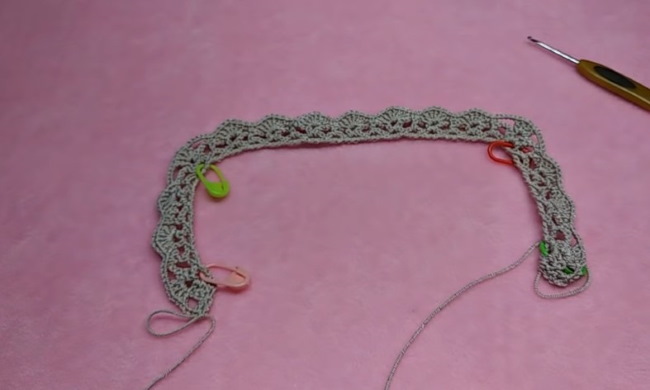
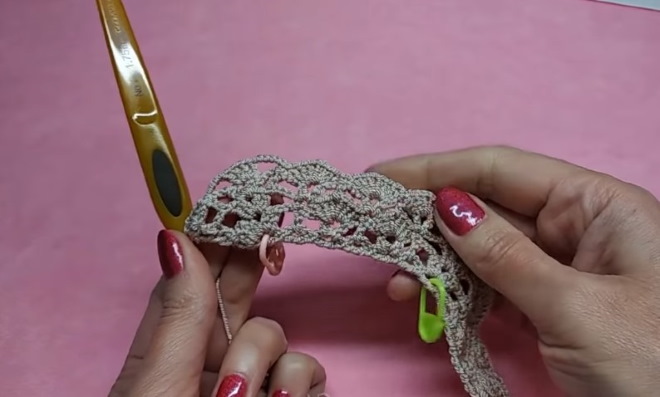
- Rows 11 and beyond are knitted according to patterns 9 and 10 R. Knitting continues until the yoke elements in the folded state overlap each other, as in the photo.
The width of the yoke at this stage is approximately 15 cm, the width of the back is 43 cm. You need to finish knitting on an even row.
Knitting the main part of the tunic jacket
There is no need to make any more increases along the neck. The loops are then added only along the raglan lines. The knitting pattern does not change, even and odd rows still alternate. The knitting pattern for the edges of the shelves changes.
Scheme:
- For odd rows. Knit 3 VP lift, turn the knitting, make 1 dc in the loop from which the lift was made, 3 VP and 1 dc in the VP fan of the previous row. The pattern and raglan lines with an increase are knitted as before. Finish the row with 3 VP and 2 dc in the last P of the previous row.
- For even rows. In the first loop, knit 1 sc and then make a fan pattern to the end of the row, taking into account the addition of loops on the raglan lines. Finish the row with 1 sc as well.
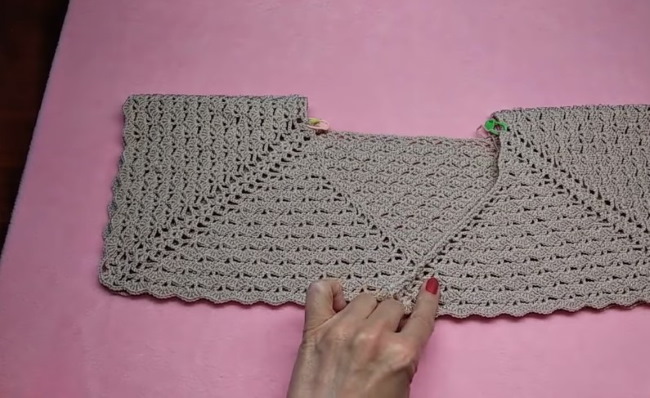
With the addition of loops along the raglan lines, you only need to knit 4 rows. The width of the yoke should be 17-18 cm, the back - 47.5 cm.
Next, do not break the thread, take a new skein and knit only the back from the wrong side. Attach the thread in the center of the raglan line and perform 4 R sprouts according to the patterns of even and odd rows. When the last row is finished, make 1 VP, tighten the thread and cut it.
Next, connect the back and the shelves, returning to knitting with the main thread:
- Make 3 lifting VP, turn the knitting, 1 CCH in the same loop, 3 VP and continue knitting according to the pattern until the raglan line.
- Before the raglan line, make 3 VP, 1 CCH in the second VP of the previous row, 3 VP.
- Next, join the front with the back. Make a yarn over on the hook, insert it into the VP of the raglan, skip the sleeve loops and insert the hook into the outermost cell of the sprout - a single crochet, which finished the row.
The thread is pulled through all the elements on the hook so that 2 yarns remain on it, which need to be knitted as a regular CCH2. Next, make 1 VP and also stitching both elements with a hook, knit another 1 column.
- Next, knit according to the pattern until the beginning of the second sleeve, which is connected at the raglan line to the outer loop of the back, similar to the first.
When the back and front are connected, the jacket is knitted without increases and raglan lines to the very end. Its length can be adjusted by trying on the item as you work. You need to finish knitting with an even row.
Jacket sleeves
Raglan crochet from above, models with diagrams of which are presented in the article, is always knitted similarly for any thing. Only the knitting pattern itself will differ.
Here, as in the previous master class, the sleeves are knitted starting from the armpits so that the connecting line is not visible. The pattern is repeated, alternating even and odd rows, and the work is finished with an even (dense) row. The length of the sleeve is determined during the fitting process.
Other knitting patterns for raglans
Raglan crocheted from above (models with diagrams differ only in the shape of the neckline on the products) can be knitted in several variations:
| Knitting pattern | Characteristic |
 | The rectangular raglan on clothes looks universal: it is suitable for both men's and women's clothing. With its help you can make an oval or square neckline. The shape of the neckline is adjusted with the help of a sprout. |
 | Raglan with a V-neck is suitable for knitting women's clothes.
The shape of the neckline visually lengthens the neck, so it looks good on full-figured women. |
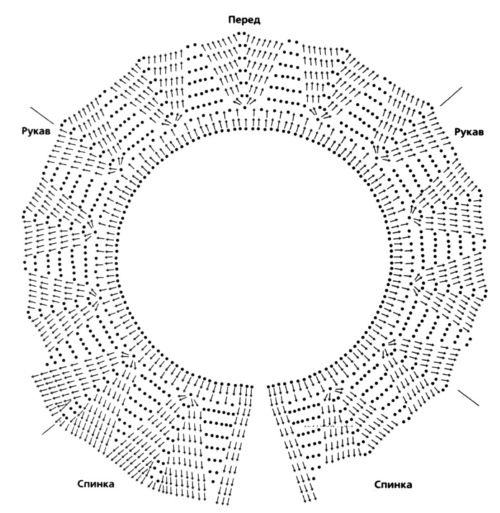 | The round armhole is suitable for knitting men's and women's sweaters, tunics, cardigans and jackets.
Here, the raglan lines are not visible in the finished product, since the addition of loops is carried out along the entire perimeter of the neck. You can also knit a turtleneck using this pattern. Then the height of the sprout is adjusted during the fitting process. It is knitted without adding or decreasing loops around the entire perimeter. |
Possible difficulties in knitting and ways to solve them
When knitting a raglan, beginners often make mistakes.
The most common of them and possible solutions:
- The knitted item is too dense, does not bend, and is “stiff”.
The cause of the problem is the wrong combination of hook size and yarn thickness. If the tool is smaller than required, the knitted fabric will be very dense, will bend poorly, and will look unnatural when worn. There is only one way out of this situation - to unravel the item and knit it again with the required hook.
- The knitted item is too loose and shows through.
Here the situation is the opposite - the wrong hook number was chosen, its diameter is larger than required. "Looseness" of clothes is appropriate if it is a summer item, but warm sweaters should be dense, but at the same time elastic.
- The product turned out to be larger/smaller than the sample.
In master classes, the number of loops in knitting is often given according to the figure of the person who will wear it. It may simply not match the size of the knitter, even if the item should visually fit perfectly.
The reason may also be in the different density of the threads used. If they are thicker/thinner in the original, then the knitted clothes will differ (sometimes even by 2-3 sizes) from the sample in the master class.
- Skipping stitches when knitting.
When working with thin threads, the pattern is small, often the loops are barely visible, which is why an inexperienced knitter can miss them. For this reason, the item may turn out several sizes smaller than expected, or the knitting will "slide" to the side of the missing loops.
For convenience, use markers. They mark key places in knitting: increases, decreases, beginning/end of the rapport. If there are no special markers, you can use improvised tools: a pin, a paper clip or a piece of colored thread.
When choosing a raglan knitting pattern from the top, you need to pay special attention to the selection of the hook and yarn. Even simple clothing models may not work if at least one detail of the work is done incorrectly.
Video about knitting
Raglan crochet from the top: