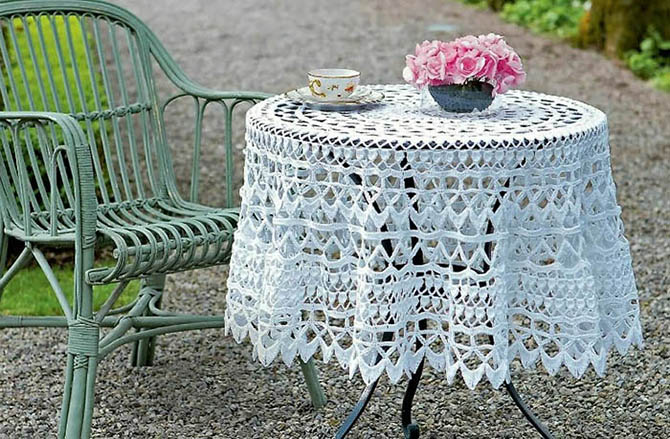
A tablecloth for a round table can be bought in a store or crocheted by yourself. For the last option, there are a large number of different patterns with descriptions that will be available to both experienced and novice knitters.
Necessary tools and materials
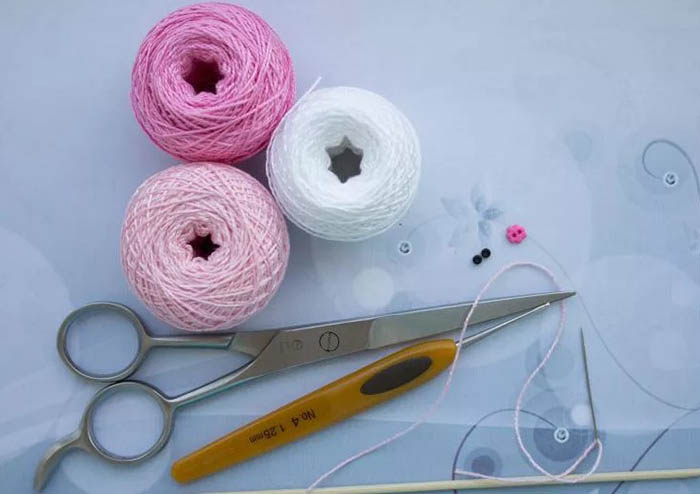
To knit a tablecloth, it is recommended to prepare a minimum set of tools and materials, which includes:
- hook;
- scissors;
- yarn.
It is better to make a crochet tablecloth for a round table from thin yarn, which was made from cotton fiber. This type of thread material is hygienic, wear-resistant and can be used to create children's clothing.
Criteria for choosing a knitting tool:
| Parameter | Peculiarities |
| Material | Beginner knitters are advised to give preference to a tool whose handle and head are made of any solid material. |
| Size | The hook size should correspond to the thickness of the thread material. Often the tool number is indicated on the yarn label. |
| Structure of the hook head | The head of the tool should not have a sharp edge, but rather a rounded cone. This will make it easier to grab the thread without leaving any snags. |
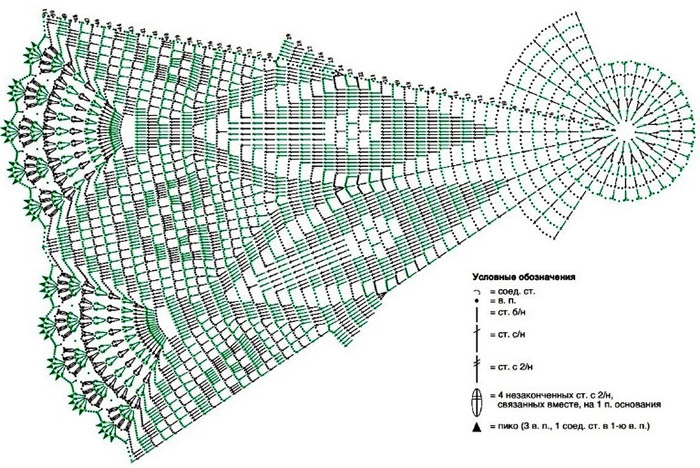
Schemes with description of works for beginners
A crochet tablecloth for a round table can be made openwork, in the fillet technique, as well as with floral and other motifs. Each option is characterized by a simple pattern, so they are suitable for beginner knitters.
Openwork
The openwork tablecloth, which was crocheted, looks beautiful on the round table. To create the canvas, you can choose any pattern or it is permissible to combine several motifs at once to obtain a delicate and airy product.
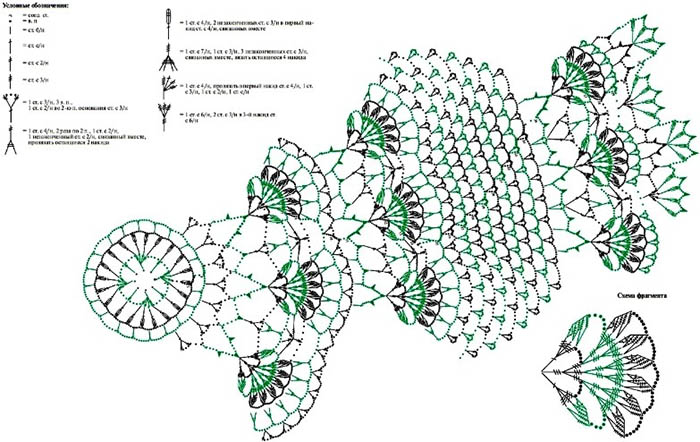
Step-by-step description of the scheme:
- Knit a chain of 9 air stitches, then close into a ring using a slip stitch.
- In the 1st row, make 3 air loops for lifting. Then, sequentially make an air stitch and a column with a yarn over (repeat until the end of the row). As a result, there should be 13 yarn over columns in the 1st row.
- In the 2nd row, make 3 lifting chain stitches into the chain stitch of the previous row. Then repeat the pattern of 2 chain stitches and a yarn over stitch into each chain stitch of the previous row one by one until the end of the row.
- In the 3rd row, make 3 lifting air stitches into the air element of the previous row. Next, knit a yarn over column into each air stitch of the previous row (repeat until the end of the row).
- In the 4th row, initially make an air stitch in the yarn over column of the previous row. Then, in the 4th yarn over column of the previous row, make a connection of the chain of 13 air stitches with a column without a yarn over (repeat until the end of the row).
- In the 5th row, knit a lifting air stitch. Then, in each chain, make 18 columns without yarn overs. Knit the 1st column into 3 air loops of the previous row.
- In the 6th row, in 6 air stitches of the previous row, insert 3 lifting air loops. Additionally, make 2 yarn over columns and 2 air elements. Then make 3 yarn over columns, 6 air stitches, again 3 yarn over columns, 2 air elements, 3 yarn over columns and 6 air loops (repeat with alternation to the end of the row).
- In the 7th row, in 1 air stitch between the yarn over column, knit 3 lifting air loops, make 3 air elements, 3 yarn over columns and 7 air loops. To the end of the row, repeat the alternating pattern of 3 yarn over columns, 3 air stitches, 3 yarn over columns and 7 air loops.
- In the 8th row, in 1 air element of the previous row, knit 4 lifting air loops and make another air loop. Then make a column with 2 yarn overs, an air stitch, again a column with 2 yarn overs, an air element, a column with 2 yarn overs, 4 air stitches, a connecting column and again 4 air loops (alternate stitches until the end of the line).
- Continue shaping the fabric, starting with row 4. Knit the product until the desired size is reached.
With floral ornament
A crochet tablecloth for a round table can be made with a floral motif. In order for the cloth to be exactly round, all the motifs must be joined with a knitting tool in a checkerboard pattern. This process must be done after all the rows have been completed.
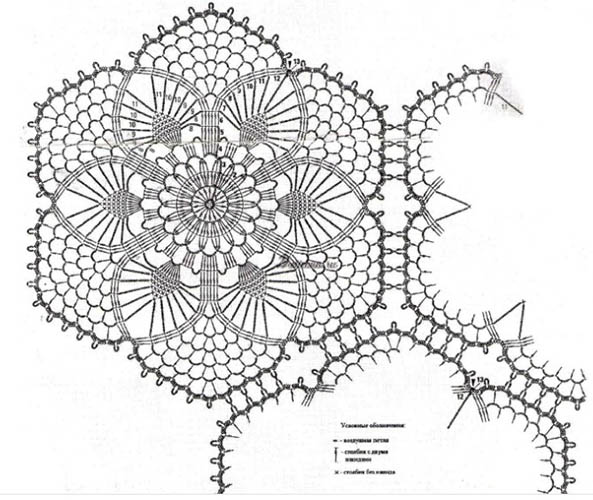
Step-by-step description of the work:
- Initially make a set of chains of 10 air elements. Then close the chain into a ring with a connecting column.
- To create the 1st circle, knit 3 air loops for lifting, and also from the air stitches of the chain, knit 24 yarn over columns. To complete the circle, make a connecting column in 3 air stitches.
- For the 2nd circle, initially make 5 lifting air stitches. Then repeat to the end of the circle with alternating pattern of 2 loops and columns with 3 yarns. To close the circle, make a connecting column in 5 air element, as well as a connecting column in 1 arch.
- In the 3rd circle, knit a lifting air stitch. Then make a chain from 5 air loops, in the 2nd air element after the column with 3 yarns over of the previous row, close with the corresponding column (repeat to the end).
- To create the 4th circle, make a lifting air loop. Then knit a chain of air stitches, and also make a connecting column in the central stitch of the arch of air elements of the previous line (repeat with alternation until the end of the circle).
- To move to the 5th circle, knit 4 lifting air stitches. Then make a group of 3 connecting columns with 2 yarn overs, knitting 3 unfinished connecting columns with a double yarn over on the 1st base element, making a yarn over and pulling it through all 4 loops, then make 5 air stitches, a connecting column in the central air loop of the arch of the previous row and again 5 air elements (alternate until the end of the circle).
- In the 6th round, knit with alternating 10 air stitches and connecting columns. Follow the pattern until the end of the round.
- Round 7 consists of 7 air stitches, a group of 4 connecting columns with 2 yarn overs, 7 air elements and a connecting column. Repeat alternating until the end of the round.
With fruit pattern
A crochet tablecloth for a round table can be decorated with a fruit pattern if the product is intended for the kitchen.
Step-by-step description of the scheme:
- Make a set of chain stitches from 7 air stitches, which are then closed into a circle with a connecting column.
- 1 row consists of 2 air stitches, 23 yarn over columns and a connecting column.
- In the 2nd row, make 3 air loops for lifting. Then, with alternation, repeat the pattern of 3 air stitches and a yarn over column (knit to the end of the line).
- In rows 3-4, knit 3 air loops and 2 yarn over columns. Then, to the end of the rows, repeat the pattern of 3 air stitches and 3 yarn over columns with alternation.
- In the 5th row, make 3 lifting air stitches, 8 air loops, and a single crochet into the 2nd yarn over column of the previous row. Next, knit 3 air elements, a single crochet into 1 stitch, 8 air loops, and a single crochet into the 2nd yarn over column of the previous row (repeat alternating until the end of the row).
- In the 6th row, make 3 lifting air loops. Next, knit 4 yarn over columns into the air stitch of the arch of the previous row, make 5 air loops and again pass 4 yarn over columns into the air element of the arch of the previous row (continue alternating until the end of the row).
- In the 7th row, knit 3 lifting air loops into the 2nd loop of the arch of the previous row, then make 4 yarn over columns into the central air stitches. Then, alternating to the end of the row, repeat the pattern of 7 air stitches and 5 yarn over columns.
- In the 8th row, make a lifting chain stitch and a column with 2 yarn overs. Then, alternating to the end of the row, repeat the pattern of 7 chain stitches, a connecting column in 4 yarn over columns of the previous row, 7 chain stitches, a connecting column in 4 air stitches of the previous row, 7 chain stitches, a connecting column in 1 yarn over column, 7 chain stitches and a connecting column in the extreme yarn over column.
- In rows 9-11, knit a chain stitch and make a column with 2 yarn overs. Then, sequentially to the end of the row, repeat the pattern of 7 chain stitches and the introduction of a connecting column into 4 chain elements of the arch of the previous row.
- In the 12th row, in the 5th air stitch of the previous row, knit an air loop. Repeat with alternation the pattern of 7 air stitches, a connecting column in 4 air elements of the arch, 4 air loops, 3 yarn over columns, 2 air loops, 3 yarn over columns, 4 air stitches and a connecting column in the arch (knit to the end of the row).
- In the 13th row, make 3 lifting air loops in the 4th air stitch of the previous row, as well as 3 air elements and a yarn over column. Then, alternating to the end of the row, repeat the pattern of 7 air elements, 2 yarn over columns, 2 air elements, 2 yarn over columns, 7 air stitches, a yarn over column, 3 air stitches and a yarn over column.
- In the 14th row, in the 2nd air stitch of the previous row, knit 4 lifting air loops. Then repeat the pattern of 6 columns with a double yarn over, 6 air stitches, 2 yarn over columns, 2 air loops, 2 yarn over columns and 6 air elements (knit to the end of the row with alternation).
- In the 15th row, make 4 lifting air stitches and 1 air loop. Then repeat to the end of the row in sequence the pattern of 1 air, 5 air loops, 2 yarn over columns, 2 air elements, 2 yarn over columns and 5 air loops (between each element, knit 6 columns with 2 yarn overs).
- In the 16th row, in 2 air stitches of the previous row, knit a lifting air loop and make 4 air elements. Then, to the end of the row, knit 4 air loops, 5 air loops, 2 yarn over columns, 2 air elements, 2 yarn over columns and 5 air loops (between them, knit 6 connecting columns into the arch of the previous row).
- In the 17th row, knit a lifting air stitch into 3 air loops of the previous row and make 4 air elements. Alternating 4 air, 5 air loops, 2 yarn over columns, 2 air elements, 2 yarn over columns and 5 air stitches, between which knit 5 connecting columns into the arches of air loops of the previous row, repeat the pattern to the end of the row.
- In the 18th row, make a lifting air stitch in 3 air loops of the previous row, after 4 air elements. Repeat to the end of the row of the pattern of 4 air, 5 air stitches, 2 yarn-over columns, 2 air loops, 2 yarn-over columns, 2 air stitches, 2 yarn-over columns and 5 air loops (between them, make 4 connecting columns in the arch of the previous row).
- In the 19th row, in 3 air loops of the previous row, knit a lifting air stitch and make 4 air loops. Repeat to the end of the row with alternating pattern of 4 air loops, 5 air loops, 2 yarn over columns in the air element between the yarn over column of the previous row, 2 air loops, 2 yarn over columns in the 2nd air element, 2 air stitches, 2 yarn over columns, 2 air loops and 5 air loops (between them make 3 connecting columns in the arch of the previous row).
- In the 20th row, knit the lifting air stitch into 3 air elements of the previous row and make 4 air loops. Alternating to the end of the row, repeat the pattern of 5 air stitches, 2 yarn over columns into the air loop between the yarn over column of the previous row, 2 air loops, 2 yarn over columns into the 2nd air loop, 7 air elements, 2 yarn over columns into the air stitch between the yarn over column of the previous row, 2 air elements, 2 yarn over columns into the 2nd air stitch and 5 air loops (between them make 2 connecting columns into the arch of the previous row).
- In the 21st row, knit an air element in 3 air stitches of the previous row and 4 air elements. Repeat to the end with alternation of the pattern from a connecting column in the arch of the previous row, 5 air loops, 2 yarn over columns in a chain stitch between the yarn over column of the previous row, 2 air elements, 2 yarn over columns in a chain loop, 7 air stitches, a connecting column in 4 air loops of the previous row, 7 air elements, 2 yarn over columns in a chain stitch between the yarn over column of the previous row, 2 air loops, 2 yarn over columns in the 2nd air stitch and 5 air stitches.
- In the 22nd row, knit a lifting air loop in 1 air stitch before the yarn over column of the previous row. To the end, alternately repeat the pattern of 2 yarn over columns in the air element between the yarn over column of the previous row, 2 air stitches, 2 yarn over columns in the 2nd air loop, 7 air stitches, a connecting column in the arch of the previous row, 7 air stitches, a connecting column, 7 air elements, 7 yarn over columns in the air loop between the yarn over column of the previous row, 2 air stitches, 2 yarn over columns in the 2nd air loop, 5 air elements, a connecting column and 5 air stitches.
- In row 23, knit 3 lifting air loops into an air stitch between the yarn over column of the previous row, and also make 2 yarn over columns. Then repeat to the end of the row with alternating pattern of 7 air stitches (repeat 4 times, alternating with connecting columns), 2 yarn over columns into the air loop of the previous row, 2 air stitches and 2 yarn over columns into the 2nd air loop (repeat twice).
- In row 24, knit 3 lifting air stitches into the air element between the yarn over column of the previous row and make 2 yarn over columns. Then alternate until the end of the row a pattern of 7 air elements, 2 yarn over columns into the air loop between the yarn over column of the previous row, 2 air stitches, 2 yarn over columns into the 2nd air loop, air element, 2 yarn over columns into the air element between the yarn over column of the previous row, 2 air loops and 2 yarn over columns into the 2nd air element (make 5 connecting columns between them).
- In the 25th row, in the air loop between the yarn over column of the previous row, knit 3 air lifting elements to make 2 yarn over columns. Repeat to the end of the row with alternation of the pattern of 7 air loops and 4 yarn over columns, knitted from the air stitch between the yarn over column (there should be 8 connecting columns between them).
- Rows 26-31 are similar to row 25.
- To continue knitting, repeat the steps starting from row 11.
Secrets for Beginners
Secrets for Beginners:
- Initially, it is recommended to make a small sample to see in advance how the product will look. This will help you understand what corrections need to be made or whether nothing needs to be changed.
- To avoid creating spiral transitions, it is necessary to carefully design air stitches to finish the lines of the fabric. Due to this, the multiplicity of loops or lines will not be lost, and the beautiful appearance of the product will be preserved.
- The motifs need to be knitted together. However, it is necessary to hide the edge of the thread material so that the tablecloth is beautiful.
Previously, all round tables were covered with a crocheted tablecloth. This gave the interior individuality. At the same time, this feature has not lost its relevance today. Not only experienced but also novice craftsmen can knit, relying on simple patterns with descriptions of various models.
Video about knitting
It is not so easy to crochet a tablecloth. But if you have the desire and persistence, you need to find a suitable model (pattern) and you can do everything in the best possible way. Good luck to you, Victoria, and thanks for the article!