Crochet napkin, as an interior item, has firmly entered into human life many years ago. It is impossible to imagine the interior of a house of the XIX-XX centuries without openwork curtains, blankets, capes, napkins and tablecloths.
Today they are still popular. Modern designers often include crocheted napkins in home interior projects. Oval napkins, crocheted according to author's patterns and descriptions, are in great demand, as they are easy to place on oblong, rectangular surfaces, with rounded corners, which prevail in most furniture compositions.
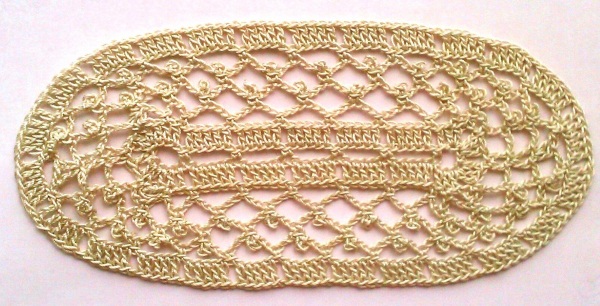
Small oval crochet doily for beginners
A small oval napkin is crocheted quite simply. This option is ideal for beginners who want to understand the principle of knitting an oval and master the skills of knitting an oval napkin. A small number of rows and elements, easy to perform, will make the learning process as comfortable, enjoyable and very effective as possible.
Materials and tools you will need:
- yarn “VIOLET” (YarnArt) — 100% cotton with mercerization (50g/282m);
- crochet hook #2;
- scissors.
Scheme:
Step by step instructions:
- Start by casting on a chain of 45 stitches.
- Insert the hook into the 10th loop, counting from the hook, and knit a single crochet.
- Continue alternating: 5 chain stitches, single crochet into the 6th stitch of the cast-on row. Repeat 5 times in total.
- Finish the row with a chain of 5 air loops. Finish knitting the row with a slip stitch. The first circular row is ready!
- To move to the next row, you need to make 3 lifting loops. After that, knit according to the attached pattern, alternating double crochets with air loops in a certain order, indicated in the figure.
- Rows 3-5 knit with arches consisting of air loops according to the pattern. In rows 4-5, simultaneously knit loops between the arches.
- In the 6th row, mark the shape and knit the base for tying the napkin using alternating chains consisting of air loops with single crochets (see diagram).
- Tie the edge of the product using alternating single crochets with 1 air loop.
- Cut the thread and hide the end on the wrong side.
A small crochet oval napkin, the pattern and description of which were offered in this master class, is ready!
Finally, it is necessary to carry out wet-heat treatment of the product: wash, starch (if desired) and thoroughly iron all elements of the napkin using steam.
Oval napkin leaves. Scheme and description
An oval napkin with plant motifs will look unusually cozy and beautiful in the interior. The leaves on the product create a feeling of peace and harmony, unity with nature. Quite simple to make, the oval napkin is also attractive because its size can be easily varied both up and down depending on what result is ultimately planned to be achieved.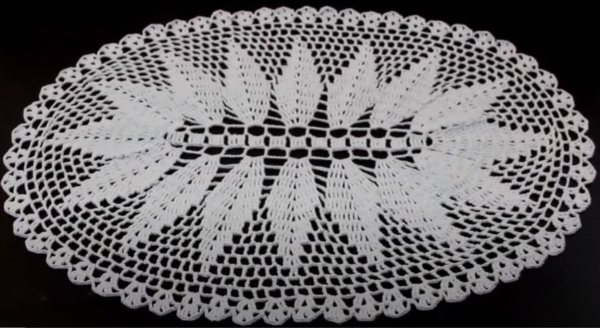
Materials and tools that will be needed:
- yarn “Hanimeli” (Lanoso) - 100% cotton with mercerization (50g/169m);
- hook No. 2.5;
- scissors.
Scheme:
Knitting instructions (step by step):
- Cast on a chain of 74 stitches.
- Insert the hook into the 4th loop, counting from the end of the cast-on row, and knit a double crochet. Knit 2 more double crochets, moving along the cast-on chain to the left. Knit 1 double crochet into each loop.
- Knit 2 chain stitches. Skip 2 stitches on the cast-on chain and insert the hook into the 3rd, knitting a double crochet. Then knit 3 more double crochets.
- Continue knitting according to the attached pattern, alternating 2 chain stitches with 4 double crochet stitches.
- Start the second row with 1 chain stitch. Knit 5 more chain stitches. Insert the hook into the base of the double crochet stitch of the previous row and make a half double crochet stitch. At the end of the row, when turning the knitting, also knit arches with half double crochet stitches.
- Continue knitting the napkin using the attached pattern, alternating 5 air loops with 1 column with 2 yarns. Each element must be knitted in an arch of 2 air loops of the previous row.
- From rows 3 to 13, knit leaves (see diagram), separated from each other by arches of air loops.
- In the 14th and 15th rows, mark the shape of the napkin using alternating chains consisting of air loops and double crochets (see diagram).
- Rows 16-17 - tying the napkin along the contour, according to the proposed pattern.
- Cut the working thread and secure the end on the wrong side of the product.
After wet-heat treatment, the napkin can be safely placed on any horizontal surface. It will perfectly fit into the interior of the apartment and make it more attractive and cozy.
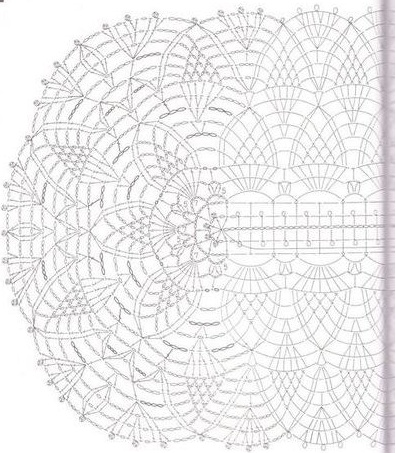
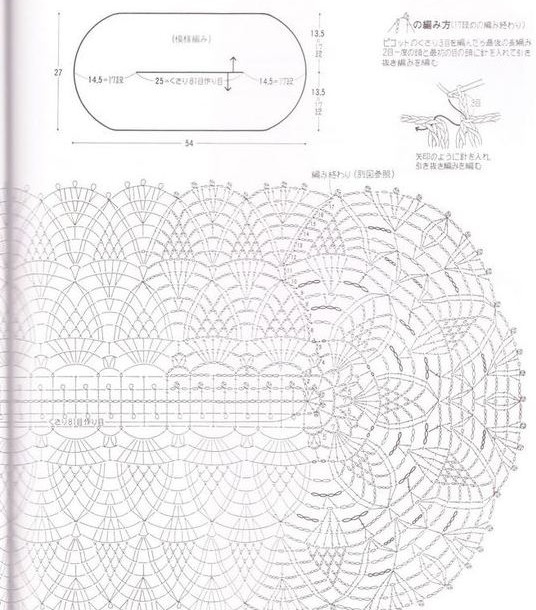
Large oval crochet napkin. Scheme and description
Having mastered the basics of knitting a small oval napkin, you can begin knitting schematically more complex products. This master class will consider the process of knitting a large oval napkin with a crochet hook according to the scheme, with a subsequent description. The main motif is the popular pattern "Pineapples", widely used in knitting various napkins, lace, collars, peplums and skirts of the "sun" and flared models.
The following materials will be required:
- yarn “Begonia” (YarnArt) - 100% cotton with mercerization (50g/169m);
- hook No. 2.5-3;
- scissors.
Scheme:
Step by step instructions:
- Start knitting by casting on a chain of 100 stitches.
- Knit 3 more loops for lifting plus 1 chain stitch from the main pattern. In total, you should have 104 loops.
- Insert the hook into the 7th loop of the cast-on row, counting from the end, and knit a double crochet. Cast on 3 more chain stitches, close them into a circle at the top of the previously knitted double crochet. After that, cast on 1 more chain stitch. Insert the hook into the 3rd loop of the previous row, counting from the knitted column, and knit a double crochet into it. Continue knitting according to the proposed pattern, repeating the alternation to the end of the row.
- Then, you need to make a turn to circular knitting and add loops to form the outline of the product. To do this, at the ends of the napkin, knit 4 double crochets and a ring into 1 loop at once (see diagram). After turning, knit the second part of the napkin according to the diagram in mirror image. Finish the row with a connecting loop.
- Cast on 3 loops for lifting and 3 loops of the pattern. In total, you should get 6 loops. Next, in the double crochet of the previous row, knit 1 double crochet. In the place of the loop, make an arch of 3 air loops. Continue knitting according to the pattern, alternating columns and arches.
- Start a new row with a connecting loop. Knitting in a row occurs by alternating large and small arches. A large arch includes 7 air loops, and a small one - 5.
- Continue knitting the napkin in a circle until the connecting loop.
- From the next row, begin knitting the “pineapple” pattern according to the proposed scheme.
Important! When knitting this part of the napkin, special attention should be paid to the rounding areas, since their knitting differs significantly from the main pattern of the side sides.
The large oval crochet napkin, the diagram and description of which were offered above, is ready. Knitting such a product will require great patience and perseverance from the master, which will be worthily rewarded with a truly magical result.
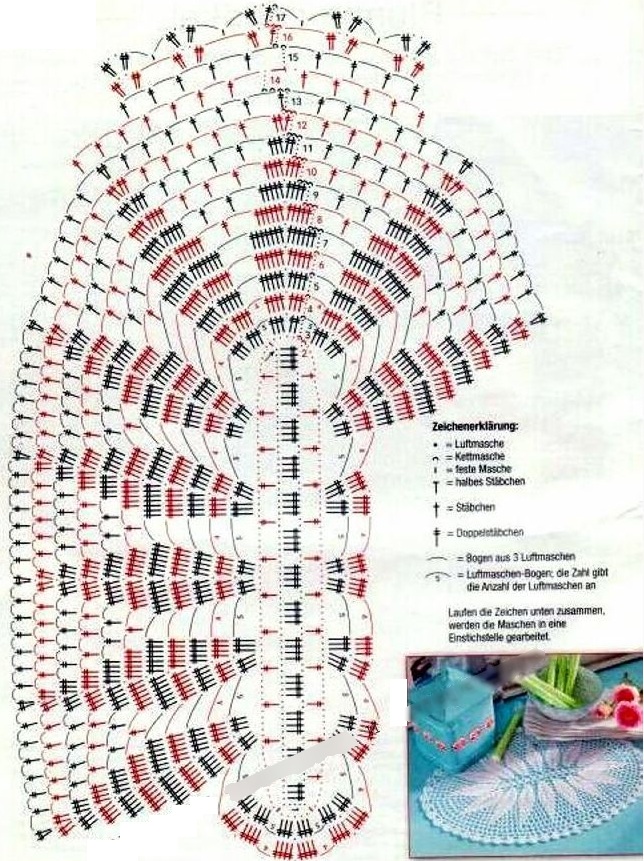
Openwork oval crochet napkin. Scheme and description
The master class below describes the process of knitting an oval openwork napkin consisting of three floral motifs that are successively connected to each other, forming the central part of the napkin. Next, the blank is knitted according to the scheme below with an expansion on the sides, forming an oval line.
The distinctive feature of the product is the “mobility” of its dimensions. The final length depends on the number of central motifs.
A medium-sized napkin with an openwork pattern will look good on a bedside table, dressing table or chest of drawers.
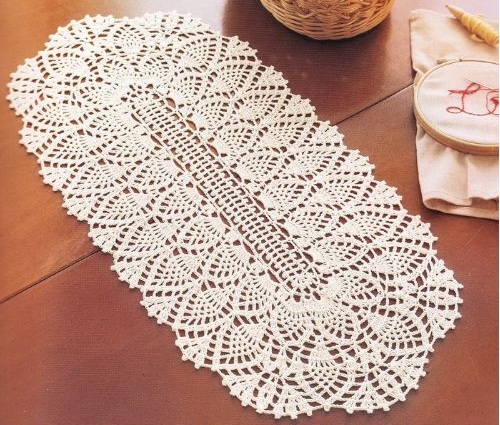
By increasing the number of motifs, it is quite easy to turn a napkin into an elegant runner, which can be used as an independent product or in tandem with a tablecloth when setting a festive table.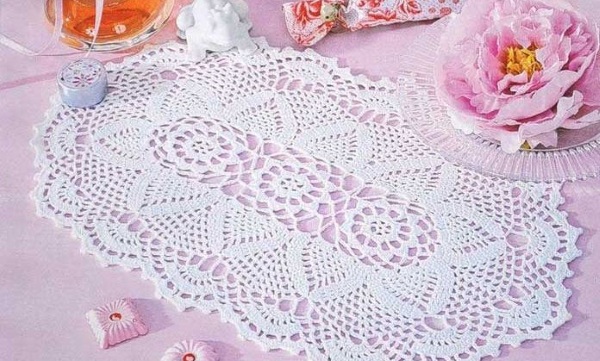
To work you will need:
- yarn “Coco” (Vita) - 100% mercerized cotton (50g/240m);
- hook No. 2;
- small scissors.
Scheme: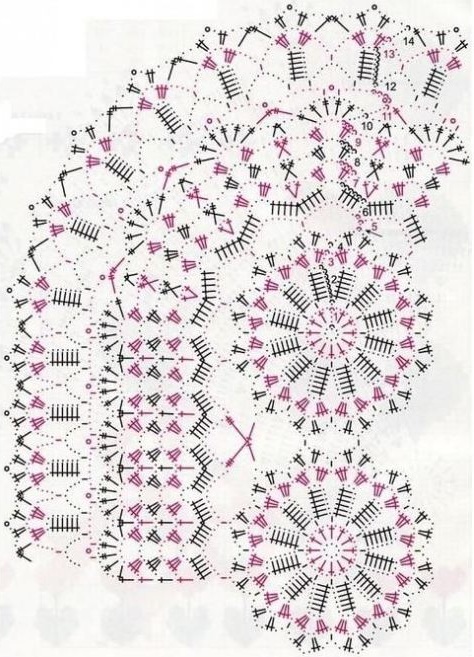
Instructions for performing the work:
- Knitting should begin with knitting a separate central element as follows:
1.1. Cast on a chain of 8 air loops.
1.2. Bring the edges of the chain together to form a circle and fasten them together.
1.3. Make 3 air loops to rise to the next row.
1.4 Knit according to the suggested pattern, alternating 2 air loops with 1 double crochet. In total, 11 double crochets should be made. The hook should be inserted into the center of the circle.
1.5 At the end of the row, knit 2 air loops and finish knitting the row with a connecting loop. The first row is ready.
1.6 Cast on 9 air loops. Knit 6 double crochets, starting with the 4th loop of the chain. Finally, attach the fragment to the main knitting in the area of the double crochet using a half column. Next, knitting is repeated until 12 elements are knitted.
1.7 The third row begins with 3 lifting loops. Continue working according to the pattern: 2 double crochets in 1 loop of the bottom row (see picture), 3 chain stitches, 3 double crochets in 1 loop of the bottom row, 1 chain stitch. After that, alternating columns and chain stitches follows the pattern.
1.8 Start the row with a lifting loop. Then, until the end of the row, knit according to the pattern: 2 chain stitches, 2 double crochets in 1 loop of the bottom row, 3 chain stitches, 2 double crochets in 1 loop of the previous row, 2 chain stitches, half double crochet in the loop of the previous row. Cut the thread and hide it on the wrong side.
The fourth row is a connecting row. When knitting the next 2 motifs, it is used to connect the parts together (see diagram).
In total, you need to connect and sequentially connect 3 motifs together.
- Attach the working thread to the place indicated on the diagram. Knit a row of arches consisting of air loops separated by half columns.
- Continue knitting the napkin according to the pattern until the end (9 more rows).
- Once you have finished knitting, cut the thread and hide the “tail” on the wrong side.
- Carry out wet-heat treatment of the product.
The openwork oval crochet napkin, the diagram and description of which are presented in this master class, is ready. In order to give the product a finished and well-groomed look, it must be hand washed at a water temperature of no more than 30 degrees. If desired, the wet napkin can be starched, then dried and ironed.
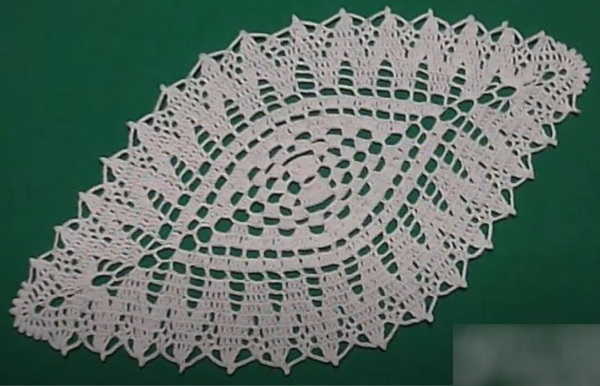
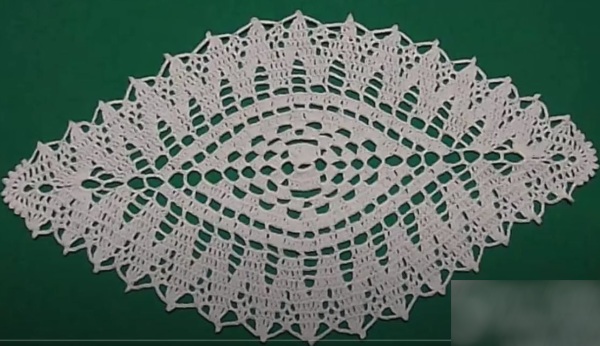
Oval napkin "Fern leaf" crochet. Scheme and description
The napkin “Fern Leaf” differs from the previous samples of oval napkins in its shape and knitting method. Despite the unusual shape elongated at the edges, the napkin is popular among crochet craftswomen, as it looks very original. In addition, the knitting pattern for such a product is easy to perform and will not be difficult even for a beginner knitter.
The following materials and tools will be required:
- yarn “Coco” (Vita) - 100% mercerized cotton (50g/240m);
- hook No. 2;
- thread cutters.
Scheme: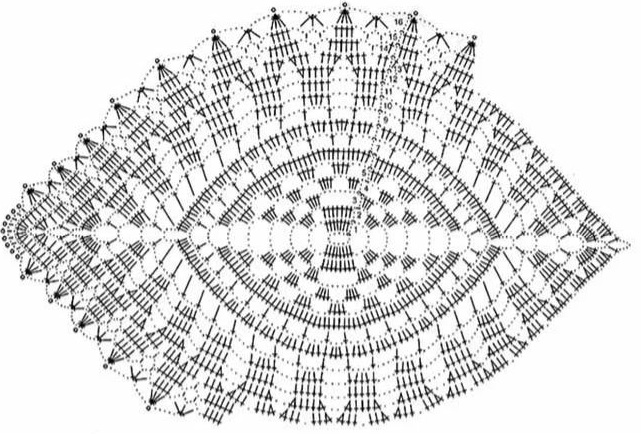
Step by step instructions:
- Start knitting a napkin by making a chain that includes 12 air loops.
- Connect the ends of the chain into a circle.
- Knit 3 lifting loops and immediately after that knit 7 double crochets, inserting the hook directly into the center of the cast-on ring.
- Cast on 8 chain stitches, knit 8 more stitches and finish the row with a chain that includes 8 chain stitches and a slip stitch.
- The second row is knitted similarly to the first. The distinctive feature is the addition of double crochets in the 2nd and 3rd (2 columns), as well as in the 6th and 7th (2 columns) loops of each arch of the previous row.
- From rows 3 to 5, continue knitting the pattern, placing the stitches in a checkerboard pattern (see diagram).
- In the 6th row, knit 60 double crochet stitches in mirror image on both sides of the napkin. Knit arches in the corners, including 8 air loops.
- In the next row, it is necessary to alternate the pattern between double crochets and arches that include 3 air loops.
- Knit the entire 8th row with double crochet stitches.
- Row 9 is knitted in the same way as row 7. The only difference is the number of loops in the arch. In this row there are not 3, as in row 7, but 4.
- From the 10th to the 16th rows inclusive, knit a plant motif (the upper part of the leaf) according to the pattern.
- When you have finished knitting, cut the thread and thread it through the back using a hook.
The crochet oval napkin, the diagram and description of which resembles a forest fern leaf, is ready. All that remains is to wash, starch, dry and iron the finished product thoroughly.
The key points in knitting oval napkins are as follows:
- When you start crocheting an oval napkin, try to always use patterns and descriptions that are clear and accessible to you.
- Beginner knitters should initially pay attention to simple-to-execute patterns containing a minimum number of elements and rows. After receiving a positive result, you can begin knitting more complex oval napkins, as well as products consisting of several elements or motifs.
- When forming the shape, remember that you need to add elements along the edges of the napkin evenly and strictly observing symmetry. Otherwise, the product will skew and gather into a frill.
- High-quality yarn is the key to the durability and wear resistance of your future product, so you should carefully approach its selection. A hook correctly selected for the yarn will help achieve the desired result.
- The color combination when knitting an oval napkin can equally improve or worsen the final result, so if you have difficulty choosing colors, you should use not only your inner intuition, but also color wheels.
- After the product is knitted, it should be processed: washed, starched, dried and carefully ironed all the elements of the napkin. Processing allows you to align the product, fix its shape so that it looks neat and presentable.
These six simple tips will help you always achieve the desired result when crocheting oval napkins. And the selection of master classes presented in the article will help you quickly master the basics of the craft and make your home cozy. Creative success and even loops!
Video about crocheting a napkin
Very simple and beautiful crochet oval napkin: