Knitted items never go out of fashion, and are especially relevant, for obvious reasons, in the cold season. If desired, you can create a miracle for each family member with your own hands. This handicraft is available to those who can hold knitting needles in their hands and are familiar with the variety of loops. To make the products colorful, use patterns with a description of patterns for knitting mittens with knitting needles.
Rules for knitting mittens
Mittens can be knitted in different ways:
- crochet;
- traditionally (2 knitting needles);
- using a set of knitting needles.
As a result, they are obtained as a whole or from parts that are sewn together. On five knitting needles, a product without seams is obtained. First, the collected loops are divided equally between 4 knitting needles, the remaining one will be the working one. Half is allocated to the top and the palm. If you knit the loops on all the knitting needles, you will get one row. When knitting mittens, patterns intended for 2 knitting needles are often used.
This requires compliance with certain rules:
- Since this is a circle, all the loops on the wrong side are knitted the other way around: face - wrong side, wrong side - face.
- When knitting with a set of needles, pay attention only to the odd rows, which are knitted twice.
- All even rows are counted from right to left, but the stitches are knitted in reverse: wrong side - face, face - wrong side.
- If the pattern has a shift on both the front and back, then all odd rows are knitted as shown in the pattern for traditional knitting.
Knitting mittens with stocking stitch
Knitting is difficult at first for those who first picked up knitting needles. It is better to improve your skills by knitting simple things: socks, mittens, scarves. These items are necessary for a person. 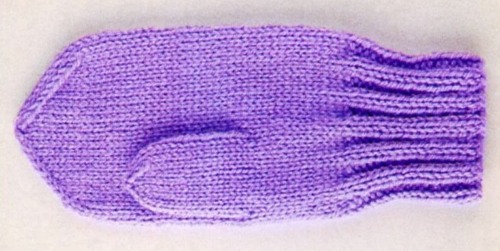 Nowadays, you can buy them, and if they are knitted by the hands of a loved one, then this will become a pleasant and useful gift.
Selecting yarn
The yarn for mittens is selected depending on weather conditions.
It can be:
- wool - for severe frosts and winds;
- semi-wool - for variable temperature;
- acrylic - for small children.
Children under one year are not comfortable in wool and semi-wool mittens, because it has the property of "biting". Despite the fact that acrylic is a synthetic fiber, it retains heat well. Knitting threads can be dyed in one or more colors. There is so-called fancy yarn. It has irregularities and villi.
Things knitted from such threads are original and fashionable.
Wool consumption for mittens:
- children's - from 50 to 80 g;
- women - 80-100 g;
- men's - 100-120 g.
Selecting spokes
Knitting needles are the main tool of a knitter. They differ in purpose, material, thickness. A sweater, jumper, cardigan, dress are knitted with paired knitting needles or connected with a fishing line (circular). Knitting needles are made of various materials. The knitter selects them at her own discretion.
What to look out for:
- Lightness - heavy ones quickly make your hand tired.
- Thread sliding - well-finished products do not catch the thread, which allows you not to be distracted or nervous during the work process.
- The end - the needles should not be too sharp so as not to injure your fingers, blunt ends will make it difficult to pick up the thread.
- Size - is determined by the diameter of the knitting needle and is measured in millimeters. They are selected depending on the thickness of the thread. Knitting density is achieved by the ratio of the thickness of the knitting needles and yarn. On the skein of threads, the manufacturer indicates the number of knitting needles for knitting with this yarn.
Steel needles are good for thin yarn. They are not long, the surface is slippery, the hand does not get tired from the weight. Aluminum ones stain the thread. Therefore, they are suitable only for dark yarn.
For mittens with patterns according to the schemes with descriptions, knitting needles of different thickness are selected. For example, for knitting braids, harnesses, thicker tools are needed, and for an openwork pattern - thinner. Experienced craftsmen knit elastic with knitting needles 1 size smaller than the main part.
Necessary measurements
To ensure that the mittens fit perfectly and sit perfectly on your hand, the following measurements are required:
- the length of the palm from the beginning to the end of the longest finger;
- the distance from the base of the palm to the thumb;
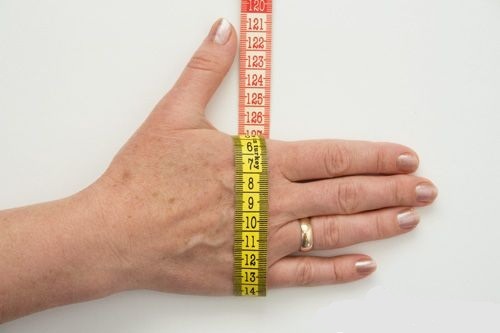
- the distance from the base of the palm to the tip of the little finger;
- thumb length;
- wrist circumference.
Stages of circular knitting of plain mittens on four knitting needles
Having everything you need at hand (knitting needles, yarn, measurements), you can start knitting.
Casting on stitches and knitting elastic
First, knit the elastic. To keep warm, it should fit tightly around the hand and not be short. In children's products, this part is at least 3-4 cm, and adult mittens look beautiful with an elastic from 7 to 9 cm. If desired, knit it longer to make a fold. This will make it look more voluminous. The elastic is an alternation of front and back loops: 1 × 1, 2 × 2. This gives it elasticity.
To determine the number of loops for elastic, several methods are used:
- It is necessary to knit a sample of 20 loops. By measuring, find out how many loops make up 1 cm. For example, there are 3 loops per 1 cm, and the wrist width is 16 cm. Multiply 16 by 3 and you get 48 loops.
- The work thread is wrapped around the wrist and increased threefold. Loops are collected from the resulting length.
The knitting tools must have the same number of loops.
Cast on 48 sts. Knit the first row of stitches with the front and back sides facing up. Distribute 12 sts on the knitting needles and connect: tie the remaining tail and the knitting thread. This place marks the beginning of a new row. You can mark it with a pin. This way you can accurately determine the knitting needle number, which is important for further work.
Knitting technique with satin stitch
Patterns for knitting mittens with knitting needles, schemes with descriptions of which can be found on the Internet, will seem complicated to beginner craftswomen. Therefore, it is optimal for them to start working with something simple - knitting loops with the front surface.
Knitting the Thumb Hole
The place for the finger is made as follows:
- They determine on which knitting needle the finger will be: for one hand - on the third, for the other - on the fourth.
- Knit the first loop, then through 10 sts thread the thread and tie it. Immediately add the missing 10 sts with yarn overs, and knit the remaining loop.
- The same is done when knitting the left mitten on the corresponding tool.
Then knit to the end of the little finger. During work, it is necessary to carry out fittings so that you do not have to unravel the completed work again.
Making a toe
To create the toe, begin reducing the loops. On the first and third needles, knit two of them at the beginning of the row, on the second and fourth - at the end.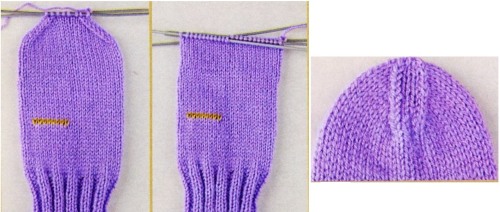 Decrease every three rows until 8 sts remain. Pull all loops together with thread and hide on the back side.
Thumb ligature
To knit a finger, loops are collected on the working tool, and the missing ones are added from the edge. They are divided into 3 parts, and the fourth is worked. 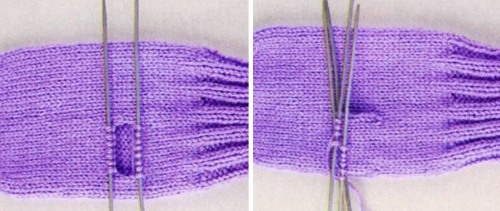 Knit with the front loops to the middle of the nail plate, and then begin to decrease 2 loops on each tool until there is nothing left. They are pulled together with a thread, which is secured on the back side.
Knitting mittens with an openwork pattern - description and patterns for beginners
Patterns for knitted mittens, schemes with descriptions, craftswomen collect in collections, using any opportunity: master classes, educational literature, Internet capabilities. They vary in complexity. A beginner needlewoman will choose a suitable pattern for herself to develop knitting skills.
You can start improving your skills by using threads of different colors. Take balls of different colors. The result will be striped mittens. The colors can be bright, contrasting for children's mittens. Using stripes of the same color, but different shades, you get a more sophisticated option.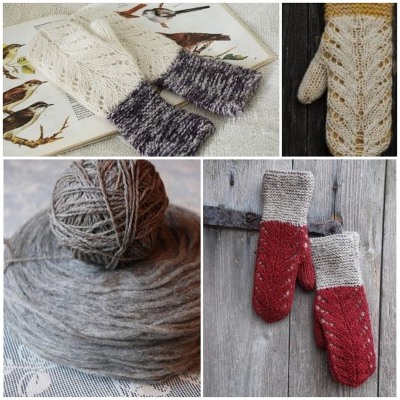
On the Internet, you can find and use patterns for knitting using the jacquard method. In this case, patterns of various themes are knitted with a contrasting color thread. The mittens are dense, since the threads are intertwined on the back side, creating an additional layer.
The complexity of openwork patterns lies in the fact that the work requires a constant count of the number of loops.
After all, the beauty of the pattern is created by adding them with the help of yarn over loops and decreasing them by knitting 2, 3 loops together. At the same time, the number of loops remains unchanged. One mistake leads to a skewed product.
Many websites offer patterns with descriptions of mitten patterns. When knitting with the front surface is fully mastered, you can move on to using simple patterns. They are knitted after the elastic band on the upper side of the mitten is designed, that is, the front loops are knitted on the palm.
Pattern #1. "Pigtails"
A simple braid pattern can be mastered even by a beginner:
- It is placed on two knitting needles.
- Depending on the number of loops, three braids are placed out of four or two out of six loops.
- The braids are done using the front method.
- Between them, loops are knitted purlwise.
- Braids are created by rearranging the loops.
- They are divided in half and first the second half is knitted, then the first.
- Rearrange the loops after knitting 6 rows.
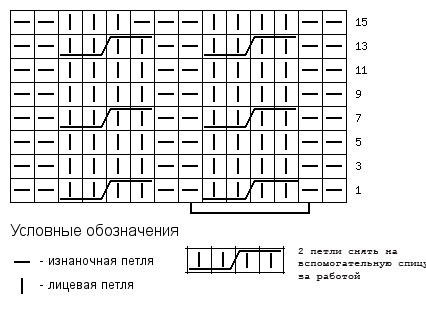
Pattern #2. "Royal Braid"
This pattern is more complicated than the previous one. Its difference is that the loops are swapped, first leaving some loops in front of the work, then behind. It turns out that the braid sometimes diverges in different directions, then converges. 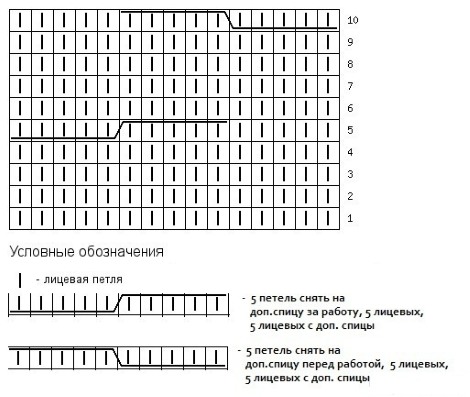 This pattern has only knit stitches. The stitches are swapped every 5 rows. The pattern requires 22 stitches.
Pattern #3. "Lace hearts"
This pattern is a test of possibilities for a beginning craftswoman.
The outline of the hearts is created by the holes from the knitted air crochets. 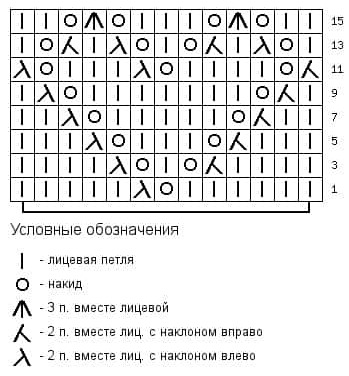 loops:
- For one heart you need 13 loops if it is a large pattern, and 11 for a small one.
- The loops are divided equally, half is knitted, a yarn over loop is made and then two loops are knitted together so that their number does not change.
- In the next row, the yarn over stitch is knitted from the back.
- In odd rows, make two yarn overs, and next to them, two together.
- Between them, the number of loops is increased to 5.
- This is done in rows 3, 5, 7. In row 9 there will already be three yarn overs and row 3 there will be two together.
- In row 11 - four yarn overs, and between them 2 times three together. Then the pattern is repeated.
Pattern #4. "Stars"
You can use a simple pattern that will decorate children's mittens.
The star is knitted from three loops:
- first three loops together,
- then a throw-over,
- knit these three loops again.
They are arranged according to the number of loops in a checkerboard pattern. Between the stars there are loops knitted in the front way.
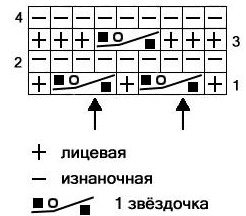
Pattern #5 "Bumps"
The pattern is easy to perform and is knitted from one loop 3. Then the fabric is turned and these additional loops are made purlwise. The knitting is returned back and the loops are reduced by knitting them together. 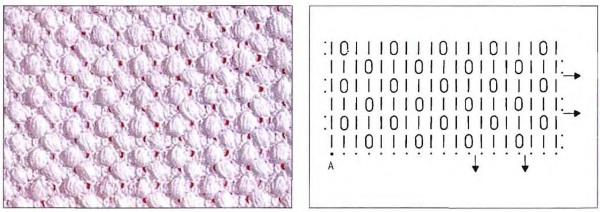 Place the drawing at your discretion. It is good for both children's products and youth mittens.
Downy mittens
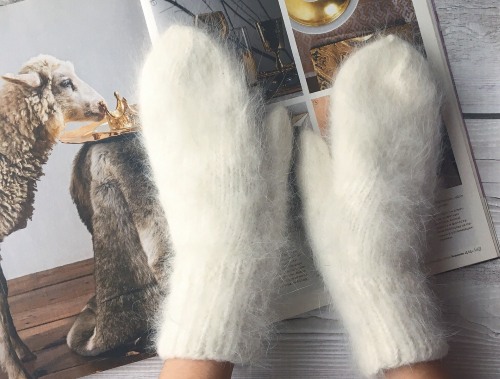
In severe frosts, mittens made of down yarn will help protect your hands from the cold. Products made of down are comfortable, warm, and light. To create down thread, they use the wool of a special breed of goats, which is grown in Russia in three regions: Volgograd, Orenburg, and Altai.
A special technology allows us to obtain a thin and at the same time strong thread, from which craftswomen create things of amazing beauty.
Properties of fluff
Goat down is completely natural. The beneficial effect of down fiber on the human body has been noted since ancient times. Its healing properties are used in nursing premature babies. For this, babies are wrapped in downy shawls that retain heat. Elderly people are saved from radiculitis, osteochondrosis and arthrosis with the help of products made from downy yarn.
When you have a cold, alcohol compresses are replaced with a bandage made from a downy shawl.
Down products not only retain heat, but also remove excess moisture. In down mittens, socks, hats, the body will always be dry. The hypoallergenic property of goat down is used in the manufacture of children's clothes. Down mittens have increased wear resistance. Dirt practically does not stick to them. Proper care will allow them to remain in excellent condition for a long time.
Choosing a knitting technique from down yarn
Mittens made of down yarn are knitted with stocking needles (set of five pieces) in a circle. The products are warm, soft, light and durable. The thin fluffy thread lies evenly and is pleasant to work with. The upper part of the mitten is decorated with braids, cords, and openwork patterns. Openwork fantasies do not reduce the warmth of the product at all. Therefore, the possibilities of knitters are limitless.
Pattern "Openwork leaves"
The pattern requires 22 loops. The pattern diagram is designed for an attentive craftswoman. Counting the number of loops is the key to success. 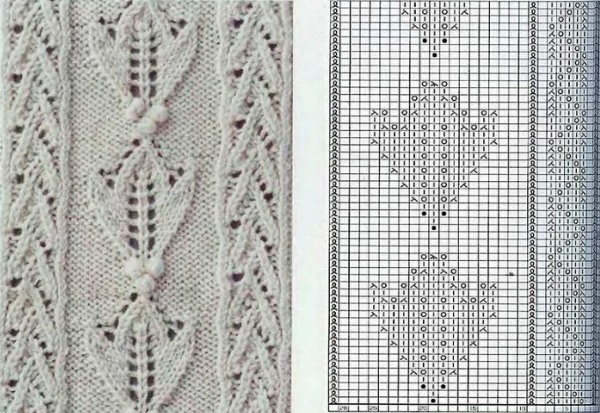 The pattern is created by the holes from knitting yarn overs made with the front method and by rearranging two front loops. They diverge to the right and left of the central back loop.
Pattern "Bindweeds"
A pattern consisting of unusual cords will look good on downy mittens. The cord itself is an alternation of loops knitted with the front and back method. Every 10 rows, there is a crossing on one side to the right, on the other - to the left: first knit the front loop, then the back loop.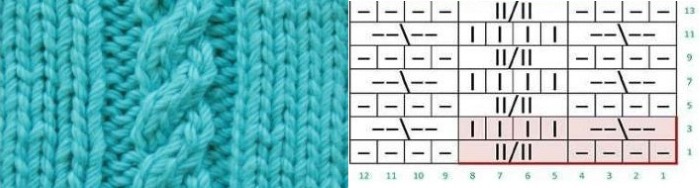
There are a great many patterns for knitting mittens with knitting needles. The diagrams with descriptions will not become clear at once. Perseverance and desire will help to overcome difficulties.
Selecting yarn color
Natural down yarn has different colors: white, gray, black. Products made of white thread are the most spectacular. Modern designers believe that down toilet items go well with fashionable clothes. A set of a hat, scarf and white mittens will make a girl irresistible.
Men's mittens
In cold weather, men will not refuse warm mittens knitted by the hands of their beloved woman. They are irreplaceable during walks in the park, a ski trip in the forest, on the skating rink.
When creating men's mittens, the same methods are used as when knitting women's and children's products:
- select yarn and the required number of knitting needles;
- take the necessary measurements;
- start knitting with an elastic band, which should not be short;
- knit the main part until the hole for the thumb is formed;
- continue knitting until you start decreasing loops;
- create a toe;
- knit the thumb.
When choosing the color of the yarn, you need to consider the man's preferences: black, blue, gray, brown, bottle, khaki. To decorate the top of a warm pair, use all sorts of relief patterns: harnesses, braids.
Patterns with descriptions of patterns for knitting mittens with knitting needles are not always suitable for men's products. You can use the "Pearl" pattern, which is an alternation of front and back loops: if in the first row they knit from the front side, then in the next row in its place they knit from the back. This is a simple pattern, but it looks decent.
Knitting is one of the oldest types of handicrafts, but its popularity not only does not fall, but only grows with each passing year. The imagination of knitters knows no bounds. The desire to make a knitted item special and unique finds understanding among connoisseurs of hand knitting.
Video: patterns for knitting mittens. Schemes with descriptions
Patterns for knitting mittens with knitting needles, see the video:
Pattern for mittens:
Although mittens (fingerless gloves) are not suitable for severe frosts, I often knit them.
Since the mittens are knitted for five fingers, you need to take five knitting needles. The first and second knitting needles will contain the upper part of the finished mitten. It can be knitted with a simple pattern - for example, "double rice". On the third and fourth knitting needles - the lower part, knitted with facial loops.
I do not recommend that beginners knit a product for anyone other than themselves, because if there are problems with determining the size, they can be easily corrected by putting the product on yourself.
The knitting density is calculated from the girth of the thumb and the palm just above it. By measuring the girth of the forearm, you can understand how many rows of loops you will need - the number should be divisible by 4.
The loops are cast on two loops folded together. A fixing knot "tail" is tied at the end. The knitting method is elastic, with alternating purl and face loops. This should be done behind the front wall of the fabric so that the diagonal pattern remains the same.
After 11 loops on four needles, you can take the fifth. Here, the same elastic is used, about 5 cm is knitted, after which you need to return to the main pattern. And, if 44 loops were used during the first knitting, this time there should be 40.