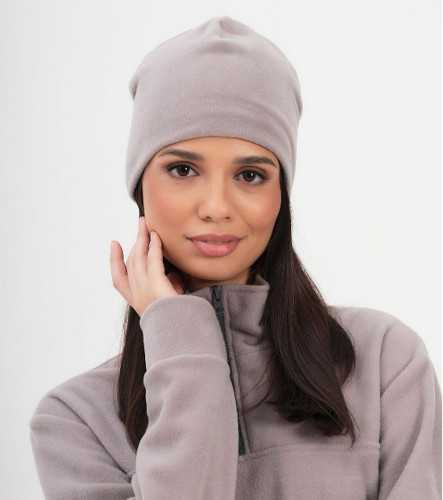
Knitwear is an elastic material for sewing, which fits the head well, does not compress blood vessels and provides air circulation. Lightweight fabrics based on natural cotton fibers are suitable for sports or everyday hats made with your own hands.
Necessary tools and materials
To create a hat from knitted fabric, you will need the following:
| Materials and tools for sewing | Brief description |
| Knitwear | For winter hats, warm fabric is selected that will protect from cold and wind. In this case, thick jersey, woolen fabrics or noodles are suitable. The special weave of fleece loops increases the volume of the hat, creating an air layer and ensuring heat retention. These types of fabrics can be treated with special compounds to impart water-repellent properties and resistance to dirt. For a demi-season hat that should be warm enough but not cause overheating, consider footer, jacquard, jersey. Velour, cashmere and ribana based on cotton or viscose are suitable. These fabrics retain heat well, allow air to pass through, and can be dyed. Cotton in knitted fabrics guarantees comfort, and due to the loose structure of the fabric, good air permeability is ensured. Lightweight summer hats require fabrics that can quickly absorb and evaporate moisture. Kulirka and interlock are most often used to make summer hats. |
| Sewing machine | It is necessary for making basic seams and finishing edges. For working with knitwear, it is recommended to use a sewing machine with the ability to adjust the pressure of the foot on the fabric. |
| Machine needle | Stretch, superstretch, jersey #65, 70, 75, 80 or 90 are suitable. The choice of a specific needle size depends on the thickness and elasticity of the material. |
| Overlock | Used to finish the edges of a product to prevent thread fraying and improve appearance. |
| Threads in the color of the fabric | Necessary for making seams and joining parts. It is important to choose threads that will match the color of the fabric well. |
| Pins or clips | Used to temporarily fasten parts of a product before machine stitching |
| Tailor's scissors | must be sharp and comfortable to cut fabric without difficulty. |
| Ruler | A tool that will help you cut out product parts with precise dimensions and proportions. |
| Measuring tape | It will be needed to take measurements and measure the finished product. |
| Chalk or soap | They will help you make markings on the fabric before cutting. It is important to use a dry cloth so that they do not smudge or leave marks. |
| Hand sewing needle | May be needed for hemming the edges of parts or making auxiliary seams. |
Features of decatizing knitted fabrics
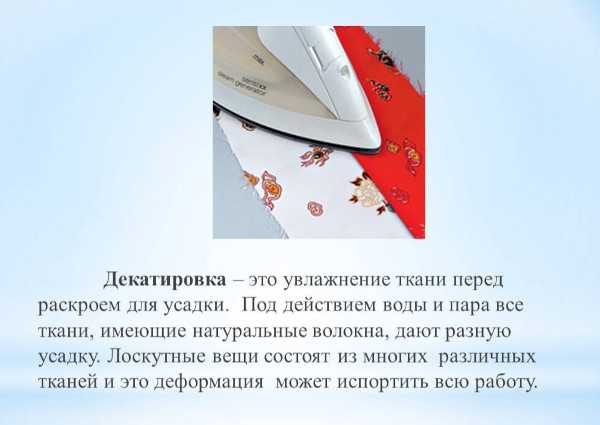
Decating is a pre-treatment of fabric to prevent shrinkage during washing. This step is required for cotton and linen, and is recommended for all fabrics if they contain synthetic fibers.
To decatize, soak the fabric or finished product in warm water for 1-2 hours, squeeze it out slightly and dry, avoiding deformation. Thanks to this procedure, the product will not shrink much later.
When decatizing, it is recommended to follow the following rules:
- It is carried out before cutting the fabric, after which it will become inconvenient or impossible to carry it out.
- First, read the manufacturer's instructions, which may contain useful information about the temperature and methods of decatizing a particular type of fabric.
- Check the dye fastness by soaking the fabric in hot water, wringing it out slightly and ironing the area.
- Do not expose knitted fabrics to high temperatures to prevent them from becoming deformed.
- Use an iron with a built-in steamer or steam generator. Humidification with hot steam will improve the processing result.
- Avoid using starch, as it significantly increases the rigidity of the fabric. After drying, such fabric may acquire an unpleasant crunch. The absorbent properties of the fabric deteriorate, it loses its hygiene.
Depending on the composition, care principle and structure of the fabric, recommendations for decatizing may differ:
| Fabrics | Recommendations |
| Cotton |
|
| Synthetic fabrics |
|
| Blended fabrics |
|
| Viscose fabrics |
|
| Woolen fabrics |
|
Decating stages:
- Check the fabric for dirt: this can be done manually or using a special device for determining the level of dirt in textiles - a moisture analyzer.
- Carry out wet-heat treatment of the fabric with steam by ironing through a damp ironing pad - a piece of fabric or gauze, moistened and placed between 2 layers.
- Dry the fabric naturally.
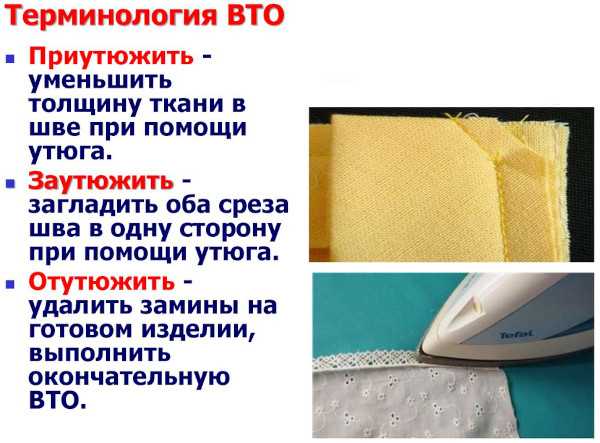
How to Press, Iron and Press Knit Fabric
General rules:
- It is advisable to iron only from the wrong side;
- It is better to turn the fabric inside out;
- the iron temperature should not be higher than that recommended for the fabric;
- To prevent the fabric from becoming shiny from the iron, place damp gauze or a thin cotton cloth on top of it.
Features of ironing for different types of knitted fabric:
| Type of fabric | Recommendations for ironing |
| Cotton |
|
| Synthetics |
|
| Wool |
|
| Viscose |
|
An incorrectly selected ironing mode can ruin the item.
If the fabric contains glitter, beads or other decoration, they should not be covered with an iron. Different types of fabric may require different approaches to ironing or may not be allowed.
Master classes for beginners
The production of headwear, such as hats, requires taking into account certain anthropometric indicators:
| Indicator | How to measure |
| Head circumference | Use a measuring tape that runs along the forehead 1–1.5 cm above the eyebrows, at the back – approximately along the base of the skull, through the most convex part of the back of the head. The tape should fit tightly to the head, but not cause discomfort. |
| Head width and height | These parameters are needed to determine the size and shape of the headdress. The width of the head is measured at the widest part of the back of the head, usually at ear level. The height of the head is measured from the tip of the nose to the top of the head. |
| Depth of the face | This is the distance from the hairline to the eyebrow line. It is also necessary to determine the protrusions in the forehead area or in other places, if they exist. This data will help to create the correct proportions of the headdress and ensure a good fit. |
| Neck circumference length | This parameter will be needed to regulate the tightness of the headdress to the neck. It is measured under the seventh cervical vertebra. |
The measurement of the listed parameters must be carried out with sufficient accuracy.
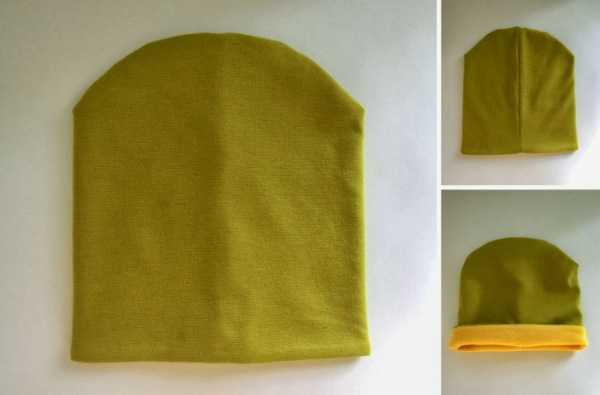
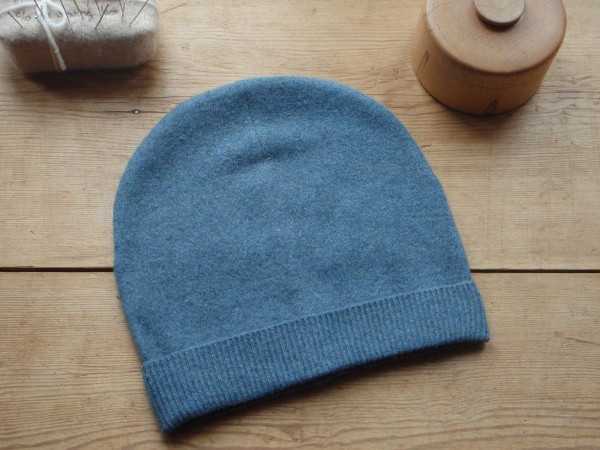
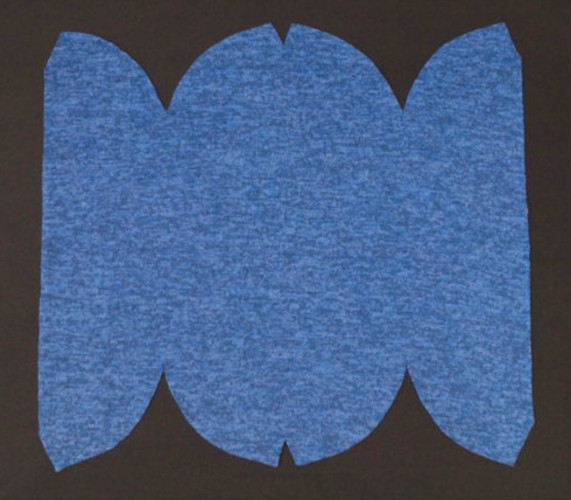
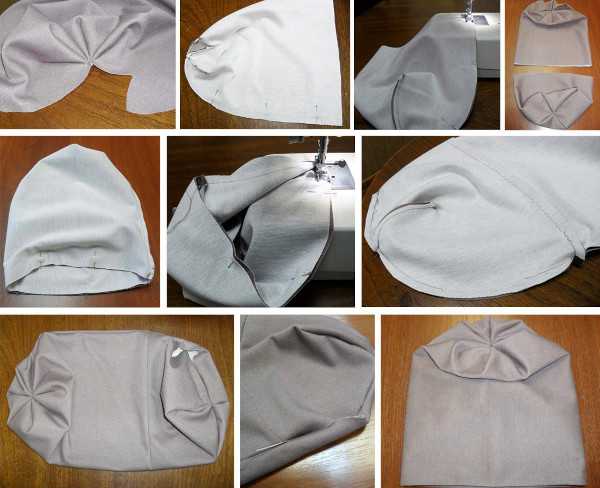
Unlined Turn-Up Beanie
To ensure durability and comfort of wear, the fabric must be elastic and pleasant to the touch.
A hat that you can sew with your own hands following a step-by-step master class will require the following steps:
- Perform fabric decating.
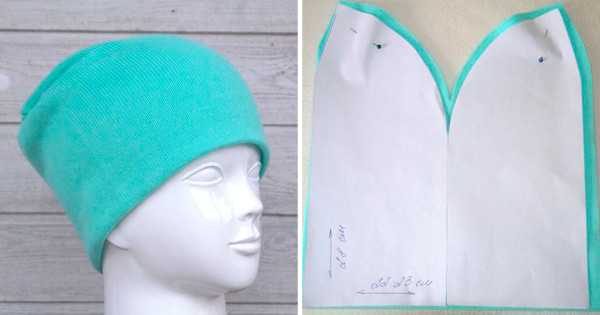
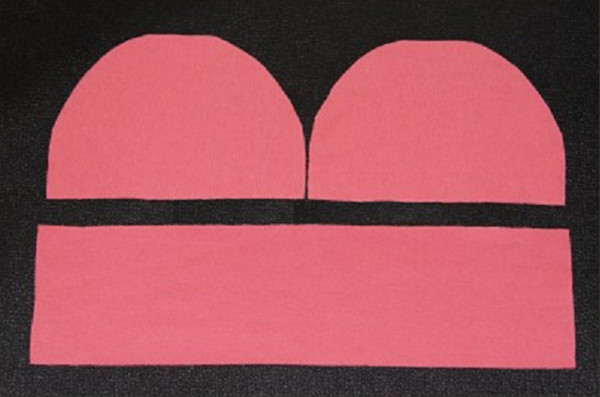
- Constructing a pattern. Transfer 4 identical pieces shown in the picture below onto the fabric.
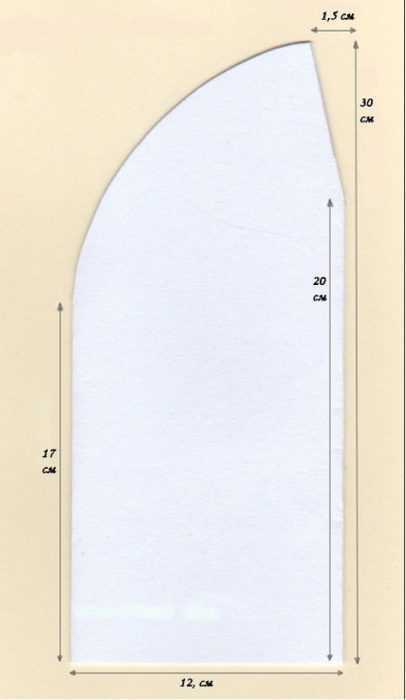
- The fabric is cut along the transferred lines. Seam allowances: 1.0 cm.
- The hat pattern piece is folded in accordance with the photo below.
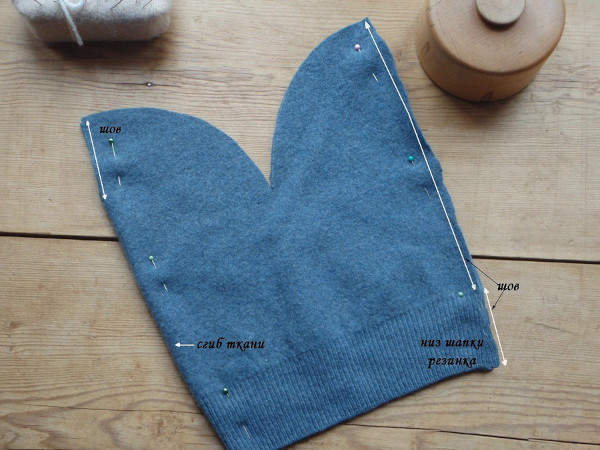
- A seam is made along the short cut at the top of the piece.
- Ironing the seams is a mandatory step.
- The seam is stitched along the long edge and finished exactly at the base of the elastic band.
- Iron it.
- The hat is turned inside out.
- Sew short sections of the elastic to the long section of the overcast. This method ensures a stronger, more durable connection than simply sewing the edges together.
- Iron it.
- The part is laid out according to the photo below.
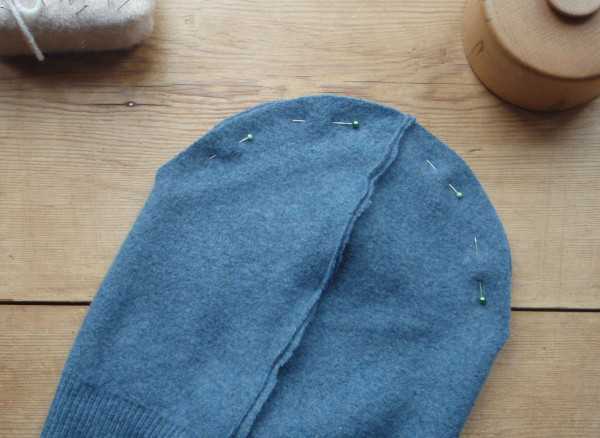
- The open cut is secured with pins and stitched.
- Iron it.
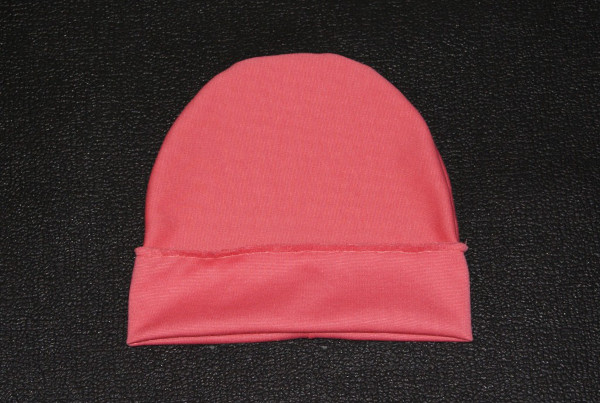
- The hat is turned inside out and a lapel is created.
- Ironing the finished product. Pay attention to the presence of seams - these can be ironed inward or ironed outward.
Double beanie with no turn-up
This model is suitable for everyday wear and can also become the basis for a stylish look in cool weather.
A hat that you can sew with your own hands without a lapel will turn out if you follow the key stages of the work:
- Decating.
- Creating a pattern according to the head size. You can use the dimensions from the previous master class as a basis. Make 2 parts as in the photo below.
- Cut out the pieces according to the pattern, leaving 1.0 cm seam allowances.
- Fold the piece in half with the right sides facing inward and secure with pins.
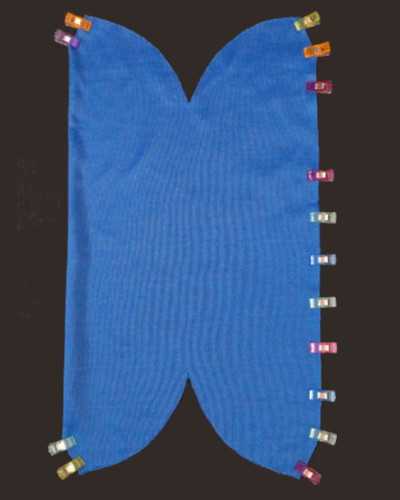
- Secure the pieces with clips where the back seam will be. Leave the seam section unstitched so that you can later turn the hat right side out through it.
- Iron the lines to secure them.
- Place the seams in different directions from the darts.
- Iron again.
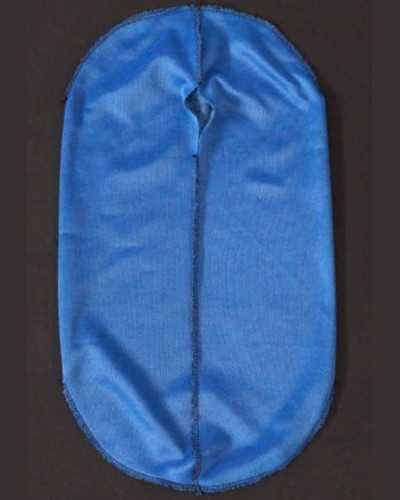
- Now the piece is turned inside out so that the front side is inside the finished hat.
- Close the hole that was used for turning. The blind stitch hides the edges and makes the product neat.
- Fold the hat. This time the front side is on the outside. Secure with pins for ease of further actions.
- Iron the finished hat.
With sewn-on lapel without lining
The parts are made from cotton fabric, which holds its shape well.
A hat that you can sew with your own hands for a cool summer is formed according to a step-by-step master class:
- Prepare the fabric (decate).
- Based on the head circumference size of 56 cm, make 3 parts: 2 measuring 28 by 20 cm and 1 measuring 56 by 13 cm.
- Cut out the pieces. When making 2 pieces measuring 28x20 cm, it is important not to forget to leave seam allowances of 1.0 cm.
- From the wrong side, sew together both pieces 28x20 cm. This will allow you to get the central part of the hat, which will cover the crown.
- Press the seam flat with an iron until it is invisible.
- Sew the bottom of the sewn pieces into a ring, using the smaller side as the circumference.
- Iron the resulting ring.
- Fold the bottom part in half with the seam inward.
- Iron the resulting workpiece. It is important to iron the seams so that no traces of the stitching are visible.
- Connect the piece measuring 13x56 cm, attach the piece measuring 2x28 cm. The seams should be flat. Stitch.
- Final processing of the product. Carefully iron the hat from the inside, paying attention to all the details.
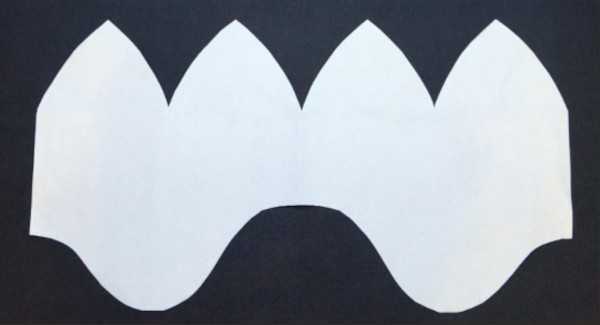
Multi-blade without lapel with lining
A hat that you can sew with your own hands from wedges, with a lining will be warmer and will require the following steps:
- Decating.
- The pattern in the photo is given for a head circumference of 52 cm.
- Seam allowances:
- top, middle, bottom cut = 1.0 cm;
- by wedges = 0.7 cm.

- The main piece and lining must be cut to the same shape.
- Using pins, mark the wedges along the top edge of the main piece and along the top edge of the lining. Pin these wedges in a circle. Repeat with the other piece. Stitch using a sewing machine.
- Iron the seam carefully.
- Pin the middle seam on the main piece, not forgetting the lining piece. Sew the middle seam of the main piece. Leave an opening of 5–10 cm on the lining.
- Turn the main piece inside out and the lining piece right side out.
Step-by-step instructions for sewing a knitted hat with your own hands are presented in the photo. - Combine the main part with the lining, paying attention to the coincidence of the cuts. It is recommended to pre-pin the lining and the main part to ensure precise alignment of the layers. Stitch.
- Iron to secure the layers together and give the garment its final shape.
- Turn right side out through the remaining opening in the lining.
- Hand stitch the hole. Make sure the seam is strong and the work is done carefully.
- The finished product is ironed. This step helps to eliminate all possible irregularities and creases on the surface of the product.
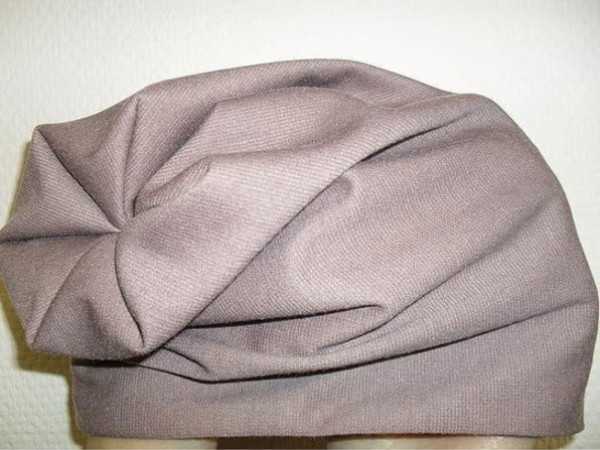
Double-sided helmet with ties
You can sew a helmet hat with ties by yourself, following these steps:
- Decating.
- The pattern in the photo is indicated for a head circumference of 51 cm. The template should be symmetrical relative to the vertical axis and correspond to individual measurements.
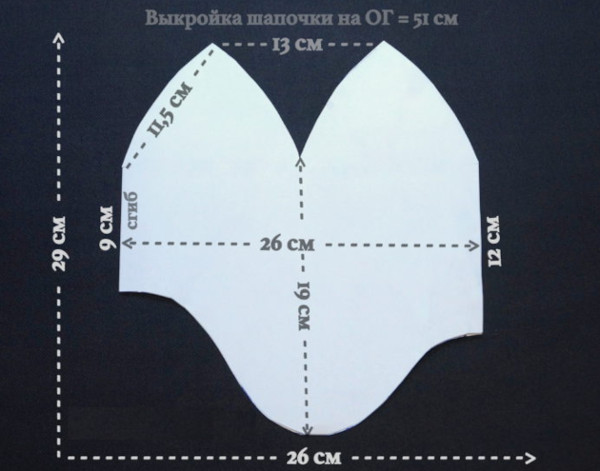
- Place the pattern on the fabric, trace its contours and cut it out. Take into account seam allowances of 1.0 cm.
- All the details are sewn together from the inside into a ring, as shown by the dotted line in the diagram. At this stage, a ring of details is obtained.
- Iron the detail.
- The ties are needed for comfortable wearing and size adjustment. They can be made from the same fabric.
- Connect 2 layers of the main part with the right sides facing each other. The ties should be between the layers. Fix the layers so that they do not shift during further processing. Sew along the edge.
- Iron as carefully as possible so as not to damage the shape of the hat.
- Finish the edges. To do this, cut the edges of the fabric at an angle. These steps are necessary so that subsequent seams are invisible, and the hat turns out neat and aesthetically pleasing.
- The top parts are placed on top of each other with the wrong side inside. Sew them together. If a 2-sided hat is being made, then sewing starts with any layer. If it is 1-sided, then first with the front side, and then with the wrong side. Sew with overcasting or zigzag.
- To hide the last seam, you can use a blind stitch made by hand.
- Ironing the finished product helps to achieve the desired shape and eliminate possible irregularities after stitching the layers.
Balaclava for winter sports
For this master class you will need thick fleece with a long pile.
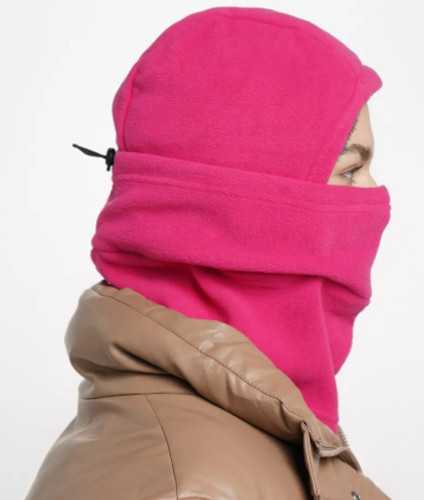
The creation of a comfortable balaclava for active outdoor recreation can be divided into several stages:
- Decating involves pre-treating the fabric with steam or ironing to prevent shrinkage after washing.
- Prepare a drawing of the future balaclava that corresponds to the specified dimensions. When creating a pattern, it is important to take into account the features of the shape of the face and head to ensure comfort when wearing.
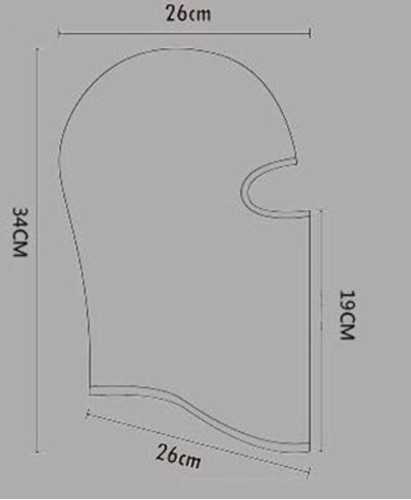
- Cut out the fabric. It is important to use quality materials so that the finished product is durable and reliable. Seam allowances - 0.7-1 cm.
- Sew the back seam using a narrow zigzag stitch.
- Press the seam using a setting suitable for fleece.
- Cover the opening of the balaclava with piping or strips of fleece.
- The overcast seam and sewn-on piping are carefully ironed.
- Connect the slit in the nose area to ensure a tight fit of the balaclava to the face.
- Finish the bottom edge with piping or fleece tape.
- The finished hat is carefully ironed to achieve a neat and presentable appearance.
Tips for Beginners
There are several important aspects to consider:
| Stage of work | Comments, recommendations |
| Choice of style | Determine the type of hat. This will determine the material consumption and pattern sizes. |
| Material properties | Take into account elasticity, texture, density. |
| Patterns and templates | Make sure that the patterns display all the necessary parameters. |
| Fabric preparation | Wash it according to the manufacturer's recommendations. Lay the fabric out with the smooth side up and let it dry naturally. |
| Taking measurements | Take the necessary measurements from the head of the person for whom the hat is being made (head circumference, height and shape of the forehead). |
| Receiving cutting details | Transfer the pattern pieces onto the fabric following the instructions. Don't forget about seam allowances. |
| Recommended seams | When working with footer, zigzag stitches with folded edges are suitable. For dense knitwear, a folded stitch with an open cut can be used. |
| Edge processing | It is recommended to overcast the edges of the seams to prevent unraveling and to give the product a neat and finished look using an overlock. |
| Trying on the product | After sewing the parts together, the product is tried on to ensure that it corresponds to the required dimensions and fits comfortably on the head. |
A hat is an essential element of a wardrobe in the cold season, providing comfort and warmth. Knitwear is a convenient material for sewing headwear due to its elasticity and ability to take a given shape. That is why this fabric is often chosen as a material for making them with your own hands.
Video about DIY knitted hat
How to sew a hat with a turn-up: