To make a birthday present for a girl more interesting, you can combine flowers and sweets, making a bright one bouquet of sweets. This is one of the best congratulation options that you can make with your own hands.
Benefits of DIY Bouquets
Candies, chocolates and other sweets in colorful wrappers, collected on long sticks and beautifully packed, look like a bouquet of flowers. It can be assembled according to the recipient's preferences.
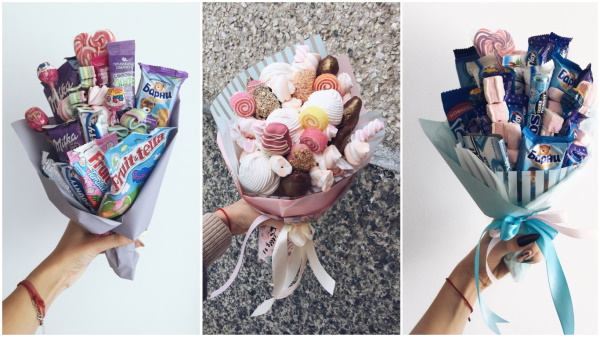
When creating a bouquet of sweets, you can fully express your creative potential. It can look different and have different compositions (chocolate bars, caramel on a stick, marmalade, chocolate eggs and candies).
Materials for work
A bouquet of sweets for a girl can be made from many available materials.
In all cases the following will be required:
- Tissue paper or crepe paper. This can be purchased at specialty stores or in the stationery section of most supermarkets.
- Wooden sticks (one for each candy or other element of the bouquet).
- Candies, chocolate, bars, marmalade – any sweets of your choice.
- Clear tape (for attaching wooden sticks to sweets).
- Scissors and hot glue gun.
- Wrapping paper or plastic, ribbons and braid for decoration.
- Gift tags (optional).
To create a long-lasting bouquet that does not require a vase, you also need:
- The container as a base is a small flower pot, box, jar, etc., decorated and designed to match the overall style of the bouquet.
- Foam plastic (you can buy a ready-made cylinder made of it or cut out a figure of the desired shape from a sheet).
Tin cans (like bean or pea cans) and cardboard boxes make beautiful vases. Not only are they free, but you can decorate them however you like.
The main decoration options are as follows:
- Cover with a layer of tissue or crepe paper (or paper gift wrap).
- Paint with glitter acrylic paints or spray paints.
- Cover with fabric using hot glue to create a soft and vibrant shell.
- Wrap the container with ribbon or craft tape, securing it in place with hot glue.
Methods of assembling sweet bouquets
A bouquet of sweets for a girl can have different shapes and volumes. Depending on the elements used, the methods of assembling the product may differ from each other.
Without a stable foundation
This product looks exactly like a flower bouquet that requires placement in a vase.
The assembly is as follows:
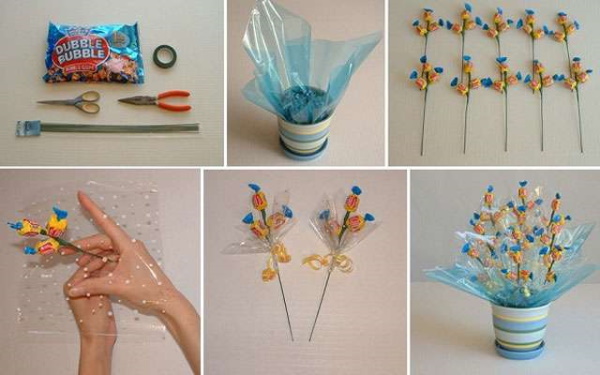
- You need to attach a wooden stick to each selected sweet, wrap it in a piece of cellophane or cling film and wrap it with transparent tape.
- Tissue or crepe paper should be cut into square pieces and folded 2-5 pieces on each treat at an angle, forming a flower bowl with petals, the lower edges should be secured with tape.
- Next, you need to collect all the free ends of the sticks into a bundle and glue them together at the end with tape so that the blanks form a bouquet.
- Then you need to wrap the entire structure with a large piece of tissue paper or decorative wrapping paper, twisting its ends around the glued part of the sticks.
- The finished bouquet should be tied with a ribbon or tape, and, if desired, decorated with a tag.
Bouquet with base
This product looks like a flower bouquet placed in a vase. To create it, you will need a base to which all the elements of the structure will be attached. This can be a mug, a vase or any other container of suitable size.
In addition, you can make it yourself from flat rectangular cardboard boxes.
The process of assembling such a bouquet is carried out as follows:
- Using a glue gun, glue the edges of 3-4 boxes together to form a triangle or square.
- Then you need to cut a triangle or square out of the foam plastic that is big enough to fit inside the box structure. You don't want to make it too small, or it will just slip out.
- It is necessary to use a glue gun to secure the foam figure inside the cardboard blank, 5-10 cm below the top edge.
- Next, you need to take a separate sheet of tissue paper (any color) and cut it into 4 identical pieces, then glue them halfway to the inside of the box structure, bending the free edges outward.
- Using clear packing tape, glue a wooden stick to the back of each candy.
- Then you need to insert each treat on a stick into the foam until you get a beautiful composition. You may need to adjust the length of some sticks by cutting it slightly. You need to install sweets in several rows by size so that they do not overlap each other and at the same time look voluminous.
- Finally, tie the decorative ribbon into a bow and glue it to the top front of the cardboard base. You can add other ribbons, bows, and gift tags if you wish.
In the form of flowers in a pot
A bouquet of sweets for a girl, designed as flowers in a pot, is a work of art. There are many options for decorating and designing such a product.
The easiest way to assemble a candy bouquet looks like this:
- It is necessary to cover a flower pot or a large tin can with fabric, colored paper or tape (wrapping it in a continuous layer around the entire circumference from top to bottom) using hot glue.
- Then you need to cut a cylindrical piece of suitable size from the foam and place it inside the container you are using, securing it with crumpled sheets of tissue paper.
- On top, you need to put a piece of clean cloth or napkin in the color of the base; if desired, you can sprinkle a layer of small marmalades or dragees on top.
- Next, glue wooden sticks to the back of each sweet (2 for chocolate bars and large bars, 1 for all other treats).
- Small squares of tissue paper should be threaded onto sticks in the middle and twisted around the candies to resemble flowers. More complex designs and decorations can be created if desired.
- Then you need to place the sweets in the pot, sticking the ends of the sticks into the foam.
- Finally, you should decorate the structure with ribbons and bows.
Volumetric stable bouquet without a vase
This sweet bouquet has the shape of a ball or trapezoid, and is made without a base at the bottom. Only small sweets in individual wrappers (candies, marmalade, lollipops) can be used for this design.
It is quite easy to make a product of this type:
- It is necessary to cut out a truncated ball (with one flat side), a cone or a trapezoid from foam plastic or floral polystyrene, and cover the resulting figure with paper or fabric.
- Starting from the bottom, you need to attach candies and other sweets to the structure in continuous layers. To attach, use sewing pins, threading them through the wrappers and pushing them all the way into the foam until only the pin head remains visible.
- Once the entire figure is covered with candies, the bouquet is ready. You can decorate it with small balls and bows on sticks, the ends of which will need to be stuck into the foam.
| Sweet Bouquet Design | Advantages | Flaws |
| Without a stable foundation |
|
|
| With a stable base |
|
|
| In the form of flowers in a pot |
|
|
| Volumetric stable bouquet without a base |
|
|
From chupa chups
A bouquet of sweets for a girl made from Chupa Chups is a simple, but at the same time cute and practical gift.
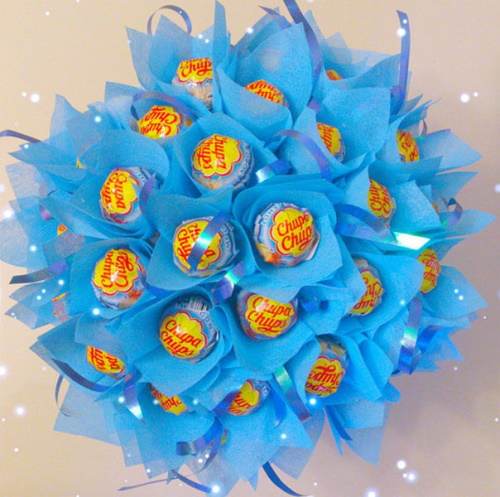
To make it you will need:
- a polystyrene foam ball with a diameter of 20 cm or more (it can be purchased at flower shops);
- a pot or bowl that is the right size to hold the polystyrene ball;
- a large bag of Chupa Chups or any kind of lollypops.
- ribbon for decoration.
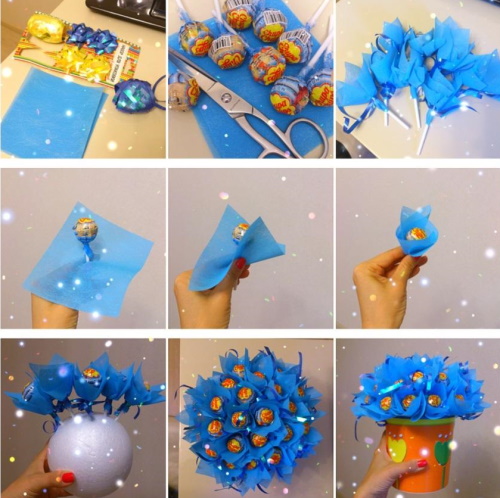
The assembly process is carried out as follows:
- It is necessary to place the soft ball in a bowl or flowerpot.
- Then you need to insert the lollipops into the ball, piercing it with sticks and pushing them in. They need to be placed tightly next to each other, in solid rows, starting from the bottom.
- When the entire surface of the ball is completely covered with candies, you need to tie the structure with decorative ribbon, fastening its edges in the shape of a large bow.
Made of chocolate
For this DIY chocolate bouquet you will need:
- small chocolate bars (weight 20-50 g) in brightly colored packaging;
- any bright decorations (mini-balls, hearts, paper flowers);
- small teddy bear;
- a box or jar (or other container) with a diameter of at least 10 cm and a height of about 15 cm.
- bright satin fabric or tissue paper;
- floral foam;
- wooden sticks;
- hot glue;
- decorative ribbons.
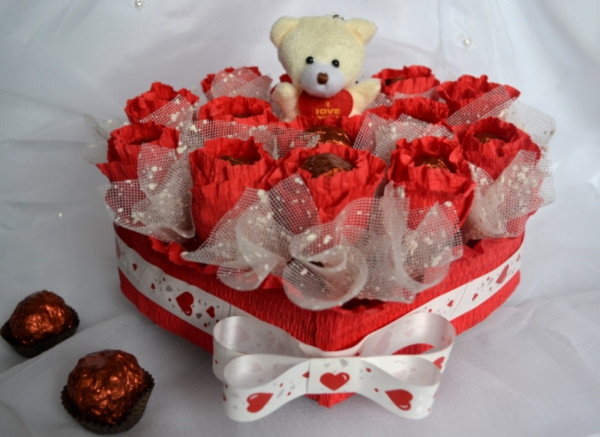
The process of assembling a chocolate bouquet is carried out as follows:
- It is necessary to glue the selected base with satin fabric or tissue paper using hot glue from the outside and inside. If the container has an uneven color, it is advisable to first wrap it in white paper.
- Then trace the outline of the base on sheets of floral foam and cut out 2-3 figures of the appropriate size, place them inside the container on top of each other and secure with a skewer or toothpicks. It is recommended to pre-wrap the upper part in the same fabric or paper that was used to decorate the workpiece.
- You need to glue 2 wooden sticks to each chocolate bar with transparent tape.
- Next, you need to decorate the free part of the sticks under the attached sweets with ribbons. You can simply tie them into bows or attach decorative balls, hearts or paper flowers.
- Place a small teddy bear in a sitting position in the prepared base, closer to the front edge, and attach sticks with chocolates and decorations behind the toy and on the sides.
- You can also add a small balloon or a handmade card to the chocolate bouquet.
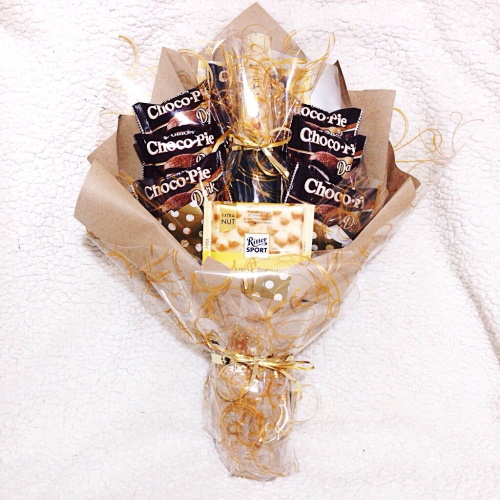
From chocolate bars
A bouquet of chocolate bars is the perfect gift for any sweet tooth.
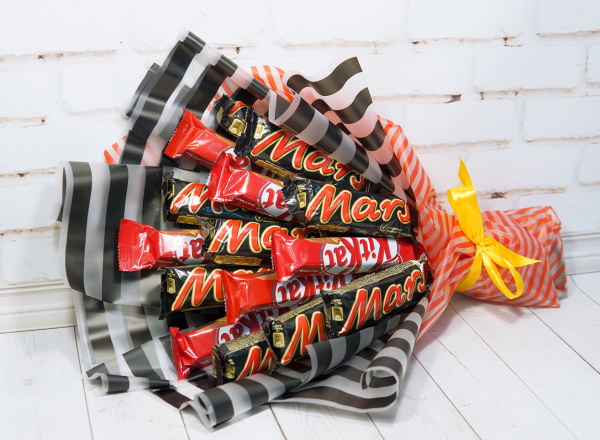
To assemble it you will need:
- wooden sticks with flat ends;
- glue gun;
- chocolate bars in brightly colored wrappers;
- a large tin can or other cylindrical container;
- floral foam;
- colored napkin or thin fabric;
- tissue paper of different colors;
- decorative ribbons.
The process of making a bouquet of bars is as follows:
- First, you need to glue the sticks to the back of the chocolate bars. A hot glue gun works best for this, but you can also use superglue or double-sided tape. It is advisable to attach the sticks to the sweets at different levels (closer to the edges, to the middle, on the entire surface of the bar, etc.) so that the blanks have different heights.
- In the container used as a base, you need to put 2-3 layers of floral foam (cut to its diameter), put a colored napkin or thin fabric on top and secure it (with glue or double-sided tape).
- Next, you need to start placing the "chocolate flowers", starting with the taller blanks for the back of the structure and ending with the shorter ones at the front. The sticks should be inserted deep and tightly.
- Once all the components are assembled, cut out several squares of tissue paper and glue them to the side surface of the base at adjacent angles (it is advisable to use alternating colors).
- The finished bouquet needs to be tied with a ribbon and any decorations to your taste should be added.
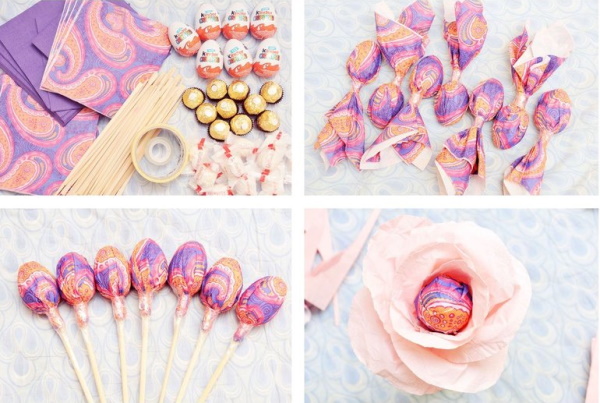
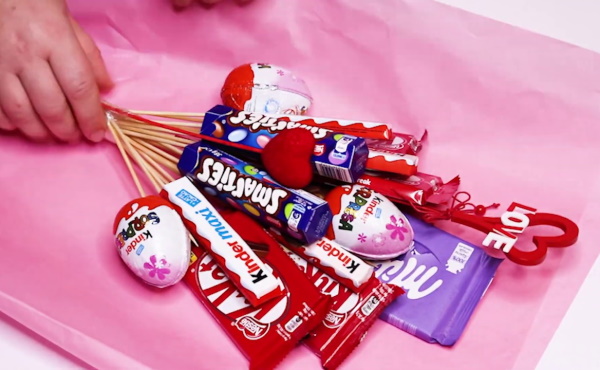
From Kinder
A bouquet of sweets as a gift for a girl can be simple, but at the same time very interesting and original. To get an excellent result, you will need to use not ordinary candies and bars, but chocolate eggs (for example, Kinder).
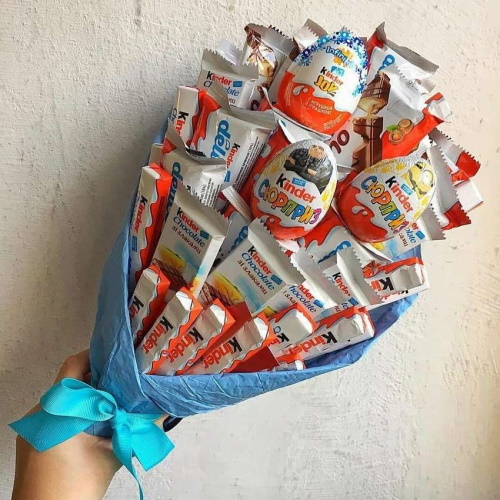
To assemble such a bouquet, you will need the following:
- chocolate eggs - quantity depends on the size of the base;
- small candies in bright wrappers, preferably made of shiny multi-colored foil.
- a cylindrical base with a large diameter (for example, a plastic bucket);
- a block of foam plastic cut to the diameter of the base container;
- bamboo sticks of different lengths;
- transparent tape;
- decorative tape;
- natural or artificial moss;
- silver spray paint;
- black gel paint.
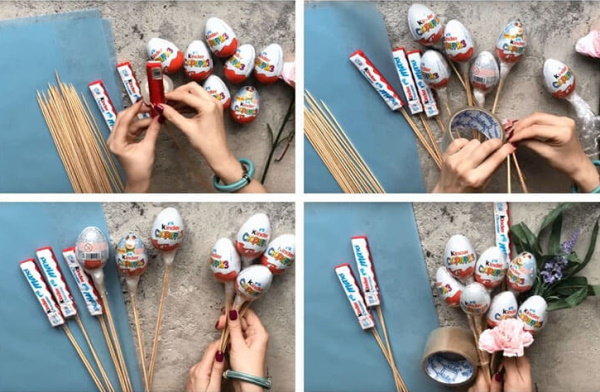
The step-by-step manufacturing process looks like this:
- You need to paint the bucket (or other container of your choice) with silver spray paint on the outside and around the edges on the inside.
- Immediately after applying the spray, dip a dry brush into a small amount of black paint and apply a few thick strokes over the uncured silver layer, immediately quickly blot with a paper towel and smear the remains, mixing the dyes.
- Next, you need to stick the ends of the sticks into the chocolate eggs, having previously made holes in each product (at the bottom). You can secure the connections with transparent tape.
- The candies should also be attached to the ends of the sticks using tape.
- Once all the paint on the base has dried, you need to put the foam plastic in the container and stick all the blanks with chocolate eggs into it. It is advisable to place them so that the sticks are higher in the middle and lower at the edges.
- Then you need to fill the empty spaces with candy blanks (you may have to break some sticks to vary the height).
- Once all the sweets are placed, the remaining visible part of the foam needs to be covered with pieces of moss.
- Finally, you should decorate the bouquet with ribbon, tying it into a large bow.
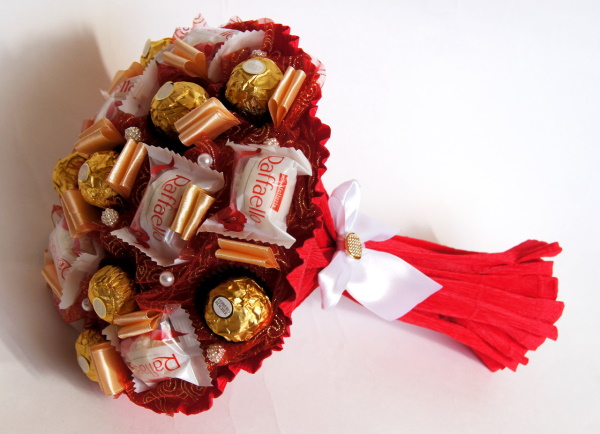
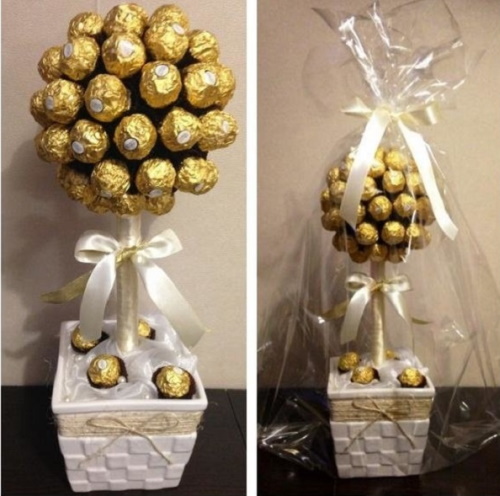
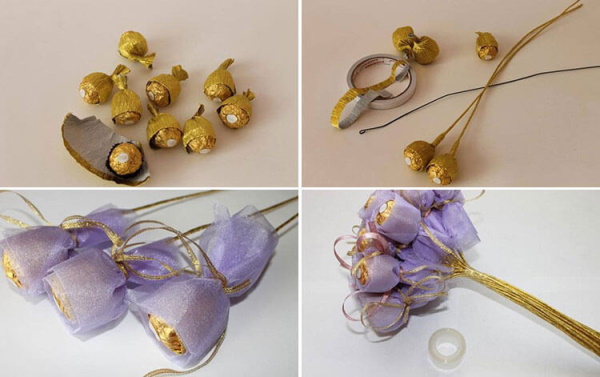
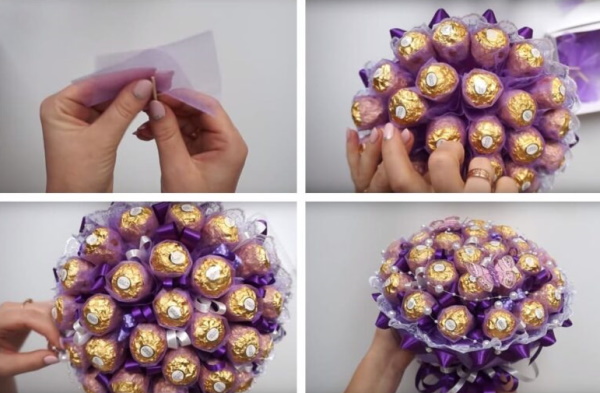
With Rafaello
Even convinced sweet-tooths should not be given ordinary boxes of chocolates for the holidays. It is advisable to make some effort and create a gift that will be special. For example, a sweet bouquet of Raffaello or other similar round chocolates.
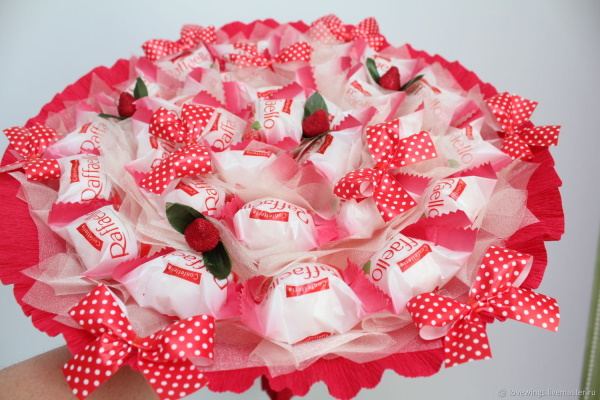
If you give sweets the appearance of flowers, you will get a double gift - a flower bouquet and a favorite treat.
To do this you will need:
- 7 or more bamboo sticks (for a larger bouquet);
- Raffaello, Ferrero or similar candies (round with soft filling);
- tissue paper in different colors (for example, red and turquoise), cut into square pieces;
- decorative ribbons;
- elastic bandage.
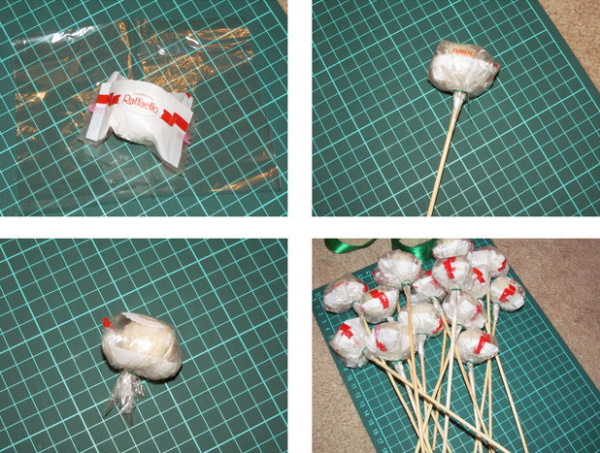
The assembly instructions look like this:
- You need to thread each candy onto a stick (you need to be careful not to pierce the sweets all the way through).
- Next, you need to take squares of tissue paper of the same color and fold each one diagonally at an angle, wrap them around the candy on a stick and secure the bottom edge with tape.
- Then you need to repeat the previous step with paper blanks of a different color, forming the flower cups.
- All the created “flowers” should be collected into a bunch and the loose ends should be glued with tape to create a bouquet.
- After this, you need to take a large piece of tissue paper and wrap the product, twisting the ends around the tips of the sticks, and secure with tape.
- Finally, you need to tie the bouquet with a ribbon, gathering its ends into a large bow.
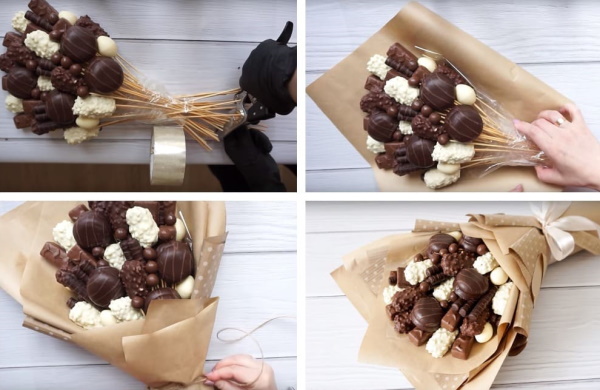
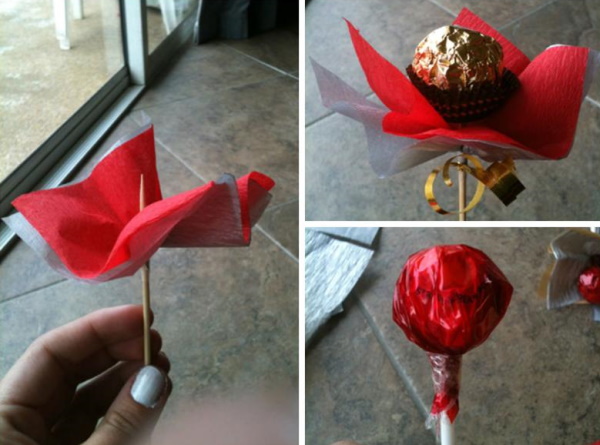
With truffles
Birthdays and other holidays provide a great opportunity to create a personalized gift in the form of a bouquet of sweets. Any sweet treats will do for this, but truffles are most recommended. Their shape allows you to create figures and structures of a very interesting appearance.
For a truffle bouquet you will need:
- colored cardboard;
- flower shaped cookie cutter (optional but recommended);
- hot glue or strong tape;
- green wooden sticks or skewers (painted green);
- double sided tape;
- small chocolate truffles in a package;
- green floral foam;
- cylindrical vase.
The product is assembled as follows:
- It is necessary to draw flower-shaped figures on sheets of colored cardboard and cut them out with scissors. It is advisable to use a large cookie cutter (draw its outline), but you can also make your own arbitrary drawing. The main thing is that each flower contains 5-6 petals of a fairly large size (they should fit chocolate candies).
- A stick needs to be glued to the back of each cardboard flower using hot glue. It needs to be positioned so that it sticks out from the bottom of the figure. The stick needs to support the entire back of the flower, otherwise it will fall. If you don't have hot glue, you can use tape.
- Next, attach a piece of double-sided tape to each petal and to the center of the flower. Alternatively, you can use a dot of glue.
- In each point prepared for gluing, you need to put a chocolate truffle in a wrapper and press it for a while. It is necessary to use small chocolates, no more than 2.5 cm in size. It is advisable to attach truffles in the same wrapper to the petals, and in another - to the center of the flower.
- Then you should cut out several leaves from green cardboard and glue 1-2 pieces onto each stick.
- Place a piece of floral foam in the vase. If necessary, trim it with a serrated knife so that it fits snugly into the container.
- After this, you need to insert all the blanks in a checkerboard pattern. It is advisable to press the flowers located in the first row into the floral foam as hard as possible, and the back layer - with minimal effort. This will allow you to achieve different heights of the bouquet components.
Practical tips for creating a bouquet
- Regardless of the type of sweets chosen, you should focus on their expiration date on the original packaging. Using them in a bouquet should not have any effect on the quality of the products. Therefore, you can assemble the product in advance and store it as long as you like within the expiration date of the sweets.
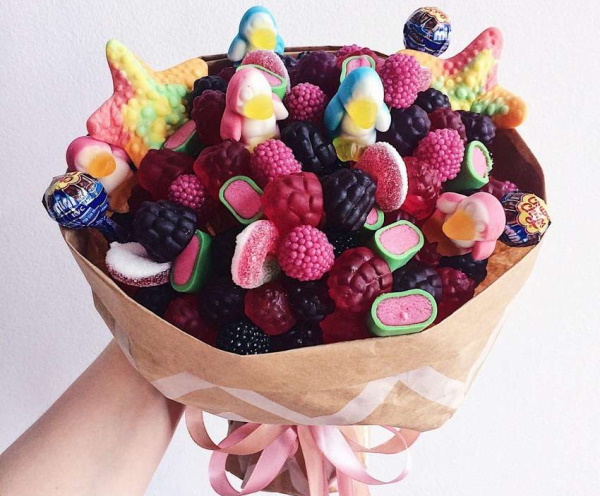
- In addition to sweets, bars and chocolates, you can add nuts, dried fruits, protein bars and so on to the bouquet.
- It is recommended to trace the outline of the base container on floral foam or polystyrene foam and cut out figures along it. This will allow for a dense placement of the material and will increase the strength of the bouquet. If the pieces of polystyrene foam are smaller than the diameter of the container, they must be glued with hot glue or secured with crumpled tissue paper.
- The type of paper you need depends on the project and the specific application. To create the flower shapes to which you attach the candies, you'll need something stiff (like cardboard or poster paper). To wrap the candies in paper, you'll need something thin and pliable (like tissue paper).
- Any bouquet of artificial fabric flowers can be turned into a sweet gift. To do this, you will need to glue a wrapped chocolate candy to the center of each flower.
- The easiest and fastest way to assemble a bouquet of sweets is to wrap all the components in colored tissue paper and then transparent cellophane on top of it, and then tie it with a wide colored ribbon to secure it.
For a more original look, you can place the bouquet in a handmade ceramic pot and tie it with linen or cotton ribbons for decoration. You will also need to insert polystyrene or floral foam into such a container. In addition, many girls will be happy to receive a bouquet consisting of both sweets and fresh flowers as a gift.
Video about bouquet of sweets
DIY Candy Bouquet: