The fascinating hobby of weaving baubles is suitable for those who like to create beautiful things with their own hands. Along with beaded products, there are less popular, but equally beautiful techniques, such as weaving with floss and kumihimo threads. They are much easier to perform than weaving baubles from beads or using a crochet hook.
Following a simple pattern, you can create real masterpieces that are worn on the arm or waist as a belt. Their advantage is that the thread is stronger than the same fishing line for beads, so the durability of floss baubles is longer. Anyone can learn these techniques, even those who have never created anything with their hands in their life.
Weaving with floss: tools for work
Weaving baubles, the schemes of which are presented further in the article, begins with the selection of threads and tools. It is necessary, having studied the topic, to decide how the product will be secured, organize the workplace and only then begin weaving.
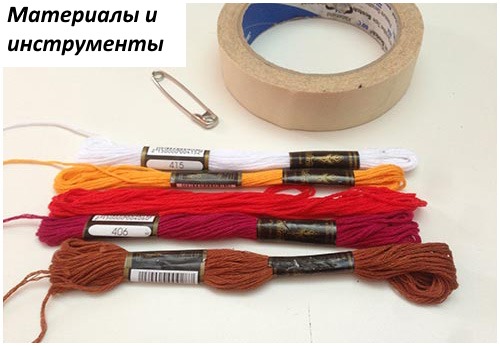
To start working, you need to have all the necessary tools at hand:
- threads;
- scissors;
- Scotch tape or any other tool for securing threads;
- large comb (to push the knots upward).
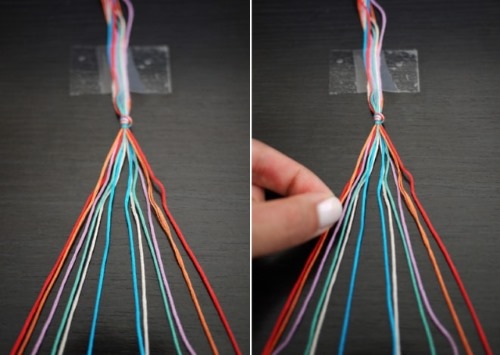
How to secure the threads
In order for the work to be even and taut, it is necessary to prepare correctly, namely, to secure the measured threads, which are inconvenient to hold with your hands, even if they are connected in 1 knot.
There are many ways to secure the threads:
- tie all the threads into a knot and attach them to the table with a piece of tape;
- do not tie the threads into a knot, but distribute them separately on a piece of tape, which is then attached to the table;
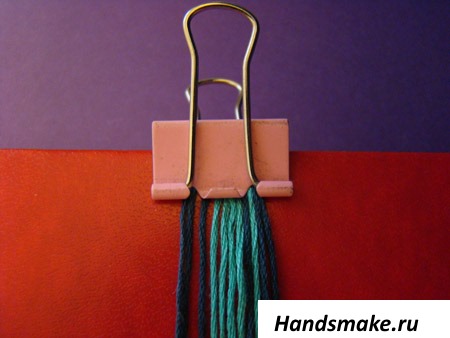
- secure the coccyxes to the book with a paper clip;
- tie the ends of the threads to a pin, which is attached to the pillow;
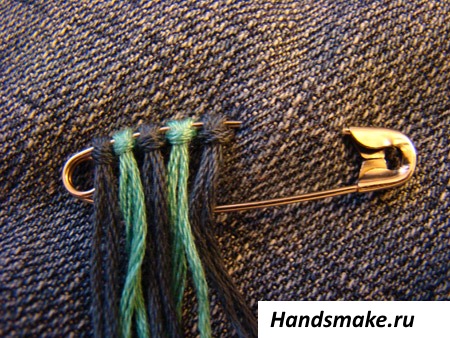
- thread each thread separately onto a large pin, which is attached to the fabric;
- place the threads separately on a paper tablet that has a clamp, place a ruler on top of the threads and secure it with a clamp;
- string all the threads separately onto fittings, for example, onto a belt.
Basic knots for weaving baubles
There are only 2 basic knots for weaving, the other 2 are their mirror image. They are performed using a working thread and a main thread, which is pulled vertically, taking a passive position.
The threads will change places in the process, this should be taken into account and do not try to twist the work, trying to return them to their original position. For training, it is better to take threads of different colors to make it easier to understand the weaving process.
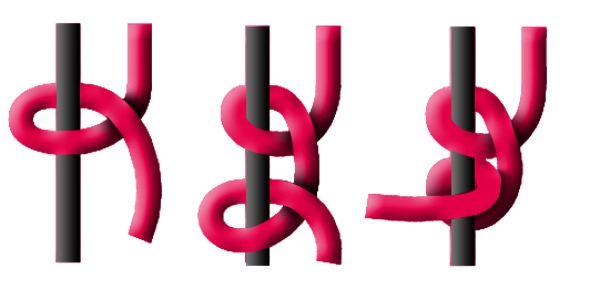
Straight knot
The right or straight knot is made with the participation of 2 threads, the working and the main one. In the diagrams it is depicted by an arrow looking from the northwest to the southeast.
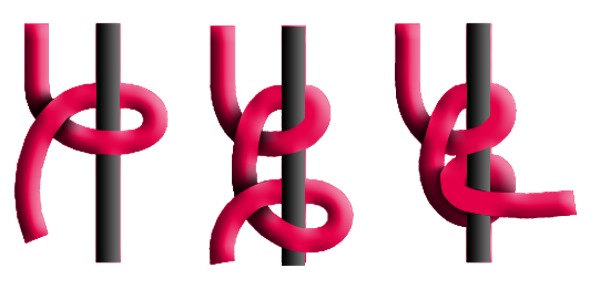
Weaving:
- The working thread is on the left, the main thread is on the right.
- The working thread is placed on the main thread in the shape of the number “4”, and its end comes out of the resulting loop.
- The main thread must be held strictly vertically, pulled with the left hand.
- Move the knot to the very top of the work, with the working thread facing to the right.
- Repeat the action 1 more time.
- Thus, the threads need to be swapped.
Reverse knot
The left or reverse knot is the mirror image of the right knot. It is represented on the diagram by a diagonal arrow running from northeast to southwest.
Weaving:
- The main thread is on the left, the working thread is on the right.
- The working thread lies on the main thread, forming a reverse number “4”, with the tip facing to the right.
- Bring the end of the working thread through the resulting loop.
- Pull the main thread vertically with your right hand.
- Pull the working thread with your left hand, moving the knot to the very top of the work.
- Repeat the process, changing the thread positions.
Left tatting
This knot is a mixture of a direct and reverse knot, the difference here is that at the end the threads do not change places.
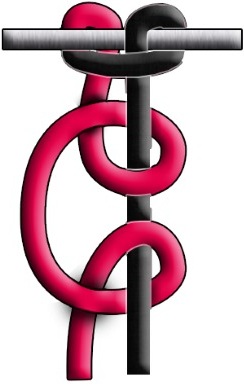
In the diagram, the node is indicated by a broken arrow pointing to the lower left corner.
Weaving:
- The main thread should be held with the left hand.
- With your right hand, place the working thread on the main thread, forming a “4”.
- Pass the working thread through the loop and pull it with your right hand to the very top, securing the knot.
- The second knot is made in the same way, placing the working thread on the main thread, forming a reverse “4”.
- Pass the end of the working thread through the loop and pull it with your left hand, now hold the main thread vertically with your right hand.
- Fit the knot to the base of the work.
Right tatting
This knot is the reverse version of the left tatting knot, and looks like a curved arrow pointing to the lower right corner in the diagram.
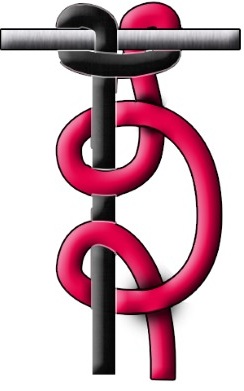
Weaving:
- The main thread lies strictly vertically and is pulled with the right hand.
- Place the working thread on top of the main thread, forming a reverse "4".
- Pull the end of the working thread through the loop with your left hand.
- Pull the knot up to the top of the work.
- Change hands, hold the main thread with your left hand, the working thread with your right.
- Place the working thread on top of the main thread, forming a straight “4”.
- Pull the working end through the loop and pull the knot up to the base.
Methods of weaving baubles from floss
Weaving baubles, the patterns for which can be found widely available, begins with learning the above 4 types of weaving.
Having mastered this basics, you can begin to make multi-colored patterns and weaves. Complex at first glance schemes are always marked with colors and their further movement in the work, as well as the direction indicated by straight and curved arrows.
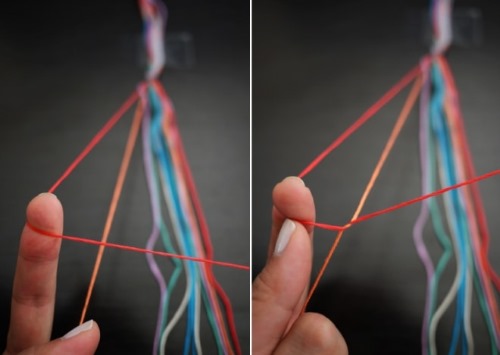
Braiding
The braid can be both the main type of weaving and the decoration of the edges of the bauble. You can use an even or odd number of threads.
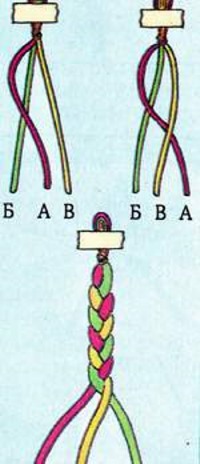
This seemingly complex weaving is best done by beginners by comparing the work with the diagram below.
Oblique weave
This weaving is called oblique because the stripes on the finished work are located obliquely. To complete the work, you can take any number of threads. Beginners are better off learning on multi-colored threads to grasp the essence of the process. The length of the threads should be 4 times longer than the finished bauble.
Weaving:
- Measure out the required number of threads and secure them at the base.
- Lay each thread separately from the other for ease of use.
- Take the outermost left thread, it will be the working thread (all the others are the main ones) and start braiding it around all the others, one after the other, using the “Straight Knot” technique.
- Having reached the end, braid the thread on the far right and make it the working thread.
- Start braiding each thread from left to right using the “Reverse Knot” technique.
Thus, all the threads from the right will migrate to the left and vice versa. Having reached the end of the bauble, you should secure the work by making a Straight Knot once. The knots will prevent the work from stretching. You should also leave space to create ties on both sides.
Straight weave
Weaving of baubles, the schemes of which are attached to the description of techniques, has one of the main techniques - straight weaving. This weaving on the finished work looks like horizontal lines, going in a row one after another.
The bauble will be the color of the working thread. The main thread can be any color, it will not be visible on the work. If you need to make a drawing in the middle, then the main thread of a different color is replaced with the working thread.
This version will describe a bauble of one color:
- Measure out several threads, for example, 12 pieces of the same length and color - these are the warp threads.
- Secure them in a row in a convenient way. It is recommended to make sure that their edges are not closed in one knot, otherwise the bauble will lose its shape.
- Leave the working thread in the skein of threads, its length will braid the entire work, so there is no need to cut it off.
- The working thread lies at the very end on the left.
- Start weaving from left to right, braiding each main thread using the “Straight Knot” technique.
- Having reached the edge, change hands and weave with the same working thread, only from right to left using the “Reverse Knot” technique.
- Decorate the ties and finish the work.
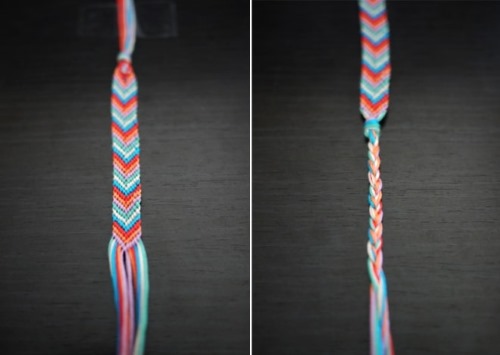
Straight weave with sharp arrows
To complete the work, you need to take an even number of threads of the same length and secure them at the base.
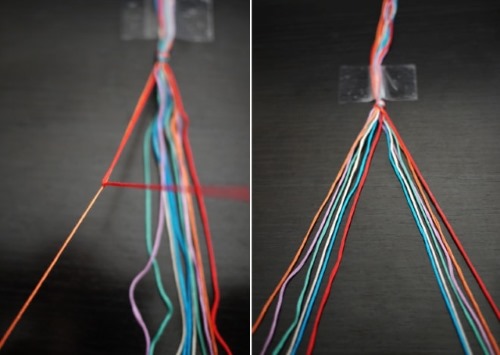
In this case, the bauble will consist of 12 threads:
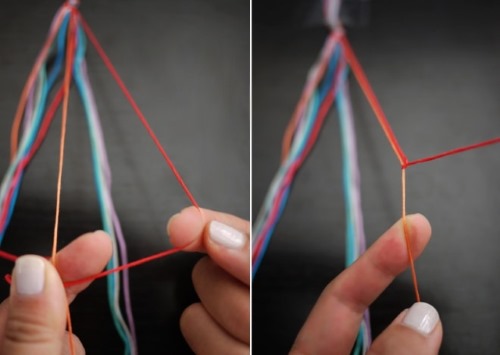
- Start working from left to right. With the outermost thread, which is the working thread, start braiding the first 5 threads using the "Straight Knot" technique.
- Walk to the work center and stop.
- Next, take the outermost thread on the right, now it will be the working thread, and begin to braid the next 5 main threads on the right using the “Reverse Knot” technique.
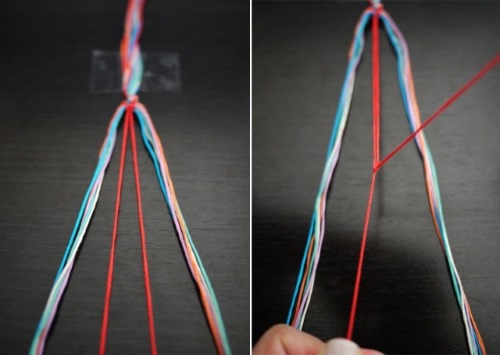
- Having reached the center, intertwine the right working thread and the left one using the “Straight Knot” technique.
- Repeat the process, starting from the left, reaching the center, then the right.
- In the center, where the working threads meet, alternate the “Straight Knot” and the “Reverse Knot”.
- Decorate the ties, trim off the excess thread ends.
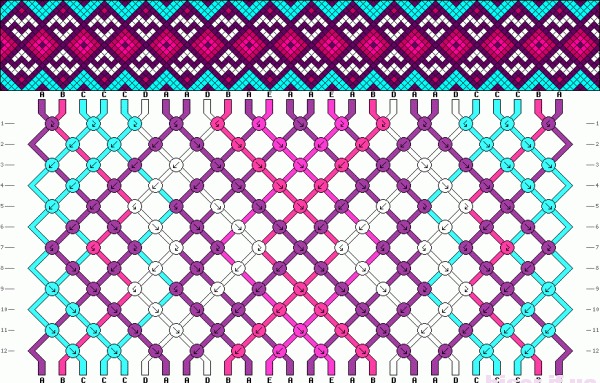
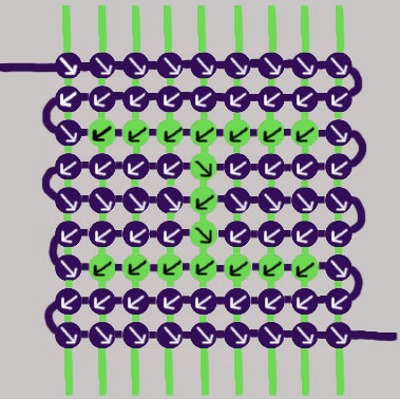
How to weave with names
Names, like any other drawings, are woven using the "Direct Weaving" technique. To do this, you need the drawing itself with the name, divided into squares of two colors, to understand where to change the color of the letter on the bauble itself.
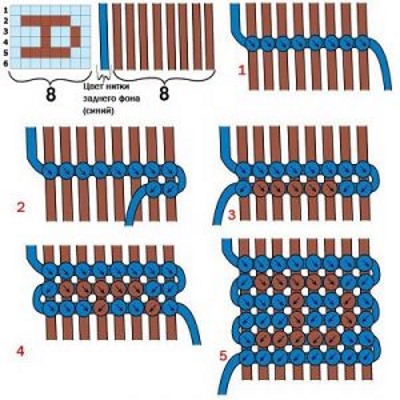
Weaving:
- Choose a thread of 2 colors, for example, white and green, where white will be the main color, and green will be the name itself.
- Measure out equal lengths for all threads and secure to the working base.
- Place the threads of the design in the center, for example, there are 12 threads in the work, 2 on each side are pure white, the rest in the center are green.
- Start weaving from left to right using the "Straight Weaving" technique the first few rows, deviating from the pattern. All this time only the white thread is visible.
- Flip the drawing with the name written horizontally vertically.
- Having reached the first green knot, make it using the “Reverse Knot” technique, that is, mirror image of the main weave.
- Alternate colors as shown in the picture.
- At the end, weave a few rows of indentation with the main color.
- Make the ties, cut the thread.
What to do if you run out of thread
Weaving baubles, the patterns of which were presented above, also takes into account other skills, such as the design of ties or the solution to such an unpleasant problem as the thread running out at the wrong time. It happens that the weaver miscalculates the length of the thread, and in the middle of the work it runs out.
To fix this, you need to do the following steps:
- Move the remaining piece of old thread to the back of the work so that it does not get in the way.
- Then measure out the required piece of thread and apply it to the place where the missing thread should be.
- Carefully braid the old thread with the working thread 2 times, tightening the knot well.
- Also take the edge of the new thread to the wrong side of the work and tie it into a knot with the old thread, cut off the remainder with scissors.
Kumihimo
Kumihimo is a Japanese form of circular cord weaving. Seeing elegant multi-colored cords for the first time, a needlewoman may think that this is a very complex weaving technique that only a select few will master. However, this is not so, moreover, this is the simplest technique for creating bright baubles.
Necessary materials and knowledge for weaving in this technique
To start weaving using the kumihimo technique, you don’t need to have any special knowledge; even a child can learn this method of creating baubles.
The most important thing in kumihimo is the combination of colors that determine the design on the product.
The materials needed to start weaving include a special kumihimo disk, which you can buy or make yourself, threads, and attention.
Making a machine for working independently
The kumihimo or marudai disk can be made of wood, cardboard, foam, plastic or any other durable material. The disks come in different diameters from 10 cm to 20 cm, round and square. Round ones are suitable for volumetric works, and square ones for flat ones.
To create a disc from cardboard (for example, from a box of household appliances or from under shoes) you will need:
- cardboard;
- compass;
- pencil;
- scissors.
Then follow the instructions:
- Draw a circle with a diameter of 10 cm on cardboard.
- Inside the circle, draw a small circle with a diameter of 20 cm using a compass.
- Draw 32 lines around the perimeter of the circle at equal distances from each other, 2 cm long.
- Use scissors to cut out a large and small circle inside the disk.
- Cut the marked lines along the circle.
The kumihimo disk is ready. You can also sign each cut, as is done on the factory version for ease of use.
Basic Kumihimo Weaving Patterns
Kumihimo baubles can be voluminous, flat, square, hollow, etc. Each of them requires a special machine, but the main and most popular are weaving voluminous (round) and flat cords. In terms of weaving technique, they do not differ much from each other, so those who master one of the techniques will easily cope with the other. Below are simple kumihimo weaving patterns.
Round Kumihimo Pattern
Round kumihimo looks like a regular braided cord, it is created in a circle on a round loom or disk. To learn how to weave a bauble in this way, just take 2 colors of floss and calculate the size. 50 cm = 10 cm of finished work, plus about 10 cm for ties.
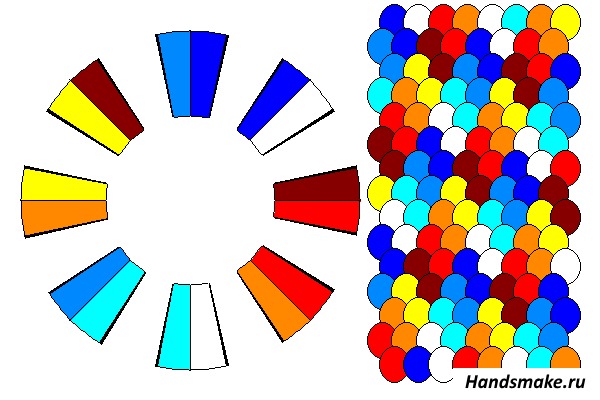
Below is a description of weaving using 6 threads:
- Measure the required length of threads and tie them into a knot, leaving 10 cm.
- Place the edge in the center of the inner circle.
- Distribute the threads 2 in the north, 2 in the south, 2 in the west and 2 in the east, pull the threads tight.
- Take the left upper thread and place it in the slot of the disk to the right of the right southern thread.
- Move the left southern thread to the right of the right northern thread.
- Turn the disc counterclockwise.
- Repeat the steps to move the threads with the western and eastern ones, which have now become northern and southern.
- Continue moving the threads in this order, turning the disk counterclockwise.
The diagrams of round kumihimo show the initial arrangement of the colors. The weaving process is always the same.
Flat Kumihimo Diagram
For flat kumihimo, you will need a square loom. It is the same as the round one, with a hole inside and slits on the sides, only square in shape. It can also be made from cardboard.
For a square cord, you need to take an odd number of threads, for example, 13 pieces:
- Place 6 threads in the slots on the northern part of the loom, 5 threads on the southern part, and 1 each on the western and eastern parts.
- Move the left outer thread from the top to the free slot down to the left.
- On the bottom, take the left thread (which was originally the outermost, but has now become the second) and place it in the vacated hole at the top left.
- Take the 2nd thread from the top and place it in the freed slot at the bottom.
- Continue until you finish the top and bottom rows.
- Swap the east and west threads.
- Turn the machine counterclockwise and repeat the process.
The square kumihimo diagram also indicates the colors for the threads. Above, a trial version with 2 colors was considered, then you can mark the colors on the loom itself, corresponding to the threads, for ease of weaving.
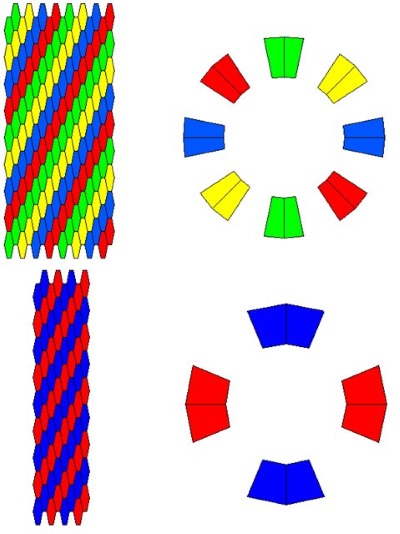
Network
 The “Braid” bauble consists of 16 threads and is made on a round loom (disk).
You need to measure the required length for 16 threads, which consist of 4 different colors.
The bauble diagram looks like this (if you imagine that the disk is a dial):
- 2 threads at 12 o'clock and 2 threads at 6 o'clock of the same color,
- 2 threads at 9 o'clock and 2 threads at 3 o'clock of the same color,
- 2 threads for 2 hours and 2 threads for 8 hours of the same color,
- 2 threads at 11 o'clock and 2 threads at 5 o'clock of the same color.
Start weaving:
- Move the right thread from the top down, to the right of the right extreme thread.
- Move the bottom left thread up to the left of the top left thread.
- Turn the disc counterclockwise and repeat the procedure with the next 4 threads.
Thus, the output is a cord with 4 flowers curling in a circle.
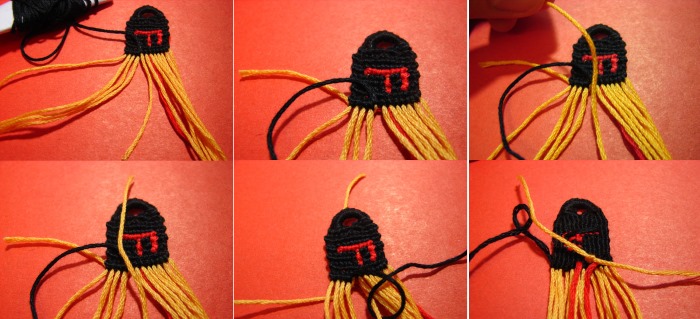
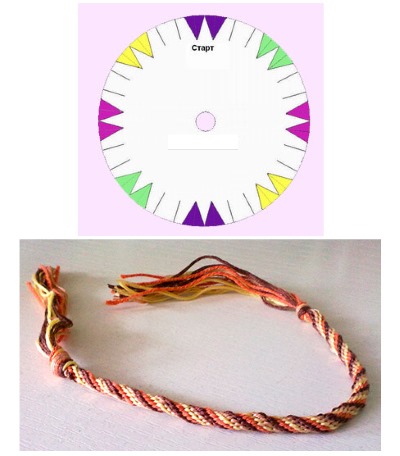
Flower
The cord, decorated with flowers along the length, is made of 3 flowers and 16 threads. First, you need to measure the required length of threads, tie them in a knot at the end and place the end in the hole of the disk inside.

For work take 9 black threads - this is the main color, 6 red - these are flowers and 1 green thread. The arrangement of flowers should be according to the scheme in figure 1. Start weaving using the round kumihimo technique.
Snake
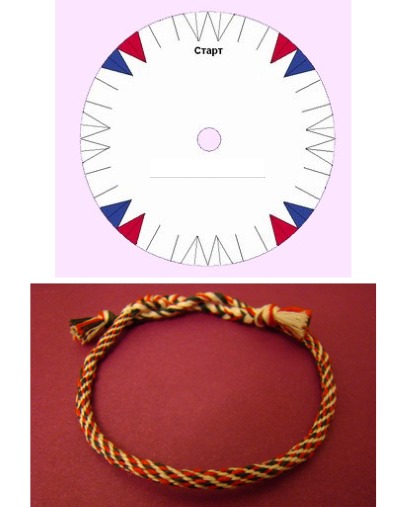 The snake is also woven from 16 threads, 6 of which are white, 4 red and 4 blue. Measure the required length, approximately 5:1, leave 10 cm for ties.
Take a disk with 32 numbers marked on it (32 is the peak of the top, 16 is the peak of the bottom, 24 is the peak of the left part, 8 is the peak of the right part).
Arrange the threads in the following order:
- white threads for numbers 23, 24, 7, 8, 31, 32, 15, 16;
- red threads on numbers 28, 11, 21, 4;
- blue threads for numbers 27, 10, 20, 3.
Start weaving using the round kumihimo technique, turning the disk counterclockwise.
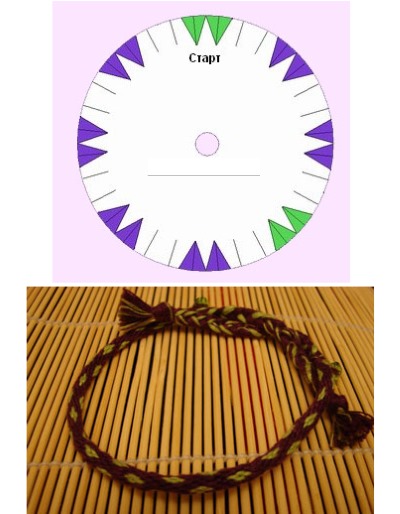
Hearts
The hearts are made of 2 colors, 16 threads thick, 3 of which are pink, the rest are black. At the beginning of the work, you should measure 80 cm of threads, tie them into a knot at the very end and place them in the center of the kumihimo disk with numbers from 1 to 32 depicted on it. The cord should be woven in a circle using the technique of round or volumetric kumihimo.

The arrangement of the thread colors should be as follows:
- 3 pink threads for numbers 23, 24, 27.
- 13 black threads on numbers 3, 4, 8, 9, 12, 13, 16, 17, 20, 21, 28, 31, 32.
Diamonds
 The 16-thread bauble includes only 2 colors, red and yellow. Yellow occupies 4 colors, the rest are red.
Before you start weaving, you should accurately calculate the size of the threads that need to be measured.
To do this, you should measure the length of your wrist and multiply this figure by 5 times.
This length is the initial length of the threads, which must be tied into a loose knot at the very beginning, all together.
Next, you need to distribute the threads in the correct places on the kumihimo weaving disk.
The slots on the disc should be marked with numbers or colors.
The arrangement of flowers should be fixed for the following figures:
- yellow on numbers 12, 13, 31, 32;
- red on numbers 3, 4, 8, 9, 16, 17, 20, 21, 24, 25, 28, 29.
Start weaving a voluminous cord, turning the disk counterclockwise after each movement of the opposite 2 threads.
How to make men's bracelets
Patterns for men's fennecs are usually selected in more dynamic colors, for example, geometric shapes, fire, cold colors, squares, stripes, tartan.
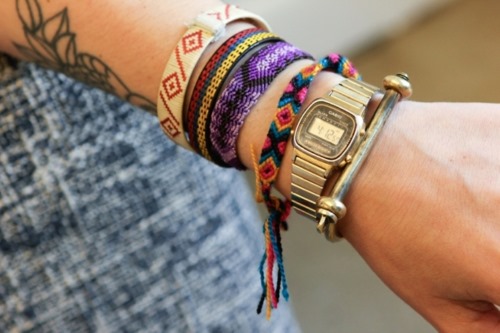
If the decoration is knitted from all the colors of the rainbow, then its owner belongs to the hippie movement. Some men's patterns from floss and kumihimo are given below.
You can also use other materials instead of floss, such as leather, some craftsmen find a use for old, non-working headphones, braiding them using the "Pigtail" technique, securing them with various fittings at the ends. Plain leather, plastic or thread baubles look elegant, especially in combination with gold or silver fittings.
Baubles made from various materials, the weaving of which was described in this article, are a cute and at the same time elegant gift. They are woven by children from simple materials and real masters from nylon and acrylic, expensive threads, the cost of which reaches thousands of rubles.
Having mastered several provided patterns for weaving with floss and kumihimo, you can learn to create more sophisticated handicrafts.
Article formatting:Natalie Podolskaya
Video about weaving baubles
Popular baubles - weaving patterns + photos:
Please change the words "needlewoman" to "needlewomen"