For children pencil drawing is considered not only an effective way to reveal creative potential, but also an effective method of reducing anxiety and getting rid of nervous tension. A number of drawings, for example, with the image of wild animals and birds, also broaden the horizons of the child, teach him to be attentive to the world around him. By drawing an owl, the young artist masters the skill of combining the simplest geometric shapes, while simultaneously studying the peculiarities of the life of this bird in the wild.
What do you need to draw an owl?
An owl (a pencil drawing for children should be created step by step), like other images of wild animals and birds, requires a number of tools for its creation.
Pencils
Pencils are the main tool in creating drawings, regardless of the idea of the composition. They must be selected carefully, without relying on the advertising of manufacturers and the accompanying marketing tricks.
If the type of pencil is chosen incorrectly, the lead of which may contain hard grains, the drawn lines will be uneven, and it will be impossible to remove them without leaving a trace because such a lead scratches the paper.
It is also important to pay attention to the type of wood used in the production of pencils. The softer the material, the easier it will be for a beginner artist to sharpen the stationery used.
A set of basic pencils should include:
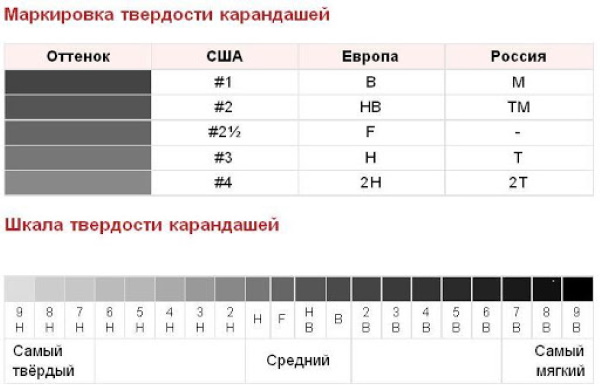
- hard pencils (usually marked by the manufacturer with the English letter "H". This type is necessary for drawing thin contour lines, as well as for marking secondary strokes inside an object when detailing an image);
- soft pencils (usually marked with the English letter "B". This type is necessary for creating shadows, half-shadows and filling the inner part of the drawn object using hatching);
- medium-hard pencils (usually marked with the English letter "F" or the combination "HB". This type is used when creating the main lines of an object within a previously outlined contour).
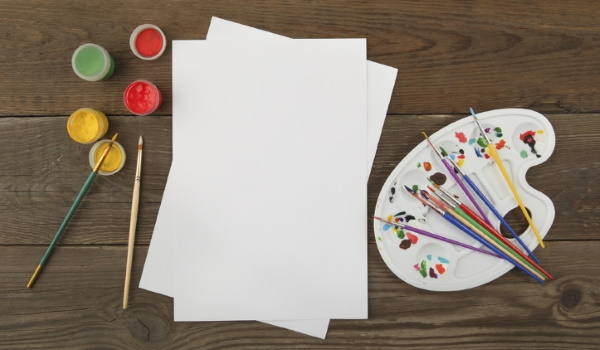
Paper
To create an image of an owl in the classic way, it is recommended to use thick paper of A4 or A3 format.
You can check whether the sheet is dense enough like this:
- Take a sheet of paper in your hand. The position of the sheet does not matter in this case.
- Turn the sheet towards the light. This method of testing can only be used in daylight or sunlight.
- If the sheet does not let light through, it can be considered suitable. Conversely, transparent pages are recommended to be left for use during the period when the child has already mastered the basic skills of fine art. Otherwise, due to the need to frequently correct the image with an eraser, thin paper may tear or become dirty (due to residual stains from the lead).
If it is not possible to use sheets of paper of sufficient density, it is permissible to use white cardboard.
If a child plans to draw an owl in squares, he will need already lined sheets. If they are not available, the young artist will be able to draw a square of the required size on the white surface of thick paper himself. The optimal size of the square is considered to be 2 cm by 2 cm or 3 cm by 3 cm.
How to easily draw an owl using squares?
An owl (a pencil drawing for children can be created in different ways, depending on the actual skills of the young artist), depicted in cells, despite the angular outline, can look bright and realistic.
The classic workflow algorithm in this case is:
- Find the starting point, stepping back 11 cells from the left border of the working plane and 3 cells from the top.
- Create an outline of the drawing using the following pattern: 2 keys down, 2 keys left, 2 keys down, 1 key left, 3 keys down, 1 key right, 1 key down, 1 key left, repeat the combination “1 key down and 1 key left” 5 times, 1 key down, 1 key right, 1 key down, 2 keys right, 1 key down, 1 key right, 1 key down, 1 key left, 1 key down, 1 key right, 1 key down, 3 keys right, 1 key up, 2 keys right, 1 key up, 4 keys right, 2 keys up, 1 key right, 1 key up, 1 key right, 2 keys up, 1 key to the right, 4 keys up, 1 key to the right, 4 keys up, 1 key to the left, 1 key up, 1 key to the left, 1 key up, 2 keys to the left, 1 key up, 5 keys to the left.
- Detail the resulting drawing by drawing the owl's wings, eyes and nose, tracing the required number of cells.
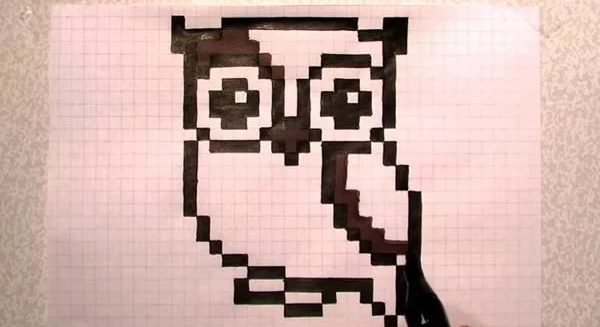
Owl pencil drawing for children on cells, instructions. - Colour the drawing, outlining the cells – the eyes – with yellow, and apply shading to the inside of the rest of the bird’s body parts.
How to sketch and detail on a blank sheet?
In order for a child to be able to independently sketch and detail the image of an owl on a clean sheet of paper, the initial picture should be one that consists of the simplest geometric figures. This will help the young artist not only to cope with the task faster, but also to learn to draw in mirror image, repeating the shapes exactly, as well as copying the sizes of the depicted details.
The simplest algorithm for creating a drawing of a wild bird on a white working surface is:
- Find the middle of the sheet of paper you are using, and then draw a vertical line in the indicated area.
- Taking the vertical as the main axis, draw an oval using a mirror image of 2 semicircles.
- Draw 2 small identical triangles (ears) close to the upper border of the resulting figure.
- Remove the derivative vertical.
- Inside the main figure, in its upper part, draw 2 identical circles at the same level (the bird's eyes).
- Place a dot (pupils) inside the eye contour.
- Between the eyes, draw a narrow oval, positioned vertically (beak).
- To the right and left of the main figure, draw a medium-sized oval, placing them on the same level so that the main outline is located in the middle of the secondary figures (wings).
- From the lower border of the large oval, draw 1 semicircle, curved to the right and left (the bird’s legs).
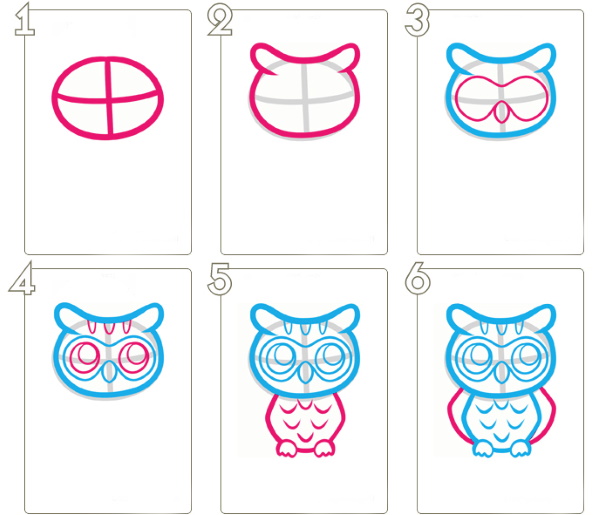
- Fill the inside of the owl's body, between the eyes and legs, with small semicircles curved downwards, placing them randomly (the plumage of a wild bird).
Pencil drawing lessons of an owl for children step by step for beginners
An owl (a pencil drawing for children is easiest to create using algorithms that involve step-by-step drawing of the bird's outline with subsequent detailing of the image) can be drawn by a child from different angles, on a branch or on a stone, in a realistic style or as a cartoon character, and so on.
Simple image
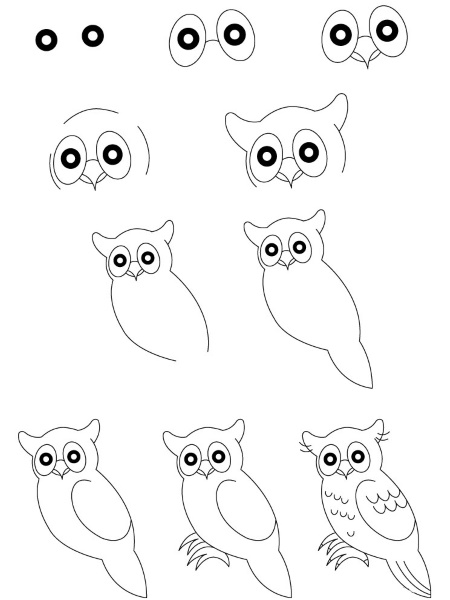
One of the easiest ways to draw an owl on a white sheet of paper is:
- Determine the center of the working plane, then draw a rounded semicircle with a downward bend in the specified area.
- Connect the extreme points of the semicircle with a slightly curved upward line (the owl's body).
- From the upper border of the resulting figure, draw a semicircle curved upwards, the dimensions of which should be approximately 1.5 – 2 times smaller than the main figure (the head of a wild bird).
- Inside the head, at the top border, draw 2 identical circles, placing them at the same level (owl's eyes).
- Place a black dot inside the eyes, thus indicating the bird’s pupils.
- Draw a small triangle (the owl's beak) between the eyes at the bottom.
- From the lower border of the body, draw 2 identical wavy lines that exactly repeat the outline of each other (the owl’s paws).
- In the area where the bird's head connects to its body, on the outside, draw 1 medium-sized oval on the right and left (wings).
- Fill the inside of the wings with vertical lines, placing them at approximately the same distance from each other.
- Draw a small oval inside the body, placing it vertically.
- Fill the inside of the oval with many small semicircles curved downwards.
- If desired, color the resulting picture.
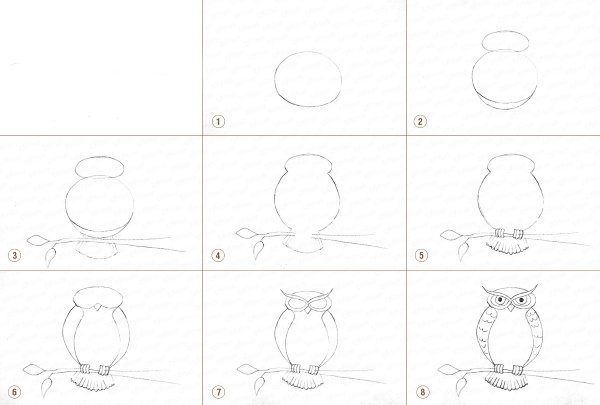
Cartoon owl with a book on a branch
You can draw a cartoon owl sitting with a book on a tree like this:
- From the lower left corner of the working plane, draw a smoothly curved line, directing it towards the center of the sheet of paper being used.
- At a distance of 2-3 cm from the main line, draw another one, the bends of which should exactly repeat the bends of the first (branch).
- Roughly from the middle of the top line, draw a vertical line upward.
- Taking the vertical as the central axis, draw a circle (the owl's body).
- Draw another circle on top, the bottom edge of which should be located 3-4 cm below the top edge of the main figure.
- From the upper border of the bird’s head, draw 2 identical small angles, placing them symmetrically (ears).
- To the right and left of the owl’s body, draw 2 semicircles with a pointed outline (wings).
- Adjust the lower part of the wings by transforming the border into a wavy line.
- From the lower edge of the body, draw 3 short straight lines on the right and left (the owl’s legs).
- Draw a figure eight inside the head, placing it horizontally.
- Inside the figure eight, draw a small circle on the right and left sides (eyes).
- Draw a rectangle stretched horizontally under one of the wings (the outline of the book). Detail the drawing of the book, finishing it by drawing the pages and, if desired, the title.
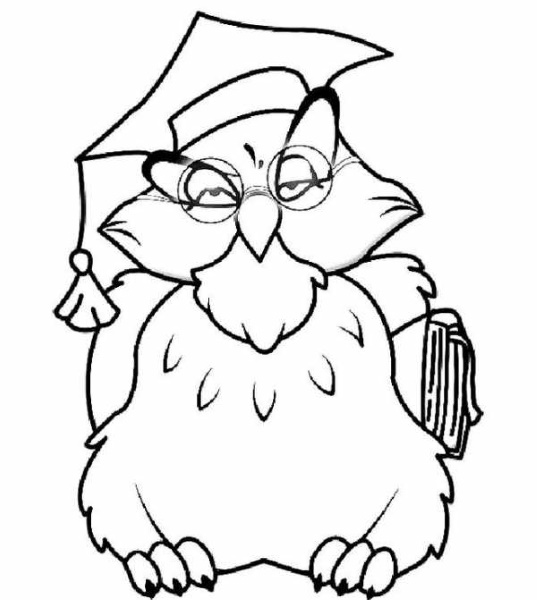
Fashionista Owl
For younger children, it will also be interesting to work on creating a drawing of an owl, depicted in pencil in a cartoon style:
- In the middle of the working plane, draw a rounded oval, narrowing it at the top and bottom (the owl's body).
- From the upper border of the body, draw 2 small rectangles, on top of which draw zigzags (tails with curly hair).
- Between the tails, draw the outline of the bangs, drawing it as a smoothly curved line inside the bird's body.
- Inside the body, draw 2 large circles (eyes), the upper edges of which must be extended to the sides (arrows).
- To the right and left of the body, draw medium-sized ovals at the same level (wings).
- Detail the inner part of the main figure yourself, drawing elements of the fashionable owl's wardrobe items.
Owl on a rock
An owl sitting on a rock can be drawn like this:
- In the middle of the working plane, draw an oval, placing it horizontally (head).
- From the upper border on the right and left, draw the same small angle, placing the figures at the same level (ears).
- Draw a semicircle at the bottom of the oval, strongly curved downwards (the body).
- On the right and left sides of the body borders, draw a semicircle that exactly copies the curve of the main contour (wings).
- Inside the head, draw two identical circles (eyes), inside which you should place a dot.
- Between the eyes, draw a small rhombus, dividing it into two parts with a horizontal line (beak).
- Fill the inner area of the wings with short semicircles, curved downwards and arranged randomly (bird plumage).
- Draw a semicircle curved upwards (stone) at the bottom of the body.
Bird on a tree background
You can draw an owl against a tree background like this:
- Along the left edge of the sheet of paper used, draw a vertical line with smooth curves (the outline of the tree trunk).
- Add branches to the trunk in chaotic areas (2 curves connected to each other).
- Draw small branches using straight and smoothly curved lines drawn from the main outline.
- Draw an owl on one of the branches.
- Draw a large rounded oval (the owl's body).
- At the top of the main figure, draw 2 round squares of the same size, placing them on the same level.
- Inside each square, draw 1 small circle (eyes).
- Draw a small triangle (beak) between the eyes at the bottom.
- Draw a semicircle (wing) on the outside from the left edge.
- Inside the body on the right, draw a semicircle of the same size with the line drawn in step 9 (second wing).
- Draw 6 short straight lines at the bottom of the main figure, grouping them into 3 (the owl’s legs).
- Fill the inside of the owl's body with short semicircles, placing them 3 in a row (the bird's plumage).
Half-turn angle
The easiest way to draw an owl in a half-turn is:
- Draw 2 identical circles on the top of the sheet of paper. Draw another circle of a smaller size inside the figures, then paint the space between the contours of the 2 figures (eyes).
- Outline the circles with ovals, placing them vertically.
- Connect the ovals with each other with a horizontal line.
- Connect the dots located on the right border of the left eye and on the left border of the right eye with a semicircle with a slight downward bend (bird's beak).
- Draw the outline of the owl's head using a semicircle curved upwards, so that the distance between the left eye and the outline of the head is smaller than the same space on the other side.
- From the extreme points of the semicircle draw rounded lines downwards (the owl’s body).
- Connect the extreme points of the semicircles, shifting the area of their intersection to the right border of the sheet of paper used.
- On the left, close to the body, draw the legs of a wild bird (3 semicircles on each side, connected to each other).
- Add detail to the image by drawing the owl's plumage (small semicircles).
An owl with spread wings in flight
To draw an owl in flight with its wings spread, you should do the following:
- In the center of the sheet of paper used, draw a large circle (the bird's head).
- Using secondary perpendiculars, depict the owl's eyes and beak inside the head (2 circles and a triangle between them at the bottom).
- From the lower border of the owl's head, draw a semicircle curved downwards (the body).
- Inside the body, at the bottom, draw a schematic of the tucked-in legs of a wild bird (semicircles).
- Determine the midpoints of the right and left borders of the bird's body.
- Connect the found points with a semicircle curved downwards, without crossing the main contour (tail).
- To the right and left of the body, draw 2 identical ovals directed towards opposite corners of the upper part of the working plane (spread wings).
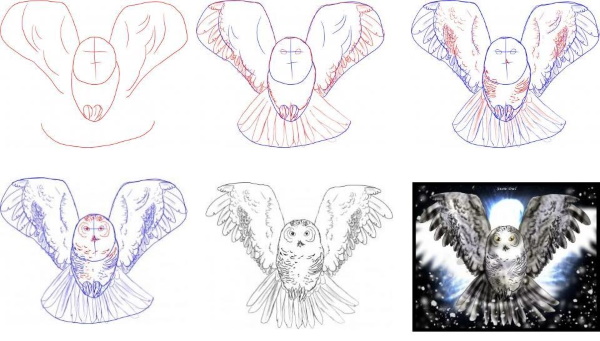
- Add detail to the image by adding the bird's plumage.
Owl head
The easiest way for a child to draw an owl's head is like this:
- Draw a medium-sized circle in the center of the sheet of paper you are using.
- Inside, from edge to edge, draw a diagonal line, directing it from the upper right corner to the lower left.
- Step back 3-4 cm from the top and bottom and draw slightly curved lines in opposite directions.
- Draw 2 identical small triangles (ears) on top of the head.
- Inside the contour of the head (between the generating curves) draw 2 identical ovals, placing them close to each other (eyes).
- Draw 1 dot inside the ovals (pupils).
- Between the eyes (bottom) draw a small rhombus, the inner part of which should be divided in half (beak).
- Add detail to the drawing by adding the plumage.
Chick
Children should be taught to draw baby owls like this:
- In the center of the sheet of paper used, draw a large circle (the owl's head).
- Below, crossing the edge of the main figure, draw another circle (the body).
- Erase the border edges inside the resulting figure.
- Slightly going beyond the outline of the owl's head, draw 2 identical circles inside the figure, filling the entire inner part of the main figure (eyes) with them.
- Erase the common edge of the circles.
- Inside each of the eyes, draw 2 more circles, each of which should be located inside the outline of the previous one.
- Draw a small rhombus between the eyes, close together, and divide the inner part of it into 2 parts with a horizontal line.
- To the right and left of the body, draw 1 small corner, directing them to the opposite upper corners of the sheet of paper used (wings).
- Draw 2 small triangles (the owl chick's legs) at the bottom of the body.
- Add detail to the image by drawing the relief of the bird's plumage.
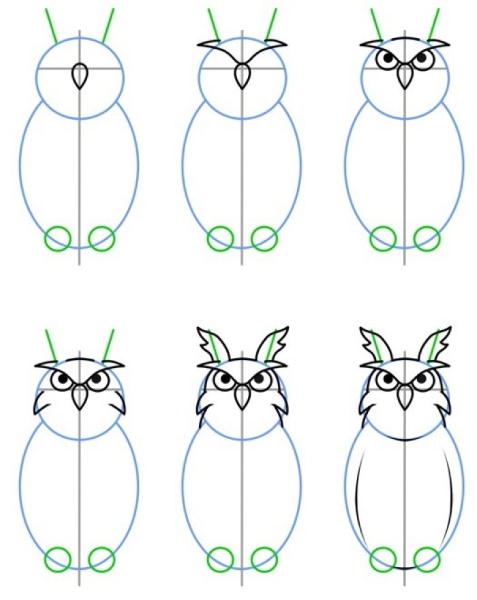
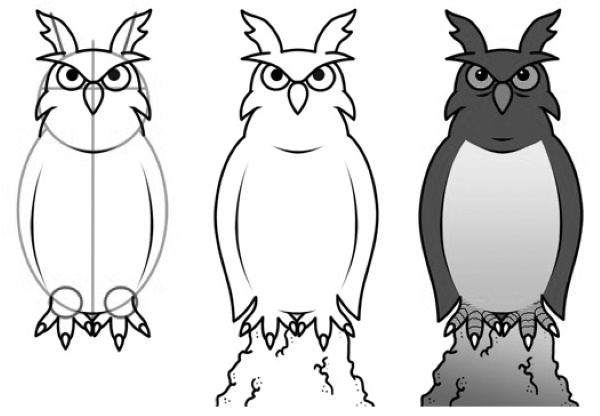
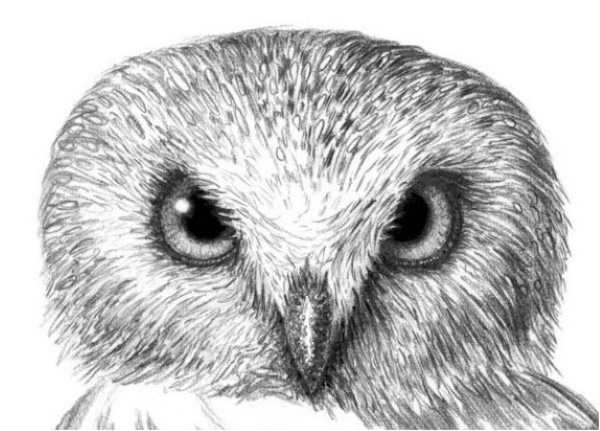
Realistic owl or eagle owl
A child should begin working on creating realistic images of an owl or eagle owl only after he or she has fully mastered the basic skills of fine art.
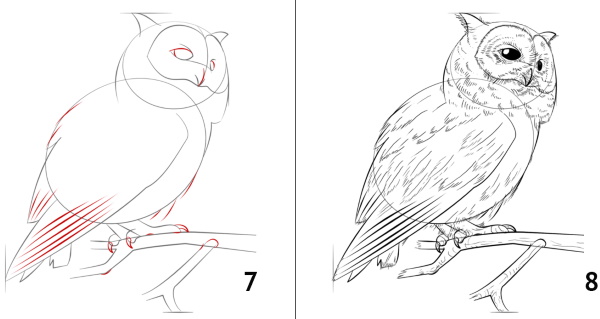
The simplest way to draw a picture of this kind is the algorithm:
- At the top of the sheet of paper used, draw a small circle (the owl's head).
- Crossing the bottom of the main figure, draw an oval, placing it diagonally towards the lower right corner of the sheet of paper used.
- Draw 2 identical triangles without bottom edges (ears) on top of the head.
- Erase the common outline boundaries of the two figures (head and body).
- Using the secondary perpendiculars depicted inside the outline of the head, draw the bird's eyes and beak, then erase the resulting straight lines with an eraser.
- Crossing the lower border of the body, draw another small oval, directing it diagonally towards the lower right corner (tail).
- Adjust the outline of the owl image, emphasizing the integrity of the bird's body parts.
- Mark the bird's plumage by applying shadows using hatching or shading (the top of the image should be darker than the bottom).
Drawings created with a pencil are not only a way for children to express their creativity, but also to gain additional knowledge and self-confidence.
By drawing an owl in the style that is most comfortable for him, the child automatically pays attention to the details of the bird's appearance, thinks about the life of an owl in the wild, and also imagines how this or that part of its body looks, for example, in flight.
This type of thinking means that there is no need to control each stage of the child’s work, giving the young artist the chance to independently cope with the task.
Video on how to draw an owl
How to draw an owl easily: