Father Frost (a favorite New Year symbol for children and adults) can be created, including from salt dough. This is a fascinating process that will allow you to express yourself creatively and at the same time make an interesting souvenir without using toxic plastic.
The finished figurine can be used to decorate your home or as a gift to loved ones. Products made from salted dough can last a long time, delighting with their design and bright decoration.
Recipes for salt dough that is suitable for crafts
Salt dough is a versatile material that is easily accessible and suitable for creating various figures and decorations. It does not require special skills or tools, so everyone can try their hand at this creative process.
Santa Claus made from salted dough is made according to different recipes. Some of the most popular recipes include simple ones.
Basic recipe
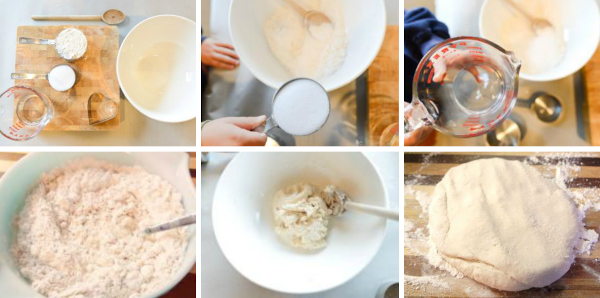
Salt dough is the most common type of dough for crafts, usually used by beginners. It does not require any complex ingredients that the housewife does not have in stock.
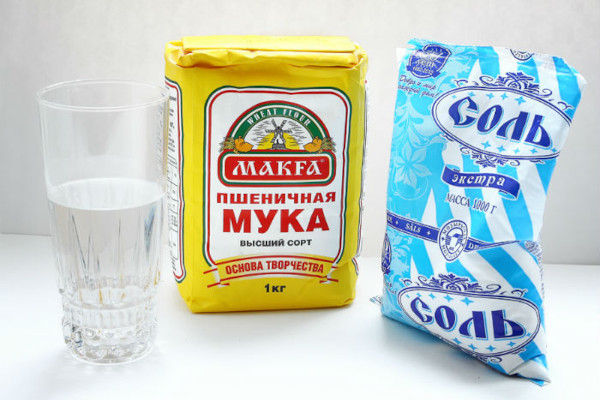
Ingredients:
- 2 parts wheat flour,
- 1 part salt,
- 1 part water.
During the cooking process you need to:
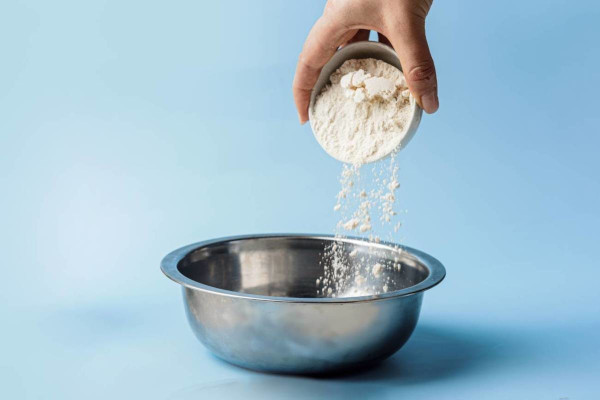
- Mix flour and salt in a large bowl.
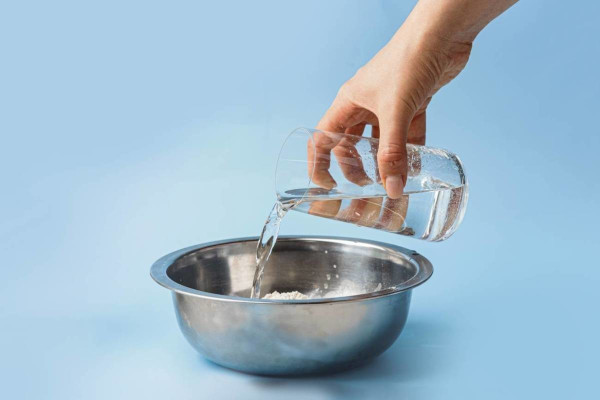
- Start pouring water in small portions.
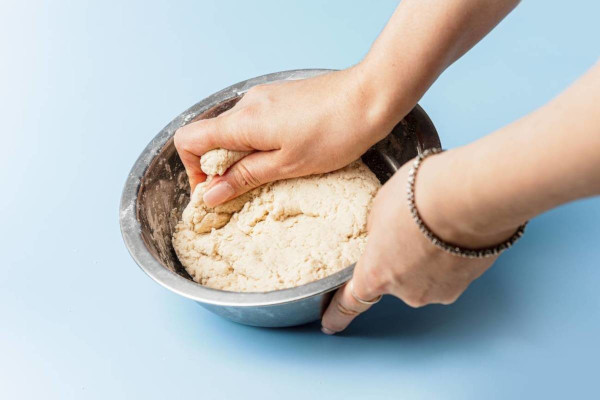
- Mix the ingredients well with your hands until you get a smooth and elastic dough.
If the mass is too dry, you should increase the portion of liquid. If it is too sticky, then add more flour.
Dough with aroma
If someone does not like the smell of regular dough, you can make a mass with a pleasant aroma. It will remain in the figures later.
Ingredients:
- 2 parts wheat flour
- 1 part salt
- 1 part water
- 1 teaspoon of your favorite aromatic spices (for example, cinnamon, ginger, vanilla).
During the cooking process you need to:
- Place flour and salt in a convenient mixing container.
- Add spices immediately if they are dry.
- Start pouring in water and thoroughly mix the ingredients with your hands until the mixture is elastic and smooth.
Instead of spices, you can also take various store-bought flavors. For example, options intended for making handmade soap are well suited. Since Santa Claus is usually made for the winter holidays, you can choose the appropriate aroma. For example, "mandarin", "pine needles", "gingerbread".
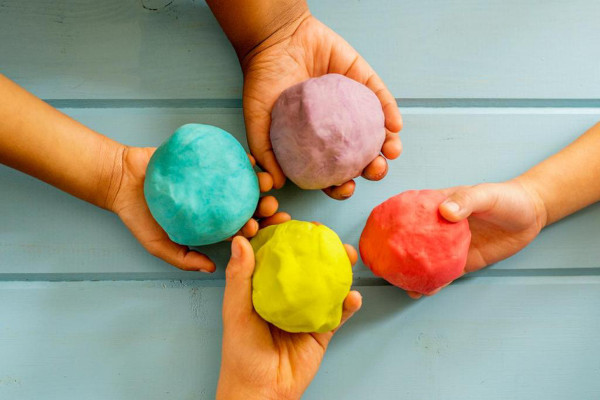
Color version
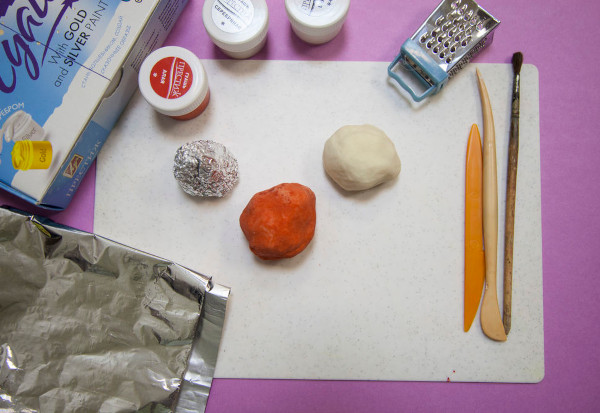
Santa Claus made of colored salt dough immediately turns out bright and interesting. You don't even have to color it additionally. Not only food dyes, but any other ones will do. After all, the figures are not intended for eating.
Ingredients:
- 2 parts wheat flour,
- 1 part salt,
- 1 part water,
- natural or food colorings
During the cooking process you need to:
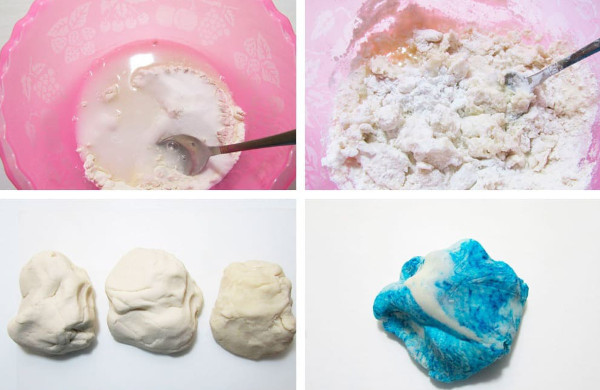
- Knead the dough from flour, salt and water, processing it until soft and elastic.
- Immediately divide the mass into several parts, roughly calculating what size the different parts will be.
- Add food coloring to each portion of the dough to create different colors.
You can choose any shades to your taste. Santa Claus usually includes red and white colors. Pink dye is suitable for the face and hands, and black or brown for the bag, boots and other details.
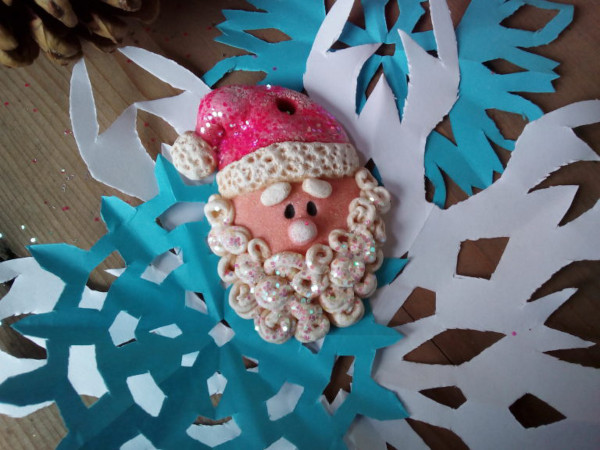
With glitter
By adding glitter, you can get special crafts - shiny and shimmering. They look festive and original. The necessary glitter is sold in large cosmetic stores and confectionery shops.
Ingredients:
- 2 parts wheat flour,
- 1 part salt,
- 1 part water,
- glitter (cosmetic or food).
During the cooking process you need to:
- Place all dry ingredients except glitter in a large bowl.
- Start pouring in the liquid with a large spoon, thoroughly mixing the ingredients after each new portion.
- When you get a smooth and elastic mass, add glitter and mix everything well again.
During the process, you may need to change the amount of water or flour in the recipe. Depending on how soft or, on the contrary, dry the dough turns out to be.
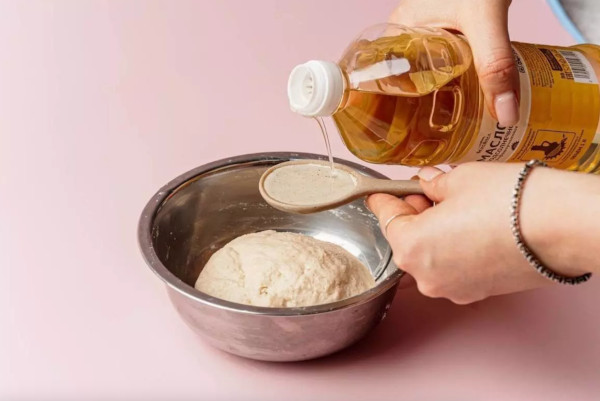
Quick recipe with butter and soda
Sometimes there is no time or opportunity to keep the finished dough in the cool for a long time. In this case, you can use a slightly more complex compound recipe. It will contain any vegetable oil and soda. Also, the components will need to be kept on the fire, so it is worth preparing a pan of the appropriate size in advance.
Ingredients:
- 1 cup wheat flour (not pancake flour!);
- 1/3 cup fine salt;
- 1 cup of water;
- 2.5 tsp baking soda;
- 1 tsp sunflower oil.
During the cooking process you need to:
- Mix all dry ingredients.
- Pour liquids (including oil) into them.
- Mix the ingredients and cook over low heat, stirring constantly, until the mixture begins to stick to the spoon.
- Cool the mixture.
Knead the cooled mass thoroughly with your hands. Afterwards, you can immediately use it to make figurines.
Preparing the dough
Santa Claus made from salted dough will turn out beautiful and neat only if the base is prepared correctly and all the basic recommendations of experienced craftsmen are followed.
It is especially convenient that the material in question does not stick to your fingers, does not have any sharp irritating odors, and does not cause allergic reactions (especially if it does not contain any additional additives). Even if the dough gets on your clothes or any textiles during the creative process, it can be easily washed off without leaving any stains.
The main secret of the discussed dough for making crafts is a large amount of salt in the composition. You can’t refuse it. It is a natural preservative, which after drying keeps the figurine in a neat attractive form for a long time.
The table will help you figure out the necessary ingredients and accessories for the future dough:
| What you will need | Peculiarities |
| Dough mixing bowl | Any capacious dish will do here. It can be a saucepan, a salad bowl, another bowl |
| Flour | White wheat flour is a must. It is the regular kind that is used, not the pancake kind. The latter makes the adze too sticky. |
| Water | Even tap water will do. The main thing is that it is very cold. |
| Salt | It is recommended to take fine salt. It is much easier to work with such a product than with coarse salt. It dissolves faster. In addition, fine salt of the "Extra" class is usually thoroughly purified during production, so there will be no unsightly impurities in the dough. |
Regardless of which dough recipe is chosen, in the process of preparing the base for crafts you will need:
- Pour salt into the container, add water. Allow the dry ingredients to dissolve completely.
- Gradually add all the flour in small portions. Mix the ingredients until they form a lump.
- Place the dough on the table and continue kneading until soft and elastic. It is important not to work with the dough for too long.
- If necessary, add a little more water or flour so that the mixture is not too wet or too dry.
If you plan to make colored, flavored or shimmering dough, then all additional ingredients should be added together with flour. You can use the dye for the entire mass at once or separately color different parts of the future figurine.
A very important step is keeping the dough in the refrigerator. The finished mass is wrapped in polyethylene film and put away in a cool place for 2-3 hours. Only after this can you lay out the resulting dough on a floured surface and begin to create the necessary shapes, details, using a knife, stamps, and other tools.
Once the dough is ready, sprinkle some flour on the surface and turn the dough out onto it. Then start creating shapes and figures using knives, stamps or other tools.
Sculpting Santa Claus
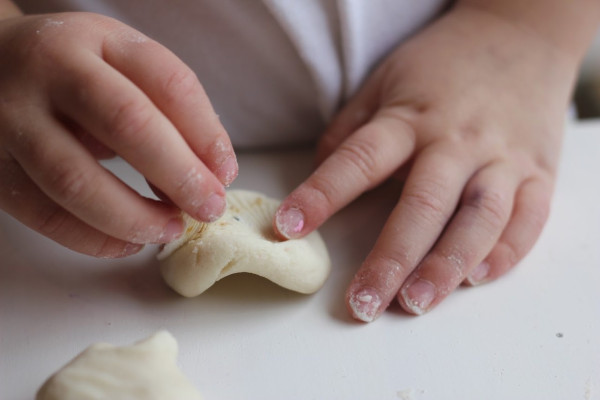
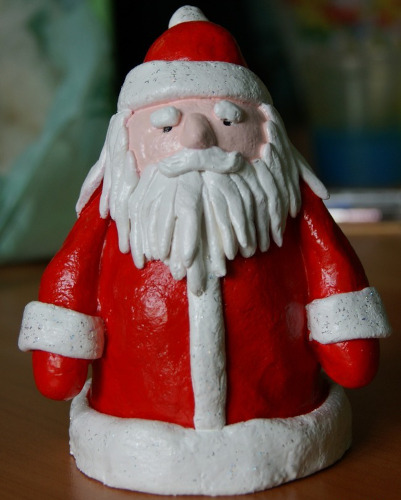
Santa Claus is molded from salt dough quite easily. If possible, it is worth stocking up on molds for the process in advance. For example, those that help quickly cut out arms, legs, a hat, a head, and facial details. If you don’t have any of these in stock, then in general all of this can be created simply with your hands.
It is also advisable to prepare for sculpting Santa Claus:
- A knife or other tool for cutting the mass.
- Ready-made eyes for figurines or paints, markers to create them.
- Additional elements in the form of sequins, glitter, ribbons, buttons, which will make the figure more realistic.
Before you start working, sprinkle the table with flour. Preferably with a small portion of fine salt. This trick will prevent the dough from sticking to the surface.
In addition to the base, you can also use foil. It is worth taking several crumpled pieces of material and creating a cone from it. This will make the Santa Claus figure more voluminous and stable. In addition, such a product will require less dough.
Next you need:
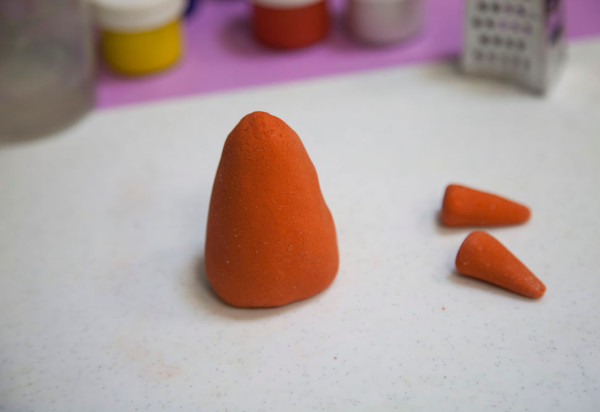
- Take a small portion of salt dough and divide it into several parts, corresponding in size to the parts needed to create Santa Claus.
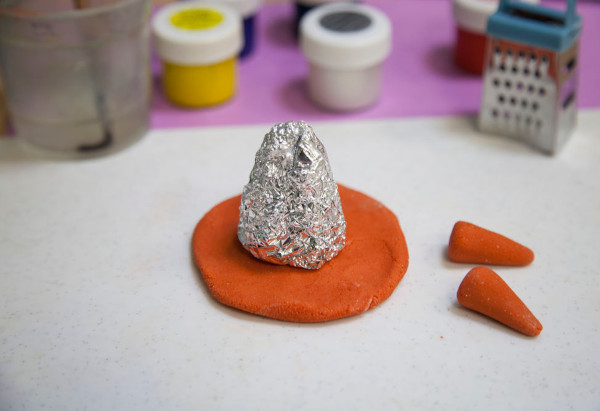
- Make a cone out of crumpled foil (optional).
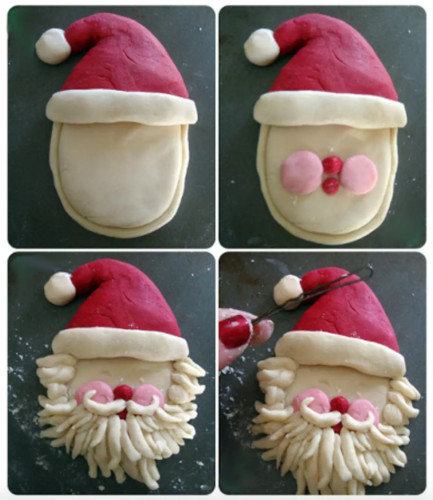
- Take a small portion of the dough and roll it into a round, neat pancake. Wrap it around the cone.
- Roll 2 neat sausages from the dough. Wrap one around the cone at the very top, thus depicting a hat figure. And the second one below in the form of a collar.
- Make a small ball and attach it under the resulting hat. This will be Santa's nose. And two flat oval figures should be placed in the cheek area.
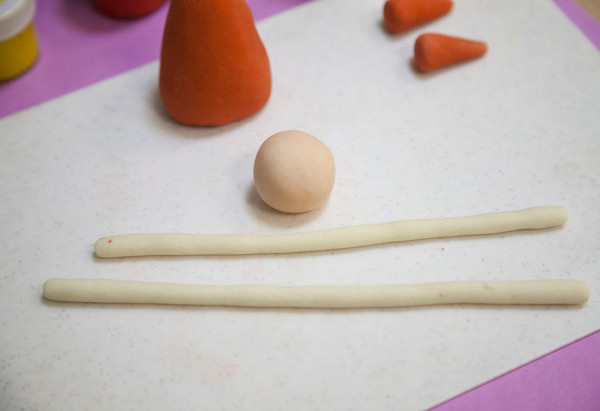
- Roll the sausage again (with a thick center and sharp ends), twist it like a rope, pinch the ends slightly. You will get a beard, which should be attached under the nose.
- Another very large sausage should be drawn along the lower contour of the figure. This will be the fur of the winter wizard's coat.
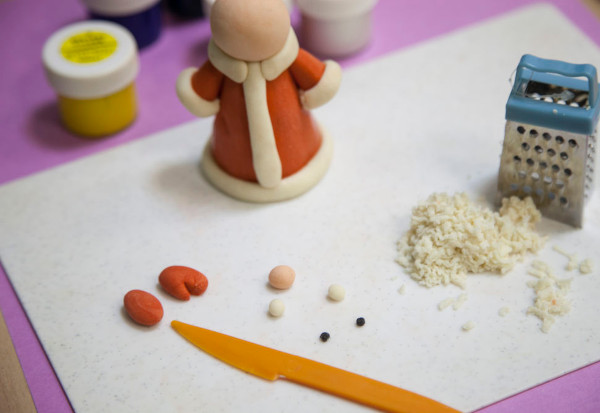
- Make two cones with holes at the narrow end. These will be the sleeves of the fur coat.
- Cut out the "mittens". Attach them along with the sleeves to the figure.
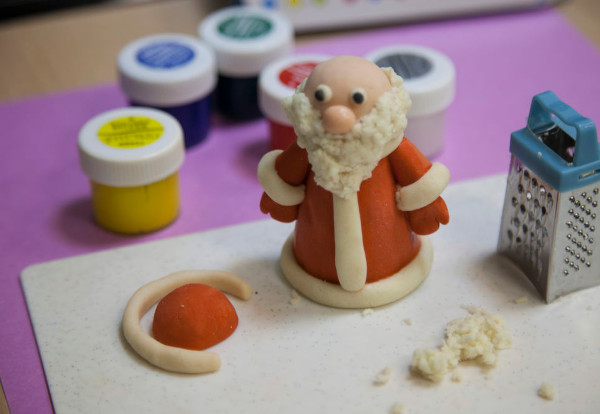
If desired, you can add other details to the product. And also create texture, "draw" them with a knife or other suitable tool. The finished Santa Claus is usually first dried at room temperature, and then in the oven.
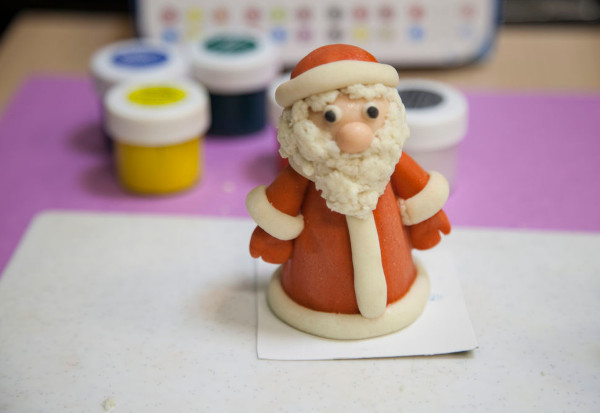
After that, it is painted and decorated according to the master's taste. Here you can use sequins, buttons, glitter, plastic eyes and other details.
How to dry properly
Drying your dough crafts is an important step in the process and will help them retain their shape and strength. There are two options. The first is to leave the craft at room temperature.
It should first be placed on a flat surface covered with parchment paper or a silicone mat. This will help prevent the figurine from sticking to the surface and ensure easy removal after drying.
During the process, you should avoid exposing Santa Claus to direct sunlight to avoid possible deformation or cracking.
How long the whole process will take depends on many factors. First of all, on the size of the figurine and the temperature in the room. On average, crafts dry for about a day. Very thick figures may require a “rest” of 2-3 days.
A faster option is drying in the oven. Before sending the dough craft to bake, you need to make sure that it is completely ready and has the desired shape. And also that the figurine is not too thin or fragile. Otherwise, there is a risk of breakage during the drying process.
The temperature should not be set higher than 100°C. Here you need to be careful not to overheat it and spoil it. The drying process will take 3-4 hours. It is important to carefully monitor how the figurine dries and check that it is even and that no cracks appear. If the latter are noticed, they can be eliminated immediately.
Use of dyes and finishing materials
Santa Claus made of salt dough should not only dry out completely, but also cool down before decorating. It is advisable to let the figure "rest" for a couple of days after making.
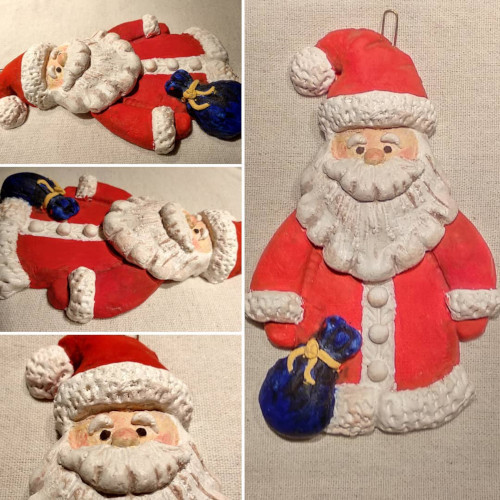
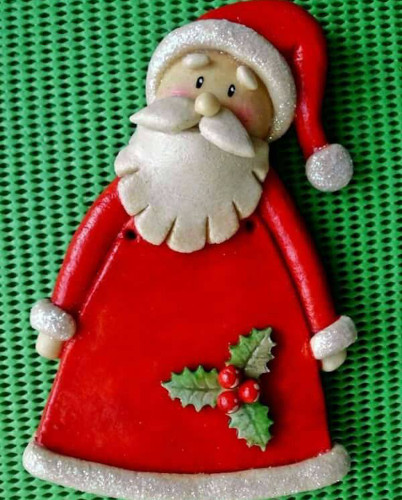
Afterwards, you can start decorating the craft to your taste. For example, use paints, varnishes, glitter, rhinestones, buttons or other elements to make the figurine bright and original.
Food and acrylic dyes are suitable. Both options are presented in a wide range of colors. You can mix their options to get new shades. Acrylic paints are especially good because they dry quickly and provide the figures with a durable, reliable coating.
To make the product shiny and smooth, you can use varnish. It will also become a reliable protection for the craft from dust and damage. Before using any varnish or paint, you should carefully study the manufacturer's instructions.
Some of them can only be applied to a specially prepared surface. Also, varnishes and paints differ in drying time. If you do not take this into account, you can smear the coating unsightly almost immediately after production.
To apply varnish or paint to the craft, use a soft brush or sponge. Then the coating will be even and neat. Always apply the selected composition in a thin layer and let each one dry thoroughly before the next new one.
Using glitter allows you to create interesting effects and turn figurines into bright, shimmering holiday decorations. When working with such an additive, it is easiest to add it directly to the dough, mixing thoroughly.
If you decide to use glitter on a finished figurine, you should sprinkle it on a surface covered with glue or varnish.
Rhinestones and beads look interesting on the figures. For example, they are well suited for decorating Santa's hat, fur coat and bag. It is convenient to attach such details with tweezers. But the most reliable option is to dip the details into the dough before drying. Then they will definitely not fall off over time.
Natural materials can always be used when making crafts. They perfectly decorate the figures and also help save on purchasing store-bought decor. These can be pine cones, pine needles, dried flowers and leaves, pieces of orange and lemon peel. The latter will also serve as a natural flavoring agent.
Santa Claus, made correctly from salt dough, turns out to be quite durable. But such figures do not tolerate various kinds of physical impacts well.
Therefore, it is worth storing them in places where they are protected from scratches and impacts. And also from moisture. It is advisable to renew the protective layer of varnish on the product from time to time to maintain its attractive appearance for many years.
Video about making Santa Claus from salt dough
Craft made from salt dough "Santa Claus":