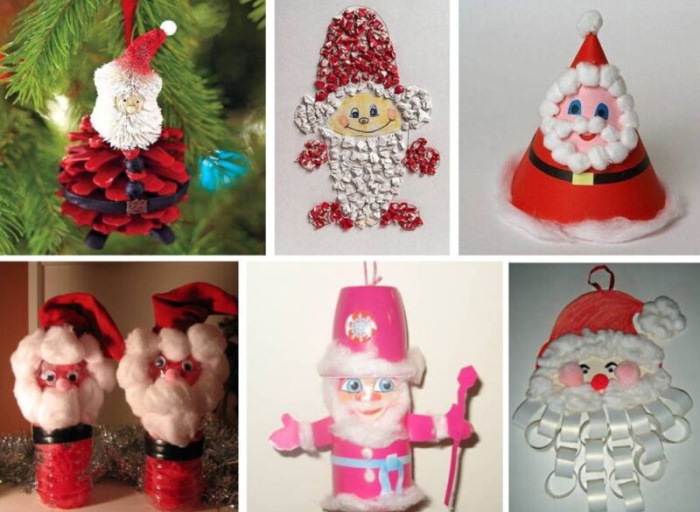
Father Frost is the main character of the New Year holiday. You can make a wizard figurine with your own hands from different materials and improvised means. It will decorate the room, add a fairy-tale atmosphere, and cheer up guests and household members.
Possible materials for crafts
Santa Claus can be made quite quickly with your own hands. The main thing is to use your imagination. The figure can be easily made not only from paper, but also from aluminum wire, fabric or plastic cups.
Materials and tools
| Materials | Decor | Tools and improvised means. |
|
|
|
You can decorate the figurine with fabric ornaments, shiny buttons, beads. You can even easily make a wall calendar with your own hands.
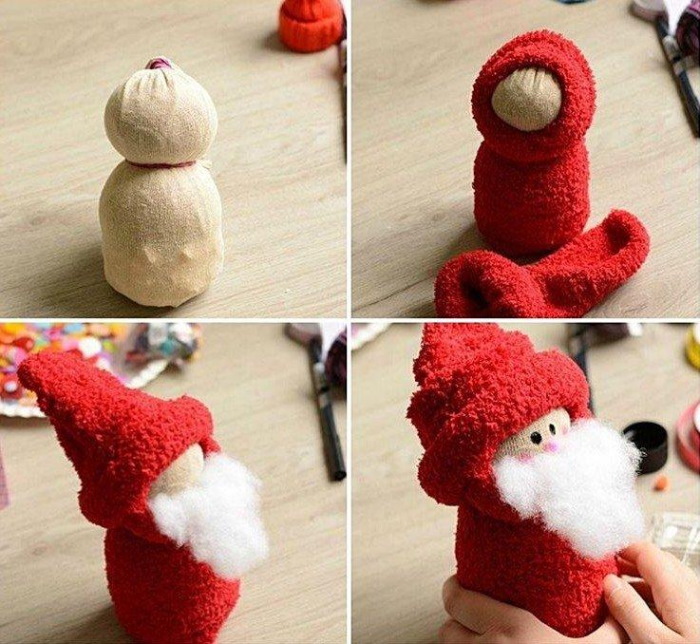
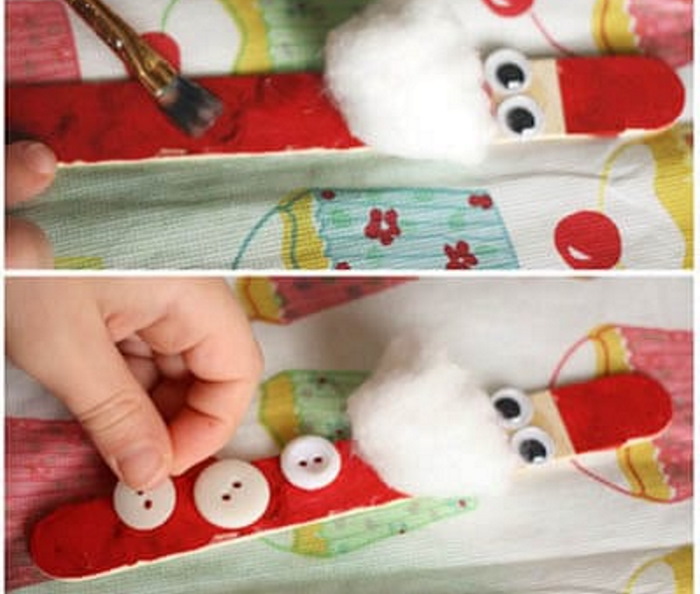
How to make a figurine from cotton wool
DIY New Year's craft can be hung on the wall or on the Christmas tree.
To implement the idea you will need:
- 8 identical flat wooden sticks (you can use ice cream sticks);
- sharp scissors;
- thin watercolor brush;
- beige paint (you can mix white, brown, red and yellow);
- hot glue and gun;
- pompom or ball of red woolen thread;
- doll eyes or large beads;
- a piece of felt (preferably red);
- cotton wool.
Instructions for making the craft:
- Place 6 sticks in a row close to each other.
- Place 2 sticks horizontally on top of the others, 1 on top, 2 on the bottom.
- Dip the brush in beige paint and paint the front side of the sticks.
- After the sticks have dried, you need to design the “face” of the craft by gluing on eyes or beads.
- Form a pompom from red woolen threads and glue it in place of the nose.
- Roll up small pieces of cotton wool and glue them along the bottom of the “face”, forming a beard.
- Cut a triangle out of felt and glue it to the top of the "face" with the tip up. This will be the hat. "Put" a pompom on the tip.
- Form a strip from cotton wool and glue it to the bottom of the felt hat.
You can also use watercolor paint to add a blush to the future Santa Claus.
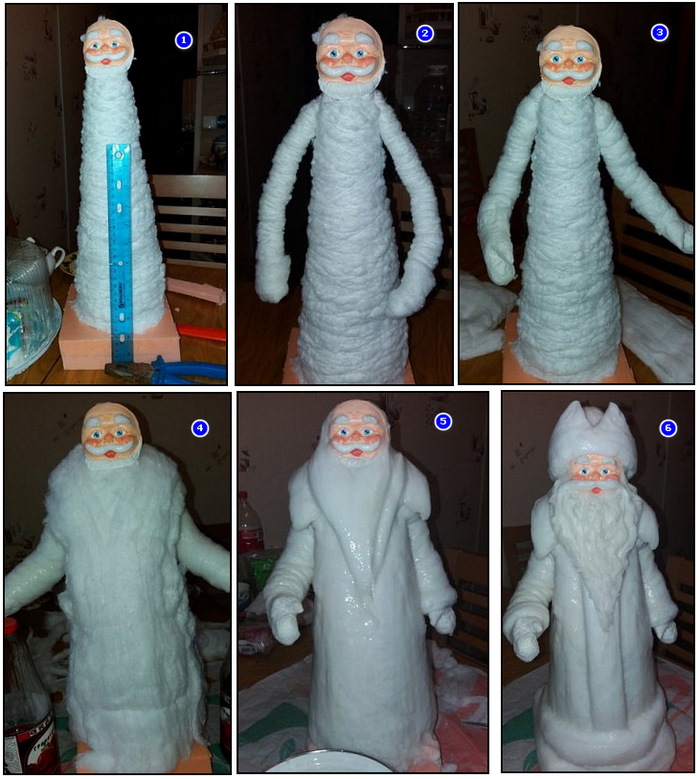
Made of fabric
Santa Claus made by hand, like any craft made from fabric, will be colorful. It is easy to sew from fleece.
Materials you will need for the figurine:
- thin silver ribbon;
- thick wire;
- 3 pieces of fleece (blue, cream or beige, red);
- round long stick (10-12 cm);
- fine-grained silk of a blue shade (crepe satin);
- glue for fabric and wood;
- sharp scissors;
- sharp needles;
- a pattern for a Santa Claus costume made of cardboard (ready-made ones can be found on specialized websites);
- silver sequins;
- doll eyes;
- filler (holofiber);
- a small foam ball (diameter no more than 7 cm).
Manufacturing algorithm:
- Place the cardboard pattern on the blue fleece, carefully trace around it and cut out the fabric.
- Sew the edges so that the piece resembles Santa Claus’s robe (the sleeves also need to be stitched).
- Turn the fur coat right side out, seam inside out.
- Iron the workpiece carefully.
- Form a head from a foam ball covered with beige fleece.
- Draw the character's "face" by gluing on the eyes and nose.
- Cut beige fleece into thin strips, stretch slightly and glue on fringe instead of a beard.
- From wire, construct a “body” - a cone with “arms” screwed onto the sides.
- Place the fur coat on the frame and attach the head.
- From the remaining blue fleece, cut out 2 identical triangles and sew them together.
- Put the hat on Santa Claus's head. Decorate the tip with a cotton pompom.
- Glue sequins and crepe satin “stars” onto the fur coat.
- Carefully stuff the sleeves with holofiber so that they hold their shape. The stuffing can also be stuffed under the fur coat.
- Cut 2 rectangles from red fleece, sew them together. Put the filling inside, tie the improvised "bag" with a strip of fabric (beige fleece).
- Hang the "bag" behind Santa Claus's back.
At the final stage, you can start making the staff. The stick is tightly wrapped with silver tape. You can decorate the staff with small stars cut out of the remains of blue fleece.
From a napkin
Santa Claus made from a napkin will decorate a Christmas tree or a box (bag) with gifts. You need to take care of finding a template in advance - on specialized sites you need to find the "face" of the fairy-tale character and cut it out so that on both sides of the hat there are paper strips 4-5 cm long.
Materials:
- thin rope;
- hole punch;
- scissors;
- paper glue;
- thin black marker;
- 2 square napkins (blue or red).
Step by step instructions:
- Fold 1 napkin into a triangle.
- Cut off the triangle corner of the 2nd napkin.
- Glue the small triangle to the large one (the result should be a figure resembling a “pioneer tie”).
- Fold the top part of the napkin inward.
- Trace the outline of Santa Claus's "face" with a thin black marker.
- Carefully glue it to the napkin, approximately in the center of the “tie”.
- Cut a small white circle out of white paper and glue it to the top corner of the napkin. This will create a pompom on the cap.
- Santa Claus's "face" can be colored with colored pencils.
- Use a hole punch to make a hole in the napkin and thread a thin string through it.
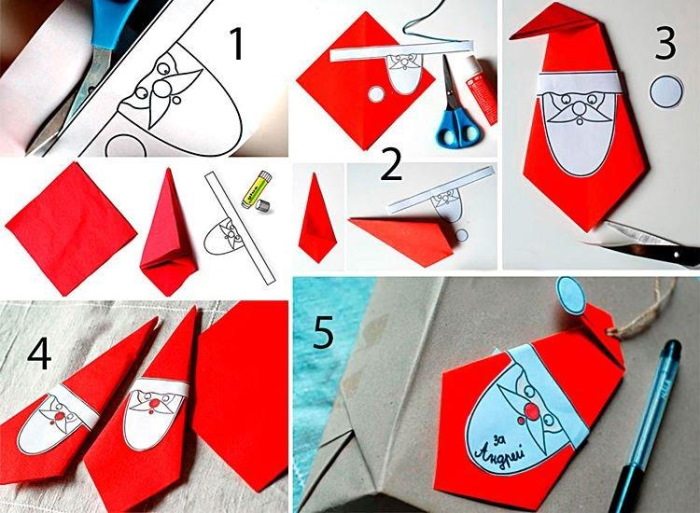
If desired, the craft can be signed.
From scrap materials (from a disposable plate)
You can decorate any interior detail with a craft made from disposable plates. If you make several Santas, you can easily make a garland out of them and hang it on the wall.
Materials:
- thin twine;
- hole punch;
- doll eyes;
- black thin marker;
- paper glue;
- scissors;
- colored and white paper;
- disposable plate.
Instructions for making the craft (step by step):
- Cut a circle out of white paper, the diameter of which is equal to the center of the plastic plate.
- Cut the geometric figure into 2 equal halves.
- From red colored paper, cut out a circle of a small diameter, a large triangle (height 10-12 cm), a wide strip with corner edges (the future rim for Santa Claus's hat). From white paper, you also need to cut out a circle.
- Cut the plate into 2 equal parts.
- Glue a red circle in the center of a white paper semicircle, and two doll eyes above it.
- Use a marker to draw Santa's eyebrows and smile.
- Color the upper part of the “face” (where the eyes are) with a yellow pencil.
- Apply glue over the entire surface of half of the plastic plate.
- Glue Santa Claus's "face" to the blank, leaving the sides of the plate intact.
- Glue a triangle just above the eyes. Bend the corner of the hat and glue a white pompom circle to it.
- Glue a wide strip with corner edges to the base of the hat - this will be the brim of the hat.
- Use a hole punch to make a hole in the hat and thread the rope through it.
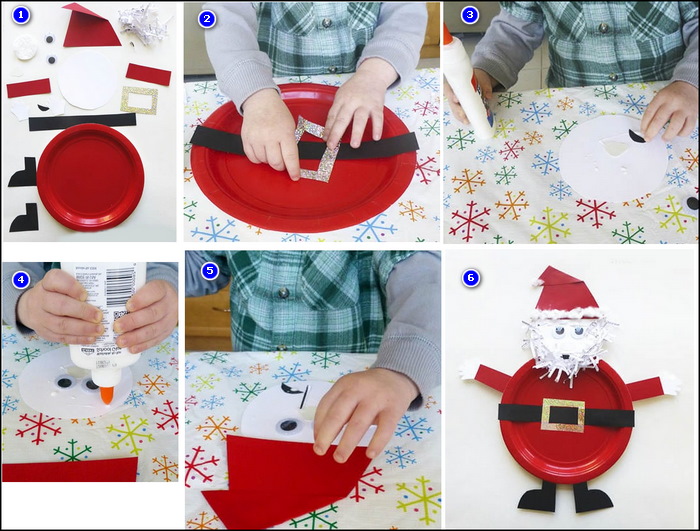
You can make 2 crafts from 1 plate. It will take about 10-15 minutes to make 1.
From the bushing
Santa Claus (a hand-made craft will look unusual) will become a decoration for the festive table. The figurine is small. It can be worn as a keychain or simply hung on the Christmas tree.
Materials required:
- thin black marker;
- scissors;
- wooden or glass bead;
- long ruler;
- glue for paper and textiles;
- colored or white paper;
- thin rope;
- cardboard sleeve.
Description of the manufacturing process (step by step):
- Cut a large rectangle out of red paper. Its edges should be 2-3 cm higher than the edges of the cardboard tube. The paper can be replaced with thick velvety fabric.
- You need to carefully glue the rectangle onto the sleeve. Straighten the fabric or paper.
- Carefully bend the edges on one side, trying to make something similar to “legs”.
- On the other side, fold the excess edge of paper or fabric inside the sleeve.
- Cut a triangle out of red fabric or paper.
- Glue it to the top of the sleeve.
- Thread the bead through the string. Thread one end through the hole in the triangle hat.
- Tie the string into a knot to form a loop.
- Print out the template of the craft's "face" or draw eyes, a nose, and a smile on a white circle with a marker. Glue the paper to the roll, just under the hat.
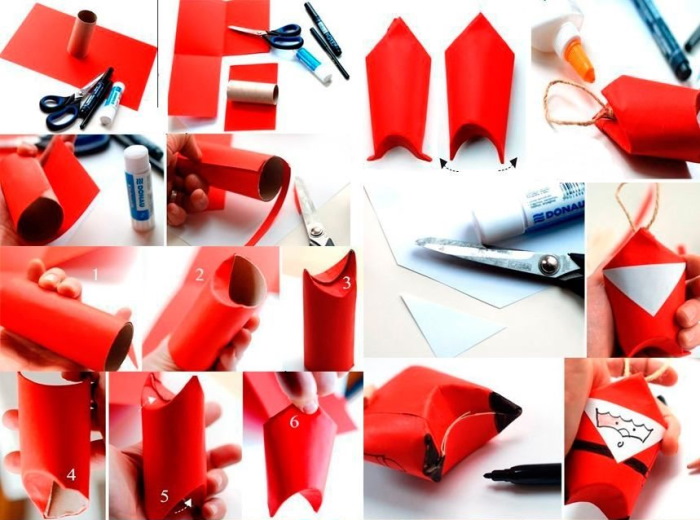
You can decorate the figurine with rhinestones, sequins or fabric patterns.
From foamiran
A festive doll made of foamiran (a dense fabric that resembles paper) turns out to be quite voluminous. For the craft, you need to prepare a convenient stand in advance.
Materials you may need:
- nippers;
- pliers;
- scissors or a stationery knife;
- copper or thin aluminum wire;
- plasticine or polymer clay;
- blue pen (preferably gel);
- blue, white marker;
- 3 foam balls of different diameters;
- hot glue gun;
- white, pink, red, black or brown foamiran (the thickness of the fabric can be any).
Algorithm for making Santa Claus (step by step):
- Cut an equilateral square (8 cm) from pink foamiran. When heated, the fabric becomes more elastic, so you need to go over it several times with a hot iron.
- A foam ball of medium diameter (4-5 cm) is wrapped in warm fabric. The corners are smoothed and the fabric is attached to the sphere with hot glue.
- A nose is formed from plasticine or polymer clay (white). It is painted beige. The nose is attached to the "face".
- The moustache, eyebrows and beard are also cut out of foamiran. The fringe is heated with an iron and slightly stretched to form curls. They also need to be glued to Santa's head.
- The eyes are painted with a blue marker, and the eyelashes with a gel pen.
- Cut out 2 identical triangles from red foamiran and glue them together. You can glue the smallest foam ball to the tip of the "hat".
- A frame in the shape of a cone is formed from thin wire. Two short pieces of wire are tied to the side part, on the right and left. These will be the arms.
- You can place several foam balls or any dense filler inside the cone.
- A long rectangle is cut out of red foamiran, the width of which is equal to the height of the cone. Carefully wrap the frame and glue the edges. The excess is cut off.
- The sleeves are glued to the fur coat separately. They can be made from strips of red foamiran. The mittens are cut out of brown fabric, and the boots are cut out of black.
- The legs of the figurine are made of wire and covered with strips of brown foamiran. Black pieces of fabric are carefully attached to the base of the legs in the form of a semicircle with a gun.
- All parts of the figure are assembled. The head can be attached to the cone using a glue gun, connecting together a foam ball and a piece of fabric stretched over the top of the wire frame.
- From the remains of red foamiran, cut out a long rectangle and glue its edges. The future bag is tied with thin twine and placed at the feet of the figurine.
- The fur coat, bag, and boots are painted with white patterns or decorated with snowflakes made of foil.
Santa's staff can be made from wire or wood chips. Silver braid, rhinestones and sequins are used to decorate this element. The finished figure can be attached to the stand with hot glue.
From the bottle
The bottle craft looks unusual. Santa Claus can be "sat" on the edge of the festive table or on the bedside table.
Materials and tools:
- lace (preferably black and white);
- cotton wool or filler;
- glue for fabric and paper;
- several cardboard tubes;
- sharp scissors;
- 1-2 pompoms (can be replaced with foam balls);
- colored thick paper;
- watercolor paints;
- brush;
- plastic bottle (volume 0.5-1 l).
Step by step instructions:
- The label must be carefully removed from the plastic bottle. The container is painted red.
- Use white paint to form an oval just below the neck and paint it over.
- The eyes are made from blue or black buttons, the nose from a piece of cotton wool. The smile can simply be drawn with red paint.
- A pompom or foam ball is glued to the neck of the bottle.
- The area above Santa Claus's "face" is covered with glue and a white cord is wound around the bottle.
- A large black button is threaded through a black cord and fixed with glue closer to the bottom of the bottle. This element will be Santa's belt.
- 2 long strips of red colored paper are glued to the right and left of the bottle (just above the waist).
- Mittens can be cut out of white colored paper, glued to strips and decorated with rhinestones.
- 2 cardboard tubes are wrapped in red colored paper.
- Cut out 4 identical semicircles.
- The elements are glued to the sleeve (one semicircle on the right, the second on the left).
- The free edges are connected to each other. The shoes for Santa Claus are ready.
- Cut 2 long, relatively wide strips from red cardboard. Fold them like an accordion and glue squares of different colors to the folds (you can use blue, yellow, green, or even black cardboard).
- The accordion strips are glued to the bottom of the bottle at one end and to the bushings at the other.
It will take about 20-25 minutes to make the craft. The figurine can be given as a souvenir to a loved one for a holiday.
From clay
Santa Claus can be molded from polymer clay with your own hands. The process is quite labor-intensive - the material must be thoroughly dried. To save time, you can make a figurine from scrap materials and add a few clay elements.
To make it you will need:
- several spruce cones;
- aluminum or copper wire;
- strong hold hairspray;
- adhesive for textiles and wood;
- brush;
- PVA glue;
- several balls of polymer clay;
- glitter (different colors);
- red ribbon.
Algorithm of actions:
- The assembly of the craft begins with the hat. A ball of 5-6 cm in diameter is rolled out of polymer clay.
- A cone is formed from it by carefully pulling out and bending the tip.
- The base of the cone is made hollow and is attached to the bottom of the pine cone.
- Roll a few more balls of clay. Make a beard, eyes, eyebrows, nose, moustache from them and glue them to the pine cone.
- The figurine's hat is generously sprayed with hairspray and immediately sprinkled with glitter. To prevent the glitter from falling off, you can also spray it with hairspray on top.
- A small piece of wire needs to be threaded across the cone and a small loop needs to be made on the side. Thread a bright ribbon through it and tie a knot.
- The “legs” are molded from polymer clay and attached to the figurine.
- The nose, eyes and eyebrows can be painted with watercolors.

The finished craft is placed in an oven preheated to 135°C and left there for 15 minutes. The temperature cannot be increased, otherwise the clay elements will crack.
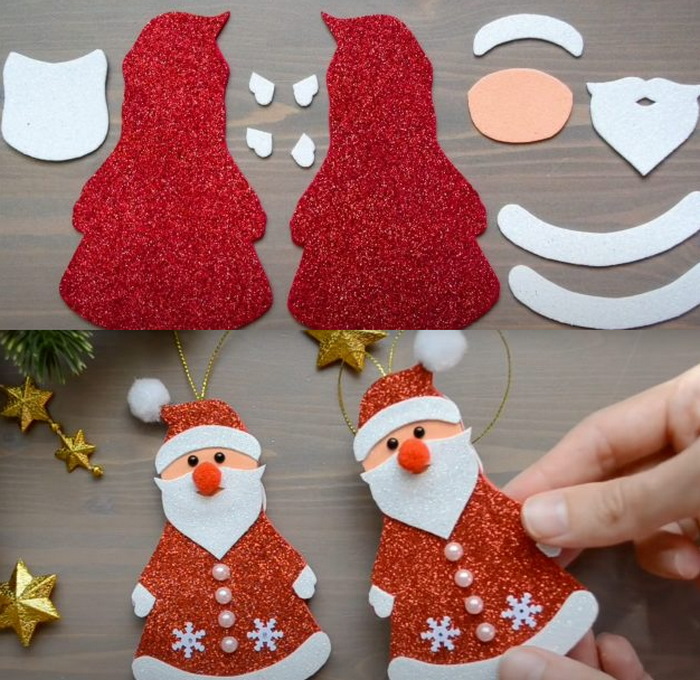
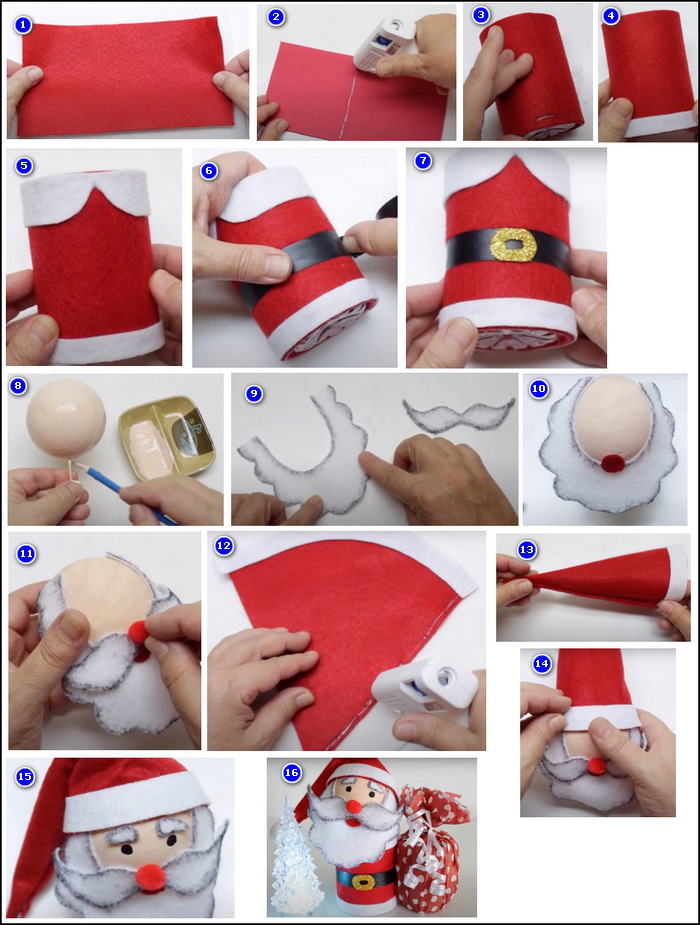
Made of felt
Santa Claus made of felt with your own hands will be small. The craft can be hung on the Christmas tree or used to decorate a box with gifts.
Necessary tools and materials:
- rhinestones, glitter, beads;
- felt of different colors (beige, blue, brown, white, 1 and 3 mm);
- sharp scissors;
- PVA glue (hot glue, gun);
- a small foam ball;
- black and beige threads;
- bell;
- pencil;
- woolen threads;
- beads;
- filler;
- aluminum or copper wire.
Instructions:
- First, you need to find and print out a template for a fairy-tale character figurine.
- The pieces are carefully cut out, applied to the felt and outlined with a pencil.
- The elements are cut out of felt: fur coat, mittens, hat, trim on the boots - from blue felt, trim (hat, fur coat) - white felt, nose, face - beige felt, boots - black. All the details need to be cut out in 2 copies.
- The parts of the fur coat and hat are sewn together with threads, and padding polyester is placed inside. The halves of the mittens and boots can be connected with PVA or hot glue. A border of beige felt is glued on top.
- 4 pieces of wire are twisted into a spring and attached to the bottom of the fur coat and its sides using a glue gun.
- Mittens and boots are put on the springs.
- The ball is glued to the top of the fur coat with PVA.
- A beard is easy to make from woolen threads. Cut the threads to the same length and comb them well.
- Attach the beard to the ball with PVA glue, and a hat on top.
- The eyes and nose can be drawn with a marker.
You can hang a bell on one of the "hands". The eyes for the figurine can be made from beads.
From plastic cups
Santa Claus can be made with your own hands even from plastic cups. The figure turns out to be quite voluminous and tall. The fairytale character can be placed under the Christmas tree.
Materials that will be useful:
- a belt or a narrow strip of leather;
- buckle imitating gold;
- character face stencil;
- construction stapler;
- red fabric;
- needles and threads;
- 20 white cups;
- 40-50 red plastic cups;
- 4-5 pink cups;
- decor (rhinestones, beads).
Detailed instructions:
- The red cups are laid out in a circle (bottom inwards). They can be fastened with staples or a stapler.
- The next circle needs to be made smaller, the next one even smaller. Collect all the elements and fasten them together. The result should be a hemisphere.
- The second hemisphere is assembled in a similar way. They can be connected using the same construction stapler.
- You need to assemble a sphere from white cups, placing 2 pink cups to the left and right of the center.
- 2 spheres are connected with a stapler. The white one will be the head, the red one – the body.
- From thick colored paper you need to cut out a nose (red), eyes (black) and mustache (white). The pink cups depict blush, so you need to glue the elements correctly.
- The red sphere in the center is wrapped with a belt with a buckle.
- Cut out 2 large triangles from red fabric. Sew them together with thread. You can glue a pompom or a bell to the end.
- The hat is placed on the “head” of Father Frost.
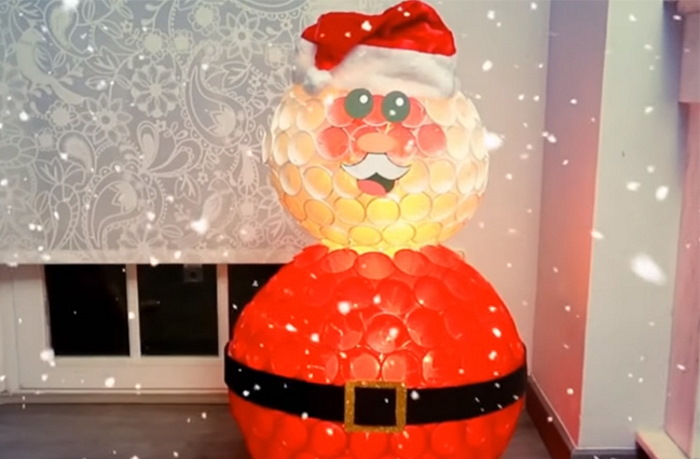
Before fastening the hemispheres, you can place a short flashing garland inside each one. Such a figure will look very impressive under the tree.
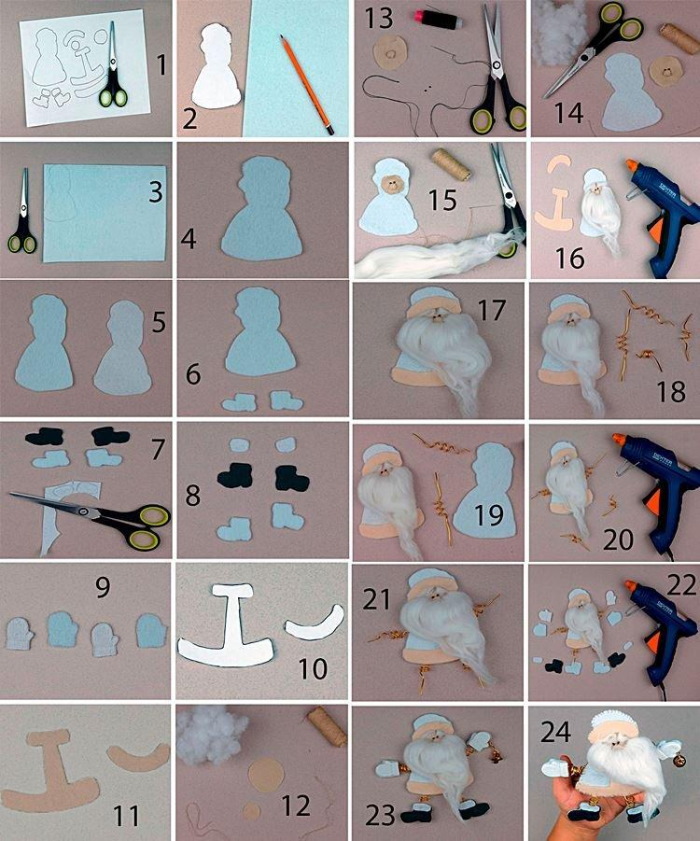
From paper
Even a child can make Santa Claus out of paper. All you need is colored paper, glue, and scissors. To keep the craft looking attractive for as long as possible, you can use cardboard.
You can use ready-made templates of the future figure. The elements of the craft are cut out, applied to the cardboard and carefully outlined with a pencil. It is convenient to make holes on it along the contour with a stationery knife. The parts of the future craft are fastened together with paper glue.
The fur coat, mittens, boots and hat can be decorated with rhinestones. All the elements (the body, head, sleeves and legs) are glued together. The beard is easy to make from woolen threads. It can also be glued. The eyes are made from beads or small buttons. The nose and smile are drawn with a marker.
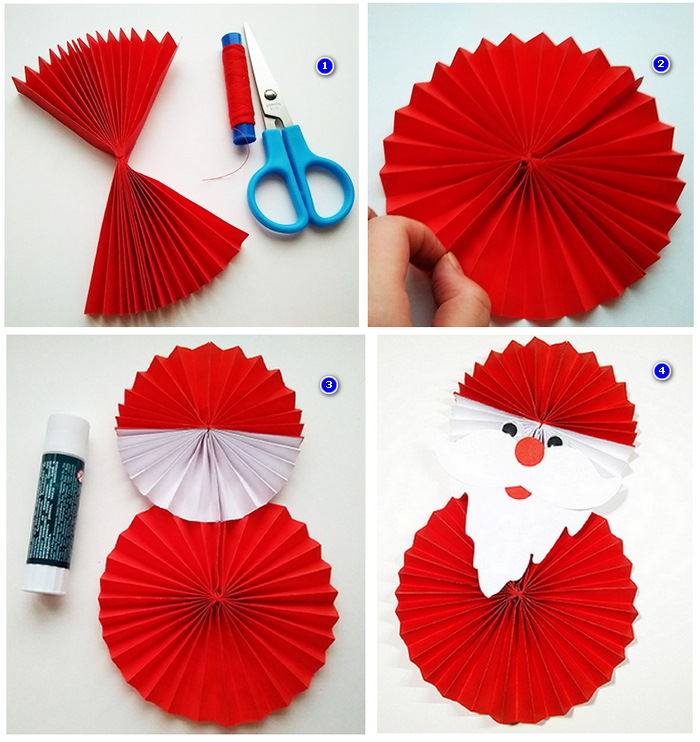
Another option for making a paper craft (materials are almost the same):
- The red sheet of paper needs to be glued onto the white one.
- From the red sheet of paper, fold a large triangle (the excess can be cut off), glue a white circle onto it and bend the top.
- The bottom of the white sheet is cut into strips, making a fringe, and slightly curled.
- A beige circle is glued above the beard. Eyes, moustache, and nose are drawn on it.
You can add a blush to the craft using glitter. Apply a little glue to the “face” (cheek area) and sprinkle this area with pink glitter.
A handmade Santa Claus will be a good gift for the holiday. When working with sharp objects, you need to be safe.
If the craft is made of flammable materials, it cannot be placed near a radiator or other heat sources.
Video on how to make Santa Claus with your own hands
The video shows how to make Santa Claus from cotton wool.