Making crafts with children is not only a fun but also a useful activity that stimulates mental activity, develops imagination, spatial thinking, and the child's independence. Interesting products can be made from dough, plasticine, paper, fabric, cotton pads, and natural materials.
Crafts from salt dough
Modeling from dough is called bioceramics. The dough is easy to work with, it is absolutely harmless, and products made from it retain a beautiful appearance for many years.
How to make salt dough
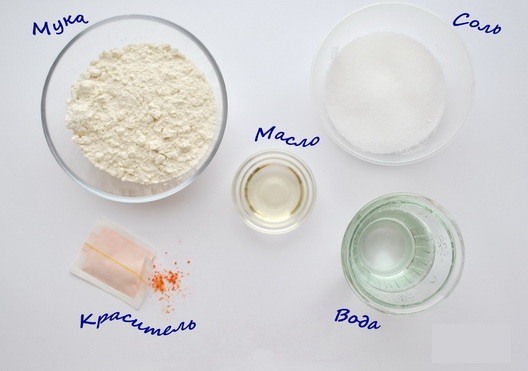
To knead the dough you will need:
- flour – 2 tbsp;
- fine salt – 1 tbsp.;
- water – 1 tbsp.;
- spoon;
- bowl.
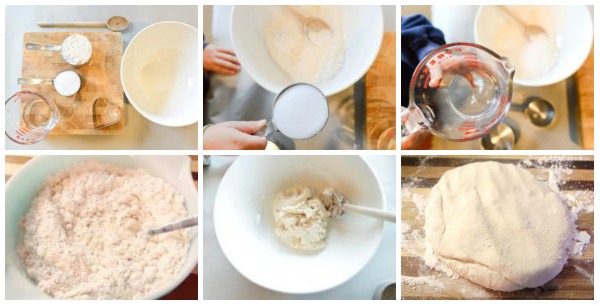
Method of preparation:
- Mix flour and salt in a bowl.
- Pour cold water over the mixture.
- Knead the dough.
The mass should be soft and elastic.
How to Dry Salt Dough
To dry crafts made from salt dough, you can use one of the following methods:
| Drying methods | Description |
| Natural | The craft should be placed in a dry, illuminated place, but protected from direct sunlight. It takes 1 day to dry 1 mm thick craft |
| In the oven | To dry items in an electric oven, it is recommended to use the formula: 1 hour for every 0.5 cm of the thickness of the craft at a temperature of 75°C. In a gas stove, the process is faster, so to regulate the temperature, you should open the oven door slightly. |
| On the heating battery | The product placed on the foil should be left on the radiator until it dries completely. |
| Combined | The craft must be dried in the air for 2 days, and then dried a little in the oven. This method is often used to dry voluminous items. |
The readiness of the product is determined by the sound that is made when you tap it with your finger. It should be ringing. A muffled sound indicates that the model is not dry enough.
How to color salt dough
There are 2 ways to color the dough:
- Paint the finished craft with gouache or acrylic paints.
- While kneading the dough, add food coloring diluted with water.
To ensure that the craft retains its appearance for a long time, it should also be covered with acrylic varnish in 2-3 layers with intermediate drying.
Salt Dough Crafts for Preschoolers
Interesting crafts with preschool children are easier to make with colored dough. Preschoolers will find it easy and exciting to work with modeling clay.
Caterpillar
For creativity you will need:
- dough of green and black colors;
- stack;
- modeling board;
- PVA glue;
- varnish.

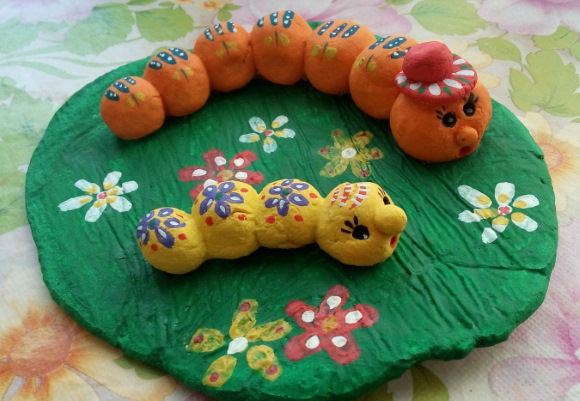
Master class:
- Roll out the green sausage.
- Using a stack, cut it into 6 equal parts and roll into balls.
- Fasten 5 balls together. Then glue the head to the top of the outermost ball.
- Make a green nose and black eyes. Attach the pieces to the head.
- Dry the caterpillar and secure it with varnish.
Sheep
Necessary materials and tools:
- colored dough;
- water;
- stack;
- brush;
- varnish;
- board.
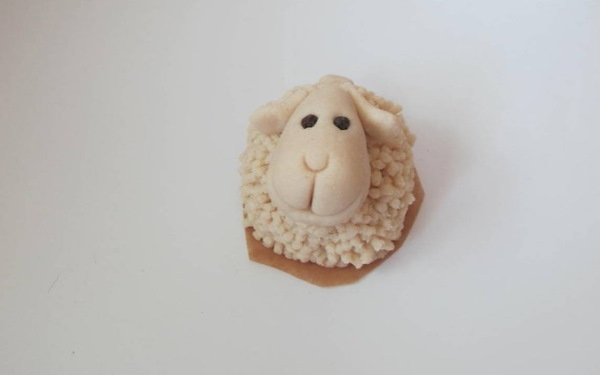
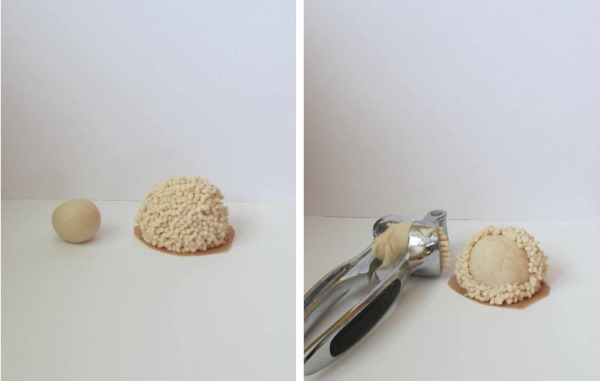
Master class:
- From the pink mass, mold an oval body of a sheep.
- Roll 4 pink sausages of the same size. One side should be slightly wider than the other. On the wide side of each leg, mark the hoof with a stack.
- Attach the legs to the body (in a lying position). All parts should be attached with water.
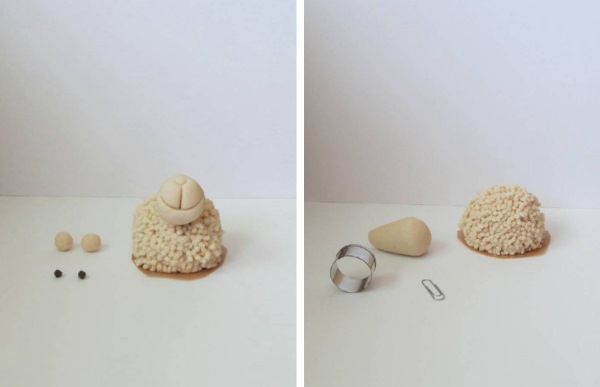
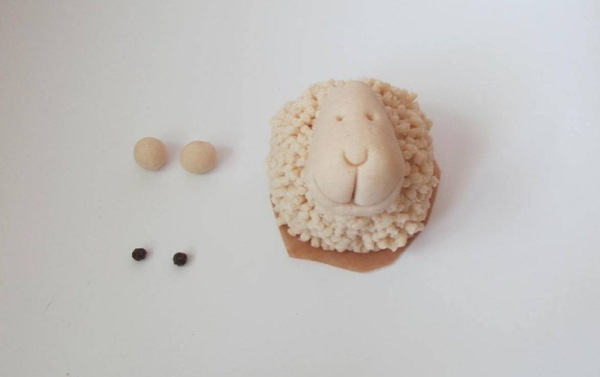
- Make a pink pear-shaped head. Use a stack to mark the eyes, nose and mouth on the head.
- Make ears by rolling 2 small sausages and flattening them. Attach the parts to the head, and the head to the body.
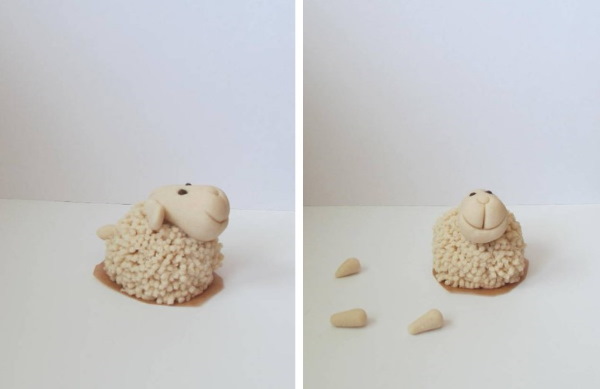
- Make a large number of small balls from white dough, which will become the sheep's wool. Using a brush with water, wet the body and glue the balls to it.
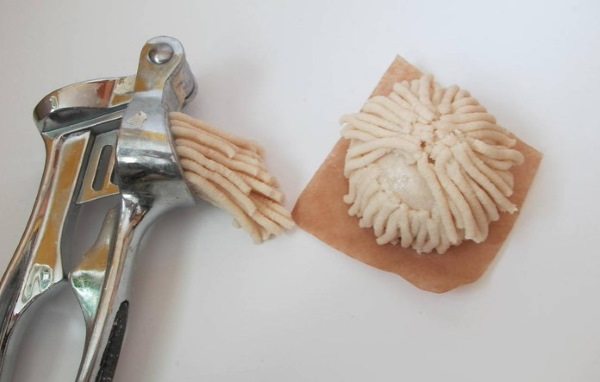
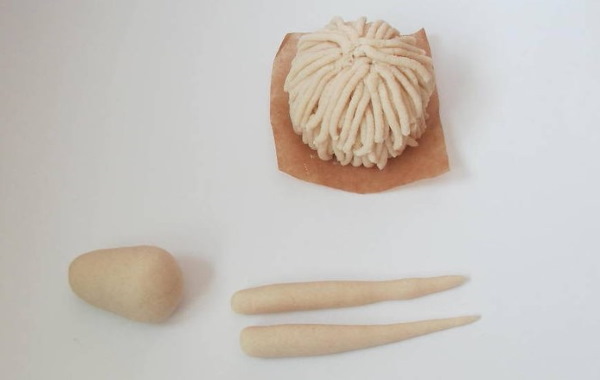
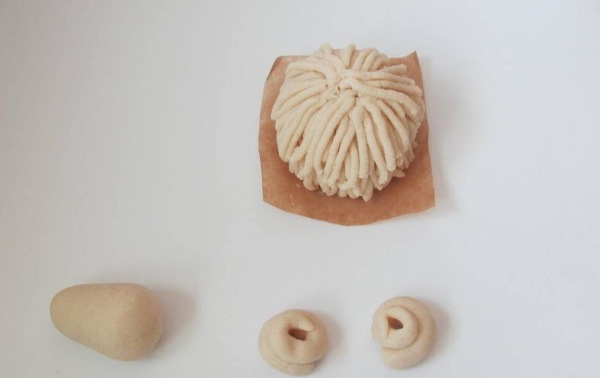
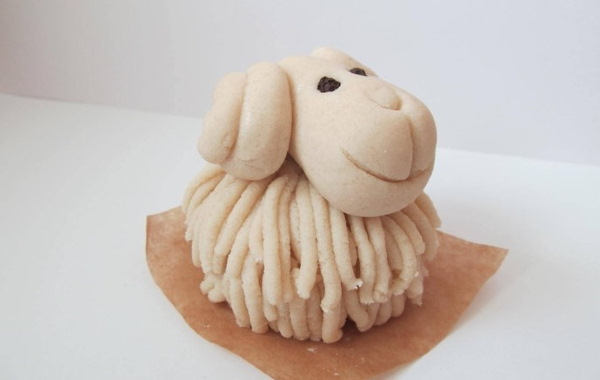
- Dry the craft and apply varnish to the surface.
Crafts for children 7-12 years old
With older children, you can make more complex models using additional materials and tools: manicure scissors, a knife, a rolling pin, stencils, paints.
Hedgehog
For creativity you will need:
- dough;
- manicure scissors;
- glue;
- paints;
- brush;
- varnish.
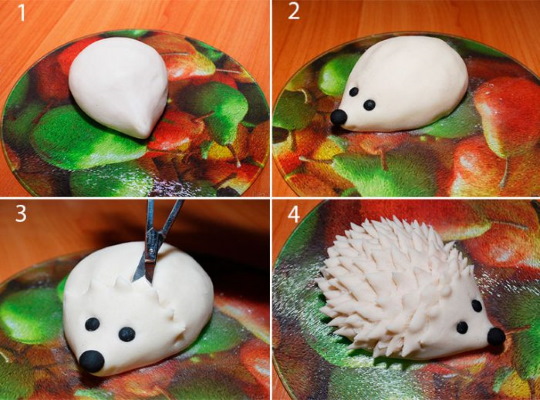
Master class:
- Roll the dough into a ball. Pull out one side, forming an oval body of a hedgehog.
- Glue the nose and 2 eye balls to the blank.
- Using scissors, make needles for the hedgehog. The cuts should be made in rows, placing the needles in a checkerboard pattern.
- Dry the product.
- Paint the hedgehog with paints. After drying, it is necessary to cover it with varnish.
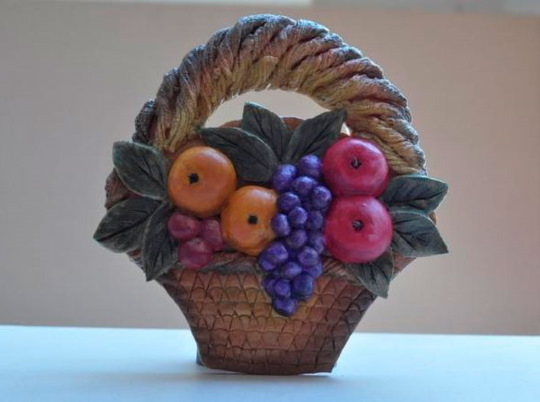
Picture-basket
Necessary materials and tools:
- salt dough;
- wooden or cardboard base;
- stack;
- paper;
- pencil;
- PVA glue;
- brush;
- rolling pin;
- carnation;
- acrylic paints;
- varnish.
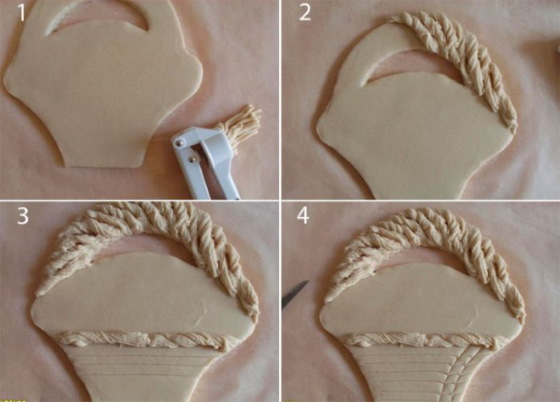
Master class:
- Draw a basket or print a ready-made template.
- Roll out the dough with a rolling pin and stick it to a wooden base.
- Place the template on the dough and use a knife to cut out the basket along the contours.
- Roll 2 long sausages and intertwine them. After that, coat the basket handle with glue and attach the twisted part to it. Glue the same part to the basket rim.
- Use the tip of the stack to draw a weave on the basket.
- Cut out 9 leaves from the rolled out dough. Draw stripes on them. Attach 3 leaves to the sides and in the center of the product.
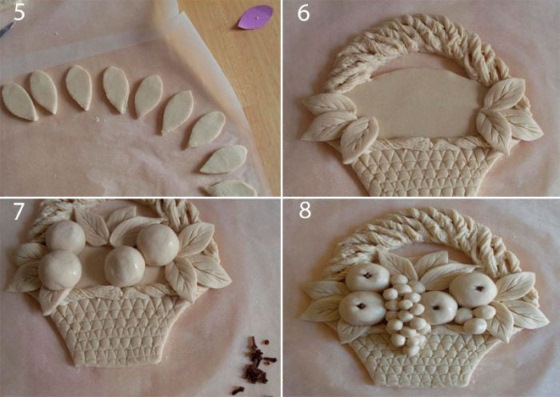
- Make 3 apple-shaped balls. Use a stack to make indentations in the apples and attach a carnation.
- Make 4 plums. Then assemble a bunch of grapes from 20 balls.
- Attach the fruit to the basket and dry the product.
- Paint the three-dimensional picture with paints and, after drying, treat it with varnish.
Children's crafts from plasticine
Working with plasticine is important for the all-round development of a child: mental, physical and aesthetic.
It allows you to realize and develop creative abilities, so classes with this material will be useful for children of any age.
For children 5-7 years old
Preschoolers can work with a stack, roll balls and sausages. With them, you can mold simple figures of animals, birds, plants, doll food.
Octopus
For the product you will need:
- purple and white plasticine;
- toothpick;
- modeling board.

Master class:
- Divide the block of purple plasticine into 5 parts.
- Roll sausages from 4 balls. Interlace them together, forming an eight-pointed snowflake.
- Stick white dots on the underside of each paw. Then pierce them with the tip of a toothpick.
- Attach an oval head with a large forehead to the center of the top. Glue on the eyes and mouth, and make dots on the top of the head (like paws).
- Give the octopus a more realistic look by bending the tentacles in any way.
Cake for dolls
To make the cake you will need:
- red, pink and white plasticine;
- rolling pin;
- plastic cap (from a bottle or cosmetics);
- modeling board.
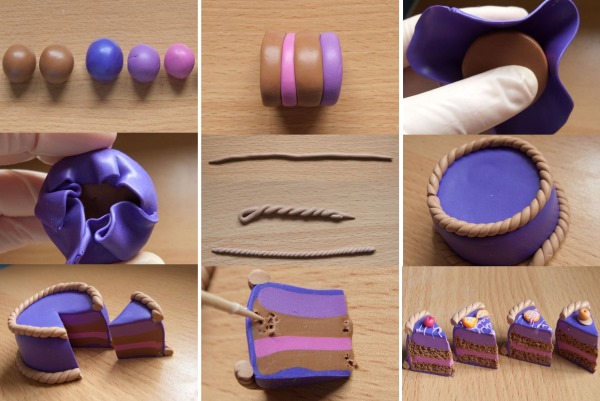
Master class:
- Roll out 2 layers of white and pink mass. Using the lid, cut out 3 identical flat cakes of each color.
- Place the flatbreads on top of each other, alternating colors.
- Decorate the top of the cake with a border. Roll 2 sausages: white and red. Then intertwine them and lay the border along the edges of the top cake.
- Roll out 5 strips of red plasticine and twist them into a spiral, forming roses. Place the roses in the center of the cake.
For children 8-12 years old
Children of this age are interested in creating three-dimensional figures with more complex and precise details, as well as appliques and creative works on various topics.
Application "Space"
Necessary materials and tools:
- plasticine set;
- stack;
- rolling pin;
- cardboard.
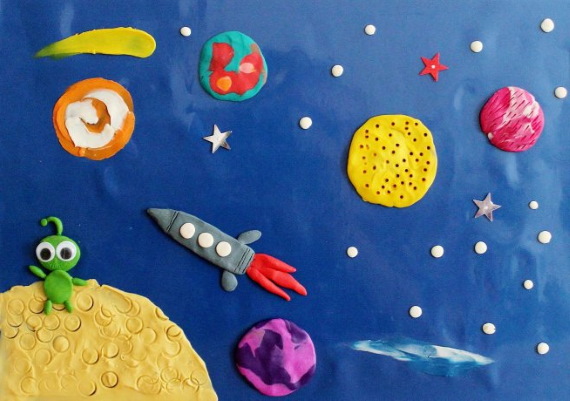
Master class:
- Using a stack, spread the blue plasticine over the cardboard base and roll it out with a rolling pin.
- Mold a blue ball and flatten it, giving it the shape of a disk. Attach a yellow hemisphere to the center of the circle. Then glue 4 or 6 legs to the flying saucer.
- Create planets. To do this, roll balls of different colors: yellow for the Sun, blue and green for the Earth, gray for Mercury, pale yellow for Venus, red for Mars, blue for Neptune, and pale blue for Uranus. For Saturn, you will need a light yellow ball with a ring.
Peacock
To make the bird you will need:
- plasticine set;
- rolling pin;
- fishing line;
- stack;
- modeling board.
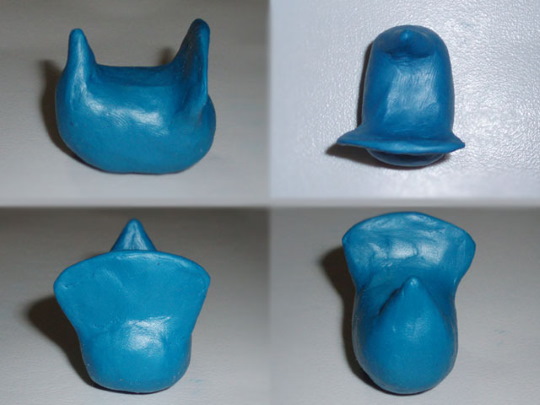
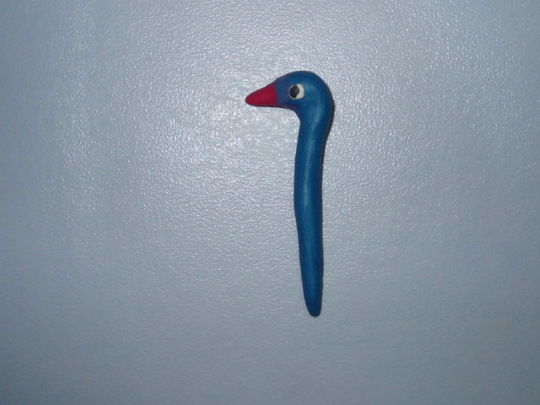
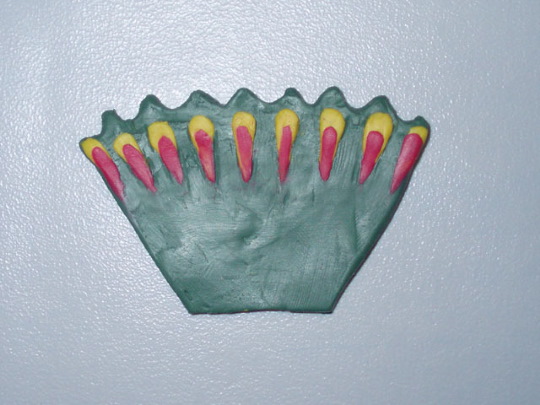
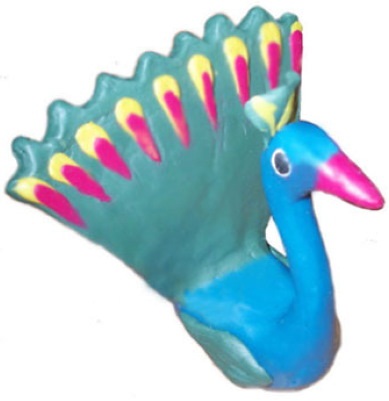
Master class:
- From one piece of plasticine make the body, neck and head of the peacock. To do this, roll a ball, and then by stretching and rolling give it the shape of a cone. From the top of the cone form the neck and head.
- Attach the eye balls and use a stack to draw a mouth. Glue a crest of 3 small rolled sausages with balls on the ends onto the top of the head.
- Attach 2 wings to the body.
- Make the tail. Using a rolling pin, roll out 5 sheets of different colors measuring 6 cm by 10 cm. The top sheet should be smaller. All the parts should be stacked on top of each other, pressed tightly and folded in half like a book.
- Step back 4 mm from the edge of the workpiece, cut the plasticine with a fishing line. Thus, cut the workpiece into 6-8 parts. Then connect all the tail feathers and attach to the body.
DIY crafts for kids from paper and cardboard
Interesting crafts with children can be made from colored paper and cardboard. This type of creativity perfectly develops fine motor skills of hands, as well as attentiveness and creative thinking.
The easiest DIY crafts for beginners
Young children should be involved in the process, starting with simple items that do not take much time to complete.
Rainbow in the clouds
Necessary materials and tools:
- set of colored paper;
- glue;
- cotton wool;
- scissors;
- stapler.
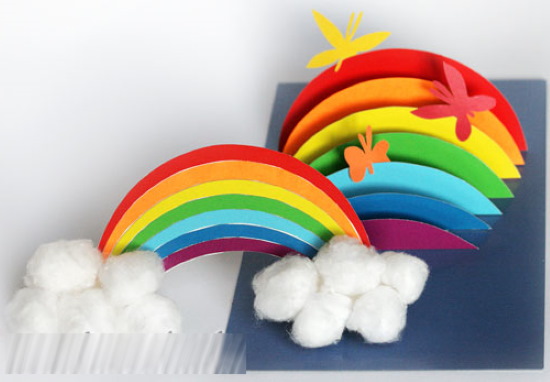
Master class:
- Cut 7 strips of paper in rainbow colors. Each piece should be shorter than the previous one.
- Staple one side of the strips together. Then bend the strips into a rainbow shape and staple the ends of the other side.
- Form 6 cotton ball clouds and glue 3 of them at the base of the rainbow.
Sun
For creativity you will need:
- yellow cardboard;
- colored paper;
- pencil;
- scissors;
- glue.

Master class:
- Cut out a circle of the sun from cardboard.
- Make eyes and a mouth from paper. Glue the parts to the solar circle.
- Make rays. To do this, place the child's hand on a sheet of paper and trace it with a pencil. Then cut out the drawing with scissors. Similarly, make 7-20 more rays - palms, placing the cut-out drawing on several sheets of paper.
- Glue the rays to the sun. You can make 1 or 2 rows of rays.
Complex crafts
Schoolchildren who have already trained well on simple designs can move on to making complex three-dimensional models and crafts using the quilling technique.
Rowan branch
To work you will need:
- double-sided paper in red, green and brown colors;
- a sheet of colored cardboard;
- scissors;
- glue;
- toothpick.
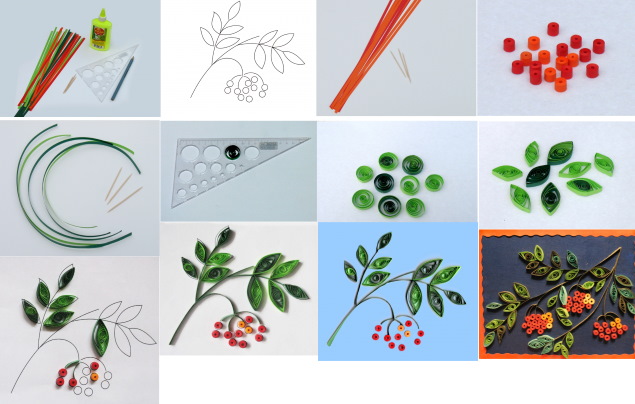
Master class:
- Draw a branch on a sheet of brown paper and cut it out. Glue the piece onto the cardboard.
- Make 25-50 berries from red paper. Cut thin strips and twist them into tight rings using a toothpick, securing the ends with glue.
- Make 10-15 green leaves. The twisted rings of strips must be pressed from both edges, forming a leaf.
- Glue the leaf modules along the branch and place a bunch of berries at its end.
Children's crafts from foamiran
With the help of this pliable material you can make toys and decorations, decorate a notebook, pencil case or pencil stand.
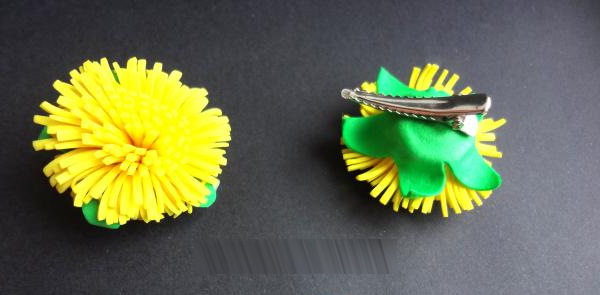
Dandelion Hairpin
For the product you will need:
- yellow and green foamiran;
- scissors;
- toothpicks;
- base of the hairpin;
- iron;
- heat gun.
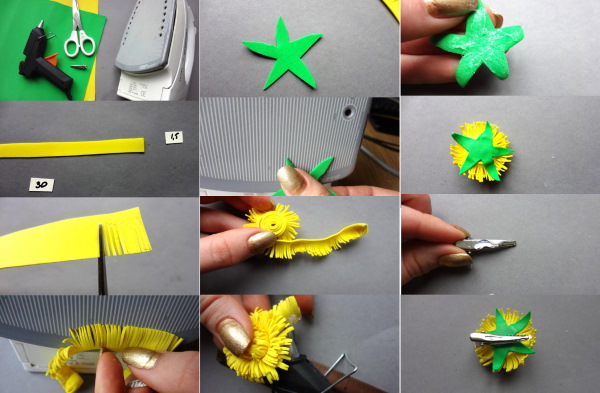
Master class:
- Cut 3 strips of yellow foamiran 25 cm long and 2 cm, 2.5 cm, 3 cm wide.
- Using scissors, make a fringe along the entire length of the strip, leaving 5 mm before the edge.
- Heat treat the blanks to make the flower look more realistic. To curl the fringe, apply it to the iron.
- Form a flower. Wind a 2 cm wide ribbon on a toothpick with the curls inward, greasing the base with glue. Then wind a 2.5 cm wide section with the curls outward. Glue the 3rd piece in this way.
- Make 2 more flowers in the same way.
- Cut out sepals from green foamirin and attach them to the base of the dandelions.
- Glue green foamiran leaves onto the base of the hair clip and attach dandelions.
From cotton pads
Interesting and simple crafts are made from ordinary cotton pads. The soft and pleasant to the touch material is suitable for working even with the smallest children. The pads can be easily cut, rolled, glued, painted and combined with other materials.
Application "Snowman in the forest"
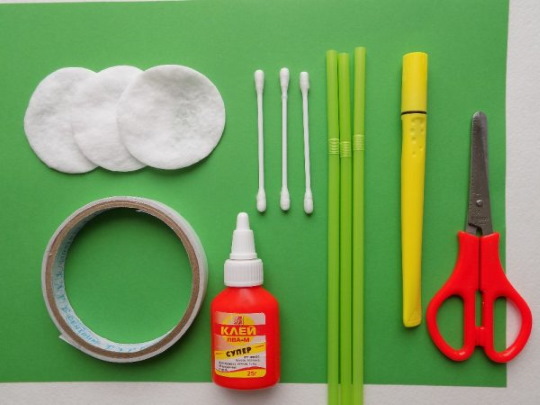
Necessary accessories:
- cotton pads;
- blue cardboard;
- colored paper;
- glue;
- scissors;
- felt-tip pens.
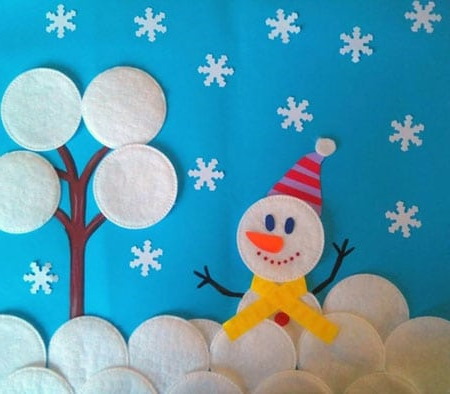
Master class:
- Draw a tree on the left side of the cardboard. Glue several cotton circles to its branches.
- Attach cotton pads-snowdrifts to the bottom of the base.
- Make a snowman from two circles.
- Cut out a hat, scarf, button, eyes and nose for the snowman from colored paper, and draw the mouth and hands with a felt-tip pen.
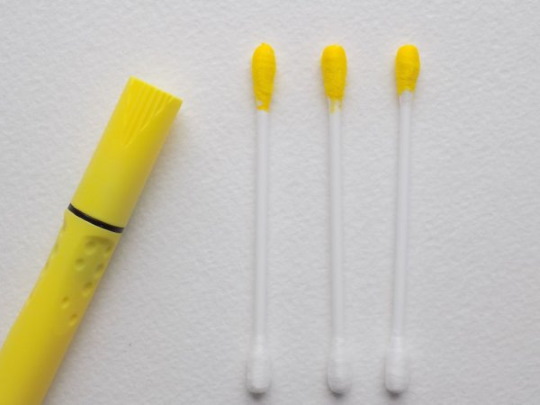
Callas
To make flowers you will need:
- cotton pads;
- wooden sticks;
- corn flour;
- millet;
- glue;
- corrugated paper.
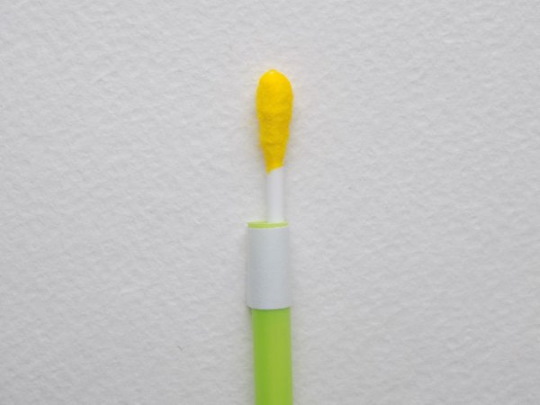
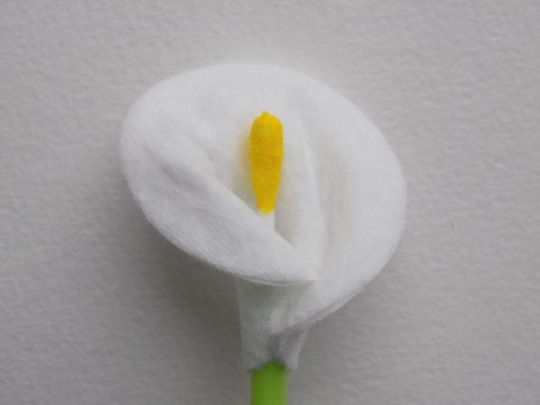
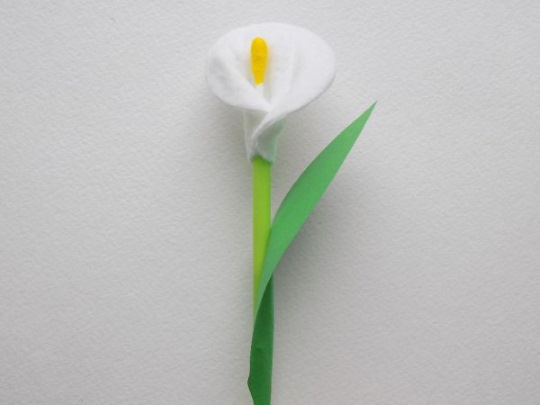
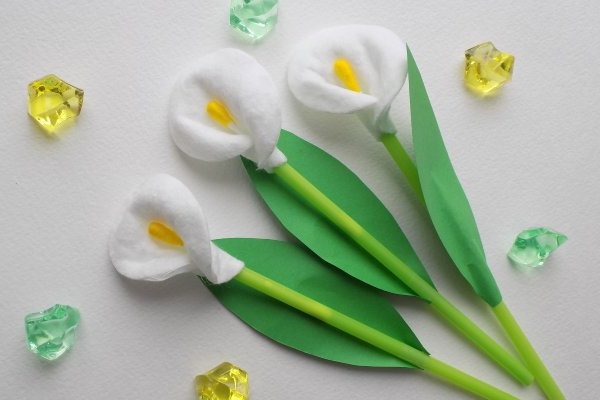
Master class:
- Coat the end of the stick with glue and dip it in corn flour. After drying, coat it with glue again and sprinkle with millet.
- Shape a cotton pad into a petal and attach it to the stick near the inflorescence.
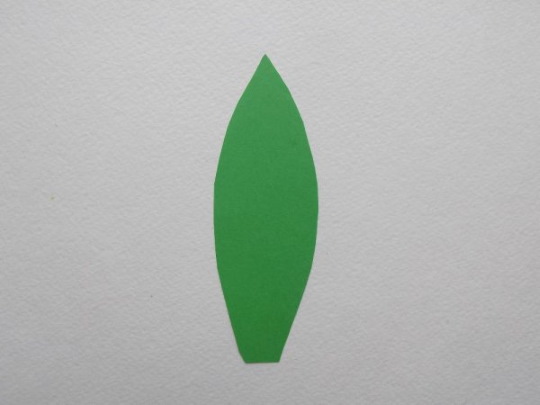
- Wrap a strip of green paper around the stick and glue a green leaf on it.
Made of fabric
Soft crafts can be made from a whole piece of fabric, scraps, napkins and even socks. The materials for appliques are only fabric and threads, and for voluminous items, you will also need synthetic padding.
Hare
For the product you will need:
- sock;
- scissors;
- needle;
- threads;
- synthetic padding;
- ribbon;
- pencil.
Master class:
- Turn the sock inside out and cut the front part into 2 halves. Then sew each of the halves together to create bunny ears.
- Turn the sock inside out and fill it with padding polyester.
- Sew the fabric of the lower part of the hare.
- Tie the ears at the base with a ribbon.
- Using a needle and thread, embroider the hare's eyes and nose, and use a pencil to draw pink cheeks.
Made from natural material
It is fun to make interesting crafts with children from natural materials: leaves, branches, cones, acorns, chestnuts, shells, dried flowers.
Owl
To work you will need:
- pine cone;
- felt;
- scissors;
- glue gun.
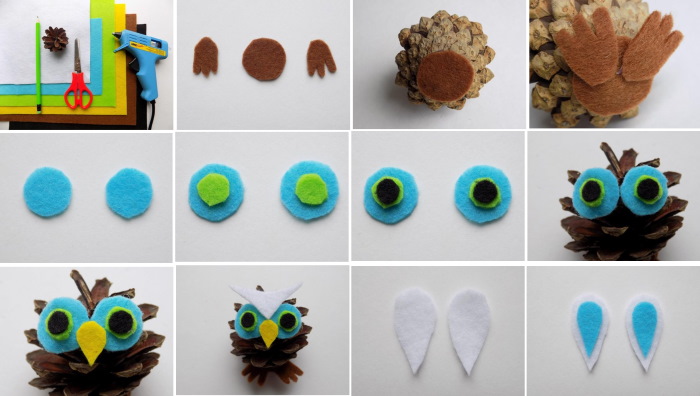
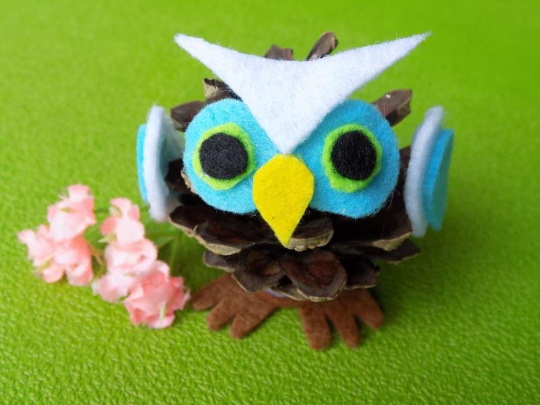
Master class:
- Cut out wings from brown felt and an owl's beak from orange felt. Make eyes by gluing smaller white circles to large orange circles and then small black circles.
- Place the pine cone on a wide base. Using a glue gun, attach wings to the sides of the body and eyes and a beak to the front.
Garland of shells
For a sea garland you will need:
- shells;
- beads;
- fishing line;
- awl;
- metal rings;
- gouache;
- varnish.
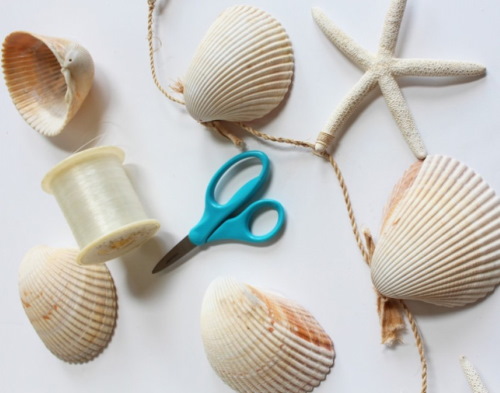
Master class:
- Wash the shells several times in soapy water. Then use an awl to make holes in them.
- Paint the shells with gouache. You can even create plot drawings on them with a thin brush. Fix the dried paints with varnish.
- String shells and beads onto the fishing line one by one.
- Attach metal rings to the ends of the garland.
Bright rug
A soft and fluffy rug that doesn't require any special skills to make can be made from the following available materials and tools:
- yarn of different colors;
- fork;
- scissors;
- needle;
- base mat.
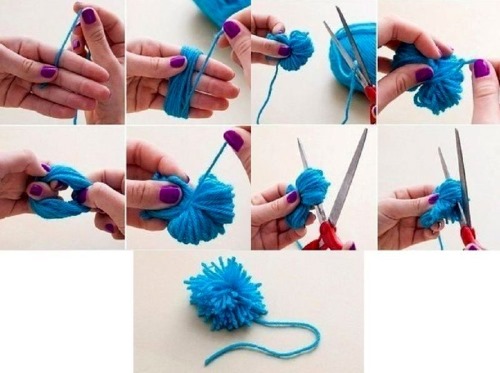
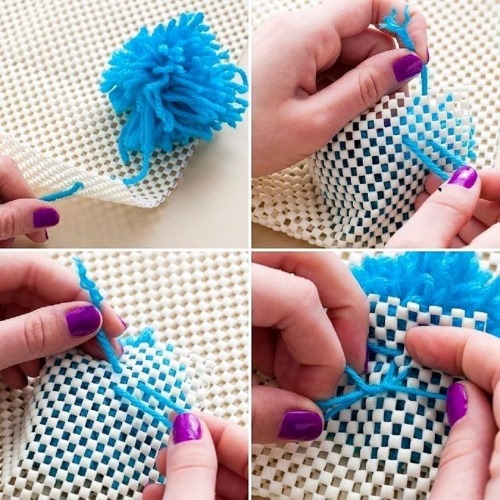
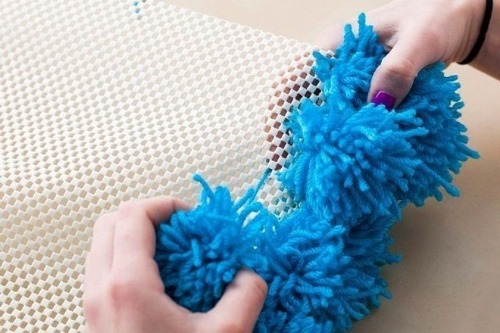
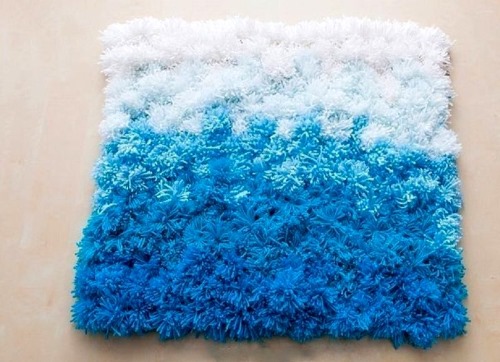
Master class:
- Make a pompom. To do this, wind the yarn around the fork's tines and tie it in the center with a small piece of thread. Then cut the yarn along the tines. The result will be a soft ball. The more threads you wind around the fork, the larger the pompom will be.
- In this way, make many pom-poms of different colors and sizes.
- Sew the pompoms one by one onto the base using a needle and the same knitting threads. The balls should be sewn tightly to each other so that the rug turns out fluffy. The rug itself can be made in any shape: round, square, oval, in the form of flowers or animals.
- Tie the threads into knots on the back side of the garment and sew a piece of fabric to it.
Keychains
Felt is a popular material for making children's keychains. A bright accessory can be made in the form of animals, birds, plants, cartoon characters.
The following supplies are required for creativity:
- felt of different colors;
- floss threads;
- padding polyester or cotton wool;
- keychain ring;
- pen;
- paper;
- scissors.
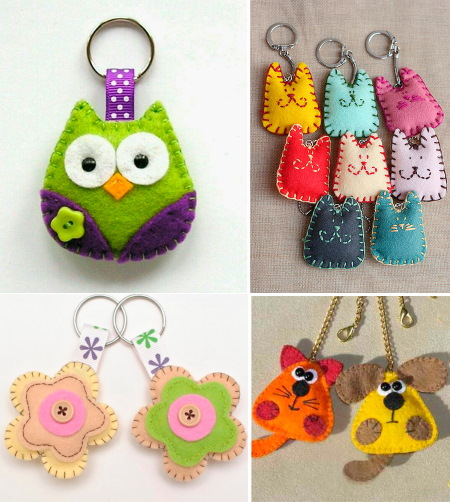
Master class:
- Draw a template of the desired design or download it from the Internet.
- Place the patterns on the felt, outline them with a pen and carefully cut out along the outline.
- Sew the pieces together, leaving an opening to stuff the item with padding polyester.
- Fill the craft with synthetic padding and sew up the hole.
- You can decorate the product with embroidery, buttons, beads or rhinestones.
- Sew a ring onto the keychain.
Exclusive mug
Interesting crafts can be made with children even from ordinary household mugs.
To do this you will need:
- plain ceramic mug;
- alcohol-containing liquid;
- paints for ceramics;
- brushes;
- varnish for ceramics.
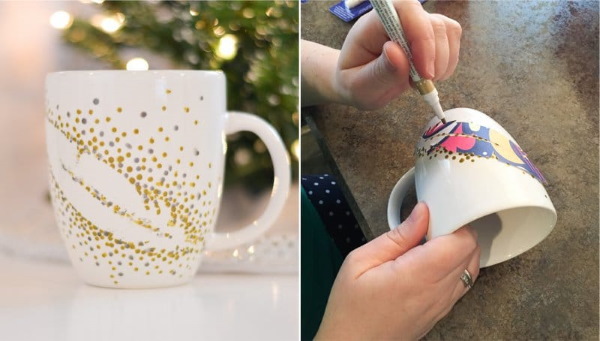
Master class:
- Degrease the surface of the mug with an alcohol-containing liquid.
- Apply a design to the mug.
- Place the mug in the oven for a certain time (indicated in the paint instructions).
- If necessary, after firing, you can add another layer of paint and then place the piece back in the oven.
- Cover the drawing with varnish and fire again.
Coasters for dishes
To make bright coasters, you will need:
- ice cream sticks;
- acrylic paints;
- varnish;
- glue gun.
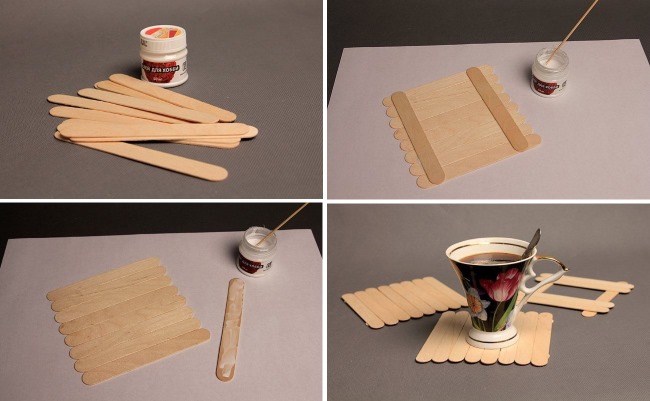
Master class:
- Using a glue gun, glue 12 sticks together.
- Paint the details with paints.
- After drying, cover the stand with varnish.
- In this way, you can make the required number of coasters with any design.
Colored cans
To make a unique decorative item you will need simple materials:
- banks;
- food coloring;
- PVA glue;
- water;
- mixing container.
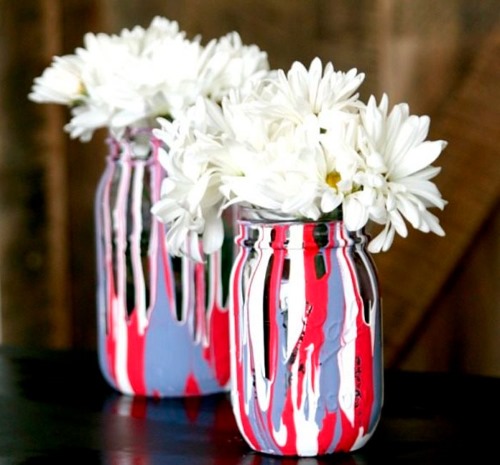
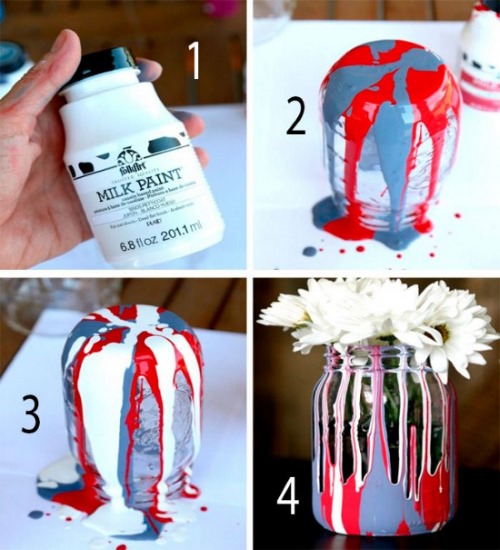
Master class:
- Mix 1 tbsp water with 40-60 drops of food coloring in a bowl.
- Pour 1 tbsp of glue into the jar and add the diluted dye.
- Shake the jar thoroughly. Then pour out the remaining mixture and leave the jar to dry for 10 minutes.
- Similarly, paint the other jars in the desired colors.
- Place the painted containers upside down on a baking sheet lined with parchment paper and place in an oven preheated to 200°C for 15 minutes.
- After cooling, the jars can be used for home decoration.
Regularity and consideration of age-related features are important in creative activities with children. This promotes the child's passion for creativity, faith in their own strengths, the desire to create common interesting crafts and implement their own ideas.
Author: Inna Chaplich
Article formatting:Natalie Podolskaya
Videos about crafts for kids
Interesting crafts with children: