Salt dough is used for activities with children. From the elastic mass, you can create various figures and forms. Working with plastic mass helps develop imagination, motor skills, abstract thinking. Creating crafts from salt dough with your own hands is an exciting activity, master classes will help you create a masterpiece.
Choosing the Right Flour
To create a flexible dough, it is better to choose premium wheat flour. It should not contain impurities or additional components. Other types of flour will not allow you to achieve the necessary dough characteristics, for example, pancake flour will increase in volume, and coarse flour will produce uneven dough.
To obtain a homogeneous salted dough for dough plasticine, the flour should be sifted first.
Water temperature and its effect on dough
It is necessary to take into account the influence of water temperature on flour particles for dough plastics. The best swelling of flour and dissolution of crystalline raw materials occurs at elevated temperatures. The higher the dough temperature, the faster the process of dehydration of sugars occurs, and the frequency of interaction between protein, starch and water molecules increases.
Plasticity of salted dough can be achieved at a raw material temperature of 18 to 25 °C. Elastic-plastic dough is obtained as a result of complete swelling of flour proteins, at a water temperature of 38-40 °C. The kneading process is important for creating a homogeneous mass. The better the quality of the flour and the higher the gluten content, the longer the kneading.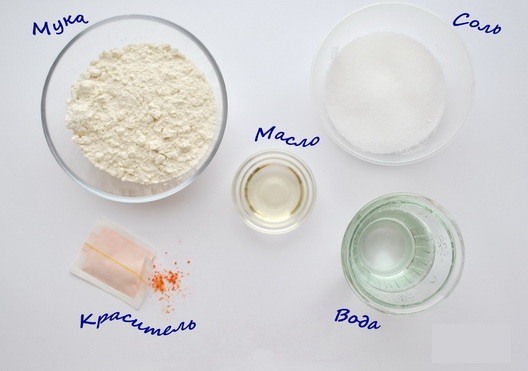
When mixing flour, water and salt into a homogeneous mass, the process of dissolution of crystalline raw materials and swelling of flour colloids is accelerated. Mixing accelerates the process of formation of gluten in the dough, so it is worth kneading the dough for a long time, until a plastic and elastic mass is obtained.
Step-by-step instructions for making the dough
If you have flour, salt and water, you can create a variety of crafts from salted dough with your own hands. Master classes will help you choose a craft of any complexity. To create dough for modeling, you need simple and inexpensive products. There are various recipes for salted plastic mass, according to which you can prepare dough that differs in properties.
Different types of dough allow you to create simple and complex elements, small details or real masterpieces. When adding different ingredients, the properties of the plastic dough can change.
Dense dough
For a thick dough you will need:
- 200 g flour;
- 200 g fine salt;
- 125 ml cold water.
The density of salt is higher than the density of flour, therefore, salt takes up 2 times less volume than flour. When making dough without using scales, take, for example, 1 cup of salt and 2 cups of flour.
Recipe:
- Mix fine salt and flour.
- Gradually pour water into the dry mass.
- Knead the dough until it forms a homogeneous dense mass.
This type of salt dough is suitable for modeling simple figures without small details. This dough is used for classes with small children who do not know how to create complex crafts. Geometric figures, simple details, for example, a snowman, fish, heart can easily be created with a child from thick dough.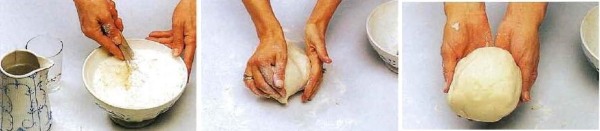
Second option:
- 200 g flour;
- 400 g salt;
- 125 ml cold water.
Also combine the ingredients and knead the dough. The modeling mass should be elastic, plastic and should not stick to your hands. Strong dough is used for sculpting large figures. With the help of thick dough, you can sculpt and simultaneously study figures and shapes with your child, and by adding dyes to the mass, you can become familiar with the color range.
Medium density dough
Ingredients:
- flour 400 g;
- salt 200 g;
- warm water 125 ml;
- PVA glue 50 ml.
Execution:
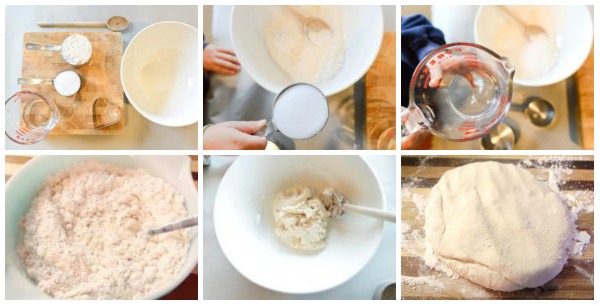
- Using a mixer, combine flour with warm water and salt.
- Add glue to the resulting mass.
- Knead the dough until smooth.
- Roll into a ball, cover with plastic and refrigerate.
The second version of plastic salt dough:
- flour 200 g;
- salt 200 g;
- water 125 ml;
- starch 1 tbsp.
Execution:
- Dissolve a spoonful of starch in half a glass of cold water, avoiding the formation of lumps.
- Boil the remaining water, pour the starch jelly into the boiling water. Stir until a thick and homogeneous mass is formed.
- Mix salt and flour.
- Gradually pour the jelly into the dry mixture.
- Knead the salt dough to medium consistency.
From medium-density salt dough, you can create crafts with small details, such as flowers, animal figures, cartoon characters. You can make crafts for a thematic exhibition, decor for a New Year tree. The products will become brighter if you add dye, liquid or powder, to the dough. It is much more interesting for children to play and sculpt from colored dough.
Soft dough
Necessary products:
- flour 200 g;
- salt 150 g;
- warm water 50 ml;
- vegetable oil 5 tbsp.
Execution:
- Dissolve salt in warm water.
- Add the remaining ingredients.
- Knead until smooth.
Soft dough without salt:
- flour 200 g;
- water 200 ml;
- vegetable oil 1 tbsp.
Execution:
- Add water and butter to the flour in small portions.
- Knead the resulting dough thoroughly.
Soft mass without salt is used for activities with children from one year and older.
The dough will produce large and small figures for various crafts. For salted dough, it is better to choose salt consisting of small particles, iodized salt is not suitable, its large particles dissolve poorly, and the mass turns out to be heterogeneous. Store the dough in a bag or in a container. When moisture evaporates, the dough is covered with a crust, which when creating crafts can spoil the appearance of the product.
The main principles of modeling three-dimensional figures
You can make a variety of crafts from salt dough with your own hands; master classes will help you learn how to sculpt correctly and come up with your own masterpiece.
Basic principles of modeling:
- Roll out the prepared salted dough into a layer of the required thickness.
- Cut out the required shapes.
- Depending on what kind of craft you need to make, connect the parts. To make the parts connect better, you can wet them with water.
- The resulting craft can be decorated with beads, rhinestones, sequins, and painted in the desired color.
- You can dry the craft in the oven or let the item dry on its own.
- After the product has dried, it can be painted or varnished.
Making DIY crafts
Money fish
Execution:
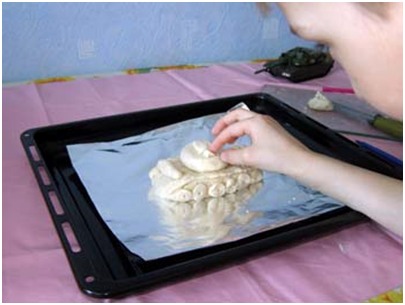
- Roll out a layer of dough of the required size with a rolling pin. It is better to cover the work surface with foil, you can also transfer the craft to the oven on it.
- Using a knife, cut out the shape of a fish, such as flounder.
- Using various tools, decorate the fish with prints.
- Use thin rolled out strips of dough to make the mouth of the fish.
- We sculpt the eyes from separate pieces.
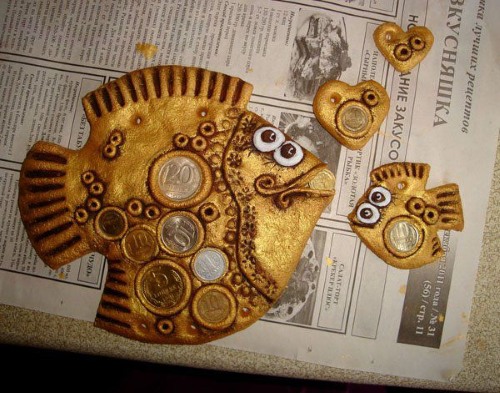
- To secure the coins, roll a small ball of dough, place it on the surface of the dough, and press the ball with a coin.
- It is important to make holes for attaching the money fish.
- To fix the craft, you need to put it in the oven.
- Once dry, the money fish can be painted in any color.
Angel for February 14
Execution:
- Roll out a 5 mm thick layer of salt dough on a sheet of foil using a rolling pin.
- Separately cut out the angel wings, the bell-shaped dress, the head, and the hair.
- Connect all the parts to make an angel.
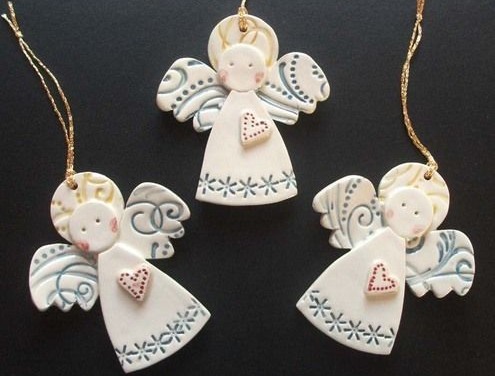
- Draw stripes on the wings, decorate the dress with decorative elements, don’t forget about the eyes and mouth.
- The craft can be painted and sprinkled with glitter.
- Then dry the product in the oven.
Funny cat made of salt dough
Execution:
- Roll out a layer of salt dough to the required size.
- Then cut out a solid figure of a cat, a head with pointed ears, a large oval body, a tail. You can also attach a fluffy tail separately.

- The flat figure of a cat can be decorated with butterflies, flowers, buttons, beads, and cereals are also suitable for decoration.
- Make the eyes, mouth, nose and mustache from three-dimensional parts, attached separately.
Tank for February 23
Execution:
- Roll out the dough with a rolling pin.
- Cut out the oval bottom, rectangular top and gun, or cut out the tank as a whole piece.
- Push through small parts.
- Dry the craft.
- Paint the tank with green and brown paints.
Flower sculpting
Execution:
- Flowers from dough can be made not only flat, but also voluminous, like real ones. For crafts consisting of flowers, you first need to make flowers, and then combine them into a bouquet.
- To create a three-dimensional flower, mold the petals and the core, then connect them.

- Flowers can be made from pre-prepared colored dough or painted after sculpting.
- Dry the finished product.
Cute hedgehog
Execution:
- You can make a flat or three-dimensional hedgehog from salted dough. A flat hedgehog should be cut out of a layer of rolled dough and decorated with any materials.
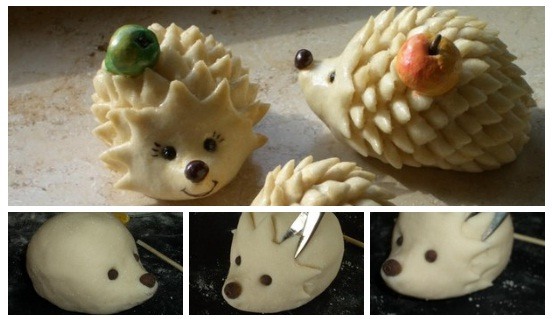
- To sculpt a volumetric hedgehog, make the body oval-shaped, add an elongated nose and form needles from dough or other materials.
- You can complement the hedgehog with apples, mushrooms and leaves made from plastic dough.
Cheerful boletus mushroom
It is not difficult to make a mushroom from dough:
- First, you need to prepare a plastic mass of brown and white colors.
- The boletus has a strong, stable stem and a round brown cap. You need to mold the individual parts of the mushroom and connect them.
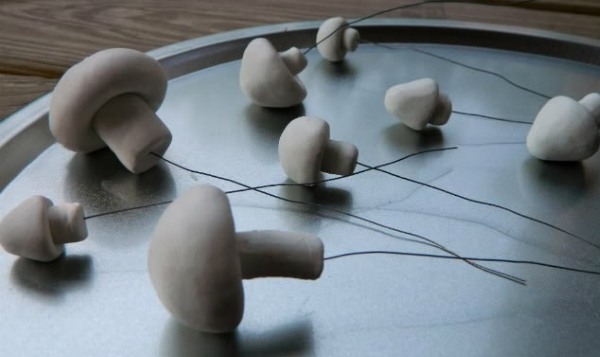
- You can mold several mushrooms, place a hedgehog between them, add berries and tree leaves.
Master classes in modeling with children
Sculpting a heart for children
It is quite easy to make a craft from salt dough in the shape of a heart with your own hands, The master class describes the sequence of actions:
- Roll out the dough on the foil surface and cut out the shape.
- You can also make a volumetric heart of any size.
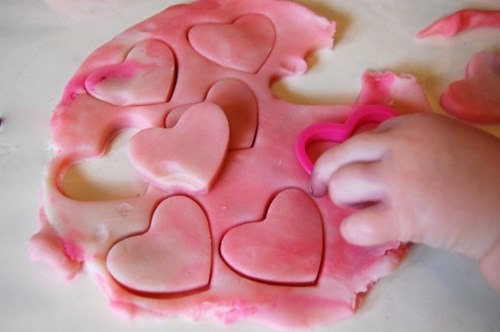
- The craft can be decorated with beads and dried in the oven or naturally.
- To make the heart look cheerful, you can attach running eyes to it.
- Dry in the oven.
- Paint it bright red.
Making a snowman for kids
Execution:
- To create a snowman, you need to roll 3 balls of different sizes, connect them and attach a hat.

Crafts from salt dough are easy to make with your own hands using step-by-step master classes. - To make the craft stable, connect the parts with a match or skewer.
- Let the product dry on its own or dry it in the oven.
- Decorate if necessary.
The snowman is suitable for a themed New Year's craft for a kindergarten.
Modeling a funny little man for children
Using this principle, you can mold a little person or an animal:
- All parts are molded and dried separately and connected with rope or thread.
- To make a little person you need to mold the head, body, arms and legs.
- Make holes for fastening the parts.
- Decorate and dry the parts, connect them together.
You will get a pretty funny souvenir or toy.
Such a craft can be given as a gift or presented at an exhibition.
Butterfly modeling for kids
Execution:
- Roll out a thin layer of dough to the desired size.
- Cut out the whole butterfly or the head, elongated body, and wings separately.
- Connect the pieces if they are cut separately.
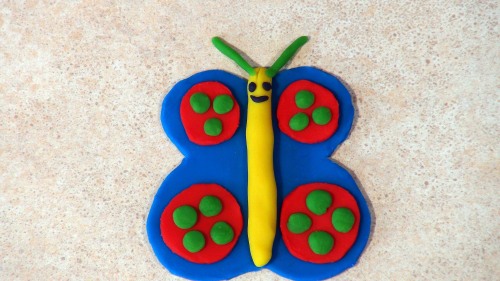
- Use rice, buckwheat, peas, and coffee beans to create patterns.
- Dry the craft.
- Paint and varnish.
How to decorate the craft
For crafts made from salted dough, created with your own hands, you can use various products that are available in every home, you can see this for yourself using the example of master classes. Modeling from salted dough is one of the most accessible and inexpensive types of creativity.
Any items are suitable for decorating crafts made from salt dough:
- beads, sequins, rhinestones, buttons, cereals, grains, they need to be pressed into the dough or glued;
- coffee beans;
- matches and skewers;
- small figures and details made of salt mass;
- threads, you can wrap the product with them;
- tree branches.
Everything you need to create crafts should be put in a box. Do not throw away broken small parts from toys, decorations, all this will be useful for creating crafts.
Drying crafts
Crafts made from salt dough, made with your own hands, should have a finished look, the master class will help you learn how to dry the finished product.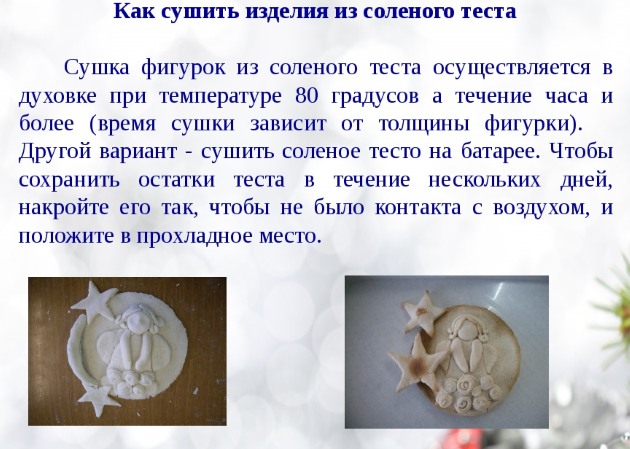
There are two ways to dry the product:
- Natural drying at room temperature. The time it takes to dry depends on the thickness of the product, the thinner the craft, the faster it dries. The craft should be dried in a dry place. When drying naturally, indentations appear at the point where the craft touches the surface of the table, so with this method of drying, the product can be periodically turned over. To dry 1 mm of the thickness of the craft, one day of drying is required. It is better to put the product in a lighted place.
- Drying in the oven. It is difficult to determine the exact drying time of a craft in the oven, much depends on the individual characteristics of the equipment and the selected mode. For example, in some types of ovens, drying of the product can take 1 hour at 100 degrees. Drying of the product in an electric oven takes 2 times longer than in a gas oven. Dry the craft for 30 minutes, then let it cool for about 3 hours. If the product has dried partially, send it to dry for another 30 minutes, and so on until the craft is completely dry.
Coloring figures from salt dough
The craft can be painted completely or individual parts of the product can be painted. Acrylic paints are suitable for this, which do not spread after drying. Watercolor paints are mixed with a small amount of water, after drying they can be fixed with a varnish coating. This will add shine to the product. You can use transparent varnish, varnish with glitter or another.
Nail polish is also suitable for painting crafts.. When painting with gouache, you need to mix the paint with PVA glue. You can apply a transparent varnish to the finished craft to give it shine. Salt dough can be easily colored by adding food coloring to it.
Make a hole in a piece of dough, add liquid dye, then knead the dough until the color is uniform. If using powder dye, dissolve it in a drop of vegetable oil beforehand. You can paint a dried and completely cooled product.
Colored salt dough is not inferior in quality characteristics to modeling dough that can be bought in the store.
Making crafts from salt dough with your own hands will help you spend time interestingly, and master classes will tell you what figure to mold from dough. During such activities, you can learn, develop your imagination, motor skills, thinking, but the most precious thing is the time spent with your child.
Children love to sculpt and play with dough, perhaps the craft will not work out right away, but classes with salt dough will help improve skills and achieve good results.
Video: DIY crafts from salt dough. Master classes
How to make a flower from salt dough, watch the video:
Find out how to make crafts from dough in the video:
There are special shops selling interesting handmade souvenirs made from salt dough.