Interesting drawings for kids It is more convenient to create with palms. For small children, this type of creativity is not only a useful pastime, in terms of developing fine motor skills, accuracy and attentiveness, but also an opportunity to strengthen the psycho-emotional connection with an adult.
By correctly organizing a lesson for a child, in accordance with his age, the teacher will be able not only to develop the skills of a growing person, but also to discover the creative inclinations that he has from birth.
Description of the technique
Palm drawings for children are created using a special technique developed by pediatricians, speech therapists and psychologists in accordance with the characteristics of the child's psyche at a certain stage of development of a small person.
A properly organized lesson involves the use of:
- Special hypoallergenic finger paints, which are easily washed off with water from any surface. If they are not available, you can use regular gouache or watercolor in a diluted form. In this case, you must ensure that the child does not lick the paints or stain the objects around him.
- A sheet of paper. It is recommended to use Whatman paper so as not to limit the child during the creative process.
- Wet wipes. Necessary for quickly removing paint from the surface of a table, clothes or other objects that have been unintentionally stained by a child.
Drawing with palms is interesting for children of any age, since this type of creativity involves direct interaction of the young creator with paints, and also gives him the opportunity to easily experiment with color, mixing paints right in his hands.
Stencil of a child's palm for cutting out of paper
If a child does not want to get his hands dirty with paint, and does not know how to use a brush due to his age, you can suggest that he use a stencil in his creative work.
A stencil of a child's palm can be created like this:
- Place the child's hand in the center of the work surface.
- Trace the outline of the hand, keeping the distance between the fingers.
- Cut out the template.
It can be used both in creating drawings and when working on applique:
| How to use the template | Description |
| Drawing |
|
| Applications |
|
Finger painting "Autumn"
It is recommended that palm drawings for children be thematic.
For example, to create an image with elements of an autumn landscape, you need to:
| Craft option on the theme "Autumn" | Algorithm for its creation |
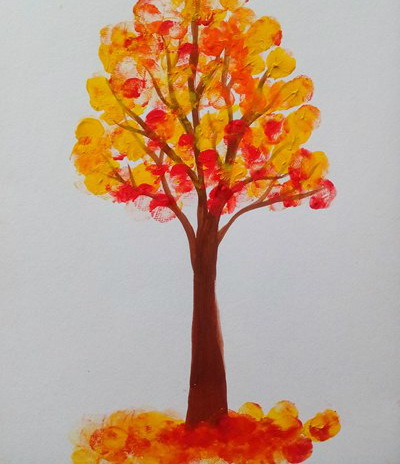 |
The main task is not to go beyond the crown of the depicted tree and to use in the work only those colors that can be seen in the autumn season. |
 |
|
Sun
You can draw the sun using handprints like this:
- Draw an even circle in the center of the work surface.
- Color the main shape yellow.
- Draw 2 identical dots (eyes) in the center of the circle.
- Step back 1-3 cm from the eyes and draw a semicircle in the middle, slightly curved downwards (mouth).
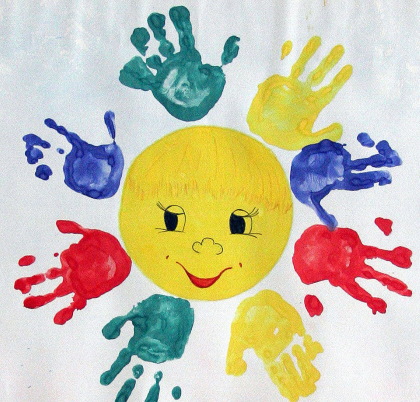
- Spread yellow or orange paint evenly and thickly over the child’s straightened palm.
- Turning your hand with your fingers away from the circle, leave as many handprints (sun rays) as possible at the same distance from each other.
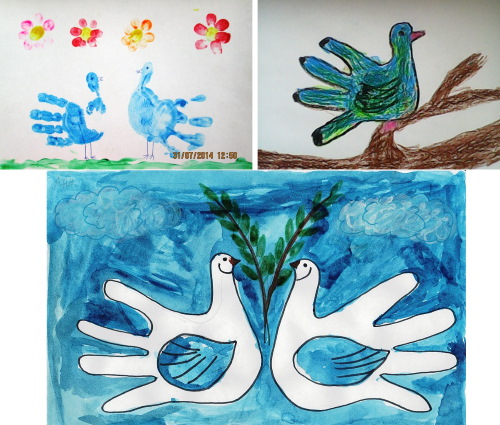
Pigeon
It is recommended to make palm drawings for kids depicting a dove with fingers widely spaced from each other. Considering that the fingers, in this case, are an imitation of wing feathers, the greater the distance between them, the more luxuriant the plumage of the drawn bird will seem.
Drawing step by step:
- Apply a thick layer of blue paint to the palm of your right hand.
- With your palm horizontally facing up, leave a handprint in the center of the work surface.
- Draw a red triangle (beak) on the side edge of the thumb.
- Draw a small circle (bird's eye) inside the thumbprint at the top edge.
- Inside the imprint of the back of the palm, draw a semicircle curved downwards (wing).
Hedgehog
To draw a hedgehog with your palms, you need to:
- Spread a thick layer of brown paint evenly over the surface of your palm.
- Place your hand on the sheet of paper with your fingers facing upwards. Leave 4 prints, placing the palm prints as close to each other as possible (hedgehog needles).
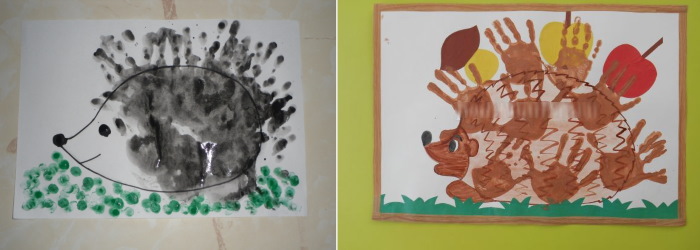
- From the left side edge of the imprint, draw an elongated semicircle, curved to the left (head).
- Draw a small black circle (dot) inside the head.
- At the point of maximum bend of the line, draw a small black oval (nose).
- If desired, add details of the surrounding environment, such as trees, grass, stumps, and so on.
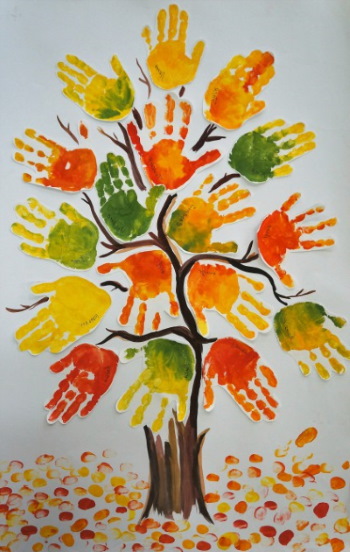
Tree
The simplest option for creating a palm drawing with a tree image is a generalized technique, which involves drawing only 2 main elements of the composition - the trunk and the crown:
- Spread a thick layer of green, yellow, orange or red paint over the child’s straightened palm, pushing it as much as possible into the folds and wrinkles of the back of the hand.
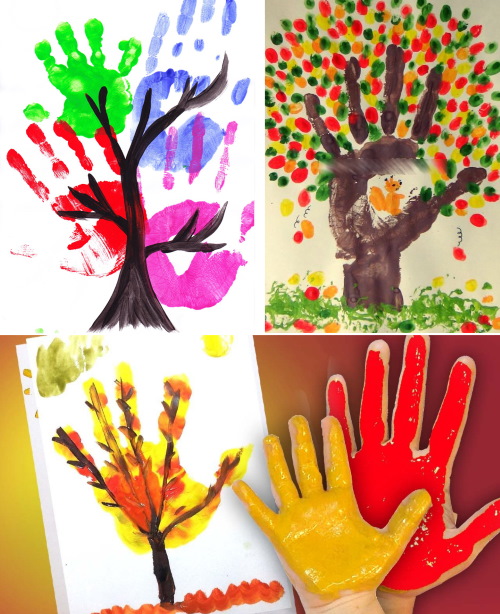
- Place your hand vertically with your fingers facing up.
- Leave a palm print in the central part of the working surface (the crown of the future tree).
- From the middle of the lower edge of the print, draw a slightly curved line of brown color downwards using a brush (the trunk).
Cockerel
To make a drawing of a rooster, created with a child's palm, more colorful and realistic, you need to:
- Apply a thick layer of yellow paint evenly over the back of the hand. Apply 4 different colors of paint to all fingers except the thumb, placing them in random order.
- Place your hand vertically, turning your fingers toward the top edge of the work surface.
- Press hard on a piece of paper, thus leaving an imprint.
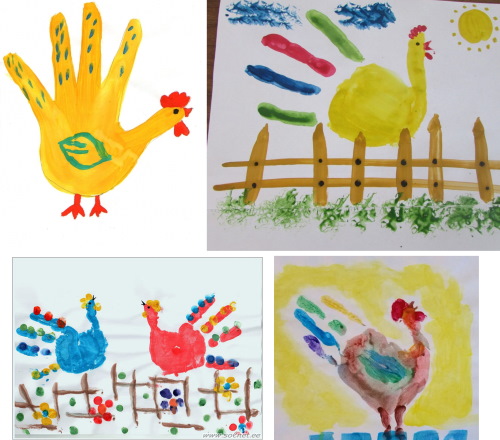
- From the lower edge of the drawn imprint, draw 2 vertical lines, at the ends of which draw 3 randomly directed lines (the rooster's legs).
- Draw a ridge onto the top edge of the thumbprint using a zigzag line.
- Inside the thumbprint, at the top edge, draw a black dot (eye).
- From the side edge of the thumbprint, draw a small triangle (beak).
Flowers
A bouquet of flowers drawn by children's palms can be used as a gift for March 8 or Mother's Day.
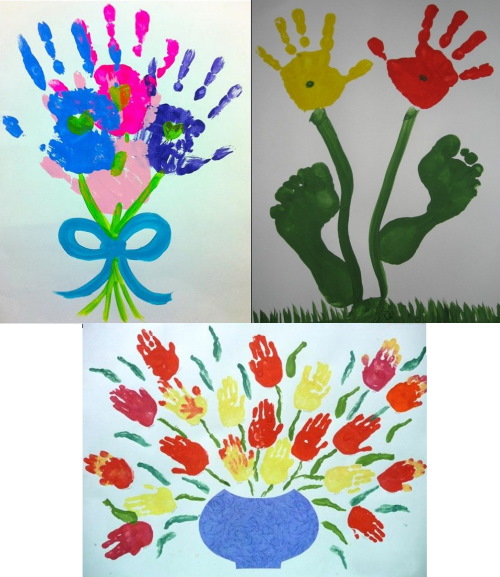
You can create such a craft like this:
- Apply as thick a layer of yellow paint as possible onto the child’s palm.
- Place the brush vertically, with the fingers facing the upper edge of the working surface. Leave 3 or 5 prints in the center of the sheet of paper, slightly changing the direction of the fingers depending on the location of a particular bud.
- From the middle of the lower edges of the prints of the backs of the palms, draw vertical lines downwards (stems), bringing them together at one point at the lower edge of the working surface.
Birdie
Using children's handprints, you can draw any bird.
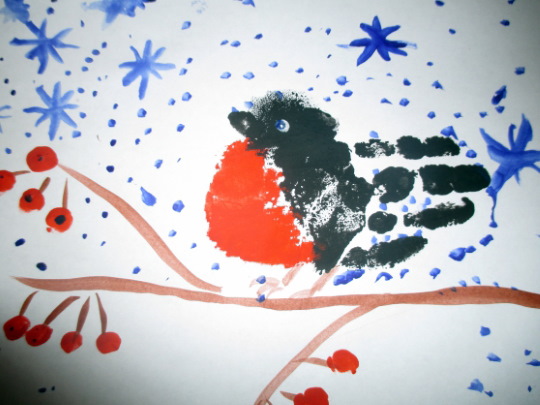
In winter, the image of a bullfinch is most relevant:
- Apply a thick layer of red paint to the child’s hand, without painting over the small oval in the central part of the back of the hand (the bird’s wing).
- Turn your hand horizontally, pointing your fingers towards the right edge of the work surface.
- From the left side edge of the imprint of the central part of the palm, draw a small triangle (beak).
- Draw a black circle (eye) inside the print on the left edge.
- If desired, you can invite your child to finish drawing a birdhouse or a rowan branch, with berries depicted as fingerprints.
Giraffe
To draw a giraffe using your palms, you should:
- Apply yellow paint to the child's palm.
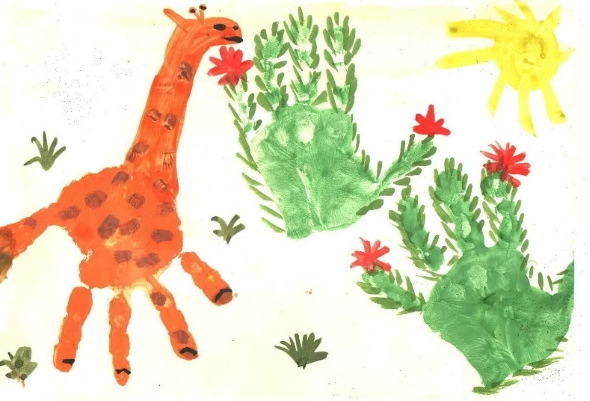
- Place the brush vertically, turn your fingers to the lower edge of the image, and leave a print. If the handprint is not intense enough, paint it manually, following the outline of the image.
- Place medium-sized brown dots over the entire area of the inner part of the print.
- Finish drawing the thumbprint with a black dot and a semicircle (eye and mouth).
- At the bottom edge of the thumbprint, draw several short straight lines in different directions (a tassel on the tail).
Swans
To make the drawing of swans as bright and contrasting as possible, it is recommended to use black and white paints:
- Apply a thick layer of white and black paint evenly to the right and left hands, respectively.
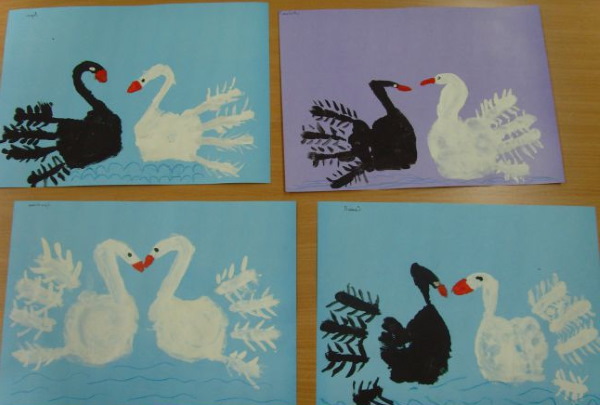
- Place your hands next to each other, with your fingers pointing in opposite directions.
- Leave prints in the central part of the work surface.
- Finish drawing the beak and eyes of the swans, taking into account that the head in the picture is a thumbprint.
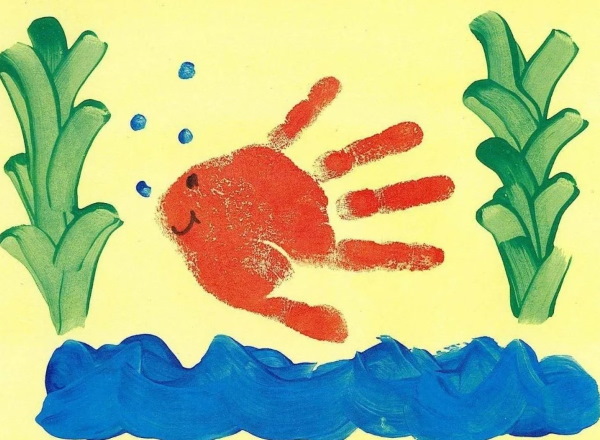
Crab
To draw a crab, you need:
- Apply red paint to both of the child's hands in the thickest possible layer.
- Turn your fingers in opposite directions, pressing the bases of your palms together.
- Leave an imprint on the work surface.
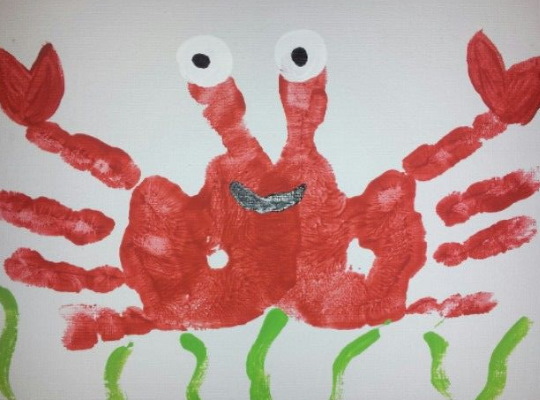
- From the upper edges of the thumbs, draw 2 elongated ovals. In their lower part, inside, draw 1 small black triangle (eyes).
- If desired, add details of the surrounding environment (seaweed, water, sand, shells).
Butterfly
Drawings of butterflies created by children with their palms will look more impressive if on one working surface there will be more than 2 insects depicted, each of which is drawn like this:
- In the center of the sheet of paper, draw an elongated oval (body).
- Draw a small circle (head) on the upper edge of the oval.
- From the head, draw 2 vertical straight lines, curved towards the end (mustache).

- Draw the eyes and mouth of the butterfly inside the circle.
- Apply bright paint in contrasting shades to both hands.
- Point your fingers in opposite directions from each other.
- Place the bases of your palms on the side edges of the drawn oval and leave imprints (butterfly wings).
Peacock
To draw a peacock, you need:
- In the center of the working surface, draw an oval with uneven edges so that visually this figure looks like a vertical figure eight.
- At the top of the oval, draw the eyes and beak of the peacock.
- Apply a thick layer of paint in contrasting shades to your hands.
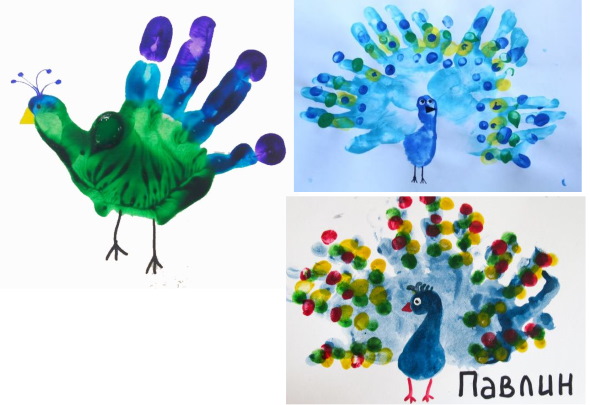
- Place the bases of the palms on the side of the main figure. Leave an imprint.
- Remove any remaining paint from your hands.
- Repeat steps 3–4 using other paint colors.
Flamingo
A child can draw a pink flamingo like this:
- Spread a thick layer of pink paint evenly over the back of one hand.
- Turn the brush horizontally, pointing the fingers towards the side of the paper so that the thumb is on top.
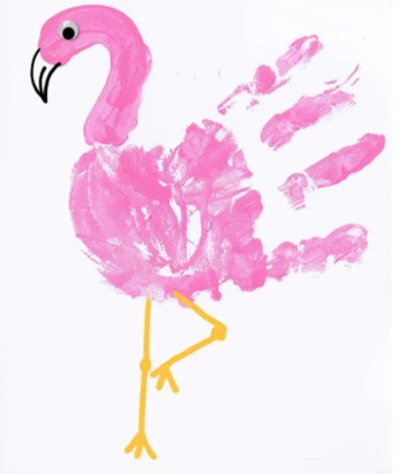
- Finish drawing the extension of the thumb, adding a curved element (neck and head). Inside the head, draw the eyes and beak of the flamingo.
- From the lower edge of the back of the palm, draw 2 vertical lines, at the ends of which draw 3 short straight lines directed randomly (the legs of the bird).
Ostrich
To draw an ostrich, your child needs:
- Apply black paint to the back of your hand.
- Turn your hand with your fingers facing up.
- Leave a mark.
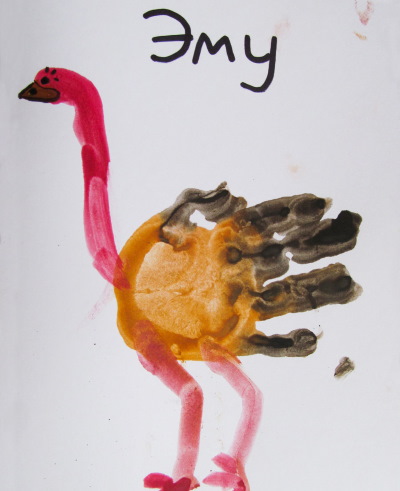
- From the bottom part, draw 2 vertical lines (bird's legs).
- Finish drawing the thumb (head), depicting the eyes and the beak of an ostrich on its inner part.
Elephant
If a child wants to draw an elephant, organize a creative activity with him, in this case, It is recommended to follow the algorithm below:
- Spread a thick layer of grey paint on the back of one hand.
- Place your hand with your fingers pointing down.
- Leave a mark.
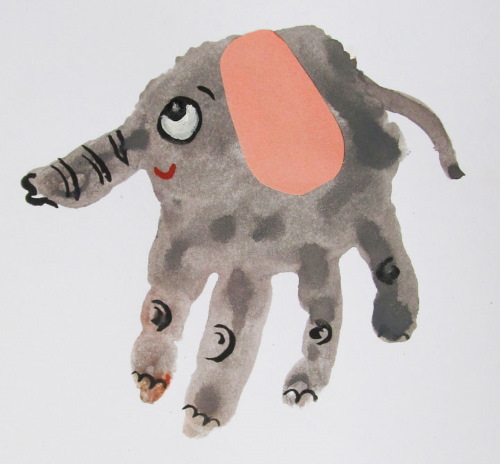
- From the side edge of the print draw a diagonal line (tail).
- Inside the thumbprint, you need to draw horizontal lines, making it look more like a trunk.
- Refine the image with characteristic features of the elephant's appearance (mouth, eyes).
Snail
To draw a snail, you need:
- Spread paint of contrasting shades on the inside of your fingers. There is no need to apply paint to the back of your hand.
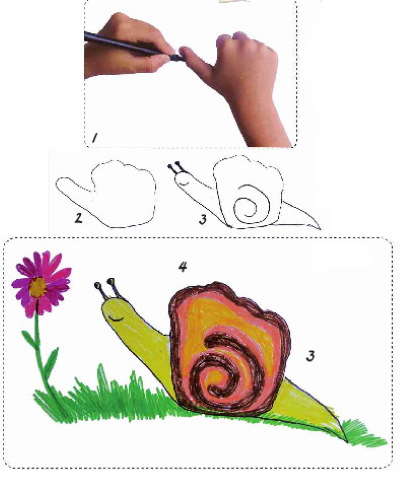
- Make a fingerprint in the center of the work surface.
- Refine the thumbprint by adding dots (eyes) and a semicircle (mouth).
Fox
To create an image of a fox you need:
- Apply orange paint to the child's palm. Paint the fingertips (up to the second phalanx) black.
- Turn your palm with your fingers down. Make an imprint.
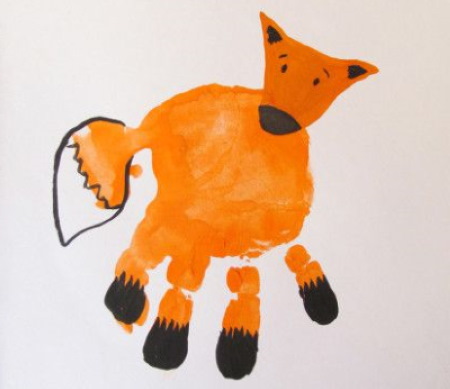
- From the upper edge of the palm print, draw a triangle (the animal's muzzle) on the side. Draw the fox's eyes, mouth, and whiskers inside the triangle.
- From the side edges of the triangle, draw another triangle on each side (ears).
- Improve the thumbprint by making its end more rounded (tail).
Horse
The technique of drawing a horse with palms is similar to the method of creating images of other animals:
- Spread brown paint over the back of your hand.
- Turn the brush with your fingers facing down, then leave an imprint in the center of the working surface.
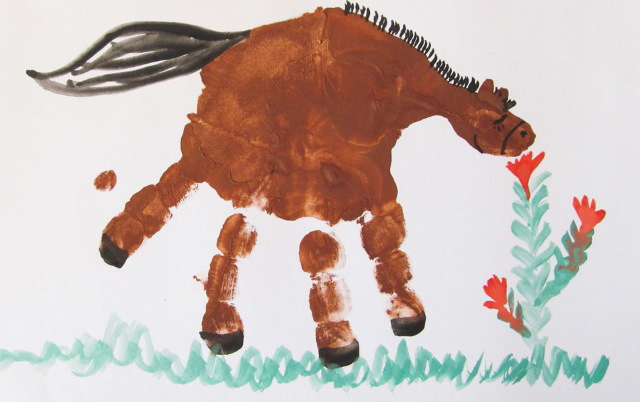
- Draw a small black circle (eye) inside the thumbprint.
- From the side edge of the palm print, on the side opposite the thumb, draw an elongated oval (tail).
Fishes
You can draw fish like this:
- Apply a thick layer of bright paint to the back of one hand.
- Place dots on the finger joints in a contrasting shade to the base paint.
- Turn your palm horizontally. Leave an imprint.
- Inside the palm print, closer to the base, draw a small circle (eye).
- On the side edge of the print, draw a small oval, placing it horizontally (mouth).
For the overall development of the baby, adults need to engage in daily playful teaching, while simultaneously studying the predispositions of a particular child. Drawing with palms in kindergarten helps to reveal the creative potential of a growing person, and also calms his nervous system, teaches him to be neat and persevering.
Video about children's drawings
Palm drawings for kids:
Drawings from palms for children is a fascinating, interesting process that develops the child's imagination. Much better than watching another cartoon or playing a game on a tablet. I recommend it to everyone!