The Snow Queen, the famous heroine of the fairy tale by G. H. Andersen, is recommended draw with a simple pencilThis choice of working tool is due to the large number of small details of the queen's image, requiring careful drawing and precision.
If errors occur during the creation of the drawing, it will be easier for the artist to correct them by removing unnecessary lines with an eraser. If it is necessary to depict the Snow Queen in color, it is recommended to color the picture with colored pencils, markers or paints after creating the main outline.
What is needed to work on drawings for the fairy tale Snow Queen
The pencil drawing "The Snow Queen" requires the artist to use a standard set of working tools.
| Working tool | Comment |
| A sheet of paper or thick cardboard of the required format | You can use either a white or light blue work surface. |
| A set of simple pencils of different hardness and a sharpener, safe to use | The pencils should be as sharp as possible, since in the process of creating a drawing of the Snow Queen, children will need to use them to draw small details of the fairy-tale character’s image – facial features, jewelry, wardrobe items, and so on. |
| Eraser | Before using the eraser in the work process, it should be tested on a separate sheet of paper. A quality eraser does not leave pencil marks and does not smear it on the surface. |
| Ruler | A number of details of the Snow Queen's image, for example, the crown, require drawing perfectly straight lines. |
| Colored pencils, paints, markers or felt-tip pens | If the child plans to eventually make the Snow Queen drawing colorful, he will need black, blue, light blue, purple and gray as the main colors. |
| A small sheet of paper folded in half | With its help, the child will rub the pencil when coloring the image, thus avoiding the formation of sharp lines in places where color shades change. |
Step-by-step master class for children: beautiful easy portrait of the Snow Queen in pencil
It is recommended to draw the Snow Queen using a pencil step by step. The drawing should begin with creating the basic outline of the image, after which you move on to detailed drawing of the costume, head, facial expression, crown, and so on.
Warp
To avoid any difficulties with the placement of the image components in future work, it is recommended to draw lines on the sheet of paper you are using.
Next, you should create a basis to simplify the orientation of the young artist in the working plane:
- Draw a vertical line from the top edge of the work surface to the bottom, stretching it across the entire width of the sheet. Since this line is secondary, when drawing it, you should press the pencil minimally so that at the final stage of creating the image it can be easily erased with an eraser.
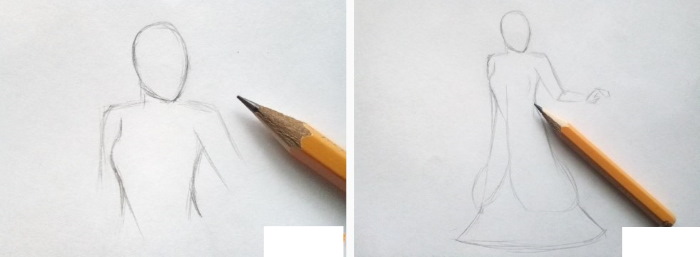
- Draw a horizontal line from the right edge of the work surface to the left, stretching it along the entire length of the sheet of paper or thick cardboard used. When drawing it, you should also use a soft pencil and apply minimal force when it comes into contact with the paper.
- Taking the vertical line as the central axis and stepping back 5-7 cm upwards from the point of intersection of the lines (the specific distance is determined by the selected size of the working surface), draw an elongated, even oval located vertically (the queen's head).
- Under the lower edge of the oval, at the same distance from the vertical on both sides, draw short vertical straight lines (neck).
- Avoiding the formation of angles and sharp transitions, from the extreme points of the drawn neck, draw 1 line of the same length in each direction (right and left) - the shoulders of the Snow Queen.
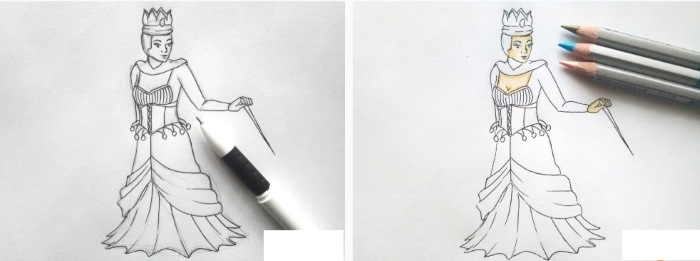
Costume
Since there can be many options for the costume of a fairy-tale character, it is recommended to invite children to use their imagination when drawing the Snow Queen's clothes.
You should not correct them or point out mistakes, in the opinion of an adult, since the correct image of the chosen character does not exist.
This approach will engage the younger generation more, strengthen trusting relationships with the teacher or parent conducting the task, and also provide an opportunity to get rid of negative emotions and nervous tension.
Very young artists, assisted by a teacher or parent, should try drawing the queen's costume like this:
- Draw 1 diagonal line on the right and left so that the extreme points of the outlines of the queen's shoulders depicted earlier are located at a distance of 3-5 cm from the edge of the diagonals. If the image of the chosen fairy-tale heroine is created on Whatman paper or a sheet of paper, for example, A3 format, it is advisable to increase the distance from the edge of the diagonals to 7-10 cm.
- Diagonal lines should be drawn slightly curved upwards and intersecting on the main vertical axis.
- From the drawn diagonals, draw 3 semicircles of different sizes, with approximately the same bend and direction (Snow Queen costume).
- Draw slightly curved verticals (2 to the right and 2 to the left of the neck), placing them close to the shoulder line. As a result, the top of the corset of the Snow Queen's dress should look like a snowflake.
- Connect the extreme points of the semicircles.
Head
The pencil drawing "Snow Queen" with the right organization of the work process can arouse interest even among boys - primary school students, who are often interested exclusively in technology.
To make the task exciting for all children, the lesson should be structured taking into account their age characteristics and development. Children are unlikely to be able to draw the required shape of the fairy-tale character's head well.
Therefore, when working with young artists, it is recommended to create the outline of the head like this:
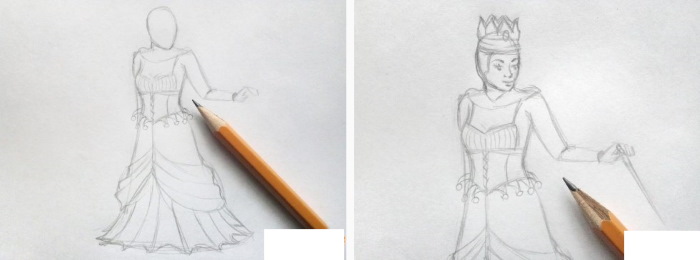
- Transform the oval of the fairy-tale character's head into a more angular shape for further drawing of the crown (the upper border should be a semicircle with an upward bend, and its extreme points should be brought together with the lower part of the oval depicted earlier).
- Divide the line that is the upper boundary of the drawn figure into 2 equal parts, then place a point on the boundary.
- The two resulting segments must then be transformed into equal semicircles with the same bends (the lower part of the crown has exactly this shape).
- Erase the secondary lines and then re-draw the desired outline of the Snow Queen's head.
If children, due to their age, find it difficult to determine the center of a line by eye or create identical curves, it is recommended to offer them the use of a ruler or special, pre-prepared templates (templates are prepared by the teacher or parent conducting the lesson, from thick white or colored cardboard).
Crown
The crown is one of the key elements of the Snow Queen's image. According to the author of the fairy tale, it consists of many pieces of ice of different sizes and shapes.
There are also many options for drawing it, and it is recommended to choose a specific one taking into account the age of the child who is drawing the fairy-tale character. Younger schoolchildren can be offered to depict the headdress in the form of figures of various shapes located close to each other.
If the creation of a drawing of the queen takes place in a lesson at a specialized art school, it is advisable to give children an example of a picture of a crown, asking them to copy the object onto a working surface, laconically integrating it into the overall composition.
The method described below is considered to be of medium complexity:
- Take the depression in the contour of the upper part of the head as the central point, then draw an elongated semicircle with an upward bend so that the top point of the semicircle is located above the identified center.
- Draw 5 elongated semicircles with an upward bend, located close to each other, to the right and left of the main figure. The size of the semicircles should be decreasing.
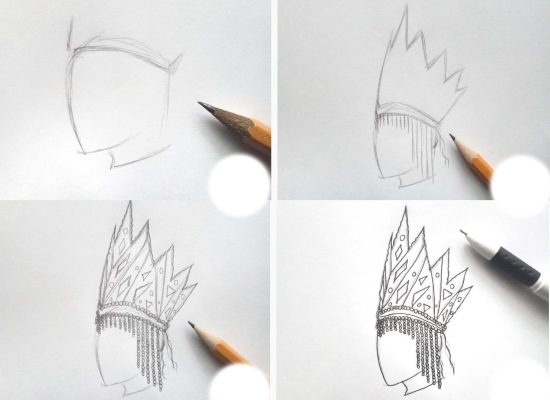

- The side edge of the last semicircle must be pulled down, draw an acute angle, and then, without lifting the pencil from the paper, pull it out to the sides of the face drawn earlier (the intersection points must be located at the same level).
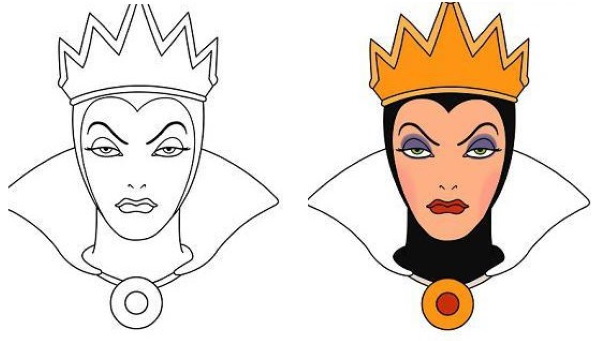
Features
Since the Snow Queen is a negative character in Andersen's fairy tale, her facial features should reflect the coldness, indifference, apathy and anger of the depicted character. Despite this, the author's descriptive image contains characteristics of the queen's appearance associated with her femininity and beauty.
Combining the two sides of the fairy-tale personality, young artists, to draw the facial features of the Snow Queen, It is recommended to suggest using the algorithm below:
- Erase the vertical line inside the queen's face, leaving only 3-4 cm in the center of the figure.
- From the bottom point of the line, draw a short diagonal to the lower right corner, no more than 1 cm long.
- Next, you should step back from the diagonal by 0.5 mm or 1 cm, depending on the scale of the image, and then draw a small semicircle with a bend to the right.
- At the level of the lower extreme point of the semicircle, stepping back no more than 1 cm, place 2 identical points (nostrils).
- Taking the upper part of the nose as the central axis, at the level of its extreme points, on the right and left, draw an oval located horizontally.
- Draw a small circle inside the ovals (the top points of the circles should lie on the borders of the ovals).
- Place small black dots (pupils) inside the circles.
- On the outer corners of the eyes, at the top and bottom, draw many short diagonal lines, located close to each other and directed in the same direction (eyelashes).
- Draw a mouth under the nose, using a semicircle with a shallow downward bend and curves drawn below and above it, at approximately the same distance.
The final touches
To make the image of the Snow Queen as complete as possible, it is recommended to refine it with simple steps:
- Step back 7-8 cm from the bottom point of the chin down (when drawing in a standard format), then draw a small semicircle with a bend in the lower right corner.
- On both sides of it, draw another semicircle, twice the length of the main figure, curved upwards (the neckline area, in particular, the collarbones of the Snow Queen).
- At the top points of each of the semicircles that are part of the queen's crown, draw 1 small circle (try to place the circles in the center of the figure's border).
- On the corners of the figures that form the Snow Queen's collar, depict small elongated circles that correspond in size to the size of the main component.
- The corners that extend downwards from the extreme points of the crown's ice floes are painted black or shaded to give them volume.
- Erase the side lines, avoiding touching the main generators with the eraser. To avoid streaks and greasy marks from the skin of the hands on the drawing, when erasing the side lines and drawing the main contour, it is recommended to put an additional sheet of paper under the edge of the palm of the working hand.
- Outline the outline of the image, making it clearer and more expressive.
Coloring
Based on the fact that in the descriptive fragments of the Snow Queen's kingdom the author emphasizes the presence of cold shades of blue, light blue and white, when choosing a palette for coloring a fairy-tale character it is advisable to use them.
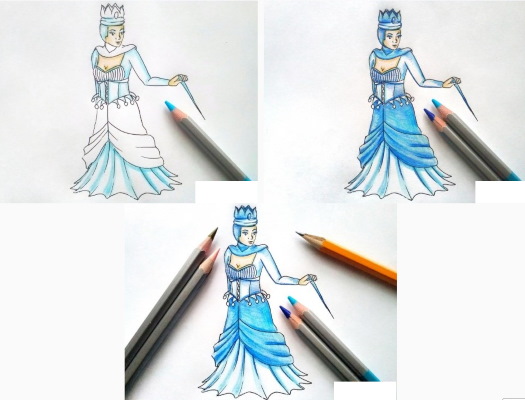
The following should be painted with a rich, deep blue:
- part of the figures that form the collar of the Snow Queen's corset;
- part of the ice floes that form the crown of the Snow Queen;
- circles on the protruding points of the forming figures of the fairy-tale heroine's clothes.
It is recommended to paint in a calmer blue color:
- alternating with blue figures, the shapes that form the collar of the Snow Queen's corset;
- alternating with blue figures, shapes that form the crown of the Snow Queen;
- eyes of a fairy tale character;
- circles on the protruding points of the forming figures of the crown of the fairy-tale heroine.
It is recommended to paint the queen's lips red to give the character's image a sense of severity and indifference.
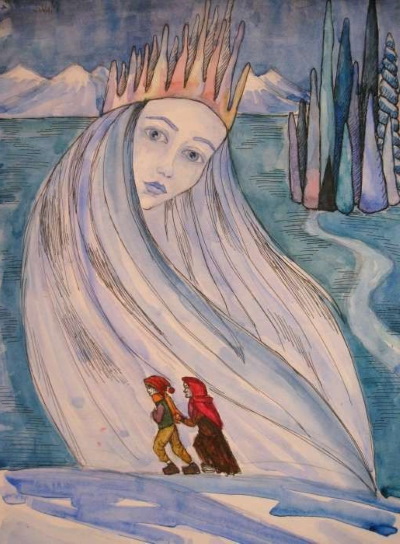
Step by step drawing of the Snow Queen on the ice throne
It is recommended to create a pencil drawing of the "Snow Queen on the Ice Throne" using the following algorithm:
- Draw the outline of the Snow Queen's throne using straight parallel and perpendicular lines. The outline of the throne involves a schematic outline of the elongated back, armrests, and 2 steps located in the foreground.
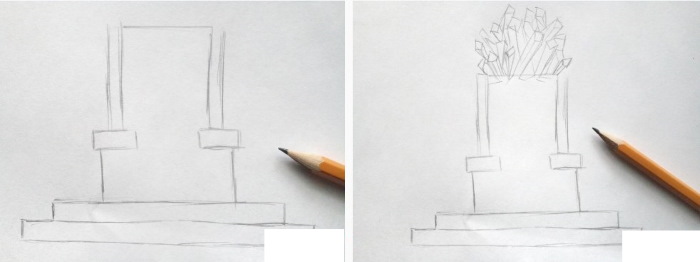
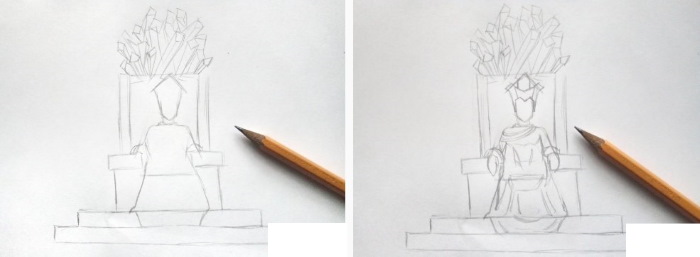

- From the upper border of the throne back, draw several elongated rectangles with a pointed edge (ice crystals used to decorate the queen's throne). The crystals should be placed close to each other, but in a chaotic position to give the drawing volume.
- In the center of the depicted outline of the throne, draw the silhouette of the Snow Queen. The fairytale character's hands should be placed on the corresponding stands, and the legs should be covered by the long hem of the dress, located on the top step. It is recommended to immediately outline the crown on the fairytale hero's head.
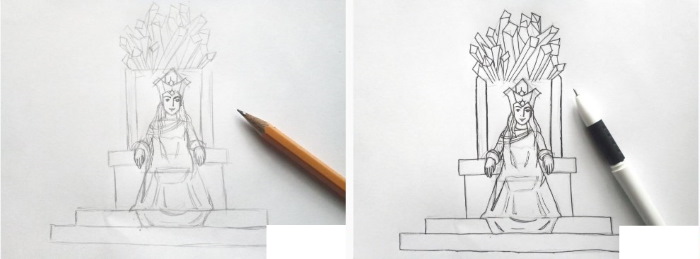
- Add detail to the image by adding small decorations to the queen's crown and clothing.
- Detail the queen's appearance - draw the eyes, mouth, nose and long hair of the fairy-tale character.
- Delete the derivative lines and draw the main ones with a black marker.
- If necessary, color the drawing in blue tones.
Step by step drawing of Kai
You can draw Kai like this:
- In the middle of the plane, draw a smooth circle, then mark the axial line for further drawing of the face, taking into account the turn of the hero's head.
- From the lower border of the head, draw 2 short parallel lines (neck).


- Draw the hairstyle of the fairy-tale character, and also more clearly outline the face, ears and part of the neck covered by the collar.
- Add detail to the face – draw the eyes, nose and slightly open mouth with thin lips.
- Continue the lines of the neck, depicting Kai’s rounded shoulders.
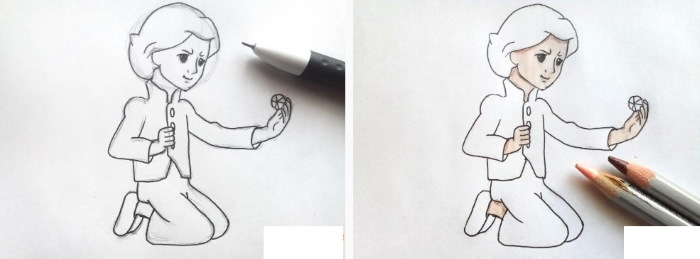
- Finish drawing the lower part of the hero's body, depicting him kneeling and holding an ice crystal with one hand.
- Add details to the fairy-tale character's clothes (buttons, laces, loops, belt, etc.).
- Delete the derivative lines and draw the main ones with a black marker.
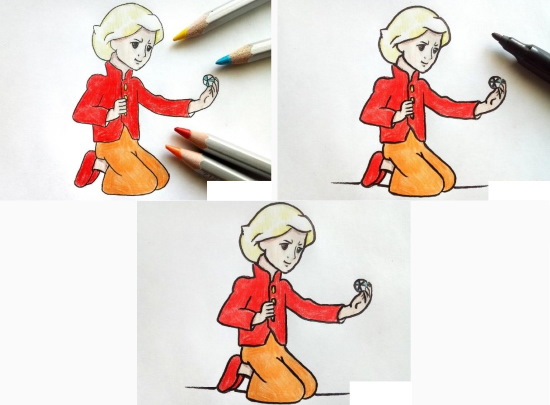
- If desired, color the drawing using red, yellow, orange and blue.
Step by step drawing of Gerda
You can draw Gerda like this:
- Approximately in the center of the working plane, draw the outline of Gerda's oval head, taking into account a slight turn to the right.
- Around the head, outline the hairstyle, depicting the girl's hair as medium length.
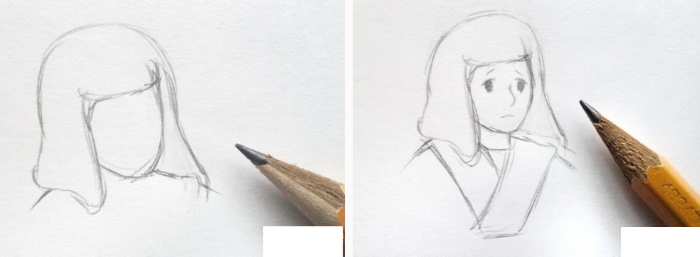

- From under the lower edge of the hair, draw smooth outlines of the shoulders.
- Detail the appearance of the fairy-tale character - draw the eyes, mouth, nose, and upper part of the clothing.
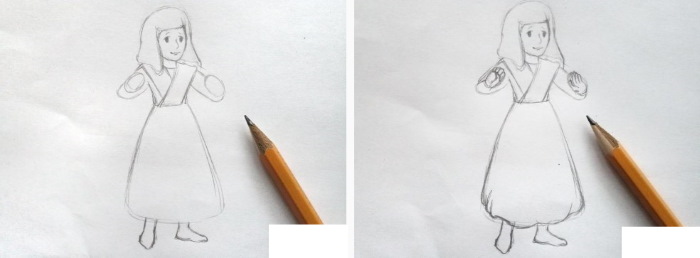
- Finish drawing the lower part of the girl's body, covered by a long skirt. From under the skirt, draw 2 small ovals - Gerda's bare feet.
- Draw the arms straight or bent at the elbows.
- Finish drawing the folds on the clothes and details of the girl’s appearance (facial expressions, folds on the skin, etc.).
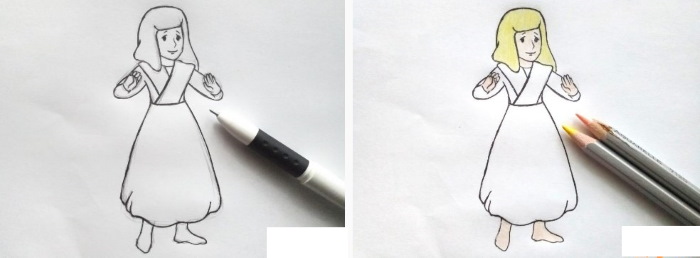
- Delete the derivative lines and draw the main ones with a black marker.
- If desired, color the image using blue, red and yellow.
General drawing of the characters of the fairy tale
It is recommended to create a general drawing of the characters of the fairy tale "The Snow Queen" in accordance with the algorithm below:
 |
|
Pencil drawings allow children to reveal their creative potential, increase perseverance, accuracy and attentiveness in completing tasks set by the teacher or parents.
By creating drawings based on the fairy tale “The Snow Queen,” a child illustrates his understanding of the work of art, expresses his attitude toward the main characters, and gives adults a reason to begin a discussion with him about the morality, meaning, and idea of the result of G.H. Andersen’s creativity.
Video about drawing Snow Queen
Pencil drawing Snow Queen: