Cross stitching is easy to learn. It is enough to look at several small patterns and before visiting handicraft stores, find out what tools and materials are needed. You also need to study the classic embroidery technique and practice so that the crosses turn out neat.
What do you need for cross stitching?
Cross stitch (small patterns and descriptions for them are presented further in the article) is done with special needles and threads, on special fabric. Beginners may need additional tools to make the work easier.
Threads
Cotton floss is considered a classic material for cross stitching. It is collected in a skein of 6 pieces, from 30 cm to 1.5 m long. The skein is easy to separate. You can embroider in 1, 2-3 threads, depending on the effect you want to achieve. For voluminous crosses, you need a thicker thread.
Mouline threads can be not only cotton, but also linen, acrylic and wool. For festive embroidery options, you can use silk threads, or buy special floss with thin lurex inserts.
Warp
The base is the fabric on which you can embroider. Experienced craftsmen advise beginners to buy a special canvas. This is a material with a special interweaving of threads, due to which small cells of the same size are formed on the canvas. In the corners of these cells there are holes through which the needle passes freely. Making stitches from corner to corner, you get even crosses.
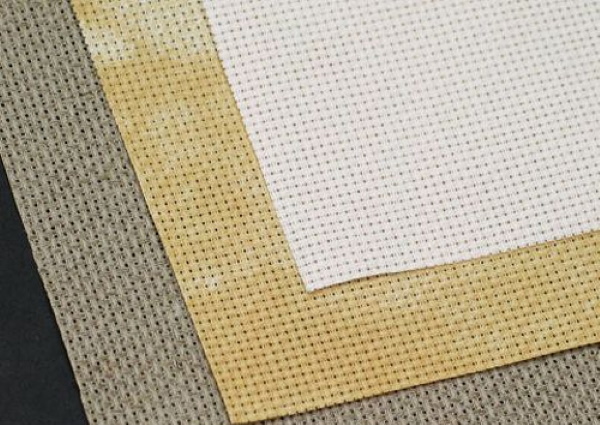
Following the diagrams and descriptions, it is important to count the number of squares in order to construct the pattern correctly. The distinctive feature of this fabric for embroidery is precisely the clear boundaries of the cells, which allow you to easily count the number of crosses.
One of the most popular canvas manufacturers in Russia is Aida. The canvases differ from each other in the size of the cells, so each type is assigned a number. Beginners should give preference to Aida canvas No. 14. The cells of this canvas are medium-sized, they are more convenient to work with.
There is also a canvas of even weave. It will be difficult for beginners to embroider on such fabric, as the cells on it are very small, and the holes are almost invisible. It is used as a background for partial drawings, when the embroidery does not completely fill the canvas.
In creative kits you can find fabric with a pre-applied pattern. It is easier and faster to embroider on such canvas than on others. The pattern looks like a pixel picture. Each cell has its own color. You don’t need to count the cells, you just need to change the threads in time and make the crosses correctly.
Tools
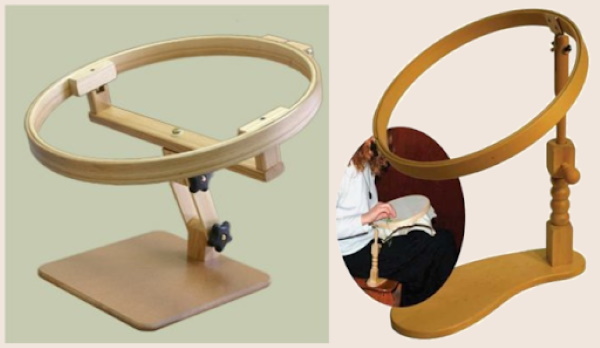
To make the work easier, you will need additional tools. For example, to prevent the fabric from wrinkling and deforming from stitches, you need hoops. These are special frames that are inserted into each other, clamping the canvas between them. The fabric is stretched, making it easier to work. Hoops are round and square. For large works, you can buy special frames on a stand, then there is no need to hold the hoop in your hand. It becomes even easier to work, since both hands remain free.
Cross stitching (small patterns are chosen by beginners to learn how to embroider complex pictures) sometimes requires marking the canvas. For this purpose, you can buy special water-soluble markers in stores. After finishing the work. The fabric is rinsed in cold water, and the drawn lines disappear. The paint dissolves without harming the fabric and threads.
It is also very important to choose the right embroidery needles. They differ from sewing needles by their narrow and thin eye, as well as a rounded end, which allows you to insert the needle without catching the threads of the main fabric. The thickness of the needle depends on how many folds of thread are used.
What are the most commonly used cross stitch needles:
| Needle number | What is it for? |
| 24 | Thick needle for threads folded 3-6 times. |
| 26 | Standard needle for Aida canvas No. 14, used for 2-fold threads. |
| 28 | A fine needle for embroidery on fine canvas with a single thread. |
What characteristics should a quality needle have:
- no burrs;
- the thread moves well inside the eye;
- The needle is strong and does not break.

You will also need scissors for the work. Large tailor's ones - for cutting the canvas, small ones - for cutting off excess floss.
What cross stitch patterns are suitable for beginners?
Cross stitch can be complex and multi-colored. Experienced craftsmen recommend that beginners do not rush to do large works. First, you need to work with small patterns. It is advisable to start with simple, monochrome patterns, and, without being distracted by changing thread colors, learn how to do stitches correctly.
When the crosses are even and neat, you can try low-color schemes, in which you can use 3-4 different shades. At this stage, the master will learn to count the cells and select colors.
It is better to use canvas with a printed pattern at the third stage of training. When the master can make even stitches and quickly match the colors of the threads to the corresponding cells, working with such fabric will become even easier.
Cross stitch technique for beginners with step-by-step description
Cross stitching (small patterns and descriptions for them are presented further in the article) is done in several ways. Before you start working on any pattern, you need to practice on a small piece of canvas and determine which method is more convenient.

| Embroidery method | How to embroider |
| Traditional | The crosses are made one after the other. |
| Danish | Fill 1 row with diagonal stitches, then make stitches with a tilt in the other direction and embroider the same row again, making crosses. Suitable for monochrome patterns. |
| Skipping stitches | Suitable for low-color schemes, where, for example, a row consists of a thread of 1 color and only 1 cell is colored in another. In this case, the cross in the cell is made from the back side. |
How to embroider correctly in the traditional way:
- Stretch the canvas onto the hoop and process the edges so that they do not fray. You can use a brush and PVA glue.
- Thread (30 cm) into the needle and secure to the canvas. To do this, pierce the canvas so as to pick up the threads of the canvas diagonally, within 1 cell. Then make a loop and thread the needle through it.
- Bring the needle to the front side through the upper right corner of the cell.
- Insert the needle into the lower left corner and pull it out from the wrong side.
- Bring the needle out from the upper left corner and pull the thread to the wrong side through the lower right corner.
- The next crosses are made in the same way.
It is important that all the crosses are made in one direction. At the end of the work, the thread must be secured from the back side by passing the needle under the stitches.
Small easy cross stitch patterns and descriptions for beginners
Cross stitch (small patterns with pictures on different topics are presented further in the article) made according to simple descriptions will help a beginner master learn to embroider neatly and quickly. Small pictures can be transferred to clothes for decoration.
Before starting work, you need to make markings on the canvas, drawing a grid on it. Each square should be 10x10 cells. Any pattern is embroidered starting from the center.
Rose
The drawing takes up a square of 32x32 cells. For work you will need floss threads of 2 colors: red and green.
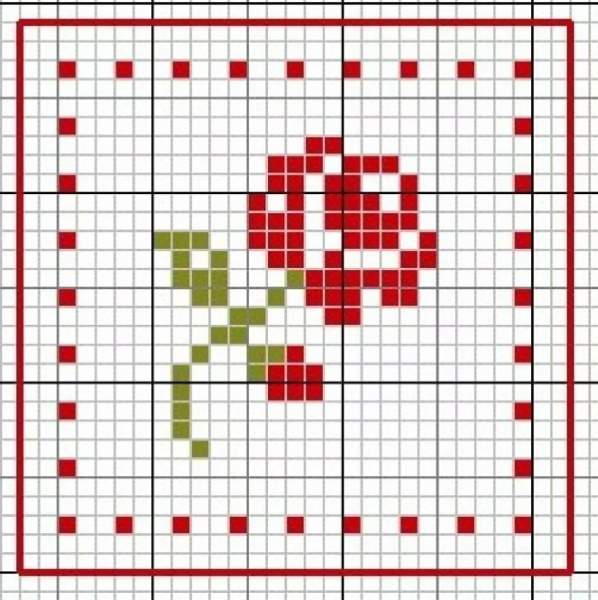
Instructions:
- Make markings on the canvas as shown in the picture. 1 large square measuring 10x10 cells.
- Starting from the bottom right corner, embroider a dotted frame with red thread.
- Find the center of the design and embroider a blossoming bud with red threads. Secure the thread on the back side.
- Embroider a closed bud.
- Change the thread to green and embroider the stem, leaf and head of the unopened bud.
You can change the thread and embroider a thin frame with short stitches, as shown in the diagram.
Poppies
The canvas embroidery takes up an area of 50x36 cells. For the work, you will need green, red and pink floss. For detailing, you will also need light pink and black threads.
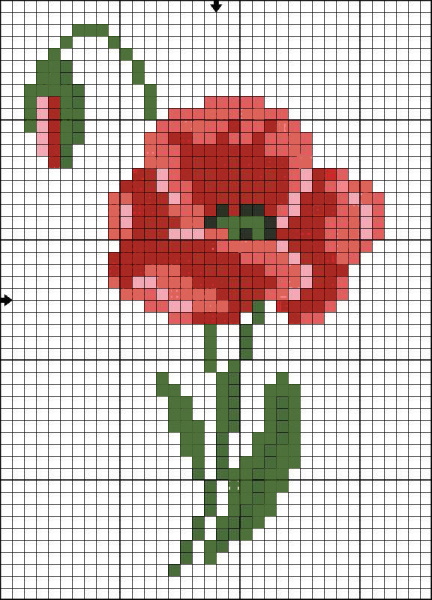
How to embroider:
- Starting from the middle, embroider the petals with red threads. Separately embroider a stripe in the unopened bud.
- Change the thread to pink and embroider lighter areas on the flower.
- Use light pink floss to highlight the petals.
- Embroider the stem, leaves, head of the unopened bud and the center of the flower in green.
All that remains is to fill in the gaps in the poppy's core with black crosses.
Mill
The drawing takes up an area of 40x30 cells. You will need threads of 4 colors: light brown, brown, black and blue.
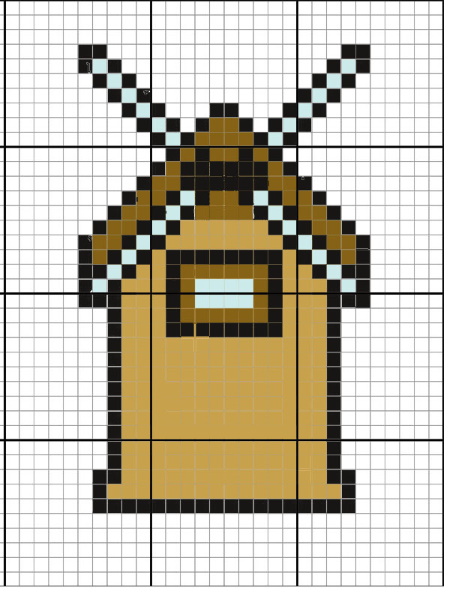
How to embroider:
- Embroider the window and blades with blue threads.
- Embroider the roof and frame on the window with brown crosses.
- Fill the main part of the mill with light brown crosses.
Embroider the border with black thread as shown in the picture.
Butterfly
The drawing is done on a canvas measuring 55x43 cells. You will need threads of 4 colors: yellow, orange, gray and black.
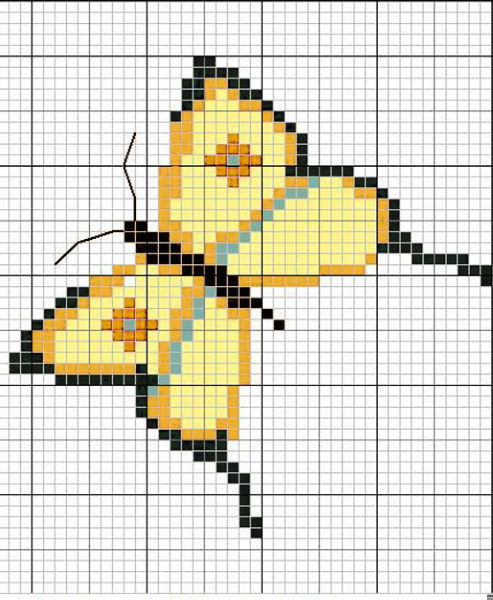
How to embroider:
- Embroider the wings with yellow crosses.
- Change the thread to orange and make an inner outline of each wing and embroider the pattern on the upper wings.
- Use grey to mark the boundary between the front and rear wings.
- Embroider the body of the butterfly with black threads and outline the wings.
The thin mustache is not embroidered with crosses, but with simple ties.
Dragonfly
The drawing is a little more complicated than the previous ones. For work you will need a canvas measuring 80x92 cells and threads of 3 colors: black, light blue and blue.
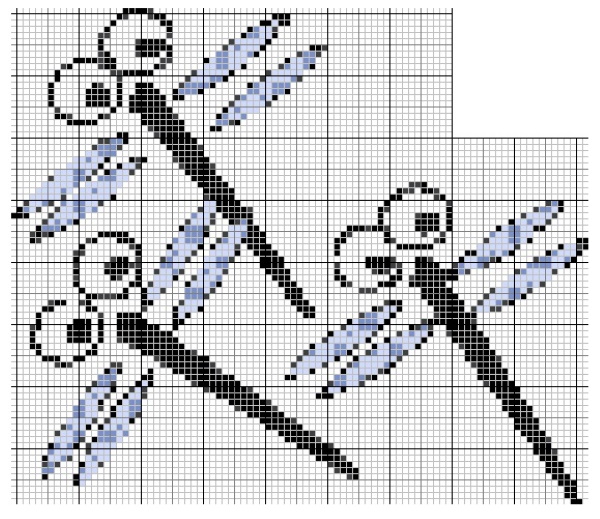
How to embroider:
- Embroider the dragonflies' bodies and eyes with black threads. Add crosses to the wings.
- Fill the wings with blue threads.
- Fill in the gaps on each wing with blue.
You can start embroidering from the center of the body of any of the dragonflies.
Snail
The embroidery is done on a canvas measuring 11x27 cells. You will need threads of 4 colors: green, light green, brown and light brown. You will also need to embroider the snail's eye with black threads.
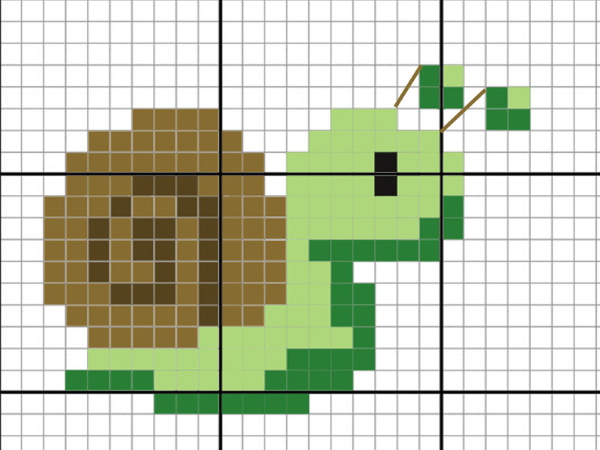
How to embroider:
- Embroider the snail shell with brown threads.
- Change the thread to light green and embroider the snail's body and the corners of the horns.
- Embroider shadows on the body in dark green.
- Using dark brown, embroider a pattern on the shell and make 2 stitches connecting the head and horns.
Using black thread, embroider 2 crosses to represent the snail's eye.
Little mice
The embroidery is done on a canvas measuring 40x36 cells. For work you will need gray threads of 3 shades, as well as black and pink.
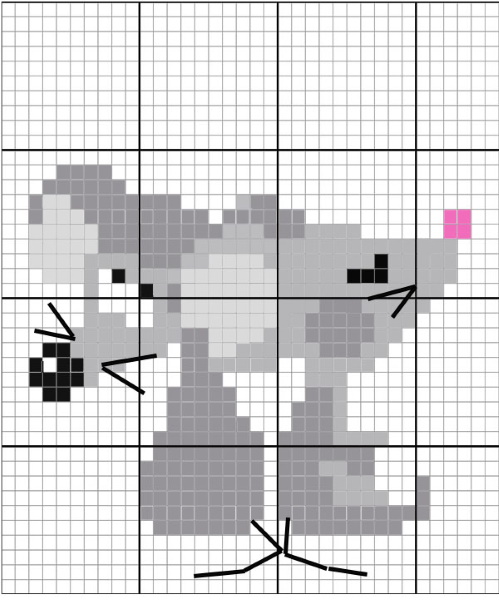
How to embroider:
- First fill in the dark areas.
- Embroider the mouse faces.
- Change the thread to the lightest one and embroider the ears.
- Embroider the mouse's nose on the right with pink thread.
- Embroider the mouse's nose on the left with black thread.
Using short stitches, embroider the mice's whiskers and tails.
New Year's mitten
The drawing on the canvas takes up a rectangle of 44x46 cells. You will need red, white and black threads for the work.
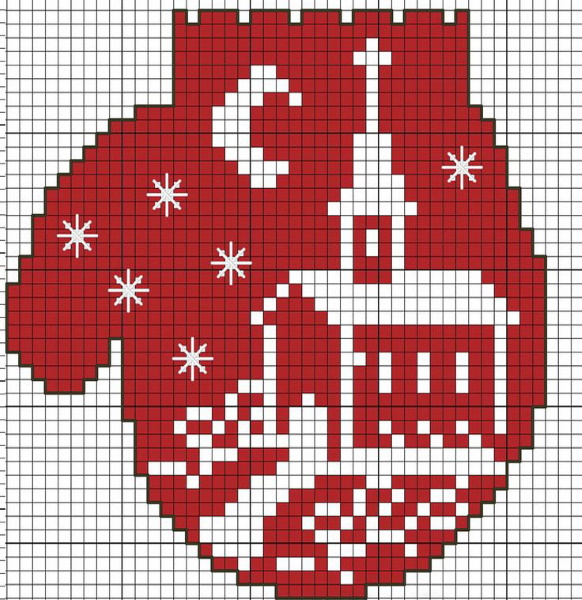
How to embroider:
- Fill all areas with red color.
- Embroider the pattern with white threads.
- Change the thread to black. Using short stitches, make an outline along the contour of the mitten.
Embroider snowflakes with white threads.
New Year's boot
The embroidery is done on a canvas measuring 50x42 cells. You will need 4 colors for the work: black, red, green, beige.

How to embroider:
- Fill all areas with red color.
- Embroider the black toe, heel and decorate the top of the boot.
- Embroider green leaves.
- Embroider patterns with beige threads.
Red berries can be embroidered with crosses or sewn on 2 small circles cut out of felt.
Snowman
The drawing is done on a canvas measuring 33x33 cells. For work, you will need threads of 4 colors: pink, orange, light blue and blue. You will also need black floss for edging.
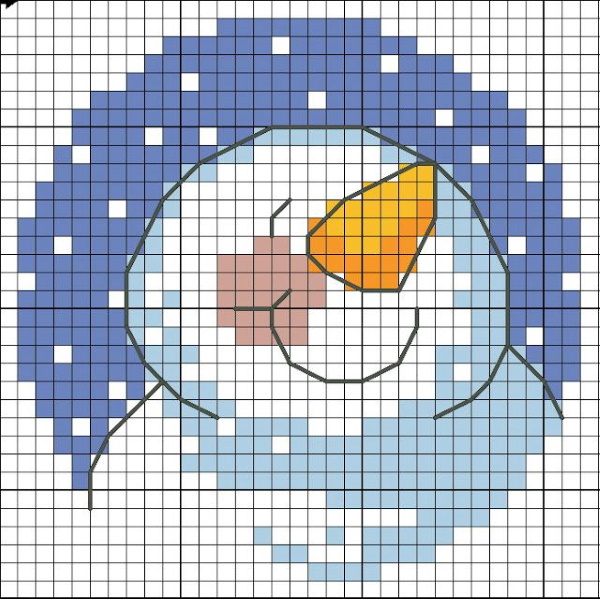
How to embroider:
- Embroider the cheeks with pink threads.
- Change the thread to orange and embroider the nose.
- Embroider shadows on the snowman with blue crosses.
- Fill the background with blue threads.
Using short stitches, embroider the black outline of all the details, as well as the eyes and mouth.
Santa
The drawing is done on a canvas measuring 60x43 cells. You will need red, blue, white and orange threads for the work. You will also need black and yellow floss for decorating small details.
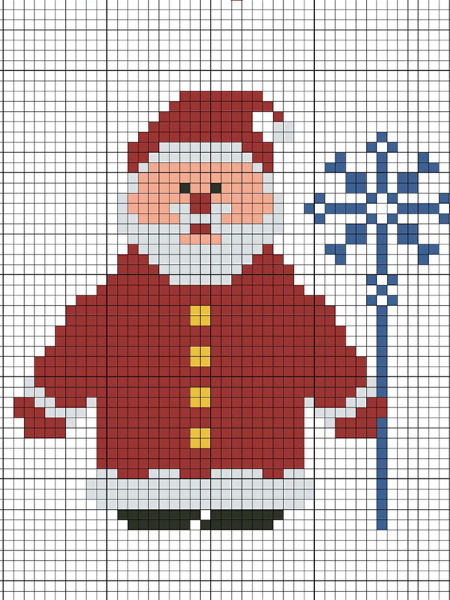
How to embroider:
- Embroider the beard, the edges of the hat and the bell with white threads. Then embroider the sleeves and the hem of the fur coat.
- Embroider Santa's fur coat and hat with red crosses.
- Embroider the face with orange threads.
- Remove the threads to embroider the staff.
- Change the thread to yellow and embroider the buttons.
Embroider Santa's eyes and boots with black crosses.
House
The drawing is done on a canvas measuring 30x38 cells. You will need threads of 4 colors: yellow, brown, green and orange.
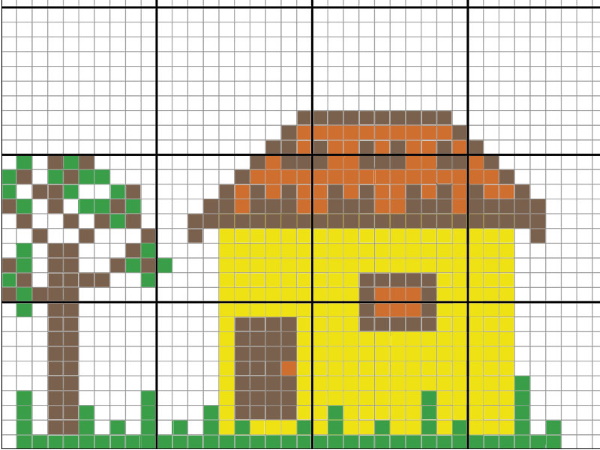
How to embroider:
- Embroider the wall of the house with yellow crosses.
- Embroider the window, door, roof and tree with brown threads.
- Fill the roof, window and mark the door handle with orange.
- Embroider grass and leaves on the tree in green.
You can add a few light green crosses to the tree to make the crown more lush.
Bullfinches
The drawing is made on a canvas measuring 70x60 squares. For work you will need threads of 3 colors: gray, red and black.

How to embroider:
- Embroider the breasts of 3 birds with red threads.
- Embroider the branches and the bullfinch wings in grey.
- Embroider the tails and heads in black.
Empty areas (eyes, feathers) can be embroidered with white floss.
Owl
The embroidery is done on a canvas measuring 54x54 cells. You will need orange, yellow, brown and black threads for the work.
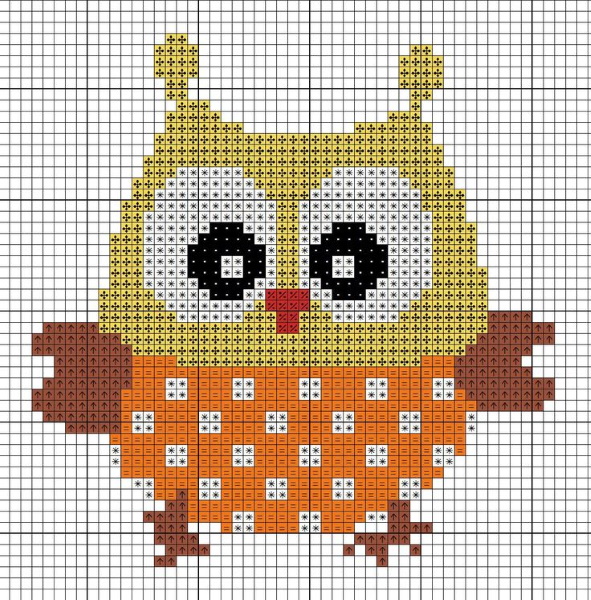
How to embroider:
- Embroider the owl's head with yellow threads.
- Embroider the body with orange threads.
- Fill in the wings, beak and paws with brown crosses.
- Embroider the pupils with black floss.
When embroidering the beak, the threads can be replaced with red ones, and the gaps can be filled with white crosses.
Parrot
A drawing for a canvas measuring 31x29 cells. You will need threads of 4 colors: red, black, blue and brown.
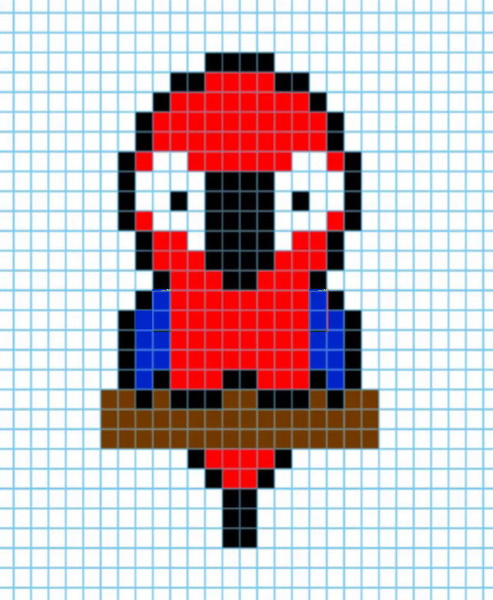
How to embroider:
- Embroider the parrot's body with red crosses.
- Embroider the wings with blue threads.
- Embroider the branch with brown crosses.
- Embroider the beak, pupils and outline with black floss.
The white area around the eyes can be left blank.
Martin
This pattern is for monochrome embroidery. Canvas size is 36x40 cells. Black and gray threads are required for work.
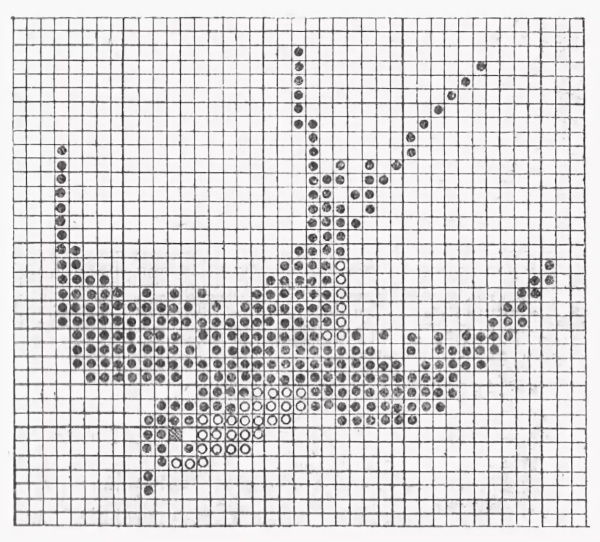
How to embroider:
- Fill the swallow's body, wings and tail with black crosses. Embroider the head.
- Embroider the chest with grey threads.
In the diagram, black is indicated by black circles, and gray by white circles.
Tit
The design is on a canvas measuring 40x44 cells. You will need threads of 4 colors for the work: blue, yellow, brown and light blue. You will also need black floss for working out the details.
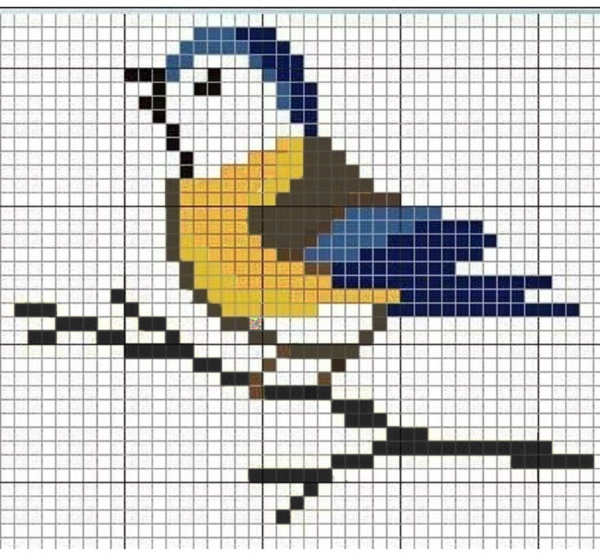
How to embroider:
- Embroider the yellow belly of the bird.
- Embroider the wings with blue and light blue threads.
- Using brown cross stitches, embroider the wing, paws and outline the chest.
Embroider the beak and eyes, as well as the branch, with black threads. Black can be replaced with brown.
Simple landscape
The canvas size for the landscape is 100x133 cells. For work, you will need threads of 4 colors: black, dark orange, orange, light orange.
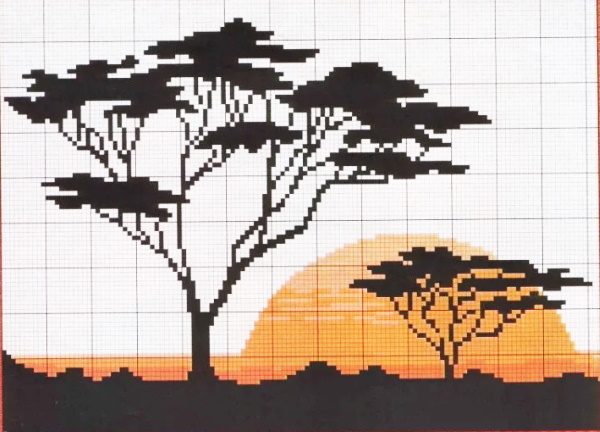
How to embroider:
- Embroider a large tree, then a small one. Fill the lower part of the picture with black crosses.
- Embroider the lower part of the sunset with dark orange threads.
- Change the thread to orange and embroider the center of the sun.
- Fill the top of the sun with light threads.
Leave the background blank. Cross stitching is easy.
You should start with small and low-color schemes, gradually moving on to more complex works. High-quality tools and materials will make the work easier, and the embroidery skill will develop faster.
Video about cross stitch
Tips for those who want to cross stitch: