According to stylists, a fashionable beret is a must-have item in a modern woman's wardrobe. If you have the time and desire to acquire an original item, it will not be difficult to knit a headdress with knitting needles, using a diagram with a detailed description of the knitting process.
How to choose yarn for a beret
To knit a beret, you need to choose the right yarn. Berets come in demi-season, winter and summer varieties.. A specific type of yarn is selected for each type. It is divided into natural, synthetic and mixed. Most often, yarn from natural components, plants and animal wool is used, for example: flax, cotton, silk and others.
For winter berets, it is recommended to take a mixed type of yarn, which differs in its density. For summer berets, it is better to take linen or silk, and for demi-season ones, any yarn.
Frequently used yarns:
- Natural yarn: Mohair, Alpaca, Angora.
- Blended yarn: yarn that contains 2 or more types of fibers. For example, wool and cotton, linen and silk, and other options.
- Synthetic yarn: acrylic, nylon and polyester.
- Fantasy yarn: Mouline, Boucle, Tweed.
- Artificial yarn: viscose, acetate fiber.
Basque beret: diagram and description
The beret looks elegant and has a voluminous pattern, it is also called the “Gerda” beret. For the product you will need 130 grams of threads consisting of 65% wool and 35% alpaca, as well as circular knitting needles No. 5 and No. 3.5. The latter will be needed for knitting the elastic.
Knitting instructions:
- The product is knitted starting with the elastic band. Cast on 84-94 sts on 3.5 mm knitting needles. In this way, 10 rows are completed, taking into account the alternation: 3 purl and 3 knit.
- Subsequent rows: 3 i., 1 k., 1 s., 1 k., 1 k., 2 k., 1 i., 2 k., 1 s., 1 k., 1 k., 1 k., repeat until the round is complete, you will get about 112-128 loops.
- Change to another needle size. Continue as planned: 3 purl stitches (over the previous circle, knit the front stitch behind the back wall). Do this for 8 rows.
- After the number of loops does not allow using circular needles, use double-pointed ones. Cast on 40-50 loops and knit the entire subsequent circle, alternating 3 loops on the wrong side with one purl, you will get about 30-32 loops.
- We knit the next row from three front loops, approximately 14-18 loops.
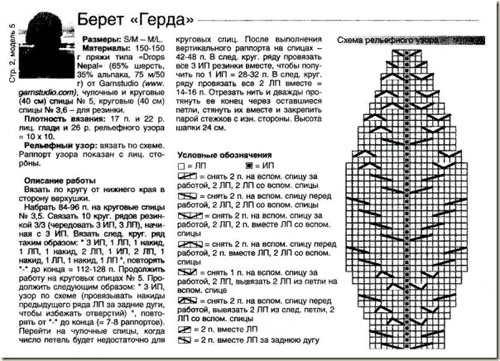
Finally, cut the thread and pull it through the remaining loops.
Volumetric beret: diagram and description
A beret of this type looks extravagant, and a certain style of clothing should be selected for it. For knitting you will need: 150 grams of yarn containing 55% wool and knitting needles number 5 and 6.
Instructions:
- First, you need to knit with a garter stitch, namely: alternating rows, the first row is the front one, the second row is the back one, you should cast on 78 loops of each of them, with knitting needles No. 5, knit like this for about 4 cm. Use knitting needles No. 6 and start knitting the main pattern: the first 4 rows with the front surface, adding 34 loops in the first row.
- In the 5th row, knit a cone-like shape from 6 loops, as follows: on six loops, using the left knitting needle, knit 8 front loops, return the loops to the right knitting needle. Repeat to the end.
- Rows 6-9 knit with front stitch.
- Row 10 looks like this: 1 knit, 1 cone, 7 knits (the cones are shifted) – repeat from the beginning to the end on all loops. Do the same from the beginning to the 10th row.
- Having knitted 30 rows in this way, we switch completely to the front stitch, starting to make decreases: we mark every 14th loop and do not knit it in the next row. In this way, 8 loops remain through which the thread must be passed.
- Crochet the elastic band.
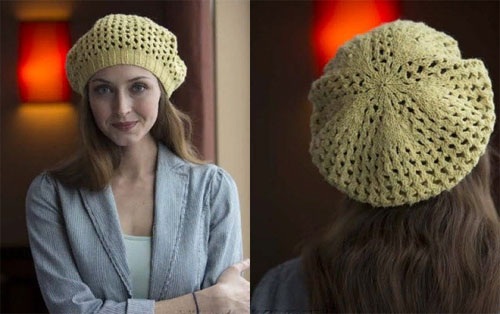
Garter stitch beret: diagram and description
Quite a few books have been written about knitted berets, patterns and descriptions for women, from which many needlewomen have learned. The most common beret to wear is the scarf beret. The garter stitch got its name from the knitting method, since it is knitted only with face loops.
The choice of yarn in this case is not fundamental, but depends only on the time of year when the product will be worn.
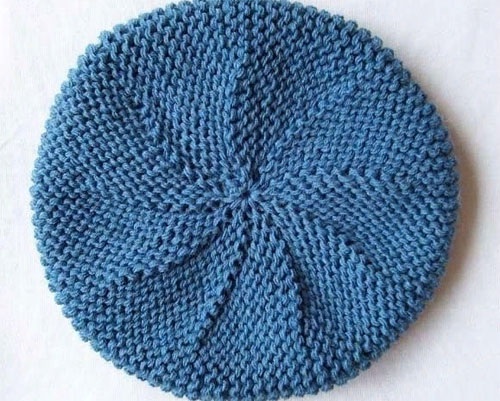
Instructions for knitting a beret:
- Cast on 66 stitches. In every second of the following rows, remove 2 stitches from the left edge of the fabric 17 times.
- When you have 22 rows, you need to start decreasing from the right: in every 7th row, remove 3 loops.
- After 36 rows you need to get back to those original 66 loops, you need to do it like this: pick up 34 loops on the right and 18 on the left, add them with the remaining 14 loops on the knitting needles.
Beret with English elastic: diagram and description
This women's beret is much easier to knit than other options. Smooth threads without long pile are best. You will need: 120 grams of thread, approximately 600 m. The size of the knitting needles varies depending on the density of the thread; when using thin thread, knitting needles No. 2 are suitable for elastic bands and No. 3.5 for the main part.
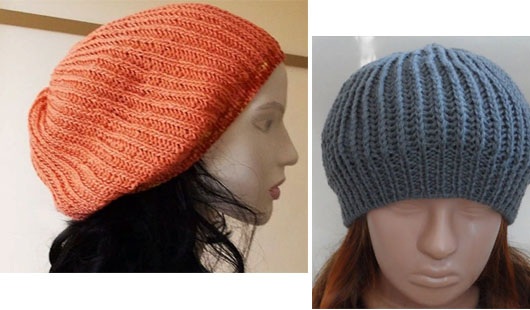
Knitting instructions:
- On knitting needles No. 2, knit a 3 cm elastic band consisting of 135 loops.
- Then start knitting using the English method:
- Starting Row: Alternation
- 2nd row: knit, yarn over, and remove stitches without knitting (purl).
- 3rd row: the loop that was cast on is knitted to the front side, having made a yarn over to the back side, do not knit it. Knit 12-16 cm in this way.
- Knit 4 rows with a 2x2 elastic band, then begin the transition to the start according to this pattern:
- The 1st row is knitted with two loops, where purl and front loops alternate.
- In the 2nd row, knit 2 loops, purl. Loop to the wrong side, and face loop to the front side.
You need to repeat the algorithm until there are 15 loops left on the knitting needles, and pull the thread through them.
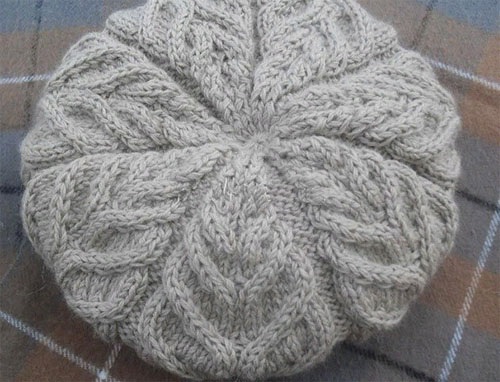
Beret with leaves: diagram and description
Any item made with your own hands will look like the most expensive and fashionable, if you take the right knitting needles for it, and also if you follow all the points of the diagrams and carefully read the description of the instructions. For women with dark hair, a white or coral beret is suitable., because the pattern against the background of these flowers stands out more colorfully and strikingly.
Detailed video tutorial on knitting a beret with a leaf pattern:
For knitting you will need 100 grams of angora yarn, knitting needles No. 2.5 for the elastic, No. 3 for the beret itself.
- Make a 3cm elastic band using the alternating method from 120 loops.
- Next, knit 10 front loops, according to the algorithm: 1 front, 1 back, 1 yarn over. There will be 10 loops left, knit them as front loops.
- Knit the next 40 rows using the alternating method.
- After 40 rows, knit with the front side until the beret is 20 cm in size.
- Start processing the bevel:
- 1st row: 2 knits together, 11 knits, 2 knits together with a leftward tilt. Repeat the algorithm until the end of the row.
- In subsequent odd rows, starting from 3 to 11, we reduce the number of regular front loops by 2, from the previous number. This method reduces the number of loops, each time there are 20 less of them.
- Row 13: knit, 2 knits together, tilted to the left. 20 loops remain.
- 15th and 16th row: 2 knit together. 10 loops remain.
- Knit even rows inside out.
- Pull the thread through the loops.
Braided beret: diagram and description
Women should not forget about berets with knitting needles, patterns and descriptions. It is very important for women to look good at any time of the year. The beret is ideal for winter colds, the pattern looks like a weave or a very thick braid. You will need 150 grams of yarn and 3mm knitting needles.

The pattern depends directly on the rapport; most often, 4-8 loops are used, which are divided in half to obtain the pattern.
Scheme:
- Take a certain number of loops and knit a 2x2 elastic band, measuring 9 cm. Take 2 times more loops.
- Next 4 rows are completely knit. Crossing in one or another is performed depending on the choice of rapport.
- The next 8 rows are done by crossing in the opposite direction.
- The following algorithm should be performed:
- 4 knits, 2 together purl, 2 purl,
- 4 knit, 2 together purl, 1 purl,
- 2 knits, 2 together purl, 2 purl,
- 2 knits, 2 together purl, 1 purl,
- 2 knit, 2 together purl.
- Knit in this way until there are 30 loops left, through which you need to pull the thread and tie tightly.
Beret "Pumpkin": diagram and description
The women's beret of this sample actually resembles a pumpkin, as it looks very voluminous. To highlight the resemblance to a pumpkin, it is better to do it in two colors. You will need: yarn of 2 colors, from the same color range, as well as circular knitting needles numbered 3 and 4.
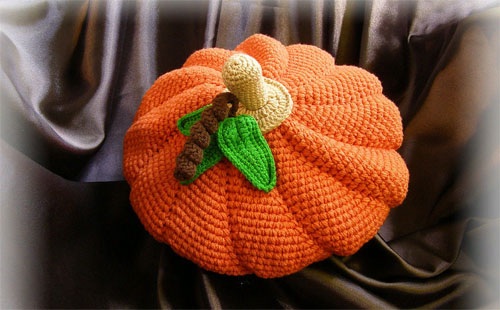
The knitting instructions are as follows:
- First, you need to cast on 90 stitches and knit a double headband with the front surface, 6 cm in size.
- Complete row, knitted inside out. On both sides of the loops, add one loop, which comes from the previous row.
- The added loops need to be knitted as purl and again lifted on both sides, only now from the front loops. Next, make the purl loops front, adding a loop on both sides.
- You need to repeat the algorithm until you have 6 loops around the main purl loops.
- Decreases are done using a mirror image, that is, if a loop was added on both sides, then now we remove these loops.
- Having reached the initial 90 loops, make 5 rows completely on the wrong side, then one row on the front side and again 5 on the wrong side.
- Divide the remaining stitches into 6 parts and decrease the end of each row by one stitch.
Leave 6 loops through which to thread the thread and tie the beret tightly.
New: Fashionable Nako Beret
The beret resembles the famous Monomakh's cap. Craftswomen knit this headdress for children, as it is very original and easy to make.
Scheme:
- Cast on 16 stitches and begin to knit rows:
- 1st row: 3 purl, 8 knit, 3 purl, 1 knit, 1 yarn over, 1 knit
- 2nd row and all purl (even) according to the pattern
- In all subsequent odd rows, add + 1 loop to the last front loop.
- 12th: 3 purl, 8 knit, crossed 5x5, 3 purl, 1 knit, yarn over, 7 knit.
- Every 12 rows you need to cross the braid. The beret consists of 6 triangles, when they consist of 14 loops, you will need to start decreasing: in all rows on the front side, remove one loop. Thus, one triangle will decrease, and the other will be added at the same time.
- The elastic band for the beret can be made to any length and with any pattern.
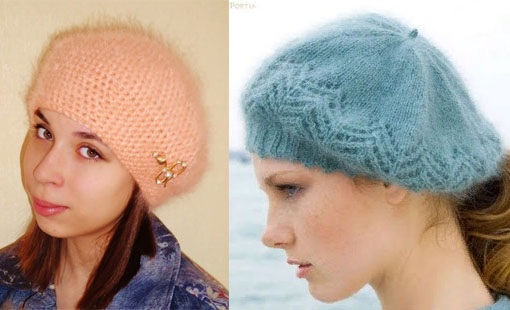
Summer openwork beret: diagram and description
A beret for the summer will help protect you from sunstroke and wind. It is also suitable not only for the hot summer, but also for the cool autumn. According to the proposed scheme, this head accessory will be within the power of even those who have never knitted in their lives. You will need: yarn consisting of 50% cotton and 50% acrylic, hook No. 2.5.
The knitting instructions are as follows:
- Start from the top of the head. It is worth noting that the knitting will be done in two threads. Wrap the threads around the wrist, getting a small ring. Tie it with 11 single crochet stitches, removing from the hand, pull the thread that was not tied around the ring and finish everything with the last connecting column.
- Then knit according to the algorithm:
- 2nd row: 3 chain stitches, 2 double crochets in each stitch of the previous row, finishing with a slip stitch.
- In each subsequent row add 1 column to the previous number and do the same. Knit 13 rows like this.
- Then knit 3 rows of yarn overs, but without increasing the loops, then divide all the loops into 4 parts and knit 9 double crochets, 2 double crochets together. Repeat 5 times.
- The beret is finished with an elastic band, knitted as follows: 1 double crochet behind the work, 1 double crochet before the work.
Below are the simplest women's berets for those who are just learning to knit. The algorithm is simple enough to understand, and anyone can handle it.
Simple braided beret for beginners
Simple options are most common among young girls who often experiment with their looks. This beret will suit any style of clothing. For knitting you will need: 150 grams of semi-wool, knitting needles No. 3.
Instructions:
- First, you need to cast on 86 stitches and knit a 10 cm 1x1 elastic band.
- Start adding one loop through every two loops. After adding, the number should be divisible by nine without a remainder.
- Next knit 17 cm without deviating from the following pattern:
- Cross 9 loops to the left: leave 3 loops on the helping needle, divide the remaining 6 in half and make one half front, the other back, and also knit 3 auxiliary with the front side.
- Cross 9 loops to the right: leave 6 loops on the auxiliary needle, knit the 3 unused loops, divide the loops from the auxiliary needle into threes and knit an equal number of front and back loops.
- After the braids are finished, start knitting 2 knit stitches together, thereby decreasing.
- Then make 2 rows without decreasing, again with decreasing. Knit like this until there are 14 loops left.
- Pull the thread through the loops.
Option #2 for Beginners: Beret with a Checkerboard Pattern
When knitting a beret with this pattern, you can use two colors of yarn., to make it even more colorful and bright. You will need: 100 grams of yarn containing at least 50% wool, the remaining 50% can be any, straight knitting needles and 3.5 double-pointed knitting needles.
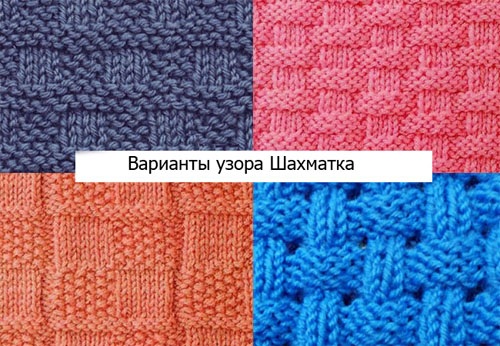
Instructions:
- Cast on 84 stitches on double pointed needles, 21 on each, knitting 12 circular rows, alternating 2 knit and 2 purl stitches.
- After 12 rows, knit a row, doubling each loop
- In the next row, add two more loops and start knitting the pattern, following the algorithm:
- First 5 rows: 5 knit, 5 purl
- Rows 6-10: 5 purl, 5 knit. Every five rows, the stitches should be swapped, example: rows 11-15 will be exactly the same as the first five, etc.
- Knit 20 cm in this way, then tighten the beret with a thread.
Beret from mohair: diagram and description
Berets made of mohair are perfect for the winter season, as mohair is a very warm and dense yarn. You will need: 100 grams of yarn with mohair, circular knitting needles No. 3.5.
Instructions:
- Cast on 100 stitches and knit a 12 cm 2x2 elastic band, alternating stitches.
- Next, knit all the stitches, adding 48 stitches in every second row, dividing them into an equal number in 4 places.
- Next 5 rows are done without increases.
- Every 3rd row decrease by 12 loops and leave only 12 loops, which are pulled together with a thread and tied tightly.
We hope our article will help you knit a women's beret with knitting needles or a crochet hook. The diagrams and descriptions in the instructions are designed for beginners in needlework.
Article formatting: E. Chaikina
Useful video about knitting women's berets
Video master class on knitting a simple classic beret:
Someone knit me a Pumpkin for the winter, I don't know how!