A special skill to transfer emotions to paper with a simple pencil. The listed tips will help you learn to draw beautifully and easily. It is with such sketches that masterpieces begin.
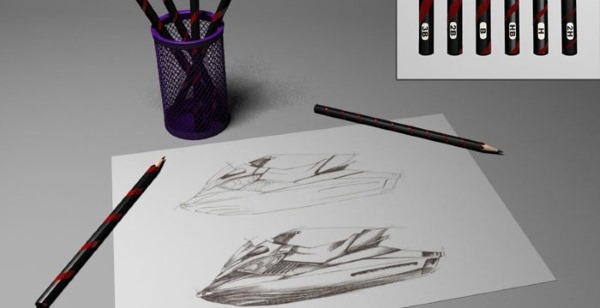
Drawing Supplies
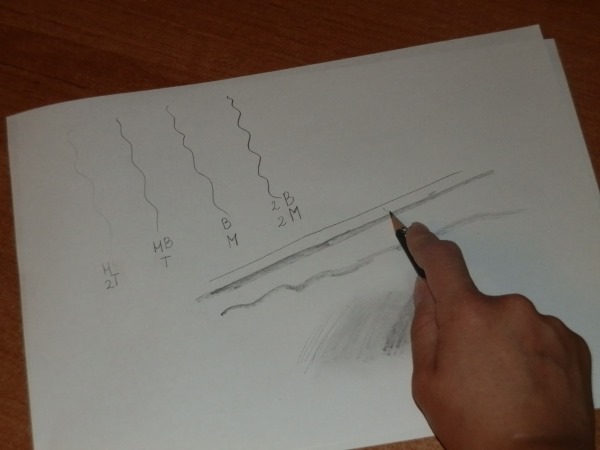
For those who are just taking their first steps in drawing, you will need a pencil, eraser and paper. To begin, you need to take 3 pencils that will differ in the softness of the lead. Each pencil has symbols.
The table shows the main designations of pencils:
| Marking | H | HB | F | HB |
| Designation | Hardness. Hard pencil | Blackness. Soft pencil | Fine point. Average value between HB and B. | Hard-soft pencil |
You should take several pencils at once, for example, "HB" for drawing precise lines and "2B" for softer ones. Masters advise sharpening pencils not with a regular metal sharpener, but with a knife. With its help, you can give the tool the desired shape. For precise lines, the pencil should always be sharp.
For drawing shadows it is better when the tip of the pencil is rounded.
The eraser should also be handled in a certain way. In order for it to erase all the small details neatly, it is recommended to cut it into 2 parts diagonally, leaving sharp corners.
Regular paper is too thin and is not suitable for drawing. It is better to take something thicker, for example, Whatman paper, but of a small size. If you start drawing on an A5 sheet, then later there may be problems with the scale of the images. For beginners, it would be better to take an A4 sheet.
Basic rules of drawing with a pencil
It is worth starting to learn this skill by redrawing simple pictures or objects. At the initial stages, this will help to feel the instrument and material.
There are important rules that are recommended to be followed:
- Position of the pencil in the hand. For different purposes, the pencil should be held differently. For example, the main lines are drawn with the palm facing the drawing, the pencil itself is located between the thumb, middle and index fingers. If you turn the palm to the side, you can monitor the thickness of the lines. This method is great for sketching and tinting. Holding the pencil like a pen, you can complete the drawing or draw small details. In any case, the tool should be located almost parallel to the paper.
- One of the most important stages of learning will be shading.It gives volume to the drawing and indicates shadows.
- It is necessary not only to draw a line, but also to be able to understand it. It can be of different thickness or length, which will say a lot about the drawing itself.
- The intensity of the pressure determines the contrast and the feel of the image itself.. You should start the sketch with light movements, so that the lines are barely noticeable. Then you can erase the wrong strokes without damaging the final result. The intensity of the pressure can be added at the end, to highlight certain elements.
- It is better not to touch the sheet with your hand while working.. Because of this, the drawing may become blurred. It is better to lift the brush or put a sheet of paper under it.
- It's worth remembering that things can always be better. But let it be a multitude of drawings, where each subsequent one surpasses the previous one, than an unfinished apple, 5 years later.
It is very important to know the basics of drawing, but you can only learn this through practice.
Basic Pencil Drawing Techniques
There are two main techniques in drawing - shading and hatching. If you master them, you can turn a sheet of paper into a living space. But each technique has its own rules and methods. You cannot use only one of them and create a full-fledged drawing. The two techniques complement each other.
Hatching
This technique involves drawing short lines or strokes on a sheet of paper. It can be used to convey the color and saturation of an object. To show depth or volume, more strokes are used. To highlight a light area, make them smaller. The strokes can be horizontal, vertical, or at any other angle.
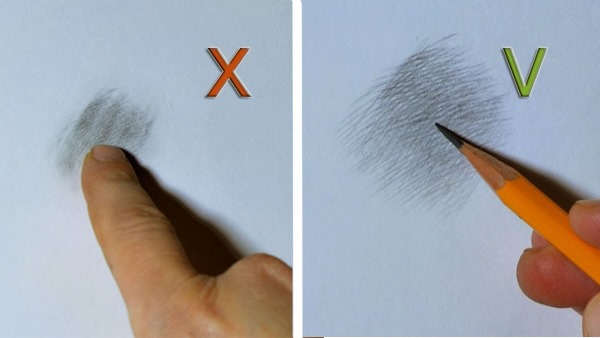
It all depends on the subject being drawn. Each time you make a stroke, you should lift the pencil off the surface and then return it to its original position. Combining several types of hatching will be a very important factor. For example, if you draw horizontal lines first, then vertical ones, the subject or area will increase depth.
Shading
Correct shading adds volume to the drawing. Beginning artists should learn this. Before shading, strokes are applied, which are later turned into monochromatic ones. This is the technique of shading. With its help, you can highlight shadows, show how the light falls. And also highlight some parts of the object.
You should shade along the strokes, then the drawing will look more natural.
You can draw lines not only in straight lines, but also in zigzag shapes. Just like in the previous technique, much depends on the drawing itself.
How to quickly learn to draw a portrait with a pencil: master class
You shouldn't start drawing people's faces right away. It's better to start by paying attention to its individual elements. It's worth practicing drawing lips, nose, eyes separately, and then combining all the parts into a complete portrait. Trying to draw everything at once, you can miss important details. But with gradual practice, drawing a separate element will take less time.
Human face
When drawing a face, it is always worth remembering the proportions. Despite the fact that everyone's face is different, there is a certain sequence on how to quickly and correctly draw a face.
For example:
- You need to pay attention to the shape of the face. If it is oval, then you should draw an oval on paper. The upper part, where the forehead is, is more rounded, and the lower part is sharp.

- The oval is divided into several parts. You need to draw a vertical line in the middle, this will be the center and 2 horizontal ones. The first one on top will be located where the eyes end, the second one where the tip of the nose is.
- In order to determine the distance between the eyes, you need to mentally put another eye of the same size there.
- You should draw 2 thin vertical lines from the corner of the eye and the beginning of the pupil down. Where the first one goes, the wings of the nose end, the second one marks the corners of the lips.
- Once the sketch is ready, you can erase all unnecessary lines and work on individual elements.
Eyes
How to draw eyes beautifully and easily with a simple pencil to convey a range of emotions, tears, laughter, sadness, joy on paper:
- Draw a straight line at a slight angle, it is responsible for the size of the eye.
- From the edges of the lines, arcs are drawn, they will be eyelids. Since the lower eyelid is not flat, it is better to draw another such line below.
- The pupil is not fully visible, so it is worth considering that the upper eyelid covers it a little.
- It is essential to depict the folds of the upper and lower eyelids.
- Correct shading will add volume to the eye. The pupil should be darker than the white. The upper eyelid falls on the eyes, creating a shadow.
Lips
Human lips can be depicted in different ways. These can be just shadows or fully drawn contours.
This:
- The lips are drawn from the first three lines. They separate the upper and lower parts.
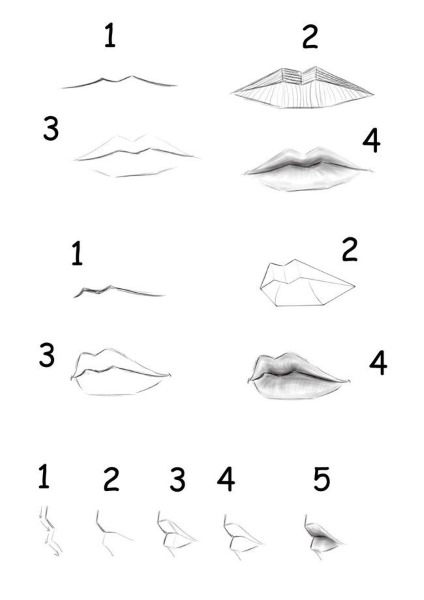
- Next, you need to decide on the length of the lips.
- The upper lip is depicted slightly heart-shaped, unlike the lower one.
- An important part will be the shadow between the lips. You need to imagine or look in the mirror how exactly the upper lip lies on the lower one, and what shadow is formed.
- The corners of the lips should be darker.
Nose
A human nose can be drawn in a minute using a few strokes, or it can take half an hour to draw all the details and shadows.
The principle of drawing a nose is as follows:
- You need to know what parts the nose consists of: the bridge of the nose, the tip of the nose, the wings, the nostrils, the nasal septum.
- Depending on the light, different parts of the nose will be darkened differently.
- The nose sketch starts with a circle to represent the tip and an oval for the rest.
- To mark the nostrils, you need to draw 2 more circles on the tip of the nose.
- Once you have determined the proportions correctly, you can begin drawing.
- The technique for drawing a nose can be either shading or shading.
Sketches of clothes
In order to draw a sketch of clothes, there is no need to accurately draw all the details of the face and figure. The main emphasis should be on the sketch itself. Proportions are very important. A person's full height can be divided into 7-8 parts. The size of this part will correspond to the size of the head.
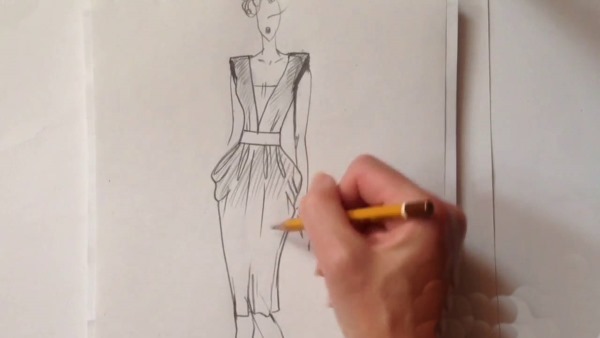
The hands are drawn slightly below the hips; this rule will protect the beginning artist from arms that are too long or too short.
In most cases, the thigh is slightly shorter than the shin. The person's waist is at the same level as the elbow. To correctly show the clothes on the model, it is necessary to draw it in different poses: a slightly turned shoulder or raised hip will allow you to correctly present the outfit itself. The model's hair should be drawn if it plays an important role in the outfit itself.
If not, then the whole head should be depicted as an oval. Before drawing the clothes themselves, they should be thought out to the smallest detail. This concerns not only their shape, but also the fabric used and various accessories.
Flowers
Flowers have a similar structure, but differ in many details. For example, they all have leaves, but they are always of different shapes.
Tulip
Usually, in the drawing, the flower consists of 3 flat petals, a stalk and a leaf. For a three-dimensional and lively image, you should pay attention to the shadows. It is better to draw a tulip at an angle. You should start with sketches of the main parts of the flower. Only after correctly determining the proportions, you can move on to drawing the details.
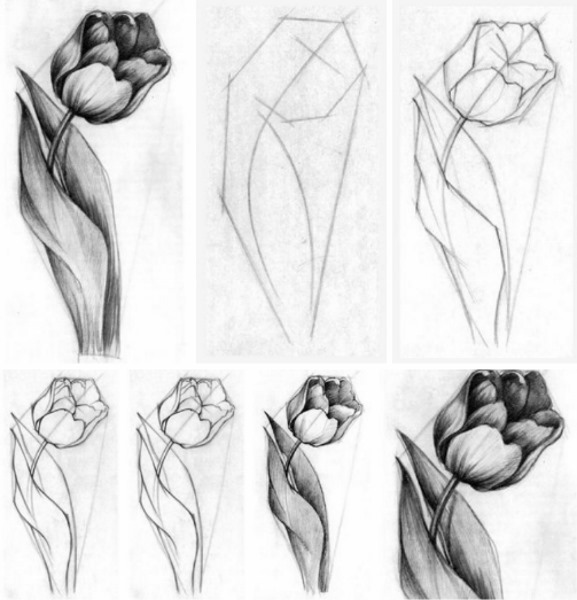
There are some tips on how to draw shadows:
- The shadow on the leaf should be in the center and the edge of the leaf. These parts are slightly lowered, so they create a shadow.
- You need to shade the edges of the stem and its lower part a little to create volume. The flower starts at the top of the stem, and it casts a shadow that needs to be depicted.
- The deeper the petals are, the darker they should be. Just like with the stem, the feathered edges will add volume.
All these tips will be useful when drawing any other flower.
Narcissus
It is better to draw a daffodil from a circle, which will represent the flower. The daffodil has 6-7 round petals with rounded edges. The center resembles a dome, so it is better to depict it at an angle. You should add stripes to the petals that go from the base, but do not reach the edge. After that, you can draw a stem and several leaves.
The leaves of the daffodil are long, they can be drawn both straight and slightly curved. As for the shadows, the rules will be the same as when drawing tulips. You should slightly darken the bases of the petals, since the central part of the daffodil casts a shadow on them.
Callas
To draw calla lilies correctly, you need to follow all the curved lines and features. You should start from the petal itself. After that, smoothly move to the stem. Shadows should be applied not only to the inner, but also to the outer part of the plant.
You can draw not one flower, but several, to make a bouquet. It is worth paying attention to the fact that the petals need to be depicted from different angles. To do this, you need to know how the visibility of the plant changes and how the shadows fall.
Sunflower
The sunflower consists of large leaves, a stalk, two rows of petals and a core. First, you need to outline all these parts. The leaves are depicted in the form of a drop with uneven edges and sharp corners.
To show naturalness in the drawing, they should be curved. Sunflower stems are very strong and massive and flow into the flower itself. Sunflower petals have a rhombus shape, only without sharp corners.
Even though they are attached to the core by the base, you can draw how they change their shape due to the wind.
Some can be turned or lowered. The core of the sunflower is drawn from 2 circles, the outer one is joined by petals. The seeds can be shown as fine shading. The emphasis on shading should be made at the base of the petals and in the center of the core.
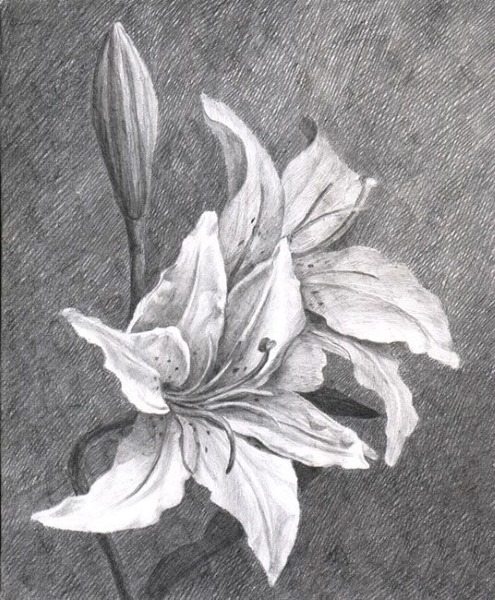
Lilies
The lily flower consists of 5 petals, which is where you should start drawing. The petals are curved and quite long, so to depict them correctly, it is recommended to draw looking at it from above. Having marked where the petals should go, you can connect them and draw the middle.
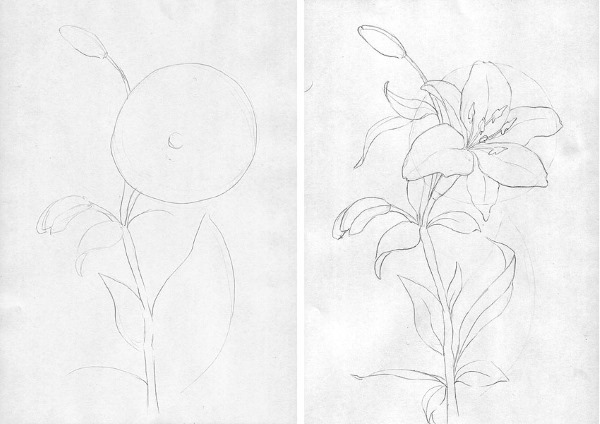
In the center of the lily is a bunch of stamens that end in small grains. The leaves of the plant are quite thin and long. They need to be darkened, as well as all other areas that are in shadow. In the petal itself, you need to add shading to the base and the middle, which is slightly deepened, so that the flower turns out voluminous.
Lotus
The lotus is slightly different from the water lily, which floats on the water. Unlike it, the lotus rises above the lake, and in the very center there is a small box. The structure of its petals is similar to a tulip. But the lotus is larger, and therefore has more petals.
First, you need to decide on the size of the flower.. When making a sketch, you need to mark where it turns into a stem. After that, you can start drawing the petals. As soon as all the main elements are depicted, you can add shadows to the lotus.
Animals
Drawing animals is similar to drawing a person in that you need to understand the structure of the body before you start working. You need to take into account the features of the animals, where the head goes into the body, the back legs should be stronger than the front, how the tail is located.
Dog
How to draw a dog beautifully and easily with a simple pencil:
- You need to draw 2 ovals for the head and body. At their junction, draw the 3rd oval for the neck. Also, you need to outline the puppy's paws.
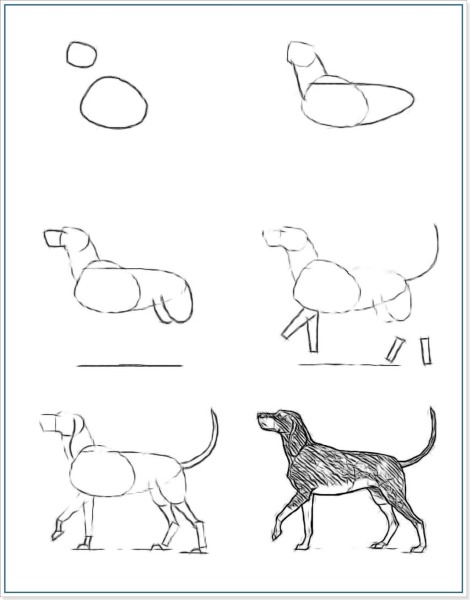
- When drawing the face, remember that the lines cannot be straight. The puppy's eyes are round, and the ears and nose will depend on the breed of the dog.
- You need to finish drawing the tail and outline the contour.
- The last step is to erase all the auxiliary lines and add volume to the fur.
Horse
The sketch starts from the head and moves to the body and legs.
It is very important to correctly determine the proportions of the body so that the head does not end up larger than the body:
- Draw a circle for the head and a pot-shaped figure for the muzzle.
- The horse's neck is narrower at the head and widens towards the body.
- To draw the body, you will need 2 circles. The one closer to the neck will be larger in size than the second.
- The front legs are slightly wider at the body and become thinner towards the hooves. The back legs have a bend that separates the hip.
- The next step is to connect all the parts and wipe off the preparatory forms.
Cat
It is better to learn how to draw these graceful animals using examples of animation. It will be difficult for beginner artists to depict the fur and shade of a cat. The body structure is very similar to a dog.
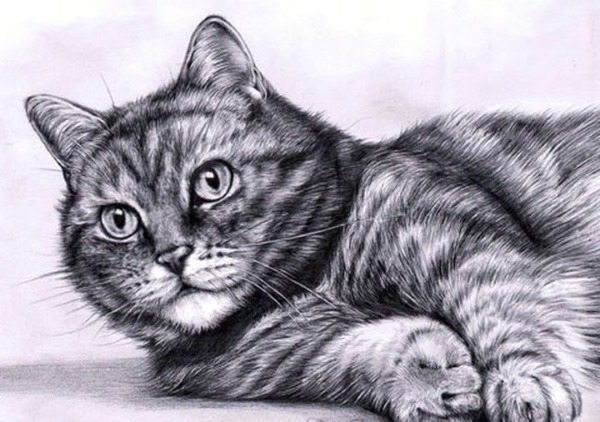
Only the cat will be more refined:
- In place of the head, draw a circle and an oval for the body.
- Next, the tail and paws are drawn.
- Having checked all the proportions, you can move on to small details: ears, eyes, and toes.
- The next step is to erase the auxiliary parts and finish drawing the fur.
Wolf
How to draw a wolf beautifully and easily with a simple pencil:
- Draw 3 circles, a small one for the head and 2 for the body.
- You need to connect these circles into the figure of a wolf.
- Next, draw the paws and tail, and on the muzzle, mark the eyes, ears, and round nose.
- Once all the main elements have been drawn, you can erase the preparatory lines and draw in the details and shadows.
Birds
You can draw a beautiful and easy bird with a simple pencil, following the same principles as for animals. You should start with a circle for the head and an oval for the body. The bird's tail and legs should be drawn at the same stage. After this, you need to draw all the details of the bird's head, on its back part, hard lines will be indicated with strokes.
The bird's feathers are quite thick, so they are drawn with short lines or shading to add volume.
They need to be drawn on the body and tail. The chest needs to be depicted as a curved line. When the bird is ready, you need to draw the branch on which it stands.
Landscapes
In order to draw a landscape, you need to understand every detail of the image. If the goal is a waterfall, you need to imagine how the water will flow, forming foam. The stones nearby cast their shadow and the foliage is darker, since water falls on it. For inspiration, you can turn on the appropriate music.
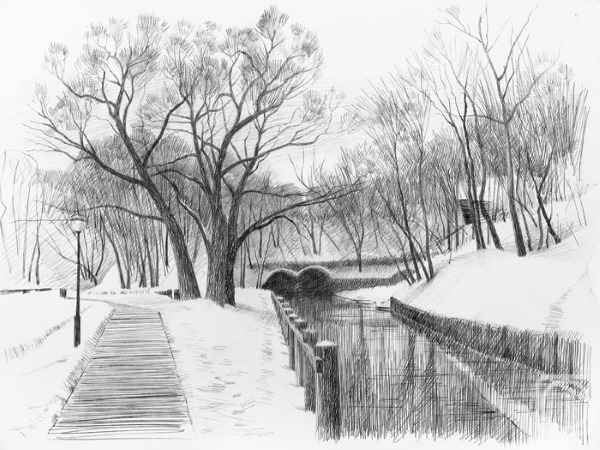
Before drawing a landscape, it is recommended to imagine the finished image in detail. After that, outline the main elements on a sheet of paper so that the proportions of the entire drawing are preserved. For example, if you want to draw mountains, you need to understand what plane they are on, what is in front of them.
Then you can begin to draw the outlines of the elements more precisely. Shadows play an important role in the landscape. If there is sun, then it is worth paying attention to where it is and what objects cast a shadow. Some artists only show the story in the picture with some outlines, allowing the viewer to imagine it. Others draw every detail.
Anime and cartoon characters
How to draw beautifully and easily with a simple pencil different characters can be understood if you pay attention to their physique and different features. The figure or facial details of cartoon characters often differ from the usual structure of a person. Big eyes or small hands make the character memorable. It will be easier to draw such characters than a portrait of a person.
There are a lot of pictures of characters on the Internet and first you should learn to copy them.
This will help in the future to draw characters from memory or even come up with your own. At the initial stages, you can ignore the shadows of the elements, since such characters are only drawn. Later, you can add the acquired knowledge to drawing anime and characters in order to make them more alive.
Cars
Unlike animals, there are precise and clear lines in drawing a car. You need to understand what parts the car consists of and how they are located in relation to each other. You need to start drawing with the outline of the body. Then highlight the wheels, hood, side doors. This is done with sketches so as not to disturb the proportions of the car.
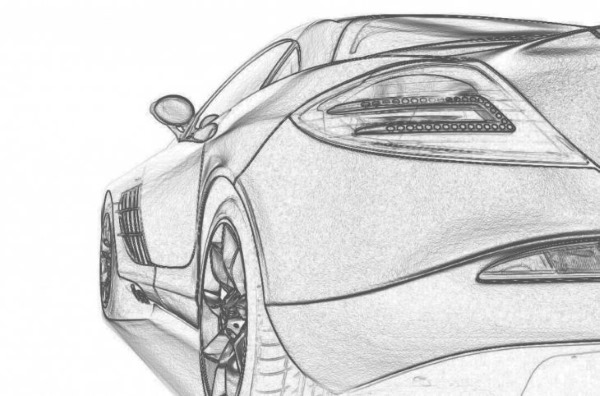
You need to understand what is depicted in the drawing and in what position the car is on the paper.. You should slowly draw all the main details and only then make the lines clearer. The car has its own shadows. It is necessary to determine which elements cast them. After that, it is better to shade some fragments so that the car turns out to be monochromatic.
Objects
Each object has its own structure, size and shape. For example, a soft blanket cannot be drawn with straight lines on paper, and if you do not add a shadow, it will look like an ordinary rectangle on paper. To learn how to draw an object of the environment, you need to pay attention to its features. Even an ordinary table can stand out with patterns on its legs.
You can turn on a flashlight and see how an object casts a shadow under different lighting angles.
This will help you understand how to correctly display it on paper. In addition, you can mentally draw a straight, horizontal or vertical line to notice how the shape of the object changes.
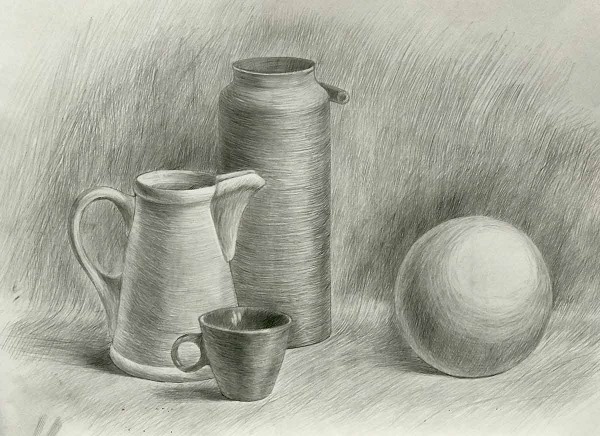
You should start drawing with a sketch of the main parts of the object, which will help you understand its shape and size. Only after that can you begin drawing clearer lines and shading the shadows. The finished image can be compared with the object. If something does not match, find out what the reason is so as not to make mistakes in the future.
Any object can be beautifully depicted on paper with a simple pencil. To easily implement all ideas, do not forget that when drawing, a person not only expresses his emotions, but also adds life to his work.
Article formatting: Anna Vinnitskaya
Video about correct pencil drawing
How to draw a girl with a simple pencil: