Children especially love the rabbit. When you don't have the opportunity to have a pet at home, you can draw one. If you follow the recommendations, then on a white sheet of paper as a result of the efforts of the young artist a cute rabbit will appear. To create a picture you will need a simple pencil, an eraser and a sheet of paper.
If you plan to not leave the rabbit black and white, but to color it, then you should additionally prepare several colored pencils or markers. You can choose colors at your own discretion.
General drawing scheme
The rabbit (it is recommended to draw the drawing for children with a thin pencil, without pressing too hard on it) on paper should first be drawn with a simple pencil. In this case, any mistakes made can be removed with an eraser without negative consequences for the drawing.
For coloring, you can use pencils or markers, but watercolors, previously well diluted with plain water, are better. It is recommended to make the background of the drawing dark, for example, draw grass or flowers to create a bright contrast.
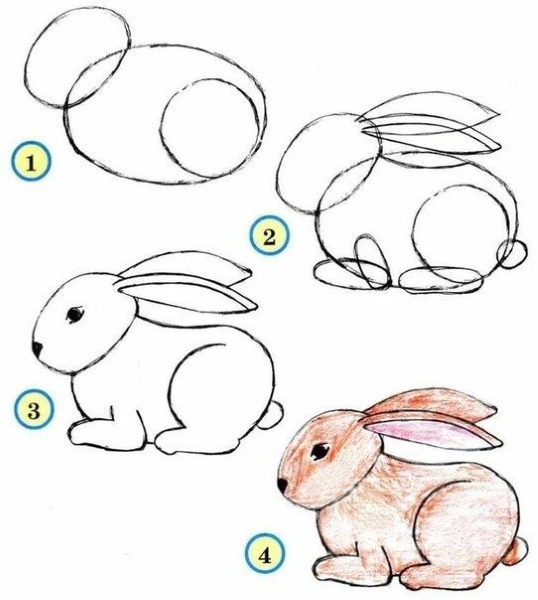
The general scheme for drawing a rabbit looks like this:
- Draw 2 ovals. One of them is smaller – this will be the head; the larger one – the body.
- Refine the shape of the head and draw the rabbit's nose.
- Draw the eyes in the form of small pointed ovals and the mustache in the form of long lines.
- Draw the ears.
- Draw the body and add a fluffy tail at the back.
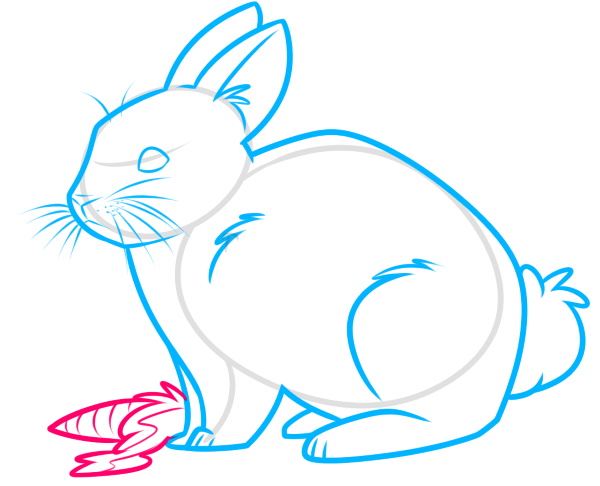
- Draw a carrot or cabbage next to the rabbit, as this is one of his favorite treats.
- Remove unnecessary lines: those that were used as outlines and were drawn accidentally.
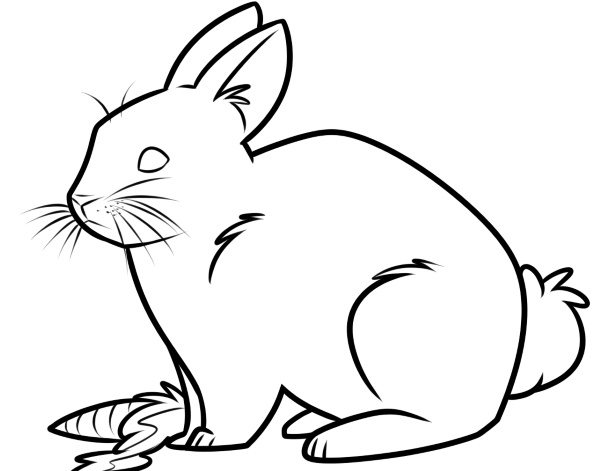
- Color the finished drawing.
Ready.
A method for the little ones
A rabbit (it is best to start drawing for children with simple options) for beginners can be made using circles and ovals.
The work takes place in the following stages:
| Stage | Description |
| 1 | 1. Draw 2 large circles, one of which will become the body of the rabbit, and the other - the head. 2. Above the head, draw 2 elongated ovals that will become the ears. |
| 2 | 1. At the bottom of the large circle, draw a smaller circle. This will be the hind limb.
2. To the left of the large circle, use small ovals to outline the front limbs. 3. Place the small circle to the right of the large circle. This will be the tail. |
| 3 | Go to image details:
1. Approximately in the middle of the head, draw a nose, which can be represented as a triangle. 2. Place 1 circle to the left and right of the triangle. Together they form a rabbit's face. 3. Draw 3 straight lines from each circle. These will be the whiskers. 4. At the top of the head, draw eyes, which can be represented as dots. 5. Place a small oval to the right of the circle representing the hind limb. This will be the continuation of the leg. |
Ready.
Cartoon rabbit
Rabbit (a drawing for children can be done in a cartoon or realistic version) cartoon for the image on paper will require a pencil and an eraser.
The stages of creating a painting are as follows:
| Stage | Description |
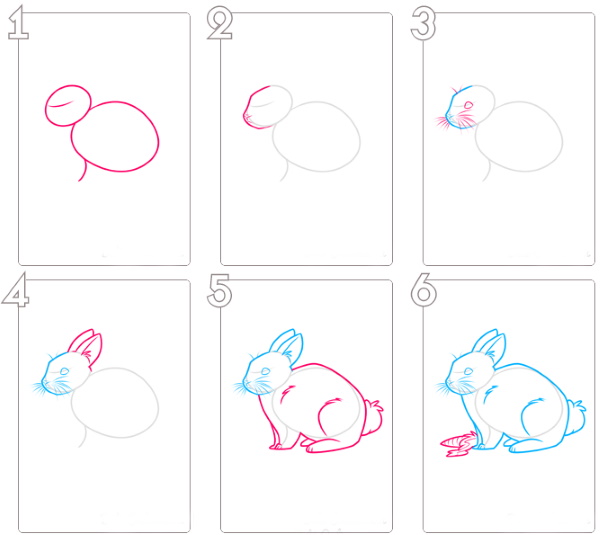
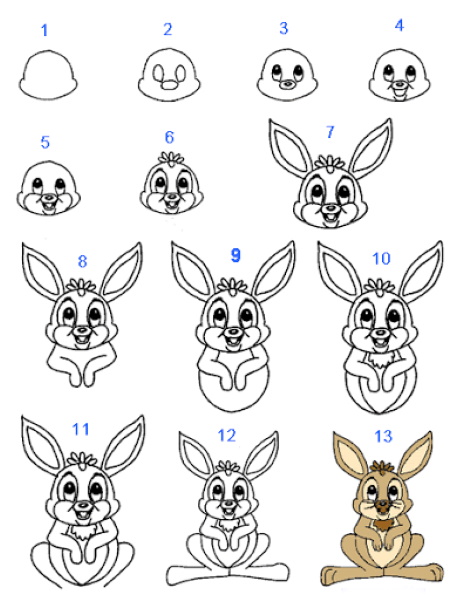
| 1 | Make an initial sketch. To do this: 1. Draw 2 shapes, one a simple circle (this will be the rabbit's head) and the other an oval (this will be the body that sits below the head). 2. Draw 2 thin intersecting lines on the head. They should be slightly curved. This will show the volume of the head (it is not just round, but spherical). A similar line is drawn approximately in the center of the body. It goes from the left edge to the right, and also curves in an arc. |
| 2 | 1. Draw the shape of the rabbit's head, including the ears that point back.
2. Add a beautiful bun of hair to the very top of the head. |
| 3 | Draw the rabbit's face using the following sequence:
1. Start with the eyes. They will be different sizes, because one of them (the right one) is closer to the viewer than the other (the left one). The closest eye should be round, and the farthest one – oval. 2. Color both eyes, leaving only the white pupils. You can use a simple pencil or some colored pencil for coloring. 3. Draw the nose. It is a small oval located between the eyes, at the bottom. 4. A few millimeters from the nose, draw the mouth, which should be represented by a short line. This line should be connected to the nose by an even shorter line. 5. Finish drawing a beautiful mustache. To do this, put several dots in the area between the nose and mouth (3 on the left and 3 on the right), and from each of them draw long lines extending beyond the head. |
| 4 | Draw the second ear, the lower part of which is hidden behind the head. |
| 5 | Draw the rabbit's front legs, each of which is a semi-oval. There should be several short arced lines on the tips of the paws, which will indicate the spaces between the fingers. For this rabbit, which is cartoonish, it is enough to draw only 2 such arced lines on each of the paws, so that it looks like it has 3 fingers. |
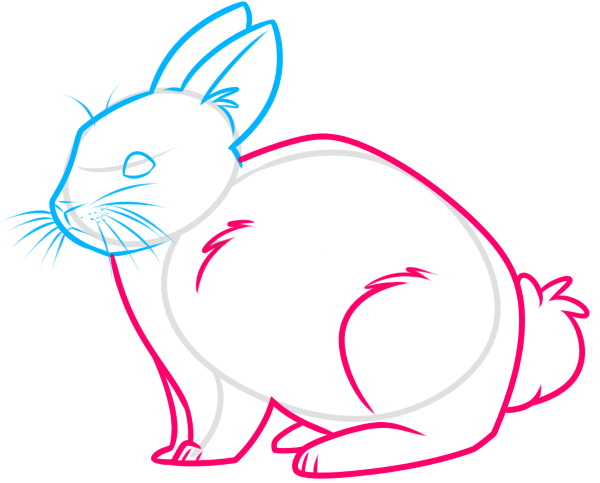
| 6 | Draw the rabbit's belly. To do this, outline the right edge of the large oval.
Then, finish drawing: · left thigh and foot; · back; · right thigh and foot; · short round tail. |
| 7 | All unnecessary lines should be removed with an eraser. This applies to the auxiliary arc lines that were drawn in stage 1, as well as pencil marks that could have been left on the paper by accident, by mistake. |
| 8 | Color the picture of the rabbit.
If desired, you can add a bright background, such as grass, sky, trees. |
Ready.
Realistic drawing
A rabbit (drawing for children can be a complex image, the main thing is to start with easy options) can be realistically placed on paper if you put in enough time and effort.
The work on its creation will be divided into the following stages:
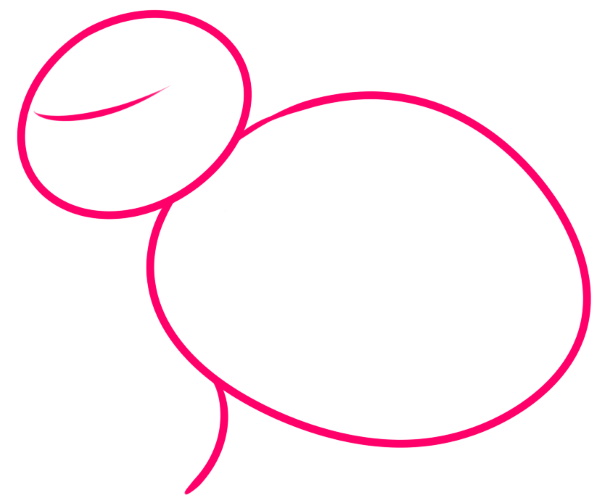
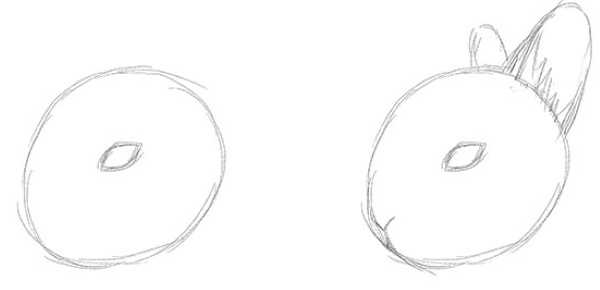
- Create the initial outline of the rabbit's head. Simple geometric shapes will be used here. The main one will be the oval, which you should start with: you should draw it so that it becomes wider at the bottom. This expansion is typical for a real rabbit, because this is where the jaw is located. This oval should be located slightly to the left and above the center of the sheet.
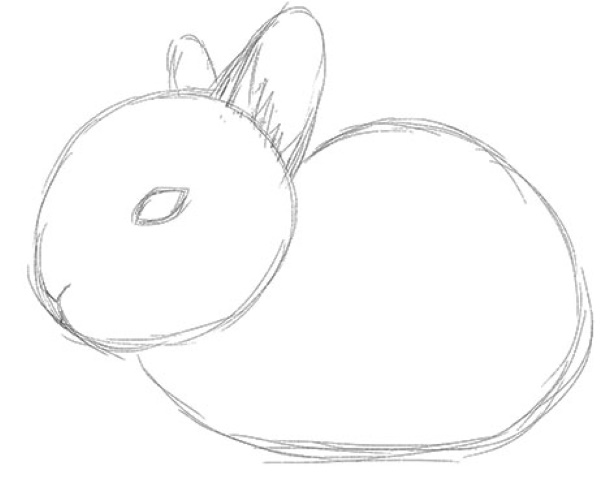
- When the outline of the head is ready, start drawing the basis of the rabbit's body. It will also be represented by an oval, but only larger. The body should be about 2.5 times larger than the head.
- The oval representing the body should be made more like a circle. The body is located approximately in the center of the sheet - to the right and below the head, and both ovals should slightly intersect.
- Below the first oval (which represents the head) and to the right of the larger oval (which represents the body), draw a circle. This will be the neck. This circle should be about the same size as the first oval.
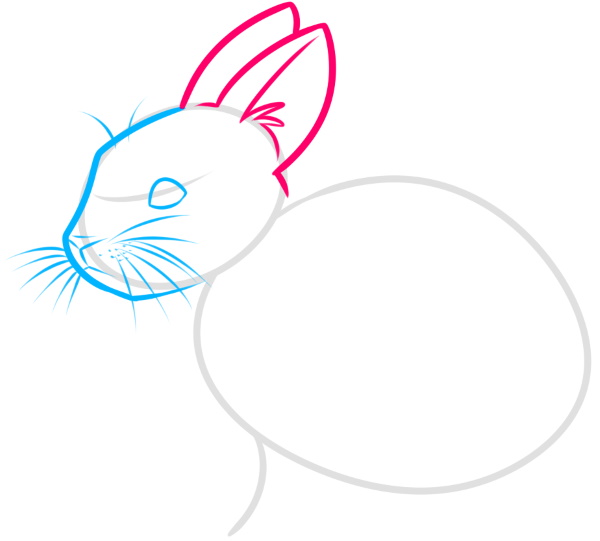
- Draw the rabbit's ears. They will be located above the head. There will be 2 of them. Each of them looks like a leaf, is a kind of oval, but only one end is sharp. The ears need to be drawn so that they tilt slightly in different directions.
- From the ears, move to the bottom of the drawing. Here the front paws will be drawn. Since the goal of this work is to create a realistic rabbit, you should remember this feature: this furry animal will be presented in profile, its paws will be of different sizes. The left paw - the one that is closer to the viewer, will be longer than the right one - the one that is further from the viewer. This simple technique allows you to avoid violating the law of perspective.
- Draw the rabbit's left front paw using two parallel lines that start from the neck and go down almost vertically (only slightly deviating to the left). Without bringing these lines to the very edge of the sheet by a few centimeters, you need to connect them with an almost horizontal (slightly deviating) short straight line.
- Draw the right front paw in the same way as the left one. It will be smaller and should be located in the drawing slightly to the left of the first paw drawn.
- Draw the hind legs. They differ significantly in structure from the front legs of a rabbit (in fact, just like our legs differ from our hands). When drawing the hind legs of a rabbit, it is worth remembering that they are 2 times longer than the front legs. And the lines that are the border of these legs should not be vertical, but horizontal. At the same time, they should also be made slightly inclined.
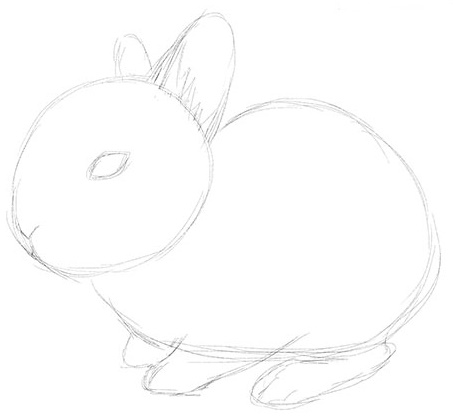
- Add a small tail - a small elongated oval adjacent to the right side of the body.
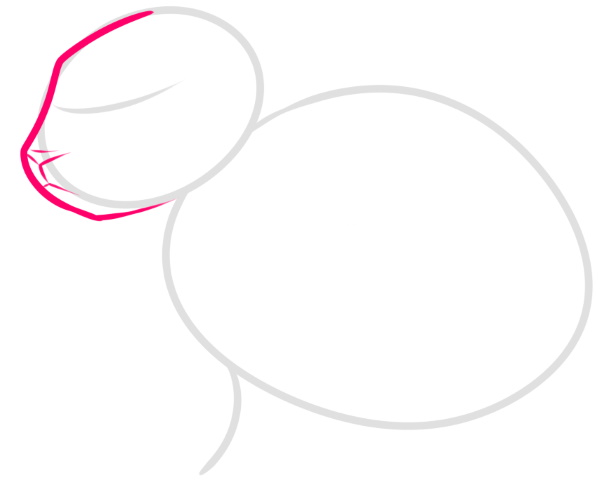
- Work with an eraser: remove unnecessary lines and outline the contours again, making them smoother.
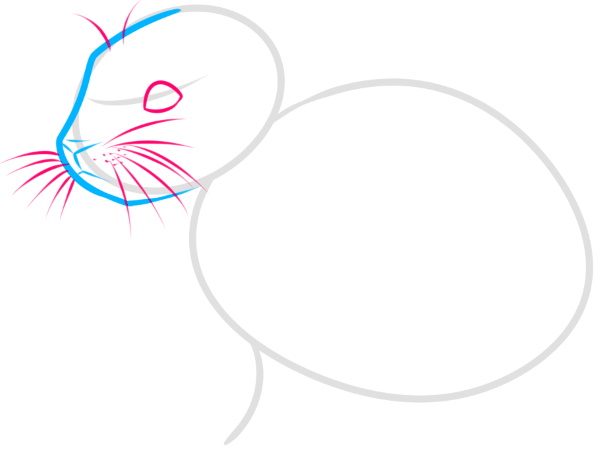
- Start adding elements to the rabbit's face. There should be a nose, a pair of eyes, and a mouth. At this stage, you can not bother yourself and just make them linear.
- Add curves to the ears and toes to the paws.
- Draw the rabbit's eyes, which are not located straight (like humans), but on the sides. Each of them can be represented as a semicircle.
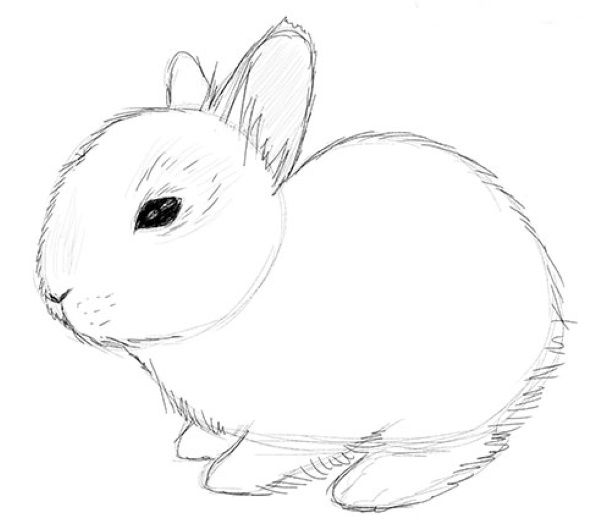
- Near the mouth, using arced lines, make 2 small round cheeks.
- Draw the darkest areas on the "rabbit's" face. These are the eyes, nose and mouth.
- Start applying a light tone to the muzzle, and then draw the ears. The density of the strokes should be greater near the bends.
- Add contrast to the ears and draw them in detail. The middle of the ear should be as dark as the area of its (ear's) outer part located near the base of growth.
- Draw the muzzle in the same way. The curves should be darker than the convex areas.
- Draw the fur from the neck. It is important to follow the following rule: the location of the strokes should correspond to the shape of the animal's body. This will give the drawing volume, which is simply necessary in this example.
- After applying the strokes indicating the fur, carefully erase the traces of the pencil lead along the edges of the cheeks and mouth with an eraser. In these areas of the body, rabbits have white fur.
- Gradually work on the front limbs and back. It is important to follow the laws of perspective here: the paw that is closer to the viewer will be lighter than the one that is further away. The left paw should be lighter than the right one.
- Note that the fur underneath the head should be slightly darker. This will show the shadow cast by the head.
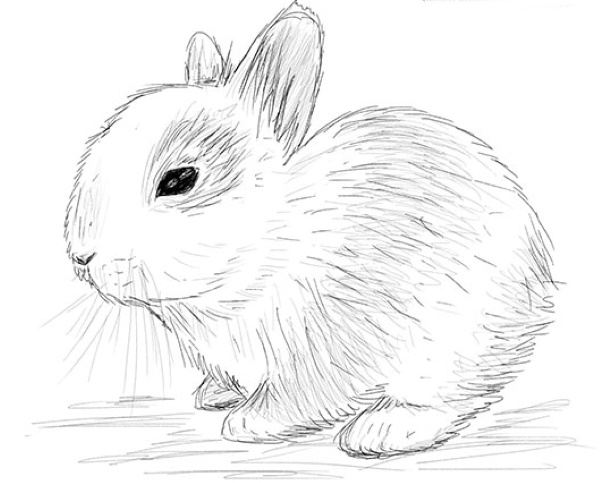
- Leave the rabbit's belly and tail edge light. Shade the hind limbs using the same rules that were used when working on the front legs.
- Even out the tone using a simple pencil with a soft lead (marked B).
- Work on the details and missing elements, and add the shadow cast by the rabbit's body. The light in this case is coming from the right, which means the shadow should be on the left.
Working with paints
Drawing a rabbit for children using paints is considered more difficult to do than using a pencil or felt-tip pen.
To work, you need to prepare the following materials and tools:
- simple pencil;
- eraser;
- cadmium yellow watercolor paint;
- watercolor paint black;
- blue watercolor paint (you can use any shade);
- watercolor paper;
- reference for drawing (optional);
- a small brush with a sharp end.
Once everything necessary is prepared, you can begin the work, which takes place in the following stages:
| Stage | Description |
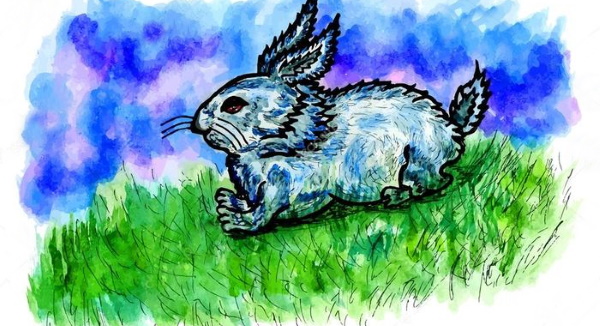
| 1 | Draw a sketch of the rabbit. This will be the basis of the entire drawing. Before applying the image, you need to decide how exactly the rabbit will look. To do this, you can use photos of rabbits for references and choose the pose that you like the most. To work out the composition, you can draw not one, but several different rabbits at once, using simple lines for this. Once the pose is chosen, it's time to flesh out the sketch. You can make the rabbit's fur any color you want, but in this example it's white. This will make it easier to focus on the shading. When creating a sketch, it is important not to press too hard on the pencil. After all, you cannot avoid random errors, and the heavier the marks, the harder they will be to remove. |
| 2 | Proceed to apply the initial coat of paint. To do this, you need to do the following: 1. Mix yellow watercolor with black. The result will be a color similar to sepia. 2. Mix the resulting pigment with a large volume of water. There should be enough of it so that as a result of mixing the paint becomes pale and warm beige. 3. Spread the prepared mixture over the entire rabbit. Be careful here, because it is important not to "go beyond" the body. The shade should not be flat. The saturation should become heavier if you need to show shading, and it is present under the ears, above the front legs. 4. After applying the first coat of paint, give the painting some time to dry. |
| 3 | Paint the rabbit's ears. To make them look more realistic, apply paint between the fur at the base. This will help create a relief effect and highlight some details of the fur. A round watercolor brush will come in handy here. If desired, you can make the beige color warmer or use light pink watercolor. |
| 4 | Work with shadows. When drawing the nose, you need to try to make its lower edge more saturated and shade the lower part of this area. Also, the shading should be around the area. This work should be done using the beige paint that was created by mixing. If the paint dries on the palette, it will turn into a concentrated version of the same shade. A slightly damp brush will be needed to weaken the color and add it to the drawing. Before starting this work, it is important to make sure that the area where the color will be applied is wetted. In this case, the mixing will be without the formation of any rough edges. A little shadow should be added to the area under the mouth. This will add depth and move the drop forward a little. After that, you need to carefully apply shading to one of the areas where the fur or paws overlap - it should match the more saturated areas of the first layer. |
| 5 | Draw the eyes and mustache. Carefully add blue to the pupils, using a small brush with a sharp end. You can use a watercolor pencil instead.
To draw a mustache, you need to draw several lines with a well-sharpened pencil. These details should be very thin and light, so you should press the pencil with minimal force. |
| 6 | Add fur to the rabbit's body. This will require a well-sharpened pencil. A reference may be helpful here. If any shortcomings are noticeable in the resulting picture, adjustments can be made. |
Pictures of a carefree jumping or peacefully sitting rabbit may be difficult to draw at first. Most mistakes are usually related to non-observance of proportions. However, if you follow the recommendations, start with the simple and gradually move on to the complex, then each new drawing will turn out better and better than the previous one, even if small children are drawing.
Video on how to draw a rabbit
How to draw a rabbit easily: