An interesting toy paper ship is made from scrap materials quickly and easily. And the process of its creation is not only an exciting, but also a useful activity, since as a result of the work of hands, the development of the most important mental and thought processes occurs.
Origami from paper
Folding paper figures using the origami technique occurs according to certain patterns, which have conventional signs and techniques.
Table:
| Conventional sign/technique | Name | Designation (action) |
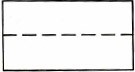 | Valley (dotted line) | The fold is made in the “towards yourself” direction: the upper part of the part covers the lower one. |
 | Mountain (dotted line) | The bend is made in the direction “away from you”: the lower part of the part covers the upper one. |
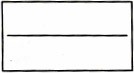 | Fold (straight line that does not affect the contour of the part) | The bending occurs “valley” (or “mountain”) and back, that is, part of the part returns to its original position after bending. |
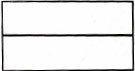 | Section (solid line in bold type) | A cut is made along this line from its beginning to its end. |
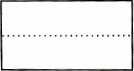 | Invisible, imaginary line (dotted line) | Provided for orientation purposes. |
| Arrow "towards yourself" | It is necessary to make a valley fold | |
| Arrow "away from you" | It is necessary to make a mountain fold | |
| Double arrow "towards yourself" | It is necessary to make a “valley” bend: bend the part “towards yourself”, and then bend it back to its original position. | |
| Double arrow "away from you" | It is necessary to make a “mountain” bend: bend the part “away from you”, and then bend it back to its original position. | |
| Wrapped "valley" arrow | You should repeat the “valley” fold several times in a row (according to the diagram) - that is, wrap the part the required number of times “onto yourself”. | |
| Arrow curled up like a mountain | You should repeat the “mountain” fold several times in a row (according to the diagram) - that is, fold the part the required number of times in the direction “away from you”. | |
| Arrow with dashes | The sign draws attention to the need to repeat the same action. The required number of repetitions is indicated by the number of small dashes. |
| Arrow with one turn | It is necessary to turn the workpiece over to the other side. | |
| Two semicircular arrows | This sign indicates the need to rotate the workpiece by 90 or 180 degrees relative to the original position. The rotation angle is determined by a specific diagram. | |
| Lightning arrow | Several different folds should be performed in a row, their sequence is determined by the pattern (“mountain” - “valley” or “valley” - “mountain”), and the number of repetitions corresponds to the number of zigzags on the arrow. |
How to Make a Waterproof Paper Boat
How to make a paper ship so that it doesn't get wet or sink in water:
- Method 1 – scotch tape. It is necessary to cover the hull and bottom of the paper boat with tape, both outside and inside. If during the tape treatment it becomes necessary to form seams, they should be made as vulnerable as possible. To do this, the tape strips should be placed on top of each other by several millimeters so that water cannot penetrate into the joints between them for as long as possible.
- Method 2 – several layers. A multilayer boat will take much longer to get wet than a regular two-layer one. To make it, you need to take not 1, but 2 sheets of paper, and then fold them according to the pattern. Such a boat will be denser, more layers will make it heavier, so the bottom should be made very wide.
- Method 3 – wax (paraffin). This is the product that can protect paper from getting wet. You need to light a candle and wait a little while the wick flares up and melts the wax to a liquid state. After that, you should drip the wax onto the boat, immediately spreading it over the body with your fingers. You need to lubricate all areas of the homemade vessel: both external and internal. You can't use too much wax - it can make the product heavier and unstable.

- 4th method – Vaseline oil. Using a brush, this product should be applied to the bottom and lower part of the boat's hull, then let the product dry a little.
- Method 5 – glossy sheets. A boat made from glossy magazine pages will stay on the water without harm a little longer than one made from regular paper.
- Method 6 – PVA glue. It must be poured into a jar or a glass, and then applied with a brush to the bottom and body of the paper boat, after which it must be allowed to dry completely in a warm place.
Multicolored boat
There are several ways to make a paper ship colorful and bright:
- you need to take a sheet of scrapbooking paper to make the craft;
- a regular sheet of paper can be covered with pieces of colored paper;
- Instead of white and lined paper, you should use magazine sheets with pictures;
- Before folding, instead of one, you need to take 2 paper blanks of different colors;
- You can give a novice craftsman the opportunity to paint a homemade vessel on his own.
Otherwise, everything is simple - a sailboat or ship is folded from the selected paper according to any pattern, treated with a waterproof compound and released into the water.
Boat folding patterns for beginners
The classic origami paper boat is the simplest version and is folded according to the following scheme:
- A vertically placed rectangular sheet is folded in half.
- The resulting blank is placed with the fold facing up, and both upper corners are folded towards the imaginary central line vertically, so that a narrow unused strip remains at the bottom.
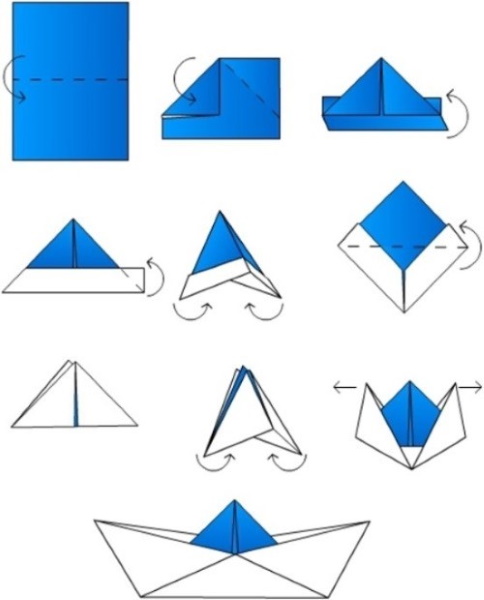
- The bottom strip of the top layer of the workpiece is folded upward, then the rectangle is turned over to the other side and the second strip is folded.
- By bending the corners, the bent strips are fixed in one position.
- Then the workpiece is opened from the inside and folded into a square by placing its parts on top of each other so that the initial fold becomes the diagonal of the resulting square. After folding, the corners are straightened.
- Now the top sheet of the resulting square blank, lying in the position of a diamond, is folded diagonally in order to align the opposite corners.
- The workpiece is turned over to the other side, then the same action is performed. At this stage, the square turns into an isosceles triangle.
- Next, the triangular blank is opened from the inside by combining the opposite corners and again turns into a square.
- The ship is unfolded from a square blank - to do this, the upper corners are pulled in opposite directions at the same time.
- The middle straightens out, and the simple paper boat can be launched into the pond.
There is another option for folding a boat for beginners, it is the simplest, and as a result of five minutes of work you get a yacht:
- On a square sheet of paper of any color, it is necessary to make a fold along the horizontal diagonal.
- Now the valley fold is performed vertically.
- In the lower triangle, an imaginary line is drawn, as shown in the diagram, along which the bending occurs.
- The bent part of the triangle is unbent, returning to its original position. Once the folding technique is mastered, steps 3 and 4 can be simplified into one, simply by bending the desired part of the triangle.
- Now, along the marked lines, you should make valley bends, carefully straightening the right angle, which is located below the markings.
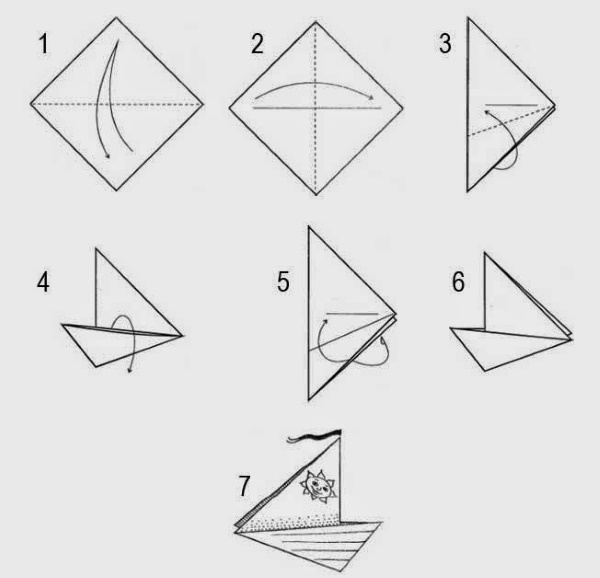
- Using glue, the two parts of the yacht are connected together, then the bottom and hull are carefully straightened out so that the product becomes stable.
If you complicate the previous diagram a little, you can get an ocean liner:
- On a square sheet of paper of any color, you need to make 2 diagonal folds, thus marking 4 triangles.
- Then you need to bend the top corner of the square piece, located like a diamond, towards the center.
- Now the same corner is folded again, only in the opposite direction.
- And once again the corner, only smaller in volume, needs to be folded back onto itself. When the technique of folding the boat is mastered, steps 2-4 are simplified into one step, folding occurs with a triple zipper.
- Next, the left part of the workpiece is folded in such a way as to cover the right part.
- Now you need to mark an imaginary line, as shown in the diagram, for folding the lower parts of the workpiece "into a mountain". Then very carefully straighten and bend the corner located below the line. After this, the parts of the workpiece indicated in the diagram need to be bent along the marked line "into a mountain".
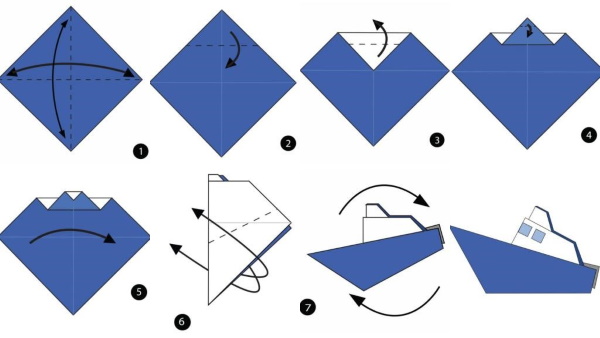
- The bent corner is carefully smoothed out, and the workpiece is turned in the desired direction.
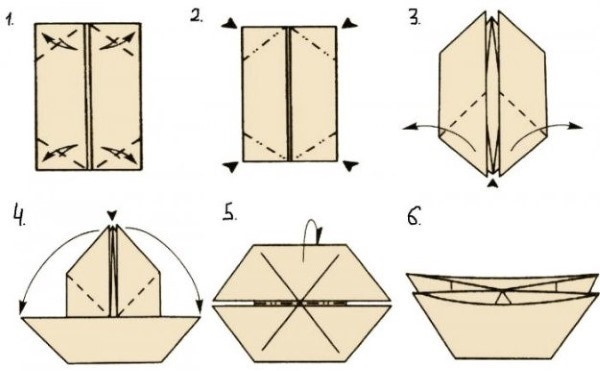
A4 paper boat
How to make a ship from A4 paper:
- On a sheet of paper of any color (the shape of the sheet must be square or rectangular), it is necessary to make 2 folds: first horizontally, and then vertically.
- After returning the sheet to its original state, you should place it horizontally in front of you, and then bend the opposite parts - the top and bottom - towards the center.
- Next, you need to bend all 4 corners of the workpiece into a “valley” to form a hexagon.
- The newly formed corners need to be bent into a “valley” again, according to the diagram – you will get a horizontally elongated rhombus.
- Once again, you need to bend the corners into a “valley”, of which there are only 2 at this stage.
- Then you need to fold the craft "in a mountain" along the central line formed in the process of performing the previous steps. After this, being careful, you should turn the workpiece inside out using a movement aimed at opening the central cleft.
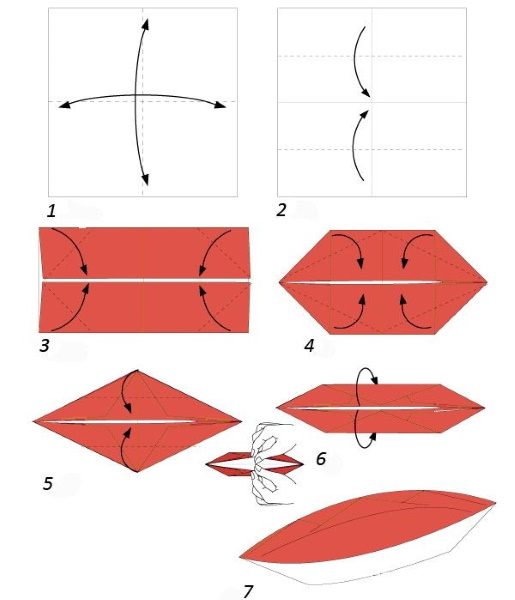
How to make a ship from A4 paper. - At the end, you need to straighten the boat, carefully tucking in all the folds that are located inside.
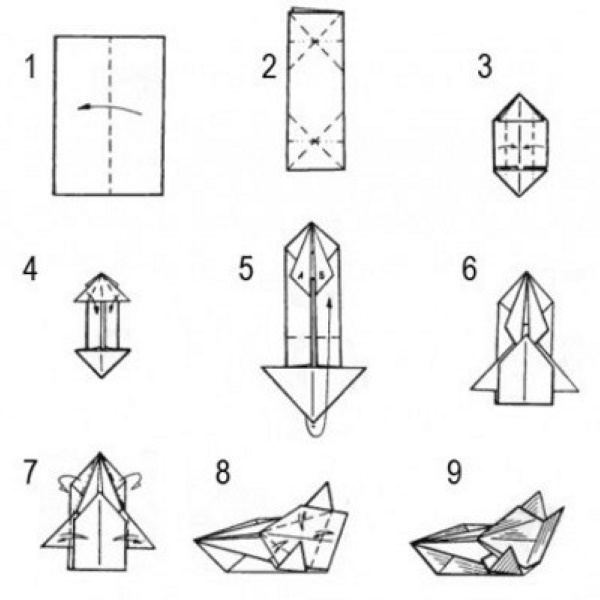
Big paper boat with a pipe
A large paper boat is not as difficult to make as it may seem at first glance. To create it, you will need a square sheet of paper and a glue stick. The square is cut out to the desired size. If you need to get a very large ship, you can take millimeter paper, which is sold in huge sheets.
Manufacturing stages:
- First, you need to fold the square so that it is divided into 2 identical rectangles, then you should bend the sides to the central fold.
- The resulting rectangle needs to be folded vertically, marking the center, then the sides need to be folded to this line to get a square again.
- Now the sides of the ship are formed. To do this, you need to straighten the corners and fold them into another shape. First, work with the upper right corner. Holding the lower right corner of the square with one hand, you need to lift the upper right part with the other hand, grab the corner adjacent to the center and gently pull, straightening it into a triangle. Now you need to smooth out the corner well inside and outside, and then do the same with the bottom side. As a result, the right part of the square should be reshaped into a trapezoid.
- The left part of the square blank is folded into the same trapezoid to form a hexagon. At this stage, the blank should look like the one sketched in point 1 of the diagram above.
- Next, the workpiece is turned over to the other side and a fold is made along the imaginary diagonal line of the square “valley” - point 2 in the diagram.
- Next, the workpiece needs to be turned over and the corners folded back so that it looks like the sketch in point 3 of the diagram.
- Now the triangle located at the very bottom needs to be bent in such a way that its lower corner coincides with the corner of the right triangle and you get the blank drawn in point 4 of the diagram.
- Both corners are glued together, then the body and bottom are straightened out so that the product becomes stable.
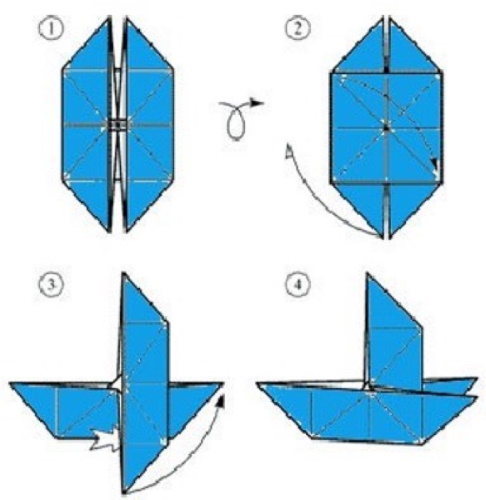
Double-pipe paper boat
How to make a paper ship with 2 pipes:
- To begin, you should fold the square-shaped paper blank first horizontally, then vertically in order to mark the central point of the figure. After this, the folds should be straightened out so that the blank returns to its original shape.
- Now each corner of the workpiece needs to be folded "valley" towards the center point to create a small square divided into 4 identical triangles. This square should be placed in front of you so that it resembles a rhombus.
- Then you need to turn the workpiece over with the bent triangles facing down, and on the back side (which was sort of the wrong side) bend the corners to the center again - the rhombus should turn into a square half the size of the previous one.
- The square must again be turned over to the other side, and its corners must again be folded towards the center, turning the workpiece into a smaller rhombus.
- Next, you need to turn the structure over again. Then, having placed it in the form of a rhombus in front of you, you should bend 2 triangles located in opposite directions from each other (upper and lower), forming rectangular pipes from them. The holes on top must be carefully straightened with your fingers.
- The 2 side triangles need to be lifted by the corners and moved apart in opposite directions, while folding the workpiece in half and unfolding the lower part so that the tops of the side triangles are directed upward.
Origami sailboat
To make a ship decorated with two sails, you will need a square sheet of one-sided colored paper. Thanks to this sheet, you will end up with a ship with sides painted in one color and snow-white sails.
The process of making a sailboat:
- First, you need to make folds on the square blank vertically, and then horizontally. You should get a large square, divided by folds into 4 small squares. Now the same action should be done diagonally.
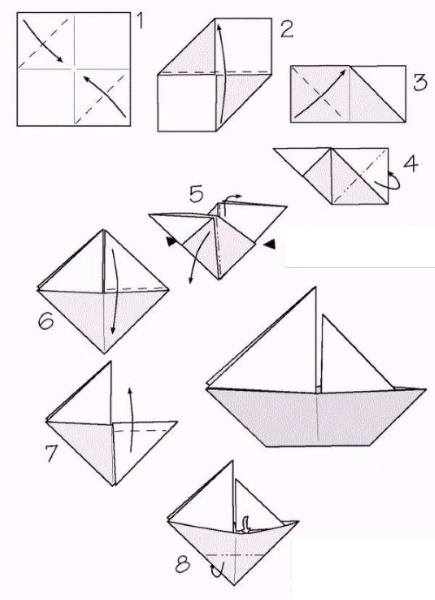
- Next, you need to place the workpiece in front of you like a diamond, with the white side up, and bend the 2 opposite corners (upper and lower) into triangles towards the center with a “valley”. The result is a structure in the form of 2 triangles, with 2 diamonds on the sides.
- Then a horizontal bend is formed on the resulting workpiece.
- When returning the structure to its original state, it is necessary to simultaneously fold the left rhombus so that its horizontal diagonal moves to a vertical position and then bends inward. In this way, the left rhombus should be reshaped into a triangle, fixed by the fold between the upper and lower rectangles.
- Now we have a parallelogram with a triangle on the left. Its right corner needs to be folded with the diagonal of the former rhombus inward. We should get the blank sketched in point 6 of the diagram, which is 2 triangles - the upper and lower, with the upper one consisting of 2 small ones.
- The left small triangle is the big sail, and the right one needs to be reshaped into a small sail. To do this, it should be folded with a zipper, as shown in points 6-7 of the diagram.

- The fold with a zipper needs to be hidden between the sides of the future sailboat. And at the bottom, along an imaginary line, it is necessary to make "mountain" bends inward to form the bottom of the vessel. At the end, the bottom needs to be carefully straightened out so that the sailboat stays on the water better.
Original ship folding options
Paper ships can have an original look if you make them according to certain patterns. There are several ways to make interesting options quickly and easily. Before you start working, you need to prepare a sheet of paper and glue. In some cases, scissors may come in handy.
The speedboat is created according to the following scheme:
- A rectangular sheet of paper must be folded lengthwise, dividing the workpiece into 2 equal parts. After this, the sheet should be cut exactly along the fold line.
- Next, you need to work with one of the resulting rectangles. In its upper part, you need to bend the right corner in the form of a right triangle, after which the same action is repeated with the left corner. Then you need to mark the intersection point of the 2 bends with a new bend "valley" of the entire upper part of the rectangle. The same actions should be repeated on the other side of the rectangular workpiece to get the markings drawn in point 2 of the above diagram.
- Now you need to make folds simultaneously on both sides so that the fold line marked at the intersection of the triangles folds in half inward and ends up covered by the newly formed triangle. This needs to be done from both the top and bottom sides of the workpiece.
- After this, you need to lift the front parts of the upper and lower triangles and bend the sides of the rectangle in a "valley" towards the central line. You should get the design sketched in point 4 of the diagram, resembling a two-way arrow.
- The front part of the upper triangle should be folded towards its base, making the vertical fold lines as long as possible so that this part forms 2 acute-angled triangles.
- After this, the lower part of the structure is bent into a “valley”, as shown in the diagram in point 6.
- Now work is done with the lower part of the workpiece. The protruding corners are bent into a "valley", then the entire boat is bent in the same direction.
- Then the side upper corners of the pentagon located at the bottom of the workpiece are folded “valley” towards the central fold line.
- The boat should be carefully straightened out, giving it a streamlined shape, after which you can begin to use it for its intended purpose.
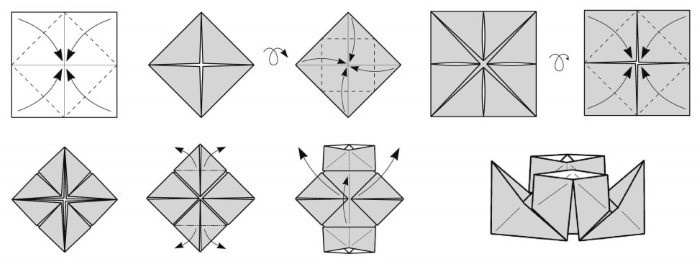
A ship with 2 hulls (catamaran) is made in the following sequence of actions:
- The square paper blank must be folded diagonally, then vertically and diagonally. After that, the right and left parts of the square should be folded toward the center.
- Now you need to work with all four corners of the rectangular workpiece. To do this, the upper and then the lower corners need to be bent in such a way that both parts of the workpiece have sharp corners. And if you turn the workpiece over, placing it in front of you in a horizontal position, you can see 2 trapezoids.
- The bottom side of the workpiece is pulled out by both parts of the corner to the sides and folded upward, forming a boat.
- The same action is repeated from above - again 2 trapezoids are obtained, only now they are 2 times smaller in size than the previous ones.
- At the end, a "mountain" fold is made, separating both boats - a catamaran is obtained. In order for such a boat to stay well on the water, the fold itself, separating the boats, must be coated with glue.
Making a paper boat yourself is an interesting and useful activity that does not require any expenses, since the crafts are made from scrap materials. Special schemes for beginners and experienced craftsmen help to make sailboats, boats, launches and yachts.
Author: Kostylina Anastasia (anna-master)
Article formatting:Lozinsky Oleg
Video on how to make a paper ship
How to make a boat out of paper with your own hands: