Beadwork is one of the most fascinating and beautiful types of handicrafts. Particular attention is paid to necklaces and chokers, the weaving patterns of which are so varied and magnificent that they amaze the imagination.
What is so attractive about beaded jewelry?
Beading necklaces and chokers, the patterns of which allow you to make jewelry of varying complexity, is a type of handicraft that has always been appreciated.
There are many factors that can be listed that make people interested in beaded items:
- Uniqueness of the decoration – each beaded product is given its own twist by the master during weaving. Therefore, these decorations are unique author's work and are made in a single copy.
- Handmade – designer accessories made by hand are considered a symbol of style and prestige.
- The variety of colors and shades of the craft material allows the decoration to be created exactly to match a specific wardrobe item.
Jewelry made from beads will always be in fashion - this is due to the fact that these products can be made in any style and thus solve the "eternal" problems of the female sex.
They can be used to emphasize a woman’s individuality and style, or to complement an outfit with a missing detail.
- Durability of products – beaded jewelry does not lose color even after many years.
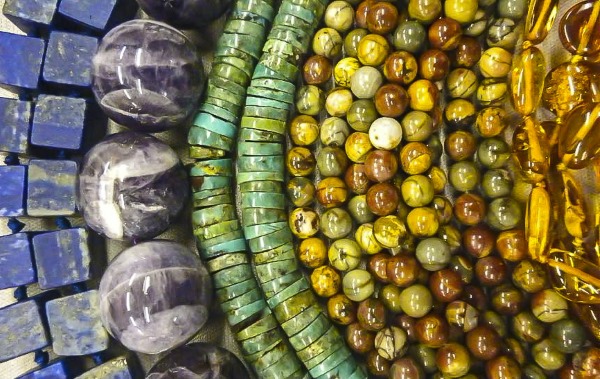
- Using natural stones to create beaded jewelry. It has been proven that each stone has certain healing properties. In addition, they can bring good luck to their owner.
Uniqueness of the craft material
Beading necklaces and chokers, the weaving patterns of which involve the use of beads with a combination of different materials, is within the power of a beginner to master.
The uniqueness of beads lies in their ability to be combined with:
- simple metal;
- tree;
- threads;
- fabrics;
- minerals and stones
- precious metals.
With its help, you can create many beautiful and original products. This will be expressed in the combination of colors and shapes. Color shades can sharply contrast with each other, but at the same time perfectly harmonize with each other.
The scope of application of beads is vast. They can be used in everything that is subject to human imagination (clothing, footwear, furniture, interior details, jewelry).
Additional materials for creating necklaces and beaded necklaces
To create a necklace or beaded necklace, first of all, you need to buy a manual with patterns for weaving them. Usually, they describe what materials are needed for crafts.
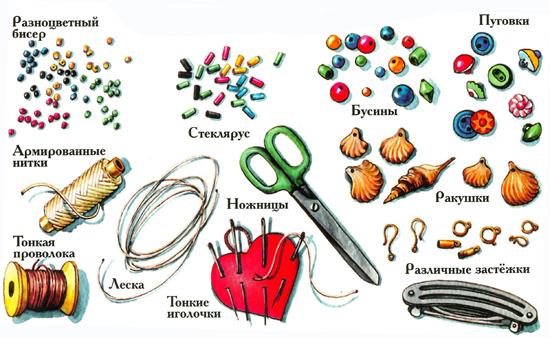
When weaving jewelry, you will need the following materials:
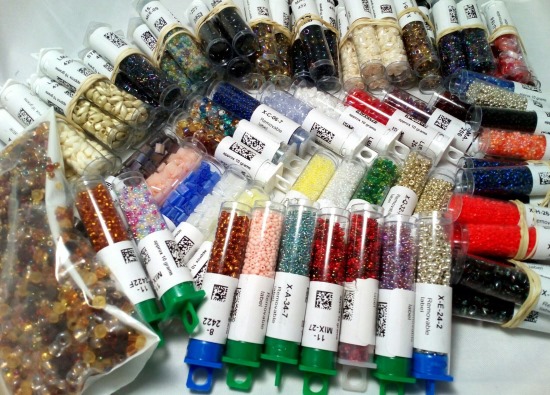
- beads, bugles, small and large beads, stones, crystals, rhinestones (if necessary to add sparkle to the product);
- fishing line, nylon thread, beading wire - the above-mentioned material will be strung on them;
- beading needle - its small thickness will allow you to work even with the smallest cuts (it is better to buy a package at once, as they are thin and break quickly);
- fastening accessories for jewelry – locks, rings, clamps, connectors, caps;
- pliers – help to attach fittings to the product;
- Round nose pliers – help to form loops;
- scissors;
- sewing pins;
- hook No. 1, No. 5.
How to choose quality beads
Beading necklaces and chokers, the weaving patterns of which are very diverse, requires a responsible approach to the selection of high-quality beads. The quality and appearance of the future product depend on this.
The most common beads are made of bone, glass or plastic. The highest quality of these is glass material. When buying beads, you need to look closely at the shape and size of the beads. They should be identical in the package, almost indistinguishable from each other and without chips.
It is also worth paying attention to the holes in the beads. They should be open and the same in diameter. Before buying, it is advisable to rub the beads in your hand. They should not leave traces of paint on the skin.
If you are planning to buy a large batch of beads, you can first take a small amount to try. You need to wrap the beads in a light-colored fabric and dip them in boiling water for a few minutes. If the craft material is good, it will not leave traces of paint on the fabric.
Beading of necklaces and chokers, the patterns of which will be presented further in the article, is best mastered immediately using high-quality material. Czech and Chinese beads are in the greatest demand on the market. Czech material is more expensive, but its quality is much higher. It is ideal for weaving jewelry.
Japanese beads are rightfully considered the highest quality material of all. With its help, you can create real masterpieces. It does not fade in the sun, does not crack, has an even and perfectly smooth shape. It also amazes with the variety of its color range.
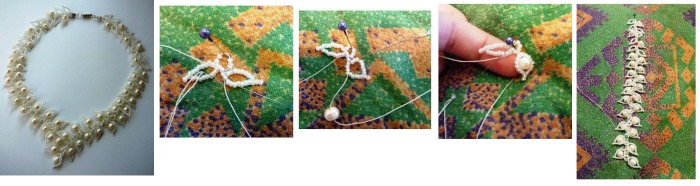
Necklace - braid
The materials needed to make the decoration are listed in the table.
| Materials | Quantity |
| Czech beads #10 (2 colors) | 1 pack each |
| fishing line 0.2 mm | 1 cat. |
| jewelry end caps | 2 pcs. |
| pins with loops | 2 pcs. |
| rings | 2 pcs. |
| glue | 1 pc. |
| lighter | 1 pc. |
| scissors | 1 pc. |
Step by step weaving of a necklace:
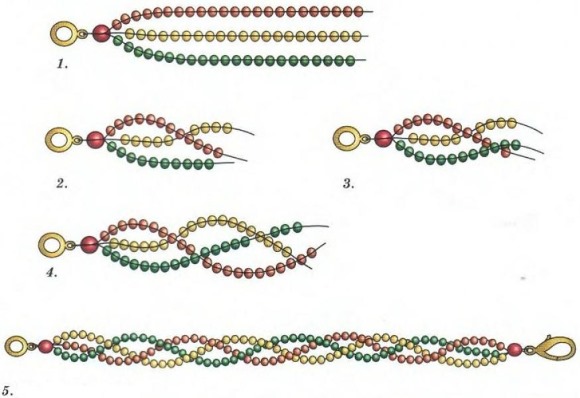
- First, you need to take 10 pieces of fishing line 70 cm long and string beads on each piece, leaving 10 cm tails on each side.
- The first and last beads need to be secured so that they do not fall off. To do this, you need to pass the fishing line through them 2 or 3 times.
- All 10 pieces of fishing line should be gathered together and then their ends are tied into a knot, which should be pushed as far as possible towards the beads and tightened.
- Next, you need to tighten the tails of the beaded necklace into a knot again, while re-tying them together.
- The excess ends of the fishing line must be cut off with scissors and then burned with a lighter.
- Then you need to open the loop of the pin or safety pin and hook the common line. Then, using pliers, you need to tighten the pin ring.
- Then you need to put the end cap on the pin, fixing it with glue for convenience.
- Next, the pin must be bent at a right angle as close to the end as possible. Then, using round-nose pliers, you need to make a loop.
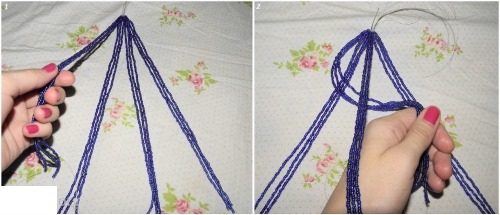


- The next step is to secure the necklace to the work area with tape. After that, all the threads with beads are divided into 5 strands (2 threads in each).
- Then the braid begins to be woven according to the pattern: the leftmost strand is passed under the next thread, and then it is passed over the next thread. the rightmost strand is passed over the previous thread, and then over the next strand. According to this pattern, the braid must be woven to the end.
- At the end, you need to remove the stop beads and remove all unnecessary beads so that the threads are the same length.
- Next, the last beads are passed through the fishing line 2-3 times so that the beads do not fall off it.
- Then the ends of the necklace are tied into a knot.
- The final step is to repeat the initial steps to make the loops. You need to insert the end piece into them, and then the clasp into it.
Bead weaving
The materials needed to weave the bead are listed in the table.
| Materials | Quantity |
| Czech beads #10 in 2 colors (white and brown) | 1 pack each |
| fishing line | 1 cat. |
| beading needles | 1 pack. |
| bead (12 mm) | 1 pc. |
| safety pin | 1 pc. |
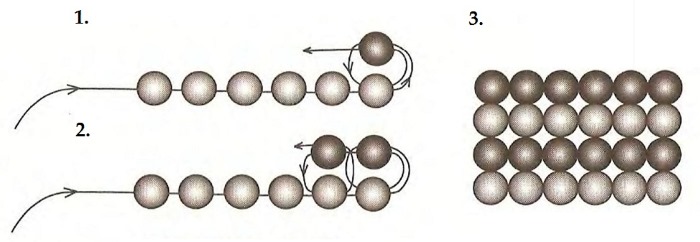
Step-by-step weaving of a bead:
- You need to put 4 white beads on the fishing line and then close them into a circle.
- Then in row No. 2, between each of the white beads, you need to weave in 1 brown bead.
- Next, you need to weave row #3. To do this, you need to take the needle out of the brown bead and string 2 white beads on it, passing the line at the end through the brown bead of the previous row.
- Next, you need to weave row #4. To do this, you need to pull the needle through the white bead of the previous row and put a brown bead on it.
- Next, take the bead that will be braided. Insert a pin into it and secure it with an elastic band.
- Then, through one bead, 2 rows of brown beads are woven.
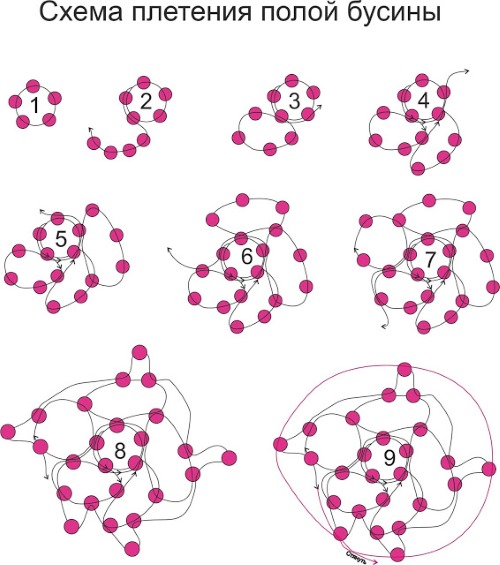
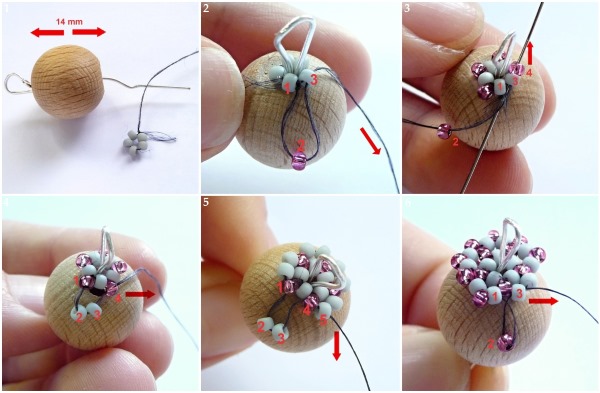
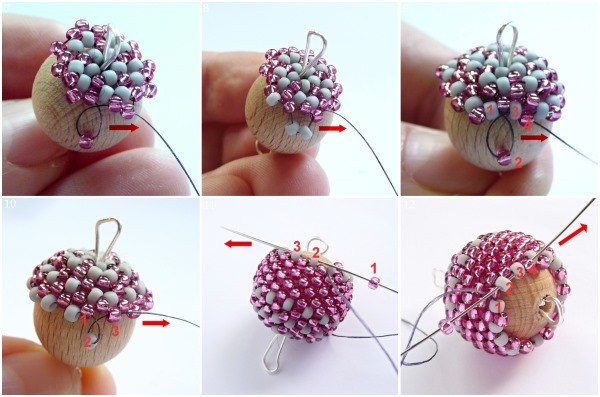

- Next, the bead needs to be braided according to the same pattern up to row 14, alternating white and brown beads.
- After this, row #15 needs to be woven according to the pattern: the needle needs to be pulled out through a white bead, then string 1 brown bead on it, and pull the needle out, threading it through 2 white beads at once. At the end of the bead, a woven square of brown beads will come out.
- In the last row, 4 more white beads are added between the brown beads of the previous row.
- At the end, the thread can be pulled out in two ways: either by pulling it through the braided bead, or by passing the needle through the beads 2-3 rows back.
- The last step is to cut off the remaining thread.
Mosaic technique
The materials needed for the mosaic weaving technique are listed in the table.
| Materials | Quantity |
| Czech beads #10 | 1 pack. |
| beading thread | 1 cat. |
| beading needle | 1 pack. |
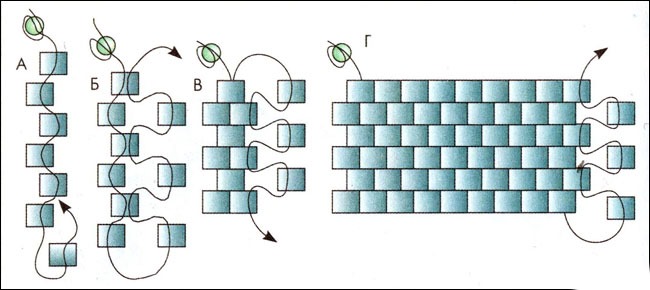
Step-by-step weaving in mosaic technique:
- You need to string an even number of beads onto the thread (approximately 20 pieces).
- Next, the empty needle without beads needs to be returned back, passing it through one bead.
- Then, on each “dropped” bead, you need to place 1 bead every other one.
- Next, you need to turn the needle in the opposite direction and, stringing one bead onto it at a time, pass them through one bead of the weave.
- As a result, you need to make the required number of rows to obtain a fabric of the desired size, made using this weaving technique.
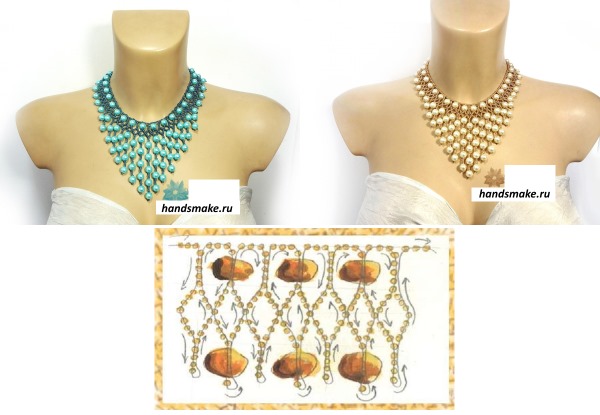
Necklace "Autumn"
The materials needed to make the Autumn necklace are presented in the table.
| Materials | Quantity |
| natural stone: jasper and bronzite (pendants) | 1 piece each |
| agate beads | 22 pcs. |
| Jasper beads | 10 pcs. |
| metal pendants in the form of openwork leaves | 25 pcs. (different shades) |
| beads #11 (dark gold) | 15 gr |
| beads #11 (brown translucent) | 5 gr |
| beads #15 (brown) | 0.5 g |
| beads chopped (brown) | 2 gr |
| glass beads (brown) | 3 gr |
| faceted czech beads | 21 pcs |
| Genuine Leather | |
| leaf toggle clasp | 1 pc. |
| nylon thread | 1 cat. |
| beading needles | 1 pack. |
Step-by-step weaving of the necklace "Autumn":
- You need to cut a piece of leather that is larger in size than the necklace element you are creating.
- You need to attach a jasper pendant to it and sew around it with dark gold colored beads.
- Next, the pendant needs to be braided using the “mosaic weaving” technique.
- First, 3 rows need to be woven with dark gold beads, and then, in the 4th row, brown beads should be used.
- Next, you need to use metal pendants as embroidery elements. They need to be secured at the base with beads and then stitched through the openwork elements with a thread that matches the skin tone.
- The leaves should be arranged so that the shape of the embroidery resembles a large leaf.
- Now, using brown translucent beads and faceted beads, you need to close the outline around the jasper that you braided, threading the needle through the protruding beads.
- The outline of the entire embroidery should be embroidered with dark gold beads.
- The next row requires placing glass beads at an angle to the main contour.
- The last outline is embroidered with brown beads.

- Then you need to cut out the resulting sheet, leaving 2 mm on each side.
- Using the resulting outline, you should cut out 2 more sheets. They should be made of leather and cardboard (1 piece of leather, 1 piece of cardboard 2-3 mm smaller than the previous sheet).
- Then they need to be glued together.
- Next, you need to sew the sheet along the edge, piercing both layers of leather with a needle and placing the beads so that they are parallel to the outer row of embroidery.
- Another sheet of a smaller size is made using the same method. Bronzite should be placed in the center, and chopped beads are used instead of glass beads.
- The resulting sheets are joined together using beads, agate beads and jasper.
- At the end there should be 3 metal pendants in the form of leaves. They also need to be sewn to the code and trimmed with beads.
- Next, they need to be attached to the bottom of the necklace.
- Then you need to weave 2 bundles using the "American weaving" technique. Their length should be 9 mm.
- You should string 4 brown and 4 gold beads onto the thread. Then you need to pass the needle back along the brown beads.
- Then you need to string 1 brown and 4 gold beads onto the thread and again pass the needle through the 3 brown beads that have already been strung and woven in and one brown bead that has been stringed.
- This step must be repeated until the desired length of the tourniquet is obtained.
- At one end of the cord, you need to secure a toggle clasp. At the other end of the cord, you need to connect the agate and jasper beads with the necklace element.
- You need to do the same with the second cord and add more beads to the top of the attachment of the sheets to each other so that the necklace fits better.
Solid weaving
The materials required for weaving a solid fabric are presented in the table.
| Materials | Quantity |
| beads of the same size | 1 pack. |
| nylon thread | 1 cat. |
Step-by-step creation of weaving using the “solid fabric” technique:
- You need to string 3 beads onto the thread and then distribute them across its center.
- On any side of the thread you need to pick up a connecting bead and thread the second side of the thread through it towards the first and pull both sides of the thread.
- Then, on one side of the thread, string 1 bead, and on the other side of the thread, string 2 beads.
- You need to thread the opposite side of the thread through the top bead and tighten it.
- Continue weaving until you reach the desired length of the weave.
- Next, the resulting chain needs to be turned at a right angle, and 2 beads should be strung onto the left thread, and 1 bead should be strung onto the right thread and both threads should be crossed in it.
- Next, you need to weave using the same technique, using the side beads of the previous row.
Weaving a necklace using embroidery
The materials needed to weave a necklace using the embroidery method are presented in the table.
| Materials | Quantity |
| purple felt | 1 pc. |
| soft skin | 0.5*0.5 m |
| beads #11 (iris) | 1 pack. |
| beads #8 (purple) | 1 pack. |
| twisted glass beads (purple) | 1 pack. |
| beads (purple) | 1 pack. |
| cabochon 13*16 mm | 1 pc. |
| cat eye beads 5*7 mm | 5 pcs. |
| toggle fastener | 2 pcs. |
| carabiner clasp | 1 pc. |
| bead thread (purple) | 1 cat. |
| beading needles #12 | 1 pack. |
Step-by-step creation of a necklace using embroidery:
- You need to draw a template of the future necklace on thick paper. Then you need to trace the resulting template with a toothpick on a sheet of felt and then cut it out.
- The embroidery of the necklace should start from the middle of the template.
- Attach the cabochon to the felt using glue. Sew purple beads around it using regular backstitches.
- The second circle of embroidery should consist of cat's eye beads and purple beads.
- Toggle clasps need to be sewn onto the ends of the necklace on both sides.
- From the center of the necklace you need to start embroidering the next 2 rows with glass beads.
- Next, you should decorate the bottom of the cabochon with No. 11 beads.
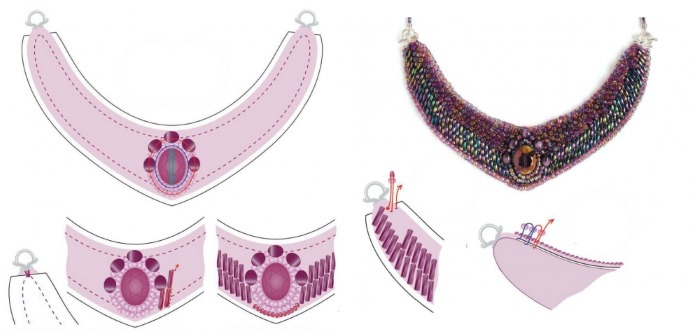
- The next step is to decorate the top of the necklace. To do this, you need to string 1 purple bead and 1 seed bead on the thread and then go back through the bead and finally through the felt.
- The entire necklace needs to be embroidered in this way.
- Next, cut out the shape of the necklace from the soft leather using the template. Then glue the resulting template to the back of the necklace and then stitch it with purple beads along the edge using the brick technique.
- The next step is to string beads and bugles onto the threads. They need to be secured to the necklace using toggle clasps.
- Next, a carabiner clasp is attached to the other ends of the thread.
Acrylic and Glass Bead Necklace: Master Class for Beginners
The materials needed to make the decoration are listed in the table.
| Materials | Size |
| Beige beads (6 pcs) | 16 mm |
| Beige beads (20 pcs) | 12 mm |
| several colors of glass faceted beads (about 95 pieces in total) | 6*4 mm |
| pins | 20 mm |
| jewelry rope | 1 m |
| round nose pliers | |
| pliers | |
| side cutters | |
| carabiner lock | |
| rings balls | |
| balls | |
| crimping clamps |
Step-by-step creation of a necklace:
- First, each faceted glass bead needs to be wound onto a pin (approximately 95 pcs.). This is done using round-nose pliers. They make double loops on the edges of the pins.
- Then, you need to attach 1 bead to one end of the jewelry rope. To do this, you need to thread the rope through it and wrap it around once.
- On the other side of the cable, a 16 mm bead is put on and after it, 15 faceted beads are strung on.
- Next, a large bead is strung again and pulled tight. The small beads form a "cluster".
- According to this pattern, the remaining large beads are strung and placed in the center of the rope.
- Next, remove the stop bead that was attached at the beginning of the weaving process.
- Then, 10 pcs. of 12 mm beads are strung on both sides of the rope.
- Next, the clasp is attached. To do this, the following sequence is put on one end of the cable: crimp, 3 mm ball, crimp, ball and ring.
- This same end, having passed through the ring, must be passed back through the balls and crimps.
- The rope is then pulled tight to form a 5mm loop.
- Next, the crimps are firmly clamped with pliers between the balls.
- The first 1-2 beads are passed through the end and the excess parts of the rope must be cut off with side cutters.
- The second end of the cable is again strung in the following sequence: crimp, 3 mm ball, crimp, ball and carabiner.
- This same end, having passed the carabiner, must be passed back through the balls and crimps, leaving a small loop.
- Then you need to tighten the cable again, clamp the crimps with round-nose pliers, pass the first 1-2 beads through and cut off the excess parts of the cable with side cutters.
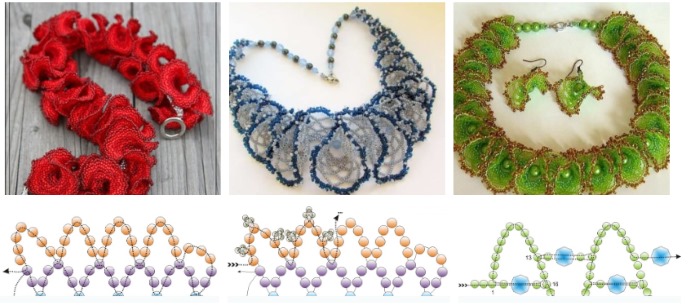
Beaded necklace "Blackberry"
The materials needed for weaving the necklace are presented in the table.
| Materials | Quantity |
| beads 10 mm (cream) | 13 pcs. |
| beads small (dark purple) | 360 pcs. |
| beads 7mm (purple) | 14 pcs. |
| bead thread | 1 cat. |
| beading needles | 1 pack. |
| lock | 1 pc. |
Step-by-step creation of the "Blackberry" necklace:
- You need to string 5 small beads on a thread. Then they should be tied tightly together to form a circle.
- The needle should be threaded through the nearest bead to hide the knot.
- Then you need to put 4 beads on the needle. From the back side, where the thread came out, you need to thread the needle into the bead. Then you need to thread the next bead with the needle.
- Next, you need to pick up 3 beads and then thread the closest bead from the central end and the bead from which the thread came out. As a result, a ring is formed.
- Next, thread the next bead through the central end and then again string 3 beads onto the needle. They are attached in the same way as the previous ring.
- The next ring is made using the same principle, but it is attached through the side bead from the first ring. As a result, you should get 3 beads standing in a row. Then you need to put 2 beads on the needle and thread 3 beads standing in a row. The thread should be pulled tight.
- Using an empty needle, thread the bead from which the thread came out, and string 3 beads onto the needle and thread it through the next 2 beads.
- Next, the next 2 beads are threaded with an empty needle and then 2 beads need to be threaded onto the needle. The next step is to pass the needle through the bead of the previous ring and through the 2 beads threaded with the needle before.
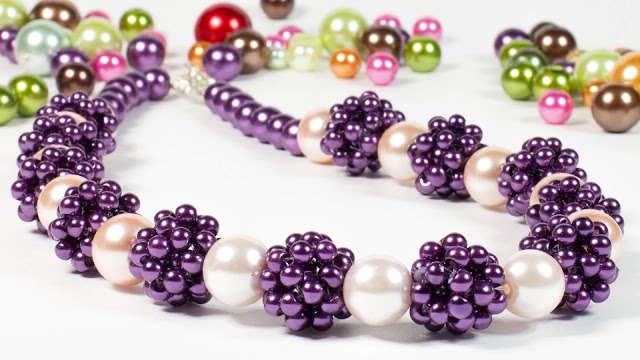
- Two more rings are made using the same principle.
- Then 3 beads are threaded with an empty needle, another bead is put on the needle and another bead is threaded into the weave.
- Next, the needle is threaded through all 5 upper beads and they need to be pulled tightly together.
- At the end, you can go over the beads where the thread is sagging or the beads are not tightly tightened. Then you need to tie a knot and cut the thread.
- You need to weave 13 of these “Blackberry” beads.
- You need to attach a lock to one end of the thread and then put on 7 pieces of 7 mm purple beads.
- Next, you need to start stringing the "Blackberry" beads onto the thread, alternating them with large beige beads. To make sure the thread is not visible in the blackberry, you can put 3 dark purple beads on it, which will help hide it and hide them in the woven blackberry.
- At the end, string 7 pieces of purple beads 7 mm again, then secure the carabiner and cut off the excess threads.
Necklace of beads and rondelles
The materials needed to weave the necklace are listed in the table.
| Materials | Quantity |
| Czech beads #10 (gold) | 1 pack. |
| rondel 3*4 mm | 1 pack. |
| beading line 0.17 mm | 1 cat. |
| connecting rings | 2 pcs. |
| lock | 1 pc. |
| chain | 1 pc. |
| beading needle | 1 pc. |
| pliers | 1 pc. |
Step-by-step creation of the necklace:
- You need to cut 2 m of fishing line, thread a needle through it and string 10 beads on the fishing line. Then you need to lower them almost to the end of the fishing line and enter the needle into the first bead, tightening the fishing line. You should get a loop on which you need to make several knots to secure the fishing line, cutting off the excess fishing line.
- Next, 2 beads, 1 rondel and 5 beads are threaded onto the needle. On the ring where the fishing line came out, you need to count 3 beads and then enter the third bead with the needle.
- The subsequent weaving should be done according to the pattern, so as not to get confused:
- string 6 beads - go through the third;
- string 9 beads, 1 rondel and 3 beads - go through the third of these;
- string 5 beads - go through the third;
- string 6 beads - go through the third;
- string 5 beads - go through the third;
- string 6 beads, 1 rondel and 3 beads – go into the third from the rondel;
- string 5 beads - go through the third;
- string 5 beads - go through the third;
- string 6 beads - go through the third;
- string 5 beads - go through the third;
- string 3 beads, 1 rondel and 3 beads – pass through the third;
- string 5 beads - go through the third;
- string 6 beads - go through the third;
- string 3 beads, 1 rondel and 5 beads – pass through the third;
- string 6 beads - go through the third;
- The first element of the necklace is ready.
- All other elements of the necklace are woven according to the same pattern. There should be 17 pieces in total.
- After the last element, you need to make a bead loop, as was done at the beginning.
- Then you need to cut 1 m of fishing line, thread it into the needle and pull the needle through the first 3-4 beads of the top row of the first element. Then the needle is threaded back to the beginning of the fishing line along the row located below. At the end, the fishing line is fixed with a knot.
- In random order, you need to reach the right bead of the central rhombus of the element with the needle to insert the rondel into it.
- After pulling out the fishing line, you need to string the rondel and pull the needle out into the left bead of the rhombus.
- Rondels are inserted into the remaining elements of the necklace using the same principle.
- Next, the connecting ring is opened with pliers and inserted together with the chain into the outer bead loop.
- The same ring and lock are inserted into the loop on the opposite side.
- The rings are clamped with pliers.
Necklace "Cascade"
The materials needed to weave the "Cascade" necklace are listed in the table.
| Materials | Quantity |
| Czech beads | 1 pack. |
| beads | 1 pack. |
| bead spacers | 1 pack. |
| bead caps | 1 pack. |
| crimps | 4 pcs. |
| crimp carpets | 4 pcs. |
| cable protection | 4 pcs. |
| lock | 1 pc. |
| jump rings |
|
| round nose pliers | 1 pc. |
| pliers | 1 pc. |
| nippers | 1 pc. |
| platypuses | 1 pc. |
| jewelry rope | 60 cm |
| pins for assembling jewelry | 2 pcs. |
Step-by-step weaving of the "Cascade" necklace:
- The jewelry cable needs to be divided into 2 equal parts, then the end inserted into the crimp, then into the protector and back into the crimp in reverse.
- Then, using pliers, you need to clamp the crimp tightly, having first secured the end of the cable.
- Next, you need to cover the flattened crimp with a crimp carpet and then clamp it with pliers or duckbill pliers.
- The same is done with the other part of the cable.
- Next, a lock must be secured to the end of one cable using a split ring, and a non-split ring must be secured to the end of the second cable.
- Then you should start threading the beads.
- Large beads should be symmetrically placed on both parts of the rope, alternating them with bead spacers.
- Next, the beads need to be framed with caps. Then they need to be inserted into one of the holes of the beads with two holes, alternating with beads and spacers.
- The ends are secured as at the beginning, and the end of the rope is passed backwards through the beads and seed beads.
- Then a large round bead is threaded through the pin, and loops need to be twisted at the 2 ends using round-nose pliers.
- The next step is to put a long bead on a pin with a cap on the end, framing them with caps. Then twist the end with round-nose pliers and connect it to the round bead, forming a pendant.
- At the end, you need to connect the suspension with a large split ring.
Necklace in Ogalala technique
The materials needed to make jewelry using this technique are presented in the table.
| Materials | Quantity |
| Czech beads #10 | 1 pack. |
| beads | 40-50 pcs. |
| beading thread | 1 cat. |
| beading needle | 1 pack. |
| scissors | 1 pc. |
| clasp | 1 pc. |
| rings for connection | 2 pcs. |
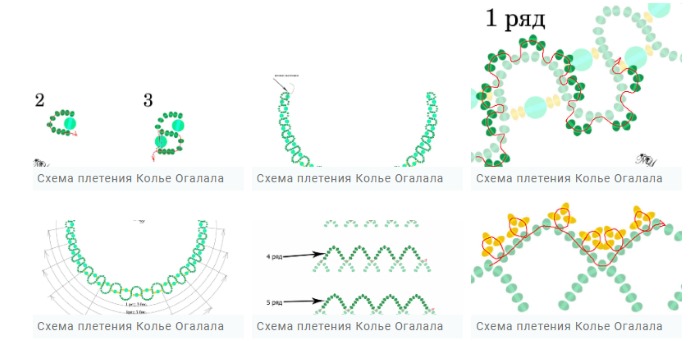
Step-by-step creation of a necklace using the Ogalala technique:
- To get a necklace 45 cm long, you need to weave 1 row 65 cm long.
- To do this, you need to fix the first bead and then you need to string the beads onto the thread to the desired length.
- In the 2nd row, for every 2 beads of row #1, there should be 3 beads of row #2. In row #3 there should be 5 beads, and in row #4 there should be 7 beads.
- Next, in the fifth row, you need to weave the fringe.
- The next step is to sew the resulting elements. They need to be sewn along the first row. At the same time, it is necessary to ensure that the necklace does not turn over.
- The final step is to attach rings to both sides of the thread to connect it, securing a clasp on one side.
Beading is an amazing type of handicraft. Necklaces and beaded necklaces can be woven using simple patterns for beginners, as well as more complex ones for experienced craftsmen. These decorations are unique, they can give a sense of confidence and beauty, refresh any image and add femininity to it.
Article formatting:Natalie Podolskaya
Video about beading
Beading necklaces and chokers - patterns:
The weaving pattern of the "Cascade" necklace does not correspond to the weaving description
I really liked your work. I will try to make it. I have a stoma (it is a hole in the neck). And I hope that I will be able to close the hole with such a necklace.
Thank you. I will definitely look at your work. I wish you creative success.