Making Christmas tree decorations with your own hands is not only a significant saving, but also an exciting creative process. There are many simple and unique ideas for decorations from scrap materials - you can choose the most suitable one and bring it to life.
Materials and tools
To make your own jewelry, you can use the following materials:
- yarn for knitting, sewing threads;
- plastic and metal lids;
- postcards;
- newspapers;
- cotton wool;
- ribbons;
- braid;
- lace;
- cords;
- buttons;
- beads;
- beads;
- glass beads;
- textile;
- felt;
- decorative mesh;
- tulle;
- foil;
- colored paper;
- cardboard;
- lamps;
- cones;
- wire;
- polystyrene foam;
- plastic bottles.
The choice of materials depends on the specific type of toy and its shape.
The tools that are most often used in the process of creating New Year's toys:
- scotch;
- glue;
- hot melt glue;
- scissors;
- stationery knife;
- simple pencil;
- gouache paints;
- acrylic paints;
- brushes;
- ruler;
- compass;
- figured stencils;
- hole punch;
- stapler.
The choice of tools depends on the type of material you have to work with.
General principles
It is very easy to make Christmas tree decorations with your own hands from scrap materials. But there are still principles for making New Year's decorations yourself.
The general principles are as follows:
| Uniform style | The set of toys should be maintained in one style: this could be a certain shape, color scheme or theme. A Christmas tree decorated with such toys will look original and interesting, not too colorful and old-fashioned. |
| Small size | You don't need to make Christmas decorations too big. Such toys will look unsightly and untidy on the tree.
The optimal size is 5-12 cm, depending on the height and width of the tree itself. |
| Loop | When making decorations yourself, you need to think about the presence and location of the loop in time. The toy must hang on the branch, hooked by the loop.
It is not possible to place jewelry resting on needles: they will constantly shift or fall. |
DIY Christmas tree toy made from bottle caps and postcards
Lids of any diameter can be used to create original round toys with pictures.
In addition to 2 caps of the same diameter and color, to make a round pendant you will need:
- pictures from postcards or books;
- a piece of tinsel;
- thin ribbon or decorative cord for the loop;
- a piece of lace or tape to be applied to the seam;
- decorative elements for design;
- simple pencil;
- scissors;
- glue.
Step-by-step description of the manufacturing process:
- Each lid should be attached to the picture you like, draw a circle on the card and cut it out.
- Apply glue along the contour of the lids and attach pictures to it, which are then framed with tinsel.

- Both lids need to be glued together from the back using hot glue or super glue. Before attaching one lid to the other, you should insert a thin ribbon or cord between them for a loop.
- The place where the lids are attached needs to be hidden using a piece of tape or lace and glue.
- At the end, you can decorate the toy with decorative elements: pine cones, beads, buttons, and others.
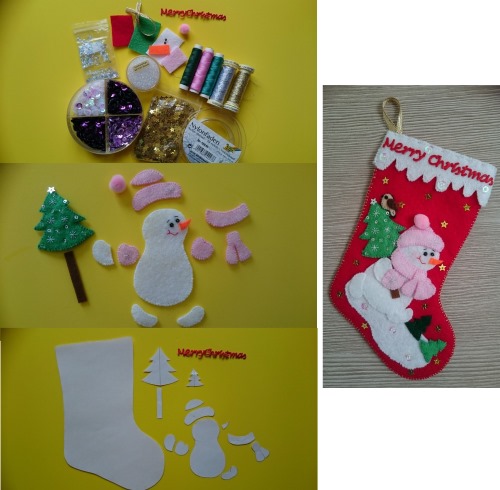
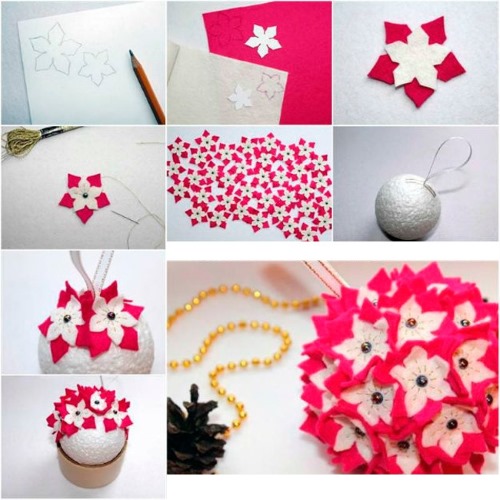
Felt Christmas tree decorations
Felt is an affordable and easy-to-process material, making things from which is a pleasure. Felt toys are bright and cozy. The main principle of making any felt figurine is that first a pattern of all the parts is prepared, which is then transferred to felt. The cut out elements need to be sewn together, gradually adding them to the base.
The main New Year character, Father Frost, is made from felt very simply.
You will need the following materials and tools:
- felt in red, white and beige colors;
- cord or tape;
- black, red and white sewing threads;
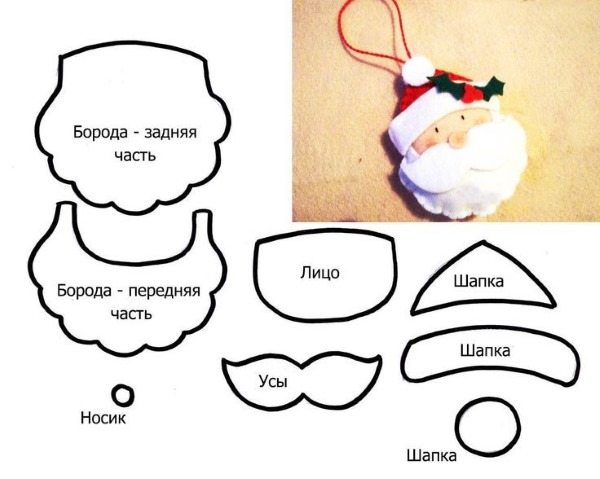
- needle;
- scissors;
- simple pencil.
The toy is made as follows:
- First, the template parts need to be transferred to felt and cut out. You should get 2 of each hat part, 1 of the other parts.
- The basis will be the face and the front part of the beard: they need to be sewn together with a regular seam.
- You need to embroider the eyes on the face with black threads, and sew on the nose and mustache with beige and white threads.
- After this, you should sew the back of the beard to the base with a loop stitch through the edge, leaving the upper part of the face unsewn for stuffing.
- The hat pieces need to be divided into threes: triangle, fur, and pompom. Each three should be sewn together to make two halves of the hat.
- Now the character's head needs to be stuffed with a small amount of padding polyester, and then sewn onto each half of the hat on the corresponding side using a regular stitch.
- Finally, fill the hat with padding polyester and sew its 2 parts together with a loop stitch over the edge, not forgetting to insert a loop between the two pompoms.
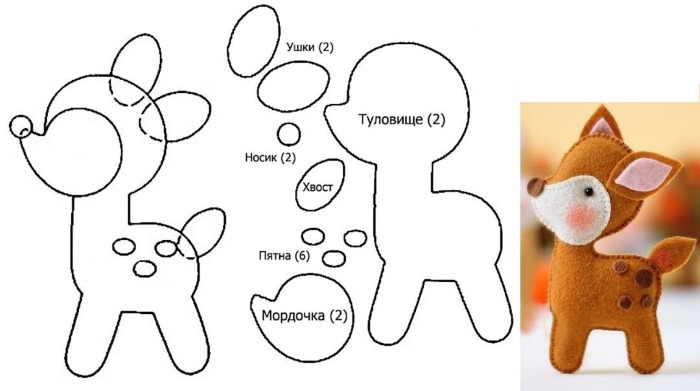
A cute little deer will make a good company for the felt Santa Claus on the Christmas tree. The materials and tools you need to prepare are the same as for the previous toy (only the felt and threads should be taken in different colors). Additionally, you will need 2 small black beads for the eyes.
How to make a deer:
- First, you need to cut out all the template parts from felt in the quantity indicated in the diagram.
- Next, you need to assemble each side of the figure: sew small parts (except for the tail) and beads to each part of the base – the body.
- After this, you need to sew both parts of the body with a loop stitch through the edge, leaving an opening for stuffing. When sewing, it is important not to forget to insert a loop so that the toy can be hung on the Christmas tree.
- After stuffing the figure with synthetic padding, you need to sew up the hole with a loop stitch over the edge.
A mini-tree on a large beauty of the same name – a guest of every New Year's holiday – looks original and beautiful. You can make a felt tree of any shape by choosing the right template. Decorative elements are used at the discretion of the master: beads, figurines, buttons and others.
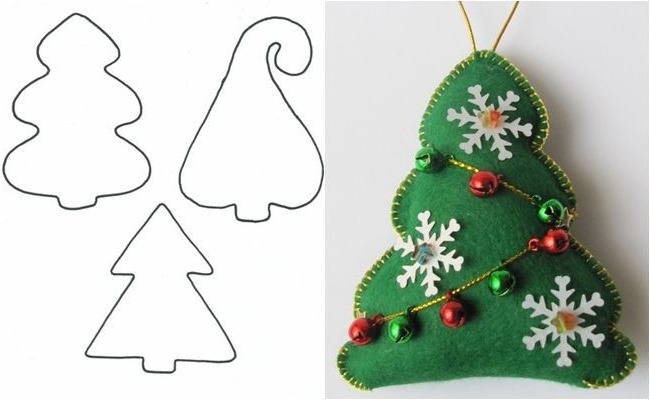
The tree is made very simply and quickly:
- First you need to cut out 2 parts for the Christmas tree from felt using a paper template.
- Each base piece needs to be decorated with decorative elements, sewn on the front side.
- After this, you need to sew the base parts together with a loop stitch through the edge, leaving an opening at the top of the tree.
- The tree should be stuffed with filler, then the hole should be sewn up, not forgetting to insert a loop.
Made of fabric
Anyone can make DIY Christmas tree decorations from scrap materials, such as fabric and various decorative elements. It is advisable to use a sewing machine for this, but if you don’t have one, you can sew the toys by hand.
Any available fabric can be used:
- fleece;
- plush;
- cotton;
- polyester;
- lace;
- flannel;
- tale.
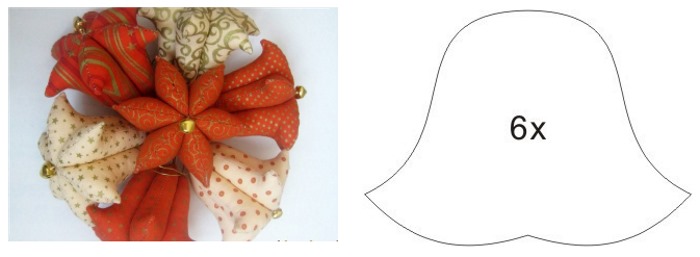
You can sew voluminous bells from thick fabric, such as flannel or cotton.
To make it you will need:
- a piece of fabric of the required size;
- loop;
- metal ringing tambourine;
- stuffing material;
- fabric chalk;
- scissors;
- sewing machine or needle;
- sewing threads.
How to make a volumetric bell:
- Using the template, you need to cut out 6 identical pieces and sew each pair together from the wrong side. When sewing, it is important not to forget to leave a small opening at each edge for turning and stuffing.
- Next, all 3 obtained bases should be turned to the front side of the fabric and folded on top of each other. After this, it is necessary to make a common line in the center, fastening all 3 bases. At this stage, it is important not to forget to sew a loop on top of the toy.
- Finally, you need to stuff each of the 6 sides of the bell with stuffing and sew up the holes with a blind stitch, then sew on a small tambourine.
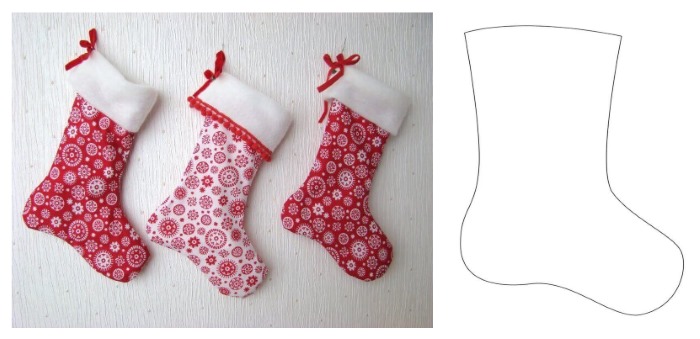
A New Year's boot is not only a beautiful Christmas tree decoration, but also a place to store small surprises.
To make it you will need the following materials and tools:
- thick fabric for the outside of the toy;
- thin fabric for lining;
- loops;
- filler (thick soft fabric);
- scissors;
- fabric chalk;
- pins;
- sewing threads to match the fabric;
- sewing machine or needle.
How to sew a boot:
- First, you need to make a pattern according to the template of the required size. You should get 2 parts for the outer side of the toy, 2 parts for the inner side and 1 filler part. It is important to ensure that each pair of parts is a mirror image.
- Now you need to sweep the blanks. To do this, you should fasten the front outer part of the boot with pins with filler, then go along the edge with large stitches.
- Next, you need to sew the front outer part of the boot with the lining piece along the top edge, stepping back 1 cm from the top.
- The same should be done with the back outer part of the boot and the second lining piece, having first sewn a loop to the lining.
- It is necessary to fold the blanks as follows: lining to lining, front to back with outer sides. The seam should be secured with pins. It turns out as if 2 boots are secured at the top: one from lining fabric, the other from dense.
- Now you need to make a line around the entire perimeter of the boot, not forgetting to leave an opening in the lining.
- The boot should be turned inside out through the hole left in the lining. After that, the lining should be tucked in.
- You can fold the top of the boot and decorate the toy with various decorative elements or fabric of other colors.
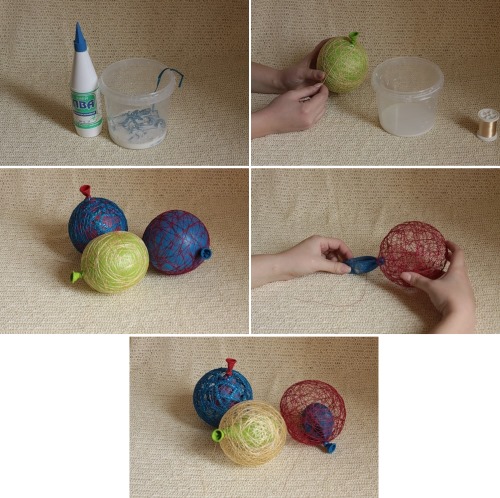
From threads and glue
Mouline, iris, wool and other knitting or embroidery threads are great materials for making your own Christmas balls. The most important thing is to have good PVA glue on hand, because without it, you won’t be able to make decorations. Balls are made from threads of one or several colors – it depends on the personal preferences of the craftsman.
They can be decorated with various details:
- beads;
- rhinestones;
- lace;
- with tape;
- ribbons;
- pieces of tulle;
- bows.
To make the balls you will need the following tools and materials:
- threads;
- PVA glue;
- small bowl;
- inflatable ball;
- needle;
- loop;
- needle.
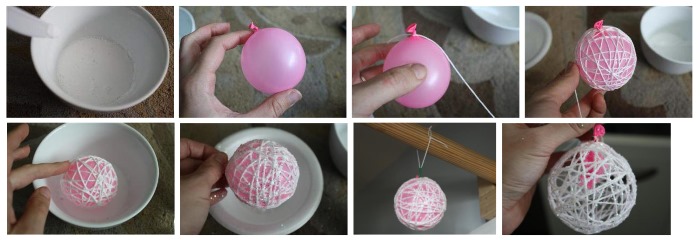
Stages of making a toy:
- The glue must be poured from the bottle into a bowl, then add a little water to it and mix. The threads unwound from the ball should be placed in this mass for 5 minutes.
- The balloon needs to be inflated to the required size and the hole tied. After that, the balloon needs to be wrapped with threads. The number of layers is up to the artist. The fewer the layers, the lighter the web will be, the more – the denser. The threads need to be dried for a day.
- When the threads soaked in glue dry, the ball must be pierced with a needle and carefully pulled out through the threads. A loop must be attached to the top, after which the toy can be decorated with decorative elements.
From newspaper tubes
DIY Christmas tree decorations from scrap materials, the simplest and most accessible of which is newspaper - unique products that are not at all difficult to create.
To do this you will need:
- cardboard base of any shape (star, Christmas tree, house, etc.);
- newspaper sheets;
- paint of the desired colors;
- foam sponge;
- loop.
Manufacturing process:
- First, you need to make tubes from newspapers. To do this, you need to cut newspaper sheets into strips 5 cm wide and wind each one onto a knitting needle or wooden skewer at an angle of 45 degrees. Periodically, you should coat the strip with glue so that the tube holds its shape better and does not unroll.
- Next, you need to cut out the base of the toy from very thick cardboard. The contours of the base should be rounded so that the tubes fit better on the figure. The surface of the base should be painted in the color that the toy will be painted in.
- You should start wrapping the base with newspaper tubes from the narrower part. During the wrapping process, it is important to ensure that the tube does not lie on the same place several times, and that there are no pronounced irregularities on the figure. If one tube ends, you need to attach another one to it using glue.
- Once the winding is complete, the finished product should be covered with paint using a small piece of foam sponge. Finally, a loop should be attached to the toy.
Christmas tree toy made from a light bulb
Non-working light bulbs can serve as the basis for an original Christmas tree toy. There are many options for making decorations: from simple painting to complex decoration with volumetric elements.
You can make any figurine:
- Christmas tree ball;
- snowman;
- Father Frost;
- penguin;
- cone.
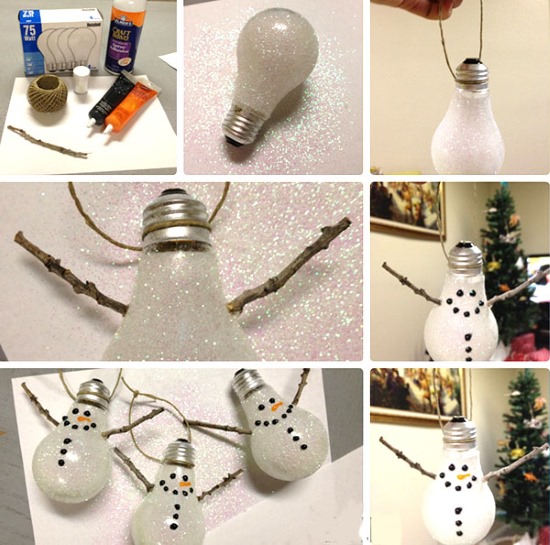
The choice of figurine depends on the shape of the bulb and the imagination of the craftsman. The simplest version of a glass Christmas tree toy is a penguin made from an incandescent bulb.
To make the toy you will need the following materials and tools:
- 1 light bulb;
- gouache (can be replaced with acrylic);
- brushes of different sizes;
- cord or ribbon for the loop;
- hat and scarf made of fabric or yarn;
- hot glue gun.
The process of making a penguin:
- The bulb should be covered with black and white paint in accordance with the penguin's coloring. The back area should be painted black, and the muzzle and belly area should be painted white. If desired, the coloring can be complicated: make arcs above the eyes, and draw flippers in the middle.
- After the paint dries, you need to draw the muzzle: eyes and nose, using a thin brush. It will be convenient to work with the light bulb if you put it on the neck of some can or on a toilet paper roll.
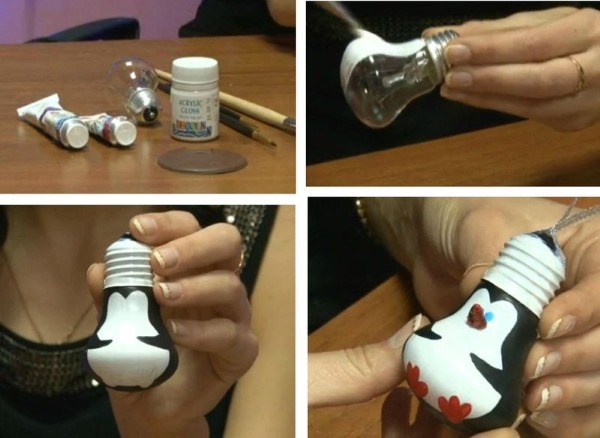
- Using hot glue, attach a loop to the top of the cartridge, which should then be threaded through the hat. Next, attach the top of the hat with a thin ribbon or cord, tying it into a bow. The penguin's neck should be tied with a scarf and secured with glue.
New Year's balls made of foam plastic
Foam balls of any size, decorated with various decorative elements, look very beautiful on the Christmas tree.
Decorative elements can be as follows:
- beads;
- rhinestones;
- small stones;
- sequins;
- buttons;
- flowers.
You can also combine the listed options with a ribbon or tape. You can attach decorative elements in two ways: with hot glue or with safety pins.
To make a Christmas tree ball from foam and sequins, you will need the following materials and tools:
- foam blank of the required shape;
- sequins;
- safety pins;
- loop;
- hot melt glue.

Manufacturing process:
- Before you start decorating the ball with sequins, you need to attach a loop to the foam blank using hot glue.
- Sequins should be placed on a safety pin and attached to the foam base in an overlapping manner.
- You need to start decorating from the bottom of the workpiece, moving in a spiral upward and hiding the loop.
Christmas tree toy made of beads
A stylish New Year's decoration will be a Christmas tree made of large beads, which is incredibly easy to make. You can use both green and other colored beads, as well as beads of different sizes.
The only strict requirement is that the wire must be dense and retain its shape well.
This is necessary so that the tree suspended by the loop does not stretch. If there is only thin wire, it must be twisted into 2 layers.
Materials and tools:
- a piece of wire of the required length;
- beads and beads of the required colors;
- a piece of satin ribbon;
- satin ribbon bow;
- a coin or some small figure to make the toy heavier.
Manufacturing process:
- The beads must be strung onto the wire from the bottom up, making inclusions of other colors between the green beads and periodically stringing beads.
- The last bead should be yellow or gold instead of the star on top. A small edge of the wire should be left free - it should be bent and hidden, passing through the outer bead and making 2-3 turns between the bead and the next bead.
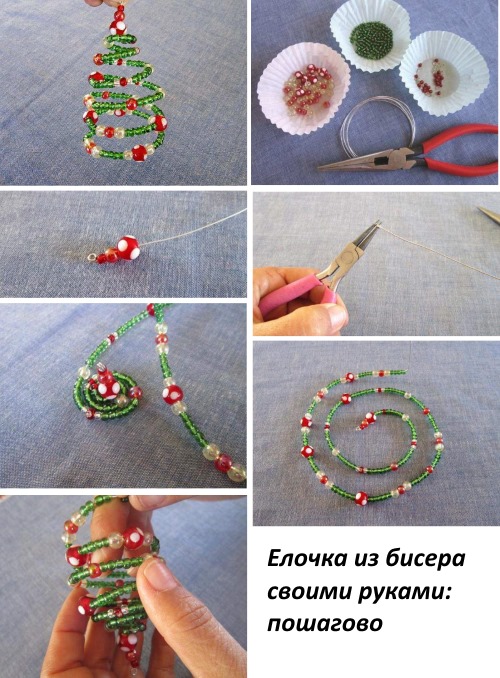
- The satin ribbon must be passed through the loop formed by bending the wire. A coin should be glued to one end of the ribbon, which is located at the bottom, at the base of the tree. The other end should be bent to the top bead and secured with glue. The joint should be hidden with a ribbon bow.
From plastic bottles
DIY Christmas tree decorations made from scrap materials, such as plastic bottles, are a great idea not only for decorating a home tree, but also an outdoor tree. Such decorations are easy and quick to make because the material is easy to process. They are resistant to moisture and temperature changes, so they will not be damaged by rain, snow or wind.
The simplest version of New Year's decoration from plastic bottles is a snowflake. Bottles of any size are suitable for their creation. For 1 snowflake you will need 1 plastic bottle.
For work you will need the following materials and tools:
- plastic bottles;
- acrylic paints of the desired colors (can be replaced with water-based paints);
- brushes of different sizes;
- glitter gel or glue;
- beads, fancy buttons or large rhinestones;
- loop;
- thick needle;
- super glue;
- stationery knife.
How to make a snowflake from a plastic bottle:
- The bottle should be placed horizontally on the table, then cut off its bottom using a stationery knife. You need to cut as close to the bends as possible - this way the snowflake will be thin and beautiful.
- Using a thin brush, you need to draw a pattern on the front (convex) side of the workpiece. Using a thick brush, you can paint the snowflake on the back side.
- Attach a decoration - a bead or a rhinestone - to the center of the snowflake using super glue. Make a small hole on top with a thick needle and pass a loop through it, tying it on the inside of the snowflake with a knot and fixing it with glue.
New Year's decorations made of paper
Paper is the most accessible material for making New Year's decorations. There are a huge number of options for toys made from different types of paper using simple and complex techniques. One of the most popular paper toys, which has an original look and a simple manufacturing method, is a lantern made from colored paper.
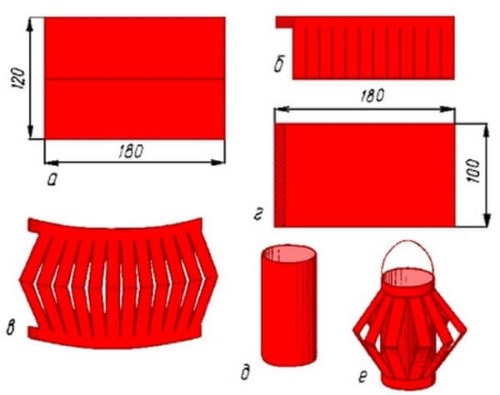
To create such a flashlight you will need the most accessible materials and tools:
- a sheet of colored paper of the required shade;
- ruler;
- pencil;
- scissors;
- PVA glue or pencil;
- thin cord.
The process of making a lantern:
- Using a ruler and a simple pencil, you need to draw a rectangle with sides of 12 and 18 cm on a sheet of colored paper, then cut it out.
- The rectangle needs to be folded in half horizontally: it should turn into a strip. At equal intervals, draw stripes with a pencil, leaving 5 mm to the edge.
- Next, you need to use scissors to make cuts along the strips, after which the rectangle should be unfolded.
- From paper of the same or a different color, you need to cut out a rectangle of a smaller size - with sides of 10 and 18 cm.
- The new rectangle needs to be rolled into a tube and the edges secured with glue.
- Having treated the edges of 1 part of the lantern with glue, you need to glue it to the rectangle rolled into a tube.
- Finally, you need to cut a thin strip of paper and glue it to the inside of the lantern to make a handle. A string should be tied to the handle, which you can use to hang the lantern on the tree.
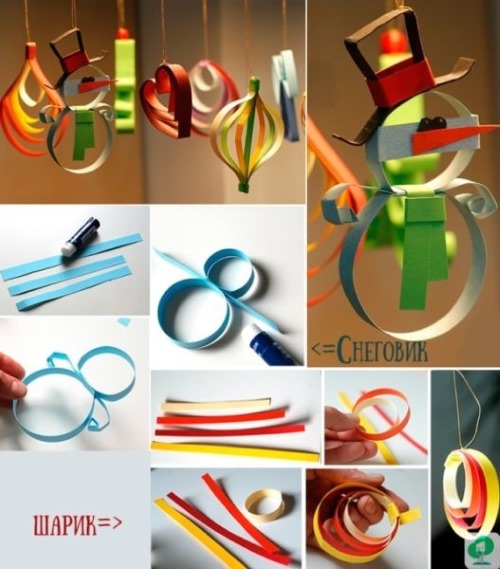
It is no less easy to make a snowman and a ball from strips of colored paper of any width.
To make paper toys you will need:
- sheets of colored paper of the required shades;
- glue stick;
- ruler;
- simple pencil;
- thin cord for the loop.
The snowman is created in the following sequence of actions:
- From a sheet of blue colored paper you need to cut out 3 strips: 2 identical and 1 2-4 cm longer.
- The longest strip should be rolled into a circle and the ends secured with glue.
- To the resulting circle you need to glue a small straight strip and the same strip, folded into a smaller circle.
- The straight strip between the 2 circles are the snowman's arms, which need to be folded over to give them any shape.
- Next, make a hat from a strip of brown paper with flowers, simply bending it in several places and fastening it horizontally with a small strip.
- You can make a scarf from a strip of paper of green or any other color by wrapping it around the place where the 2 parts of the snowman are connected and fastening it with a small strip of the same color.
- To make a snowman's face, you need to cut out a strip, the length of which should be slightly larger than its diameter. This strip should be glued to 2 opposite walls of the circle, and eyes and a triangular nose should be attached to it.
- A thin cord must be tied to the snowman's hat, which will be used to attach the toy to the tree.
A ball made from paper strips is created even easier and faster:
- It is necessary to cut out 4 strips of different lengths from colored paper of different shades.
- Each strip should be rolled into a circle and the edges glued together.
- The circles must be glued together at the seam, placing one inside the other.
- For additional fixation, the gluing area should be wrapped with a paper strip coated with glue. First, you need to thread a cord for the loop between the strip and the ball.
New Year's toy made of cotton wool
Cotton wool Christmas tree decorations are soft and fluffy items of various shapes that will help make your tree even cozier and more elegant. Making them yourself is not as difficult as it may seem at first. In addition to cotton wool, in the process of creating the figures, craftsmen use such improvised materials as foil, napkins, salt dough and others.
To make a simple New Year's decoration from cotton wool in the shape of an apple, you will need:
- cotton wool;
- 80 cm foil;
- awl;
- wet wipes;
- Moment glue;
- PVA glue;
- a small piece of dry branch;
- medium volume brush;
- watercolor paints;
- loop;
- scissors;
- glass of water.
How to make an apple from cotton wool:
- A piece of food foil of the specified size must be crumpled into a tight ball, shaped like an apple.
- The surface of the resulting figure should be carefully smoothed out from unevenness, after which you need to pierce the middle of the ball with an awl.
- Using the handle of the brush, you need to form a fairly wide and deep hole in the hole.
- The wet napkin should be cut into 2 squares and a foil ball should be placed in the center of one of them. After folding the edges, use an awl to stick them into the hole.
- The hole should be formed again with the handle of the brush, after which it should be filled with super glue and a piece of dry branch should be inserted.
- A piece of cotton wool needs to be smoothed out into a rectangle, the size of which corresponds to the foil ball. Then a thick layer of PVA glue needs to be applied to the cotton wool and the apple.
- An apple should be placed in the middle of a piece of cotton wool. The ball should be wrapped with cotton wool, gluing it to it and smoothing out any unevenness with your fingers. The cotton wool should also be coated with glue on top so that the figure holds its shape better.
- After gluing the cotton wool, you should firmly compact the surface of the cotton wool with your fingers.
- Now you need to wet the brush with water and paints of the desired colors and paint the apple.
- At the end, make a leaf and a loop. To make a leaf, cut a strip with a side of 1.5 cm from the remaining square of wet napkin. It must be tightly tied to a branch of fruit and cut in the shape of a leaf.
- Both parts of the napkin need to be glued together, not forgetting to insert a loop between them, after which the leaf is painted green.
Using the same principle, you can create Christmas tree decorations of various shapes.
Snowman from a sock
A cute snowman made from a sock will decorate your home for the holiday and help create a New Year's mood. When creating a toy, it is necessary to take into account that the Christmas tree snowman should be small in size.
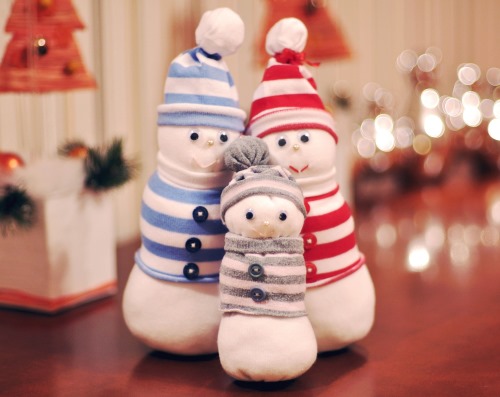
You can make it from a child's sock, and it is advisable to fill it not with rice, but with synthetic padding or holofiber. Snowmen made from large socks will look great under the Christmas tree and on the table, such toys are filled with rice, which makes them more stable.
Materials and tools needed to make a snowman:
- white cotton sock;
- colored terry sock;
- filler;
- scissors;
- 2-3 buttons;
- white yarn;
- a piece of black yarn for the mouth;
- beads for eyes and nose;
- strip of fabric for a scarf;
- hot melt glue;
- needle and white sewing thread.
Manufacturing process:
- From a white sock, you need to cut off part of the foot up to the heel.
- You should fill this part with rice (or put some soft filling), leaving a little free space to the top.
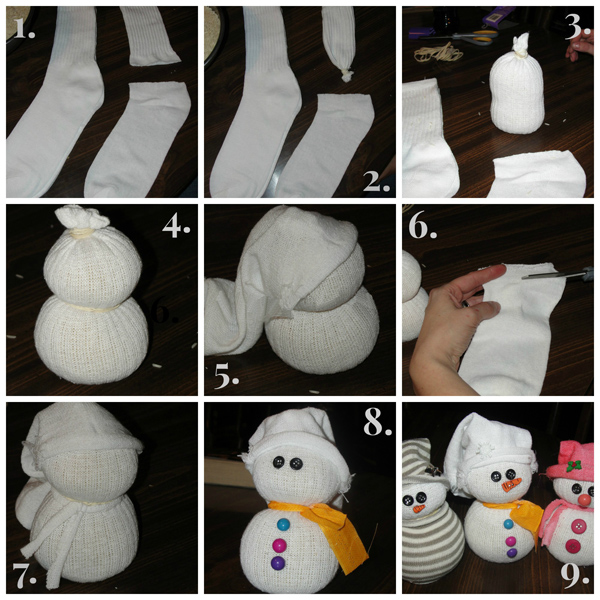
- The top of the filled part needs to be stitched with large stitches, then the thread should be pulled tight and a knot should be tied.
- Using a piece of white yarn, tie the sock around about the middle, leaving more filling at the bottom of the snowman.
- The top of the terry sock should be cut off and set aside. Then the heel and toe should be cut off from the remaining part of the foot.
- The bottom of the terry sock should be finished with a line of blind stitches along the edge on both sides so that the terry does not unravel - you get a sweater for a toy.
- The top of the sock must be turned inside out and the edge opposite the elastic must be sewn with regular stitches. Then the workpiece must be turned inside out – you will have a square hat.
- From white yarn you need to make 2 small pompoms, which you need to decorate the hat with by sewing them to the corners.
- The blouse and hat should be put on the snowman, then buttons should be sewn onto the clothes. The eyes, nose and mouth are glued to the figure's face with hot glue.
- A scarf can be made from a strip of knitted fabric by cutting the ends of the strip on both sides. The scarf should be tied around the snowman's head, hiding the thread separating it from the body.
Decorating a New Year tree with your own hands is a simple and very exciting creative process. From a large number of options for Christmas tree decorations, you can choose the most suitable one and create original decorations from materials that are at hand.
Article formatting:Natalie Podolskaya
Video about Christmas tree decorations made at home
DIY Christmas tree decorations from scrap materials: