Fish can be of different colors and sizes. For small children, drawing begins with simple "classic" shapes - an oval body and a triangular tail. Gradually, the drawing is complicated by adding additional details - scales, algae, other inhabitants of the underwater world. Especially bright and interesting are the images of tropical fish, which can be drawn in an aquarium or among corals.
Simple drawing of a fish
The easiest version of a fish is made as 2 semicircles with additional elements - a tail, fins and scales. For children under 2 years old, their number can be limited so that the picture turns out faster and easier.
For the work described in this example, you will need graphite and colored wax pencils (you can also use regular ones), paper and an eraser for correcting the contours.
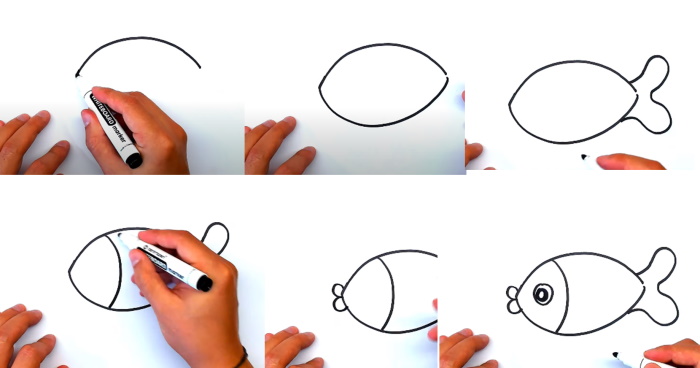
Below is a step-by-step process for drawing a simple fish:
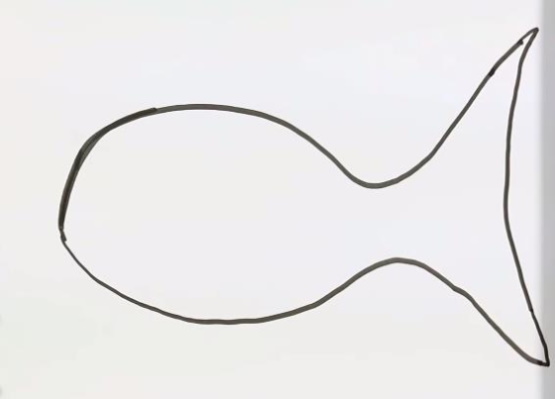
- Draw the top semicircle.
- Add a lower semicircle to create a closed line.
- Draw the second main element – the fish tail – using a wavy line. The size of the tail should correspond to the fish body, that is, it should be larger.
- In the front part of the fish, draw its part with an arc. The head will be on the left.
- Draw the fish's mouth using two semicircles on the left. You can make it even simpler, in the form of an arc. Then the fish will "smile".
- In the middle of the head draw a large round eye, and inside it - another circle, which will be the pupil. Leave it white in the middle.
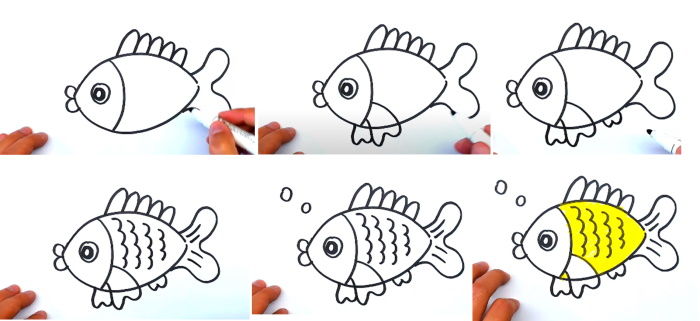
- Make the upper fin in the form of a "fence" of identical oval shapes. Closer to the tail, they should be shorter in length. All parts of the fish will have a rounded, streamlined shape.
- Draw 2 fins from the gill arch at the bottom. The second fin will be at the back and it needs to be made smaller.
- At the back of the fish, draw a small rounded fin.
- On the fish's body, depict scales using wavy lines. Make the line shorter closer to the tail. Draw several diverging stripes on the tail.
- Draw a pair of bubbles above the fish - one larger, one smaller.
- Color the fish's body yellow.
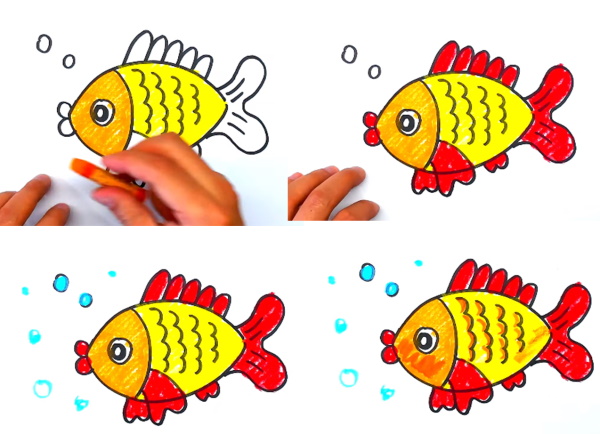
- Paint the fish's head dark yellow or orange.
- Paint the remaining parts of the fish bright red.
- Color the bubbles with a blue pencil, and also draw a few more additional bubbles around the fish. You can do it differently - leave the bubbles white, and color the surrounding space blue or blue.
- It is not necessary to paint over all the empty space on the sheet; you can just make a few strokes around the outline of the fish.
- Outline the scales on the left with a dark orange pencil. Also add a few orange strokes on the fish's head and belly. This will give the drawing more "texture".
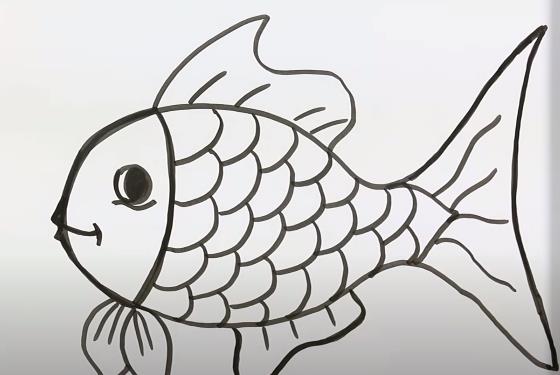
Colorful fish
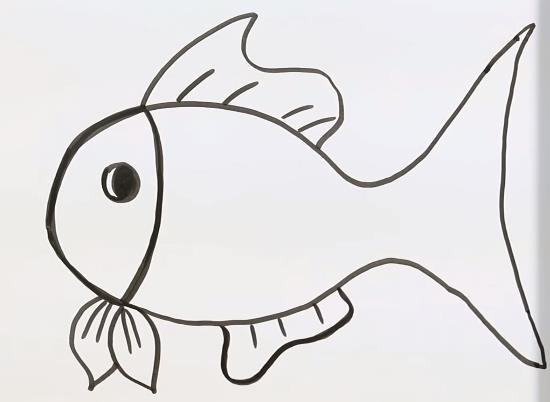
The fish (the drawing for children differs in the number of details) in this example is a little more complicated than in the previous one. But you can learn colors with your child using this picture. For work you will need a set of colored pencils (or felt-tip pens) and paper.
Step by step drawing process:
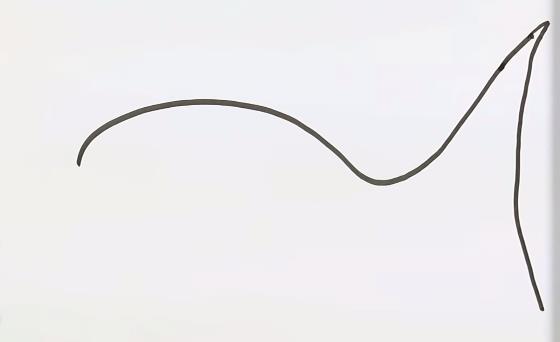
- Draw the upper outline of the fish with a smooth curved line, raised on the right side. This is where the tail will be located.

- Draw a vertical, slightly concave line.
- Round off the head on the left side and finish drawing the bottom side of the fish.
- Draw an arc that will represent the head, just like in the previous example.

- Using a smooth, slightly tapered line, draw the upper fin as shown in the figure below.

- Draw the lower fin as a rectangle with rounded corners.
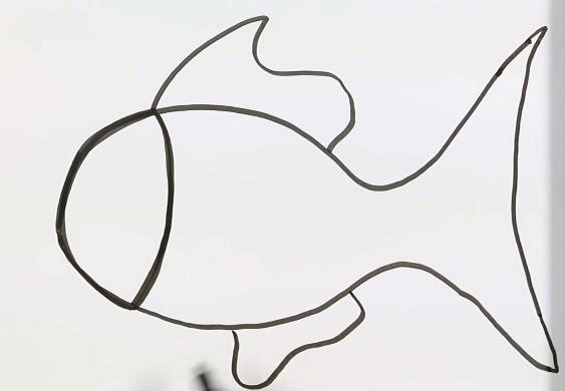
- Draw a pair of fins under the head, resembling the shape of flower petals.
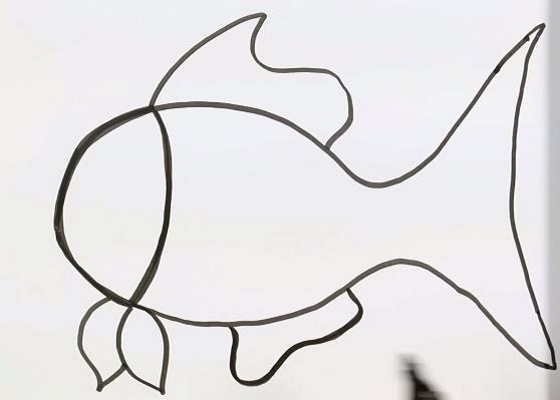
- Draw several stripes on the fins:
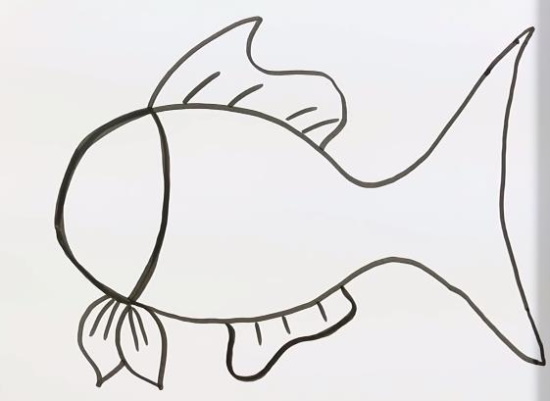
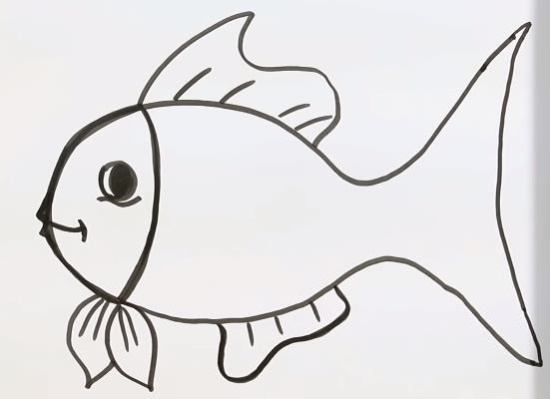
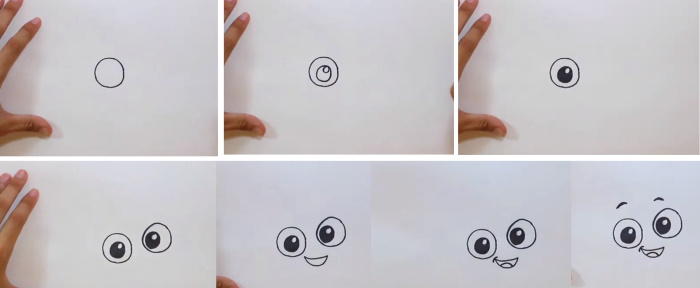
- Draw a round eye on the head and paint the pupil black.
- Draw a fish's "cheek" under the eye using a wavy line.
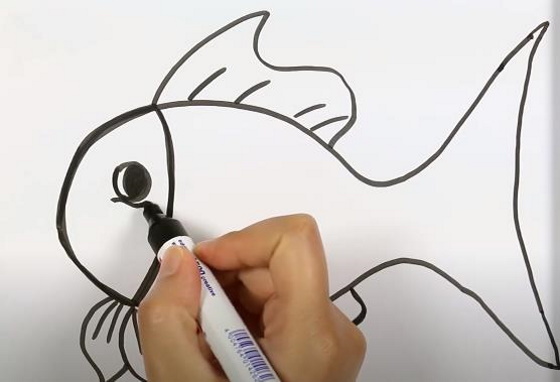
- Make the fish's lips protrude slightly beyond the outer contour, and draw a smile inside the contour.
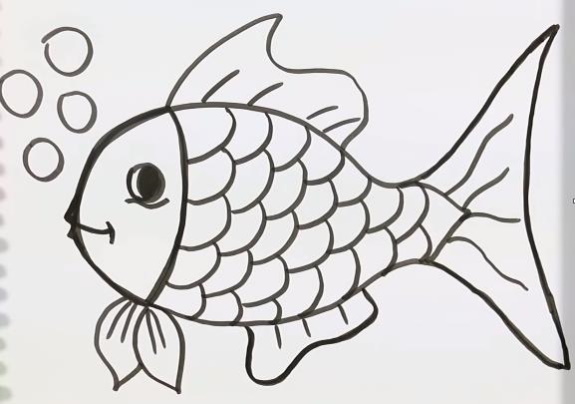
- Draw the first row of scales on the fish's body. This can be done using arcs that overlap each other.
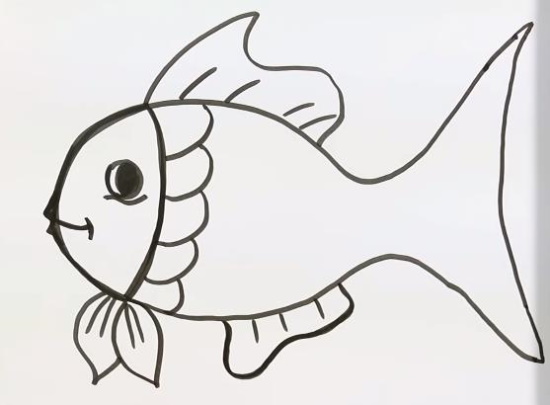
- Add scales to the rest of the body, and on the tail draw several diverging lines from the last large triangular scale.
- Draw large bubbles above the fish's head.
- Paint the fish tail pink. You can choose other colors if you wish.
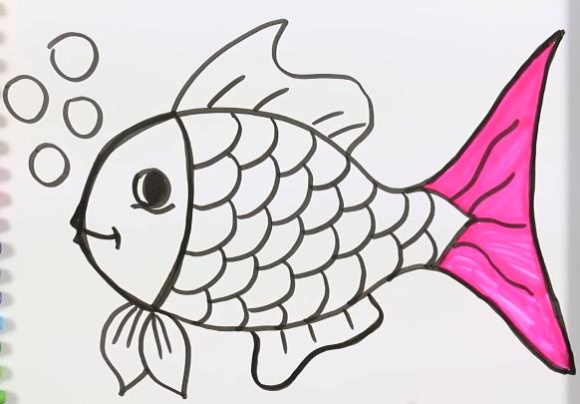
- Paint the large fins light purple and the small ones dark purple.
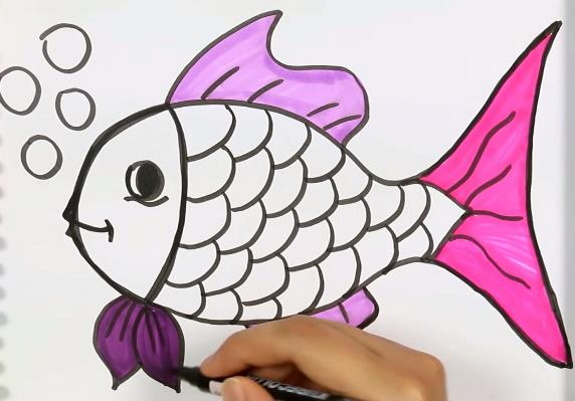
- Paint the head yellow.
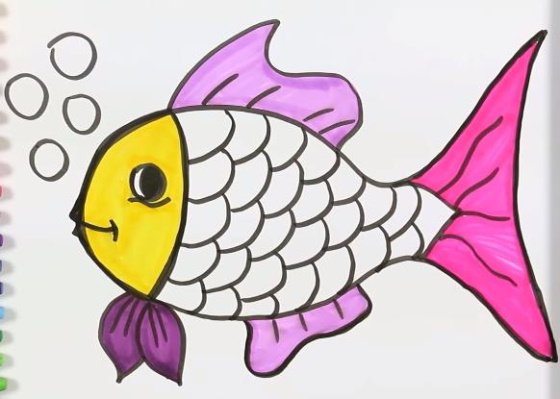
- Color the scales in different colors. You can do this in rows. Color the bubbles in the picture with a blue pencil.
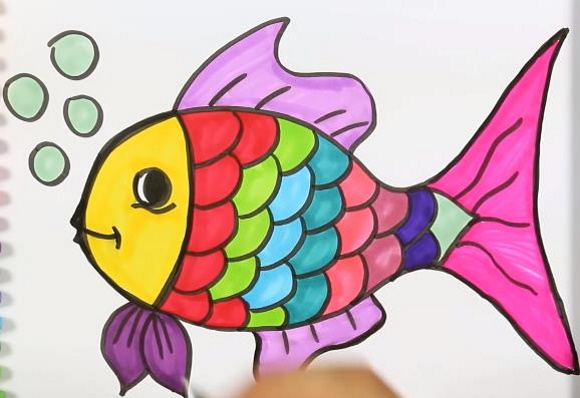
- To develop skills, you can ask your child to outline all the contours with a white marker.
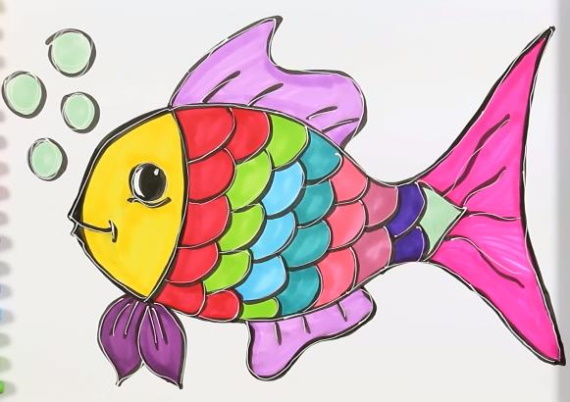
- You will get a bright picture.
Cartoon Clownfish
The clownfish in this drawing for kids is taken from the popular cartoon "Finding Nemo". These fish have bright colors, which in natural conditions can be red, orange or yellow.
Accordingly, you will need one of these colored pencils (in the example, the fish is colored orange), a black pencil or marker, and a sheet of paper.
The step by step process of drawing a cartoon character is as follows:
- In the middle of the sheet, draw a medium-sized circle – the fish’s eye.
- Inside it, add a pupil, also in the form of a circle, and another small circle at the top (highlight).
- Paint the pupil black.
- On the right, draw the second identical eye of the clownfish. It should be located a little higher, since the fish is turned sideways.
- Draw a smiling mouth in the shape of a crescent moon.
- Add a small tongue inside it, and draw a small arc on the left – a fold near the mouth.
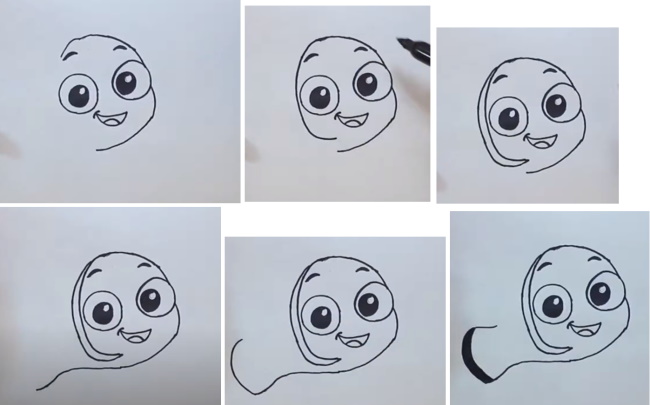
- Draw two short, raised eyebrows above the eyes.
- Draw Marlin's head as shown below. At the bottom, slightly "move away" from the contours of the mouth.
- On the left, finish drawing the head using an arc, but do not close the outline.
- Draw another arc parallel to this one on the outside. The resulting stripe should remain unpainted.
- Draw a wavy line at the bottom, continuing the body of the fish.
- Make another arc on the left – this will be the tail.
- Draw a parallel line inside the tail and color the stripe black.
- On the tail, draw short lines towards the head.
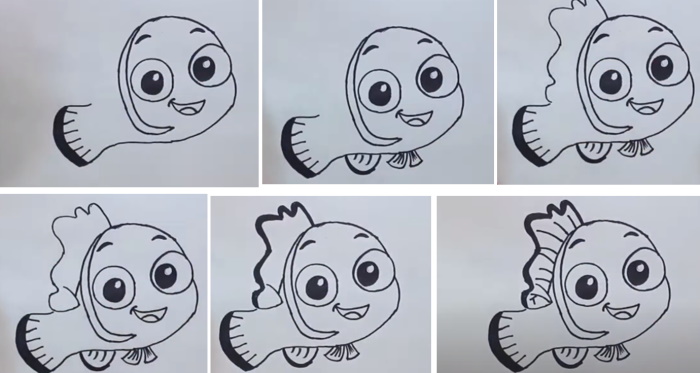
- Draw the lower fins - one on the belly, larger, in the form of a semicircle, and two closer to the head, smaller in size. They can be made as rectangles. Also draw stripes inside them.
- Make the upper fin in the form of a wavy line descending to the tail.
- Connect it at the bottom to the head as shown in the picture.
- The upper contour of this fin should also be made brighter, in the form of a black stripe.
- To add more realism, make arched lines on the upper fin.
- Draw another fin on the right in the form of a trapezoid.

- Draw a strip along its edge and segments inside it.
- Add more stripes to the fish's body.
- Color the body and fins with an orange pencil, leaving the stripes white. Color the inside of the mouth with a pink pencil, and the tongue with light yellow. The Marlin fish is ready.
Small children love to draw with bright colors. Therefore, wax crayons (they are made in the form of pencils) can be recommended for them. The basis of such crayons is vegetable wax or paraffin. Natural dyes are used for their production, so they are safe for early ages.
The crayons lay well on both regular paper and cardboard, do not require significant effort for coloring, unlike traditional colored pencils. Also, wax has water-repellent properties, so if you need to paint the background with watercolors, it will not mix with the pencil drawing.
Fish in an aquarium
Fish (a drawing for children can be supplemented with various elements) can be depicted as part of a beautiful composition - against the background of corals and algae or in an aquarium. This example examines the process of drawing several fish at once in a round aquarium.
The order of actions to create such a drawing is as follows:
- Draw two semicircles on the left and right – the walls of a round aquarium. Draw the bottom and neck of the aquarium as “pancakes”.
- Draw the neck of the aquarium in the form of an arc with a slight bend.
- The water level can be shown using a simple wavy line.
- At the bottom of the aquarium, draw small stones in the form of circles and ovals, as well as algae.
- Draw a spiral on the stones – a mollusk shell.
- On the surface of the shell, depict curls in the form of small arcs diverging from the center.

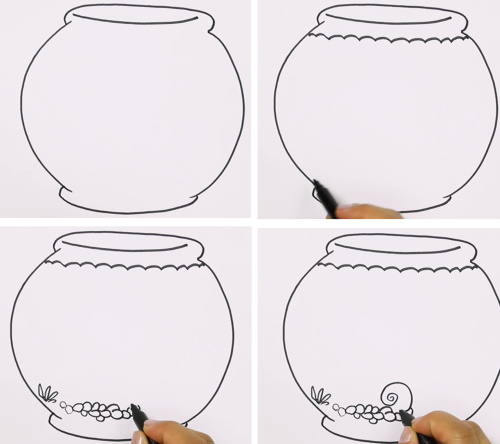
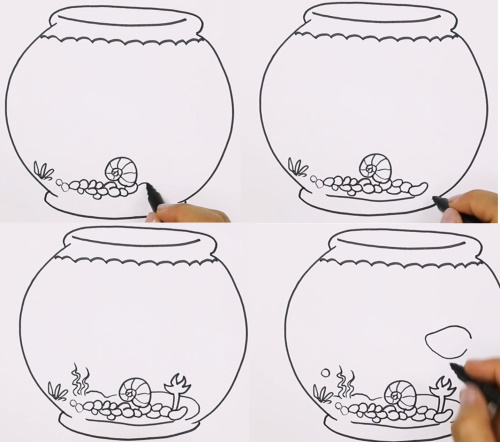
- On the right, add pebbles of various sizes and round shapes, and also outline the bottom of the aquarium.
- Add the rest of the aquarium design details - on the right is a leafy algae on a stem, on the left is a long wriggling algae. Draw an arc on top to show the level of the ground in the background.
- Draw the body of the first fish on the right side of the aquarium. It should be wide in the middle and narrow at the fish's snout (on the left).
- Show the line of the gill slit with a curved line, draw a round eye, color its left part (pupil), leave a small part white (highlight).
- Show the upper fin as a strip tapering towards the tail with an uneven upper edge.
- Draw the lower fin in a similar way - using an uneven line, draw a smaller fin near the gill line, and draw several lines on the tail, diverging towards its ends.
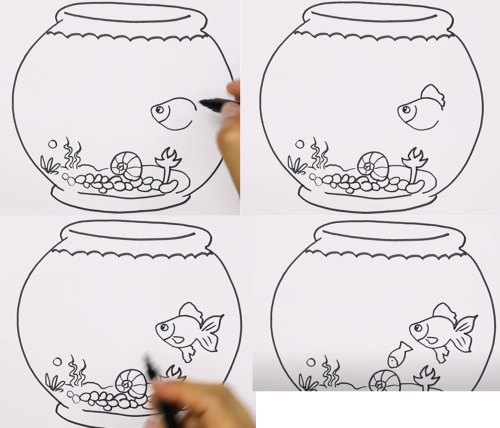
- Below, draw a small fish of a simple shape in the form of an oval (body) and a triangle (tail), show the gills with an arc, and the eye with a dot.
- On the left side, draw a fish of the same shape as the first one, turning it in the opposite direction.
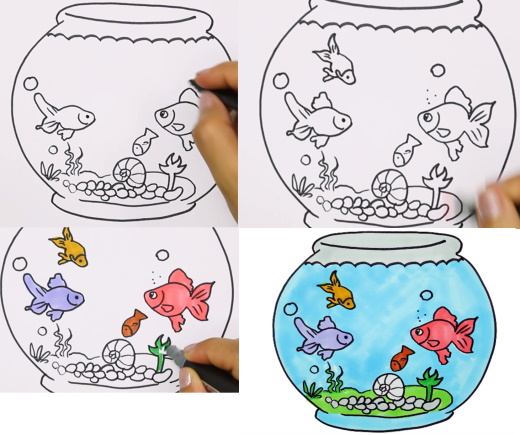
- You can draw another smaller fish on top using the same techniques. As additional elements, depict bubbles.
- To simplify the drawing, paint the fish in solid colors - red, blue, yellow, brown.
- Color the algae and the bottom of the aquarium with a green pencil, the pebbles and shell with a simple (gray) pencil or leave them white, and the water with a blue pencil. The upper part of the aquarium can be left uncolored.
Porcupine fish
Fish (the drawing for children in this master class is unusual) depicts a type of sea animal. It has an unusual ability to swell in case of danger, due to which it becomes similar to a prickly hedgehog, for which it received its name. For work you will need colored pencils or markers.
Drawing a porcupine fish is done in the following order:
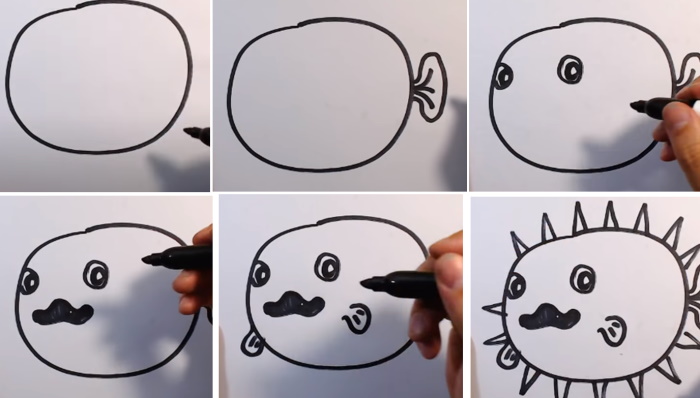
- Draw a large circle in the center of the sheet – the swollen body of an exotic fish.
- Add a flattened tail on the right, draw 3 arcs on it. The fish will be positioned sideways to the viewer.
- On the left side of the body, draw two eyes with black pupils.
- Draw the mouth as a large oval hole with jagged edges. It also needs to be painted black.
- Draw the fins at the bottom of the body in the form of small oval shapes.
- Along the outer contour of the fish, add long spines in the form of elongated triangles.
- Draw smaller thorns inside the outline, pointing their corners up and down.
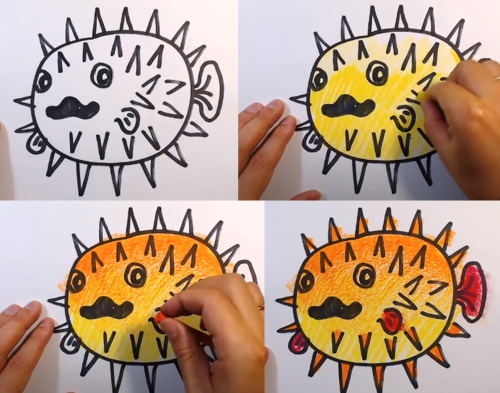
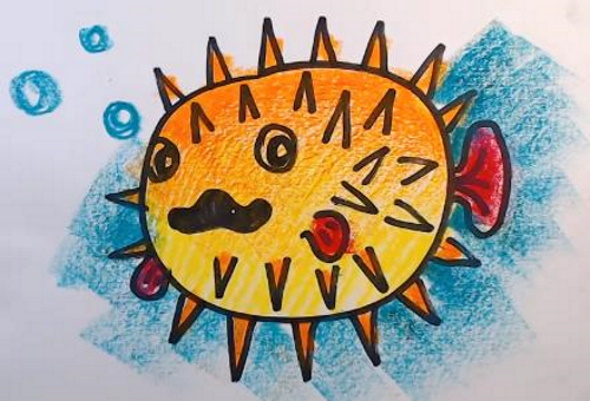
- Color the body of the porcupine fish yellow.
- Add orange strokes to the top, achieving a smooth transition to yellow.
- Paint the fins and tail red, and the needles at the bottom and along the outside contour dark orange or brown so that they stand out.
- To the left of the fish, add large bubbles with a blue pencil, and in the lower and right parts of the sheet, use the same color to color the space near the outline.
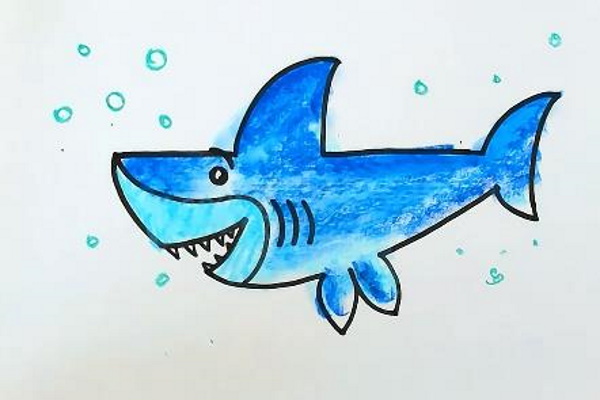
Shark
Fish (a drawing for children should be interesting) can be made in a variety of ways - using fairy tale or cartoon characters, bright tropical fish or in a realistic technique.
In this example, you can learn to draw a simple illustration of a shark - a large sea predator. Using different types of fish when drawing with a child, you can simultaneously introduce him to the diversity of these animals and their living conditions.
Such activities will be useful in the future at school in lessons on the surrounding world. For work you need a sheet of paper and wax crayons (or regular colored pencils).
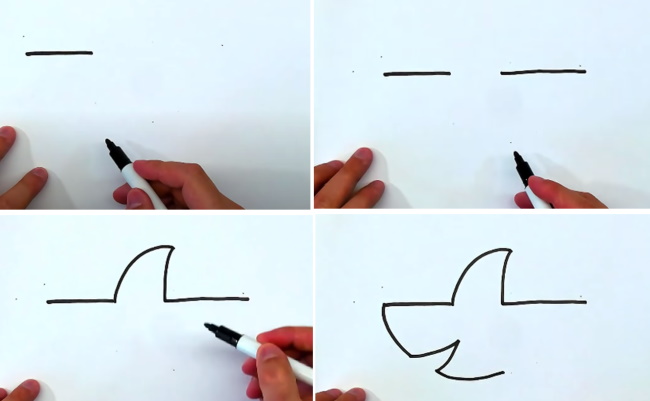
The drawing of a shark is done as follows:
- Draw a short segment in the upper left part of the sheet. This will be the shark's nose. Leaving a small empty space, draw the line further, to the right edge of the sheet.
- Where there is an empty space, depict a large fin - its left part as an arc, and the right part as a segment.
- Draw the shark's nose, directing the arc downwards, and approximately in the middle of this line make a triangular "cutout" - the shark's "smile".
- In the lower part of the body, draw 2 fins that resemble leaves in shape.
- Draw the tail in the shape of a crescent.
- On the shark's head, make a small circle and draw an "eyebrow".
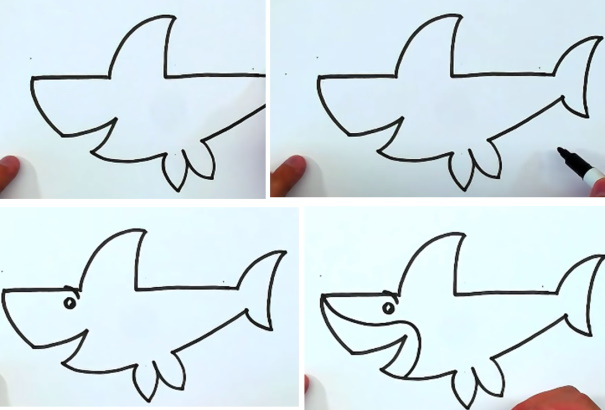
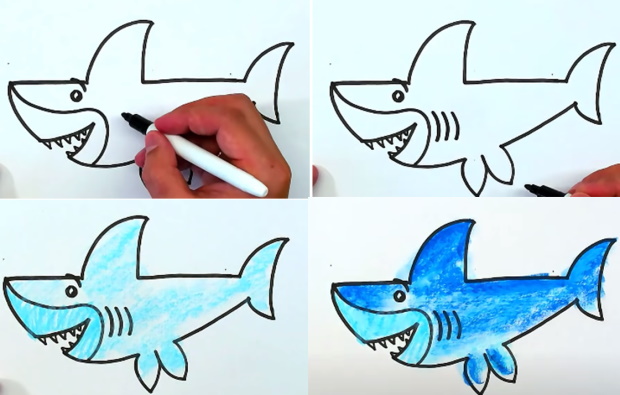
- To give relief to the muzzle, draw a wavy line from the end of the muzzle to the belly of the shark.
- In the shark's mouth, add a row of sharp teeth in the form of small triangles.
- To the right of the animal’s mouth, draw 3 parallel arcs depicting gills.
- Color the entire body of the shark with a blue pencil without pressing too hard.
- Apply a layer of blue pencil to the upper part of the body.
- If wax crayons or pastel pencils were used in the work, they can be lightly smeared with fingertips to achieve a more even transition between blue and blue. Also add a blue tint to the lower parts of the fins.
- You can draw blue or light blue bubbles of different sizes around the shark.
Monkfish
This master class looks at how to draw a deep-sea anglerfish, or sea monkfish. This fish has an unusual, scary look with a huge mouth full of sharp teeth, but its main feature is the presence of a "fishing rod" on the nose of the fish, which glows at the end due to luminescent bacteria in it.
With this "fishing rod" the anglerfish lures other fish and swallows the prey. This work is more difficult and is suitable for older children. For it you will need a set of colored pencils, a simple pencil for marking the contours, an eraser and paper.
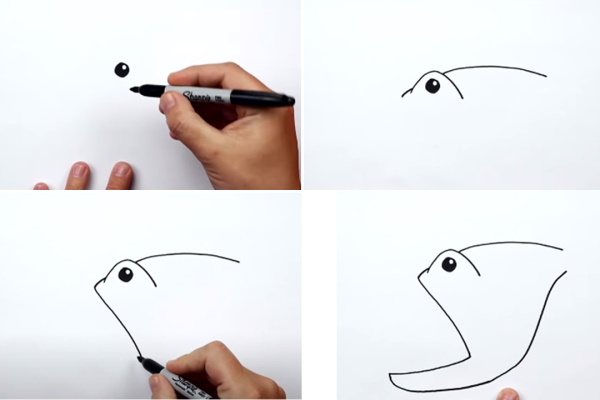
The monkfish can be drawn as follows:
- Place a small circle approximately in the center of the sheet and paint it black, leaving a small white highlight. This will be the fish's eye.
- Above the eye, draw a bulge and the upper outline of the fish in the form of a long arc.
- From the left edge, draw a line downwards at an angle that will outline the open mouth of the anglerfish.
- The lower jaw should be made horizontal. It should protrude forward. The transition from the lower jaw to the tail should be depicted as a steeply rising smooth line.
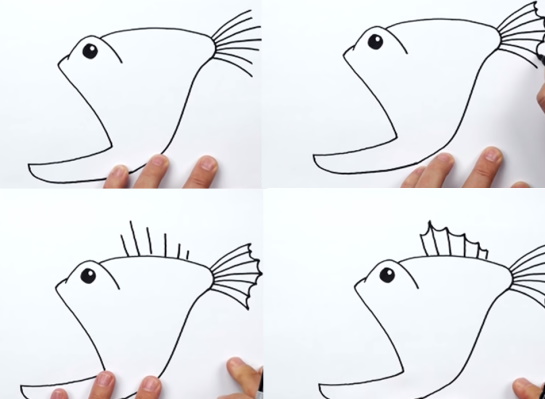
- Round off the right end of the body. Draw the tail as a series of “ribs” – diverging lines of approximately the same length.
- Connect the “ribs” on the tail with concave arcs.
- For the upper fin, draw a series of lines on the back of the fish. Draw the second line longer, and gradually shorten those that go to the tail.
- These segments are connected in the same way as on the tail. Thanks to this method of drawing, the fin acquires a "spiny" appearance.
- Similarly, draw a smaller fin on the belly.
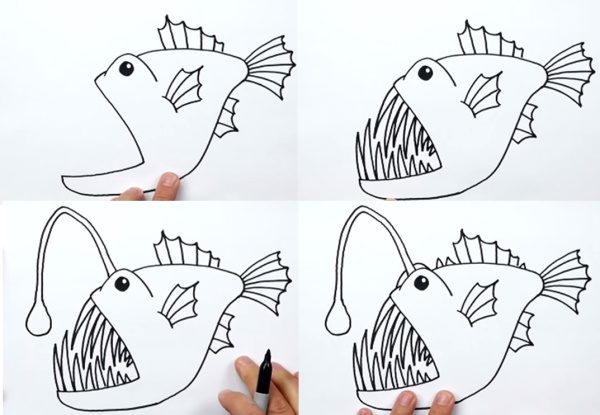
- On the body, under the eye, add a third fin pointing backwards.
- In the open mouth of the fish, draw teeth on the lower and upper jaw. Closer to the end of the muzzle, they should be very long, and inside - smaller.
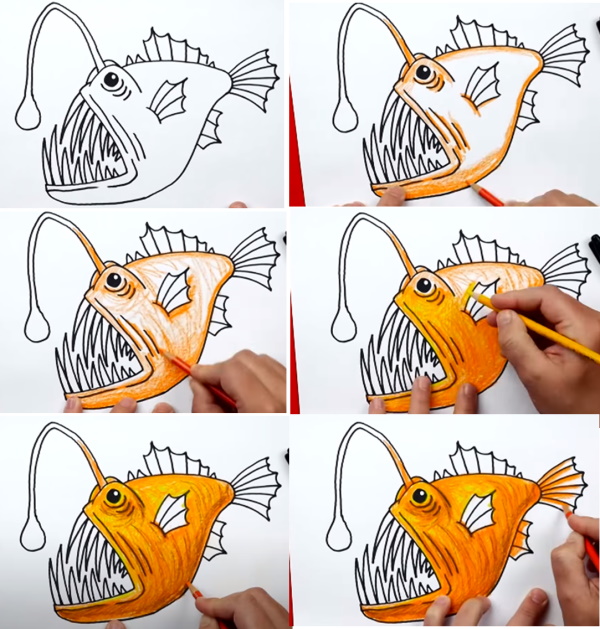
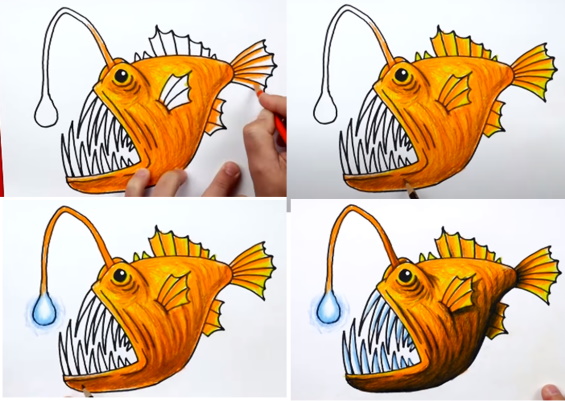
- From the fish's eye, draw two parallel arcs, this will be the "fishing rod". Draw a rounded shape at its end. The fishing rod should hang over the open mouth.
- Draw the outline of the second eye behind the “fishing rod” and add a few more spikes to the fish’s body.
- Draw more contours around the mouth to give it extra volume. Also add folds under the eye.
- Colour the fish using successive shading with yellow, brown and orange pencils as shown in the diagrams below. Colour the glowing end of the "fishing rod" blue.
- Finalize the contours and shadows with a dark brown pencil.
Fish for older children can be drawn using the sketching technique from a photograph.
To do this, you need to carefully study a realistic image of an animal and highlight the most vivid, memorable details in it, thanks to which it becomes recognizable in the drawing.
First, a sketch is made with a simple graphite pencil, and then a more detailed elaboration is made with a black pen or liner - a marker with a thin rod. Volume is given to the drawing using hatching, taking into account where the light falls from.
Video about drawing
Fish drawing for kids: