To create a wolf mask It is permissible to use any material. For example, you can take cardboard with paper, felt or cotton fabric, or make a three-dimensional structure in the style of papier-mâché.
Any method of creating a mask is considered not difficult. Therefore, you can create the product together with children even at home using improvised means.

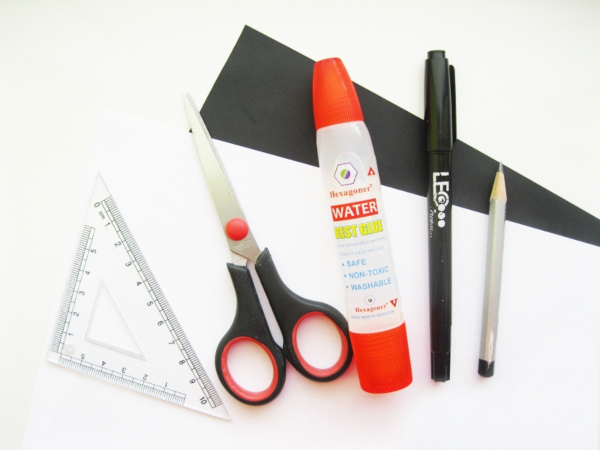
Necessary materials and tools
A wolf mask (you can make the craft from scrap materials) requires the preparation of a minimal set of tools and materials.
For example, you can apply:
- white and colored paper sheets;
- stationery knife or scissors;
- pencil with ruler and eraser;
- cardboard;
- PVA glue.
Depending on the difficulty level of the craft, additional materials for decoration with tools may be required.
Types of colored paper that are suitable for creating a paper head design:
| Type of paper | Peculiarities |
| Normal | The pigment can be applied to 1 or 2 sides. The first option is suitable for decoration and appliques, if only the outer colored part will be visible in the design. To create a three-dimensional product, it is recommended to use paper with 2 colored sides. At the same time, this option is considered universal and profitable. |
| Velvet | It has a pleasant texture to the touch, so the product will have a voluminous and beautiful appearance. When combined with other materials, this type of paper can be used to decorate not only a head mask, but also photo frames, game figures, and postcards. Thanks to the soft velvet texture, animal fur, leaves, grass, or other applique items will have a realistic image. If the material is high-quality, the texture will be uniform, while the paper will not crumble, stain your fingers, or become creased at the folds. |
| Foil and holographic | To decorate an applique with a craft or to complement a theatrical costume, it is best to use holographic or foil paper. This material is characterized by iridescent and shiny elements. |
| For origami | Unlike the classic material, origami paper has a more compact structure. Due to this, it will not tear when turning inside out or wear out when bending. It is often sold in the form of squares. |
When choosing colored paper sheets, you need to look at the density of the material and the quality of the coloring. In this case, the paper should have uniform saturated shades, and also be easy to bend and cut.
Cheap material will not work for making a mask because it will be thin and have a gray color. In this case, the sheet will quickly get wet from the glue and tear. To make the craft, it is advisable to use offset colorful paper, the density of which will be at least 60 g / m2.
Types of colored cardboard suitable for creativity:
- Unilateral. Suitable as a base material for applique. At the same time, fragments can be cut out from it for gluing onto the base with the colorless part.
- Double-sided. If you need to create figures or other three-dimensional structures, cardboard painted on both sides is ideal. As a result, the mask will be colored on both the outside and the inside.
- Coated. It has a smooth surface and a pure uniform shade, so it is more suitable for making head masks than the uncoated type of cardboard. The latter is characterized by less saturated tones and a rough surface, so the product will not be very beautiful. Uncoated material is better used to create large decorations or elements for the stage, stands.
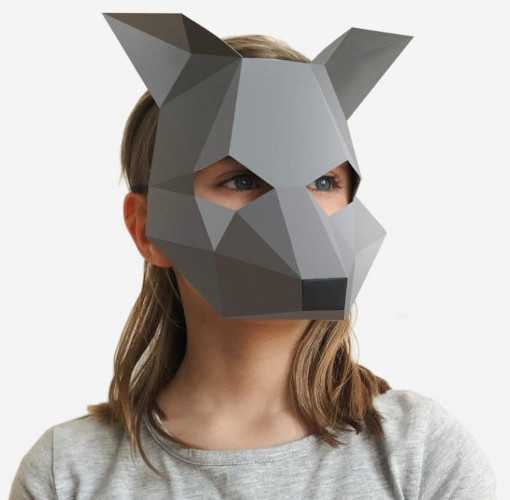
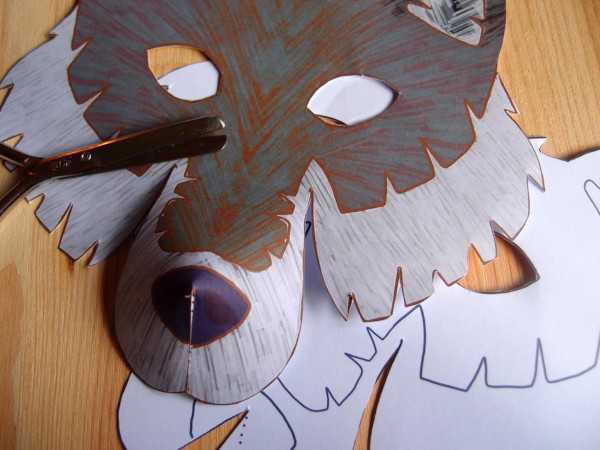
Master class on making a paper mask
A wolf mask (not only adults but also children can make the craft) can be made from ordinary colored paper. It will take no more than 2 hours to create the craft, and you do not need to prepare complex materials with tools. To make the work easier, you can use a ready-made template that needs to be cut out and simply glued to the base.
The template should look life-size, so the sheet should be A4 format. The density of the material should be at least 200-300 g/m2.
Step-by-step process of creating a design:
- Cut out all the necessary fragments using the template, moving the scissors along the solid lines that are not interrupted. Do not touch the dotted lines. You will need to bend the craft along them later.
- To make the bending process easier, use a ruler to go over the broken lines. Additionally, draw along the line with the edge of a teaspoon. The pressure should be light.
- All cut out fragments are joined and glued to similar figures using PVA glue.
- Set the product aside for 60-120 seconds to dry.
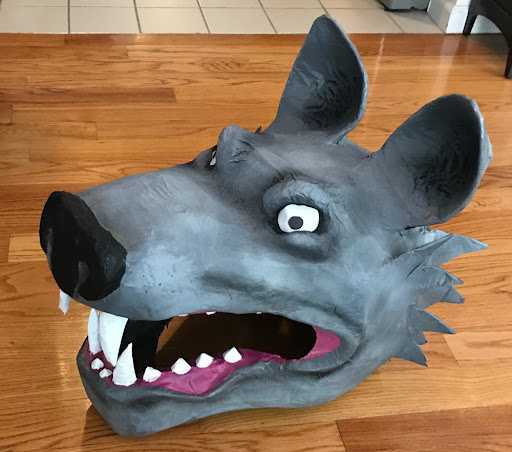
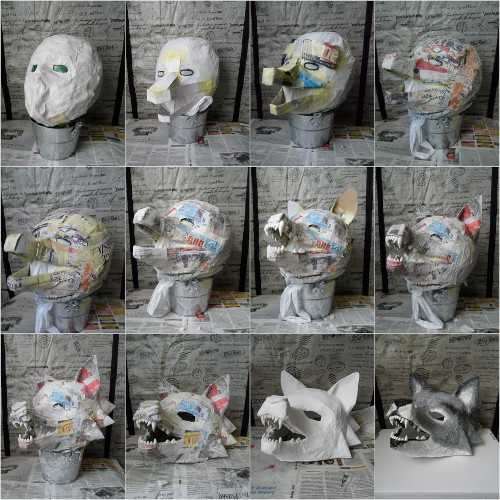
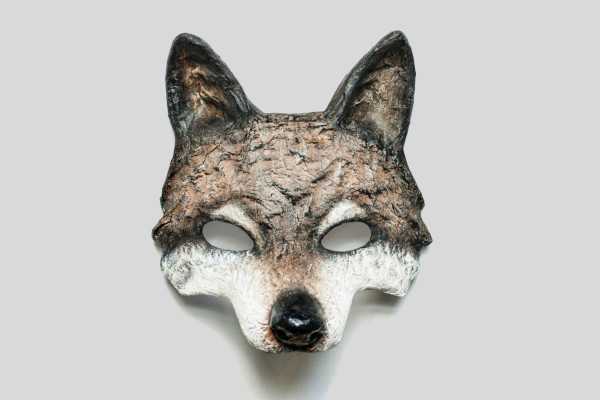
From papier-mâché
A wolf mask (you can make the product using a ready-made template or you can draw the animal's face yourself) can look more realistic if you make the structure using the papier-mâché technique.
To work you need to prepare:
- PVA glue (you can make your own paste from starch or flour);
- office, toilet or newsprint paper;
- sculpting clay to create a model of the head.

Step by step creation process:
- To make the base of the structure, knead the plasticine with your fingers to create a flat cake. Place the material on the face to create contours. Highlight the cheekbones and nose areas well. Additionally, mark the open area in the eye area.
- Leave the prepared structure on a flat surface to harden.
- Tear thin paper sheets with a porous structure into small pieces measuring 15x15 mm.
- To soak the paper blanks, make a weak solution based on water and glue.
- Cover the plasticine template with the first layer of wet paper. Distribute the paper pieces evenly, immediately smoothing out the bumpy areas. When the paper is completely dry, it will be problematic to smooth out the surface.
- Soak the first layer with glue and start laying out the next paper layer.
- Similar manipulations in the form of wetting the paper pieces and soaking them with glue are done twice. The mask should exactly imitate the base. The layer thickness should not be less than 3 mm.
- To fix the shape of the product, the 5th layer should be a piece of gauze. Then again apply pieces of paper in 2 layers. The last layer should be pieces of craft paper.
- To make paint application easier, cover the outer top layer with a white sheet of paper.
- Do not touch the structure for 48-72 hours to allow the product to dry completely.
- After some time, cut off the excess, adjust to size and sand the surface with sandpaper as needed.
- Use a pencil to mark the outline of the image to be colored.
- To fill large areas, use a foam sponge and acrylic paints. To draw small fragments, use an art brush.
- If desired, the structure can be treated with varnish.
- Make holes on each side of the craft for an elastic band or ribbon so that the mask can be tied. It is advisable to make the holes while the mass is wet. When the product dries, the holes need to be drilled.
- Rain, fringe, sequins, lace, feathers or beads are suitable as decoration. It is recommended to use universal transparent glue for fixation.

Once the structure is covered with paper strips, the product should dry well and become hard. This may take several days, so the room should not be damp. At the same time, the craft should not be touched by other family members or pets.
The structure should dry for at least 24 hours. If you don't have much time, you can use different devices to speed up the process. If you don't have glue, you can make a paste out of flour.
Manufacturing features:
- First, you need to bring 250 ml of liquid to a boil.
- Mix approximately 190 g of flour in 125 ml of cold water. As a result, the mixture should acquire a uniform texture.
- When the liquid in the pan starts to boil, the liquid dough should be poured into the boiling water. It should be poured in a thin stream, without stopping the stirring process.
- The mixture needs to be boiled for some time, then cooled. During the cooking process, the paste needs to be stirred regularly and intensively.
You can make a papier-mâché mask using a simplified version. In this case, you need to make a plastic mass based on toilet paper or paper egg cells, as well as paste or glue. Afterwards, you can form a structure from the composition.
The process of creating papier-mâché mass:
- Cover the toilet paper rolls with cold water. When choosing egg trays, first soak the material in water for 5 hours.
- Boil the mixture at minimum heat until the composition becomes homogeneous.
- Rub the mixture through a sieve, squeezing out any unnecessary liquid with your fingers.
- First, crush the mixture with your fingers. Then you can use a blender. The main thing is that the mass is wet.
- Spread the workpiece in an even layer on the table and dry.
- If necessary, add glue or paste to the mixture to knead a moderately dense dough that will not stick to the surface of your hands.
- Don't add too much glue, otherwise it will be difficult to create the mask.
- The remains of the dry preparation can be stored in the refrigerator in a bag.
- After the dough has completely dried, you can begin painting and decorating the craft. However, the structure should initially be painted white so that the previous tones of the paper do not stand out.
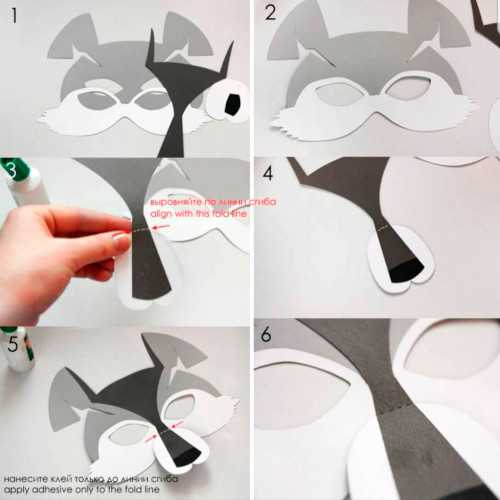
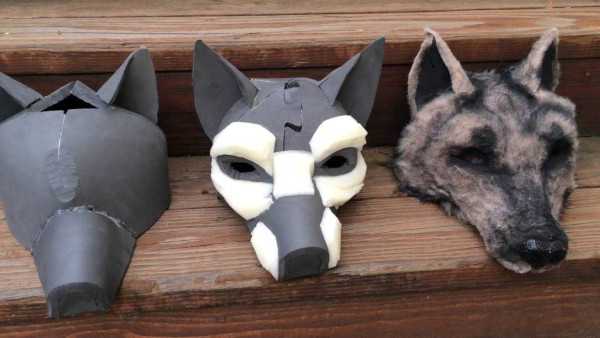
With a voluminous nose
A wolf mask (the product can be made not only from paper, but also from felt) can be made with a voluminous nose.
To do this, you need to prepare:
- cardboard or a thick sheet of paper in a gray tone for the base;
- a round elastic band or ribbon to create ties;
- eraser with a simple pencil;
- scissors with PVA glue;
- colored paper sheets in white, gray, black and brownish shades.
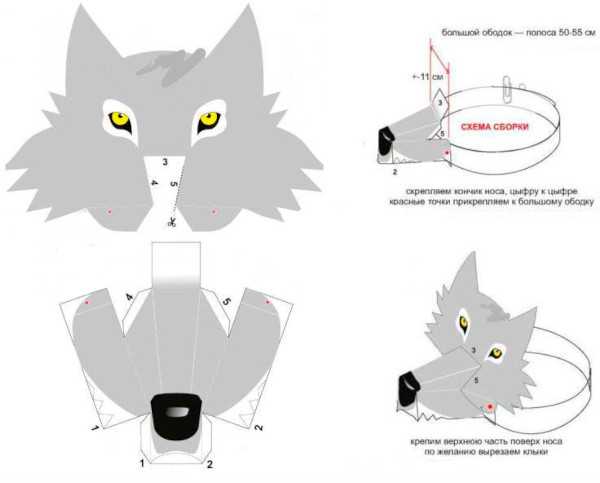
Initially, it is recommended to make a trial drawing of the animal's muzzle so that the craft is beautiful. Thanks to the special cut of the product and fragments of colored paper, the mask turns out to have a voluminous nose.
Step-by-step description of the work:
- Measure the circumference of the child's head. The width of the structure should be equal to 1/3 of the length of the head circumference.
- On gray cardboard, draw the contours of the craft in the form of cheeks and a nose. Additionally, mark 2 holes for the eyes. The height of the craft should completely or only half cover the face.
- To add volume, make cuts from the center of each eye to the edges of the mask.
- Cut out the ears separately so that there are allowances at the bottom, which are necessary for fixing to the craft. Fold back the allowances and make cuts on them for easy gluing to the base.
- Make cuts in the center of the ears, and join the edges together with glue. As a result, these parts of the mask will be voluminous and slightly curled inward.
- Make the edges and top of the ears from a black sheet of paper. Glue the fragments.
- Divide the tape or rubber band into 2 parts. Use pieces of cardboard to make the area where the tape is attached stronger on each side of the product.
- Make holes through which to pass the ribbon. Leave small ends on the outside of the craft.
- To create the lower part of the animal's muzzle in the form of cheeks and eyes, use a white sheet of paper. Glue the cut out fragments to the base. As a result, these details will hide the ends of the ties.
- Use grey paper to cut out thin circles. Glue the details onto the holes intended for the eyes.
- Make the nose from a brown paper sheet. Glue the part to the base.
With a solid nose
You can make a theatrical wolf mask with a solid nose. This will create a three-dimensional structure that can be put on your head.
Step by step creation process:
- The main blank is a circle cut out of a thick sheet of paper. There should be a cutout in the front.
- The lower section of the product is cut in the form of corners that will imitate animal fur.
- Separately cut out the lush eyebrows with ears and tufts of fur on the cheeks. For this, use light colored paper.
- To create a solid nose, initially draw a blank. To do this, draw ½ of an oval. Make a cut on the rounded section of the figure.
- Join the edges of the cut together using glue to obtain a three-dimensional piece.
- Cut the flat part of the fragment into corners. Then bend the corners at an angle of 90°.
- Glue the corners to the main part using glue.
Design ideas
Regarding the purpose of the craft, the animal mask can be decorated in various ways. To make it convenient to attach the decorative elements to the structure, it is recommended to use a glue gun with a silicone type of glue.
Design ideas:
- To imitate animal fur, cotton wool or pieces of artificial fur can be used as decoration. A thick paper sheet or wire is suitable for creating eyelashes and a mustache. A white cardboard sheet is suitable for decorating teeth.
- To create an attractive and bright product, it is advisable to cut out parts from paper in contrasting, saturated shades.

- If the mask is intended for a kindergarten, glitter can be applied to the structure. In this case, the necessary elements of the product should be treated with glue, then sprinkled with glitter.
- In order for the product to have a long service life and look beautiful for a certain period of time, the craft needs to be painted and varnished.
How to paint a mask
To get a spectacular craft, you need to paint the mask beautifully. For these purposes, it is recommended to use gouache or wax crayons. When drawing small details in the form of ears, eye rims, nose and hairs of the fur, the wolf's muzzle will look natural.
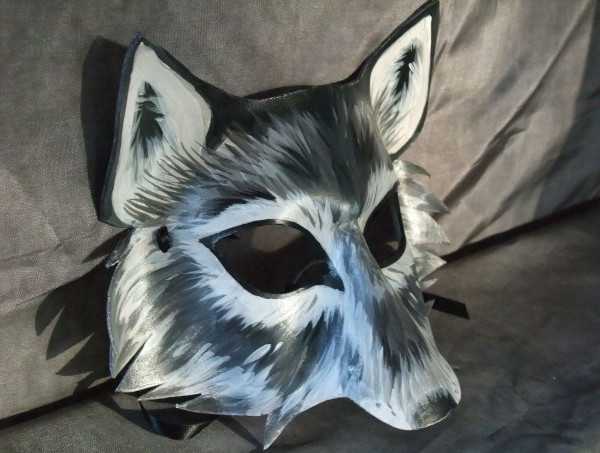
In this case, it is important to take into account the direction of the hairs. When drawing, you need to move from the central area to the edges of the structure. In this case, the movements should be in the form of strokes.
To convey the depression on the animal's head, there must be dark areas of fur. If the image is created correctly, the drawing can be given volume.
If gouache was chosen for coloring, the surface of the mask should be covered with acrylic varnish. However, the paints should dry completely first. Due to this, traces of gouache will not remain on the face.
A wolf mask can be the main attribute of theatrical performances, which will complement carnival images with New Year's costumes.
At the same time, it is permissible to make the product from improvised materials and in a short period of time. Simple templates help to create an original holiday decoration to please children.
Video about making a wolf mask
Simple paper wolf mask: