To knit crochet patterns, you initially need to make knots. Initially, you need to know how to perform this technique. The main technique is presented in the form of an air loop and a chain from it. Beginner needlewomen are advised to familiarize themselves with where and how these loops are used, as well as with the step-by-step technique of creation.
Definition of this type of loops
Crochet air loops (for beginners, step-by-step techniques for crocheting the initial knot and chain are presented) denote a series of consecutive elements formed when the yarn is pulled through the previous loop with a tool.
The technique of knitting is carried out directly in the air and freely, while the knots are not attached to anything. In this regard, they are called air knots, and the sequence one after another is called an air chain.
The air loop is considered the initial element of any knitted product, for example, a dress, hat, scarf, napkin. If the technique is performed correctly, the composition will look neat, and this will also affect the correctness of the further process.
A pigtail or chain of air knots is presented as a large number of elements that are tied together. For knitting, you only need to prepare a hook and threads. The latter can be purchased at any handicraft store, where a huge selection of yarn is presented.
The main characteristic of a hook is its number, which is directly related to its diameter. To make the work look airy and graceful, it is necessary to take a tool with a small diameter. Beginners mainly use hooks, the diameter of which varies from 3 to 5 mm.

There are hooks made of different materials on sale. Large tools are made of bamboo, medium ones are made of aluminum and other light alloy metals, and thin ones are made of steel.
When choosing yarn for crocheting, it is recommended to consider the following features:
| What to look out for | How to check |
| Strength of threads | To check the yarn, you need to stretch it. If the finished work will be of different shades, the threads must be identical in elasticity and material of manufacture. Otherwise, the product will not have a very attractive appearance. |
| Compound | It must be taken into account in relation to the final result. It is recommended to adhere to the requirements of the source of the scheme. The yarn can be fluffy, smooth, artificial or natural. Everything will depend on the final product. |
| Color fastness | To check the durability of the pigment, it is recommended to wet the edge of the yarn with water, lay it on a light fabric and iron it with a hot iron. If the items are washed quite often, they should have a durable shade. |
| Thickness | The threads must be selected according to the hook number. It is often shown on the packaging. If it is not there, you need to apply the yarn to the hook. If part of the thread has gone deep into the tool's barb or protrudes, it must be replaced. The yarn must necessarily correspond to the hook's barb size. |
Knitting with air loops does not cause difficulties, because it is necessary to repeat the same actions all the time. With the help of a hook, you can create souvenir or children's toys, as well as interior or clothing details.
Designation on the diagram
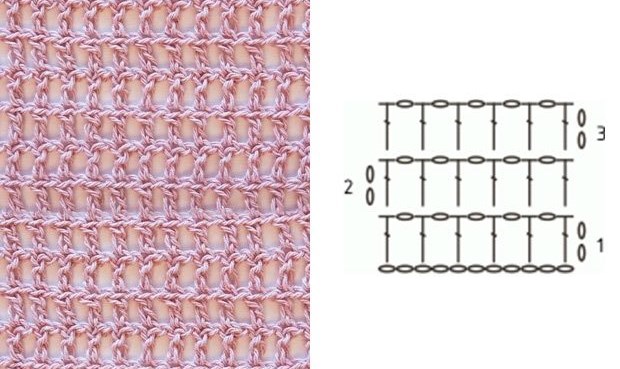
Air chains with loops are shown on diagrams as arcs, dots, filled or hollow circles, and also small ovals, which can be filled or hollow.
Examples of displaying nodes in diagrams:
- Ovals, small circles and dots act as air or lifting loops. Their calculation should begin at the beginning of the work, if the author of the scheme has not calculated them in advance.
- A huge ring with a number in the center. The number is the number of chains that are in the shape in the middle of the image.
- The chain of nodes located between the columns is represented by an arc. The number of loops that need to be made is often indicated above it.
Basically, diagrams always come with explanations. If they are not available, you need to remember how simple air nodes can look on the diagram.
Rules for counting in a chain
When creating a product using air chains, the required number of knots must be correctly calculated. At the stage of knitting chains, the counting must be done from the initial element. The loop that is on the tool should not be taken into account. It acts solely as a fastener of the product to the inventory.
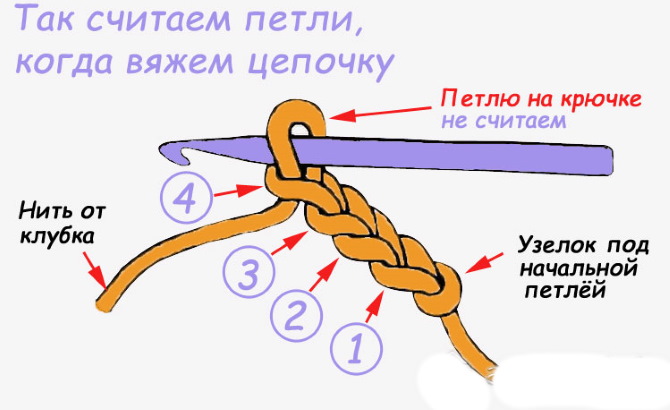
After a certain number of knots have been collected and a new row has been taken, the counting must begin from the hook side, without taking into account the loop located on the tool. The first loop is the one located in front of it. The last one is the initial element, which was made at the very beginning.
Algorithm of work
Crochet air loops (for beginners, step-by-step instructions on how to crochet chains and hold yarn) are considered the start of knitting, so it is very important to master this technique. The chain is presented as a simple element in crocheting. The first and all other knots are very easy and quick to make if you choose the right yarn with the tool.
For knitting at the learning stage, it is recommended to use a light, not too thin and even thread, because it is easier and much more comfortable to work with. Hooks of sizes No. 3 and 4 are suitable for such yarn. At the same time, the label with the threads always indicates which tool is best suited for this type of yarn.
Hook position
There are two ways to hold the tool in your hand: like a table knife or a pencil. You need to choose the method that seems more comfortable. If your fingers get tired, you can change the position of the hook in your hand.
Initial loop
Beginner needlewomen are best off using step-by-step master classes, which describe in detail the technique of knitting the initial and subsequent air loops with a crochet hook. After training, the process will be quick and easy.
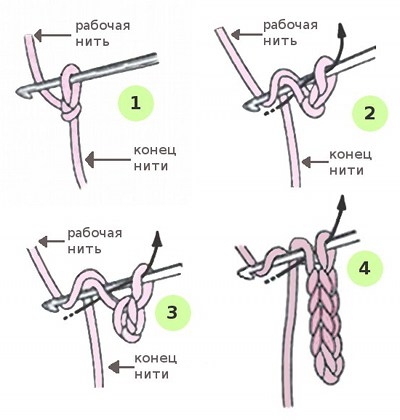
To knit the initial loop, you need to do the following:
- Throw the thread over to form a loop. The shortened part of the yarn should be on top.
- Insert the hook into the loop from below, holding the tool in a way that does not cause discomfort. If necessary, you can change the position.
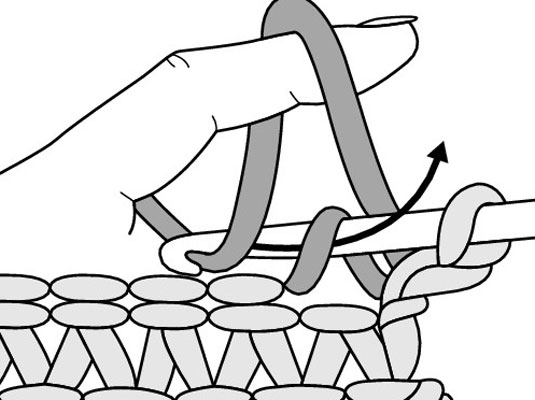
- Cross the long and shortened parts of the yarn. Lower the short end of the thread down, raise the long end up. Hold the long part of the yarn with your index finger. Place the thread over your finger and pull it slightly so that the loops are not too large.
- Grab the yarn with the tool. Hold the area where the threads cross with your middle and thumb.
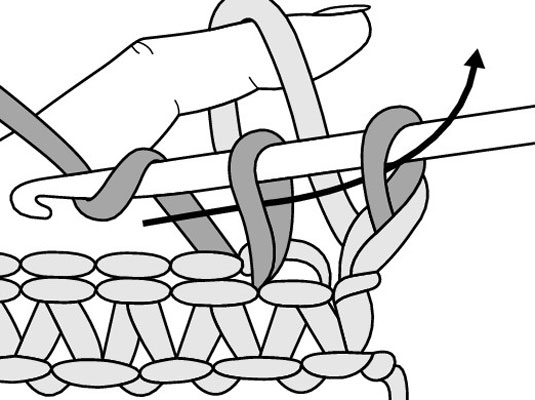
- Pull the fixed yarn through the knot.
- Tighten the element a little by pulling on the shortened end of the yarn.
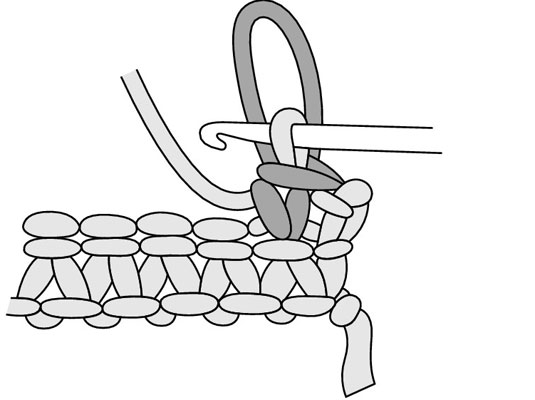
The result should be the first air knot. To make the product more dense, the loops should be made narrow.
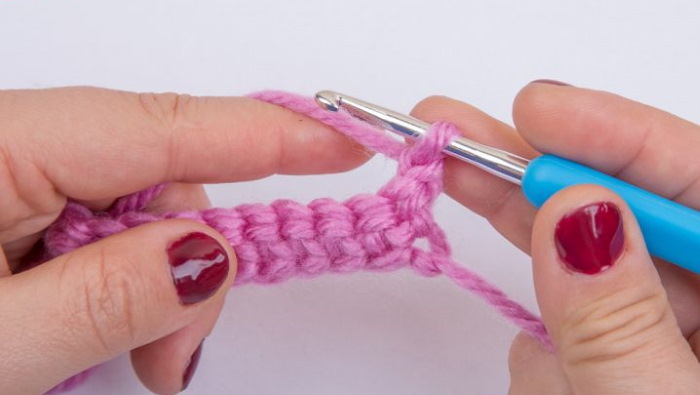
Sequence of work
Crochet air loops for beginners are presented step by step below:
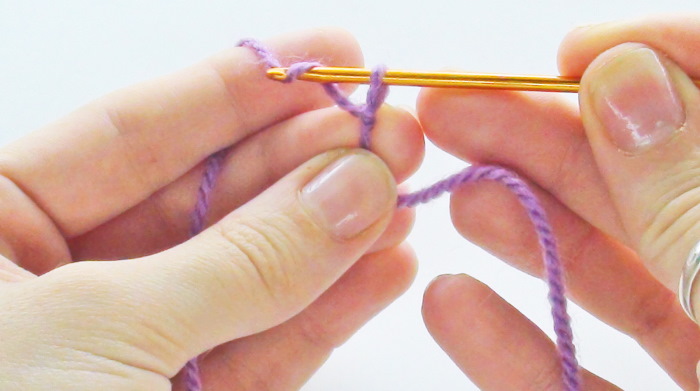
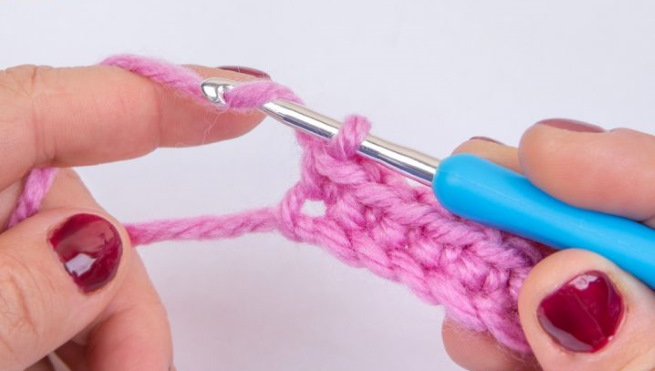
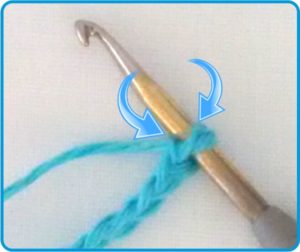
- Make the first knot and grab the working yarn with the tool.
- Pull it through the starting knot to create the first air element.
- To create the following chains, perform similar actions. Grab the working yarn with the tool and pull it through the air knot.
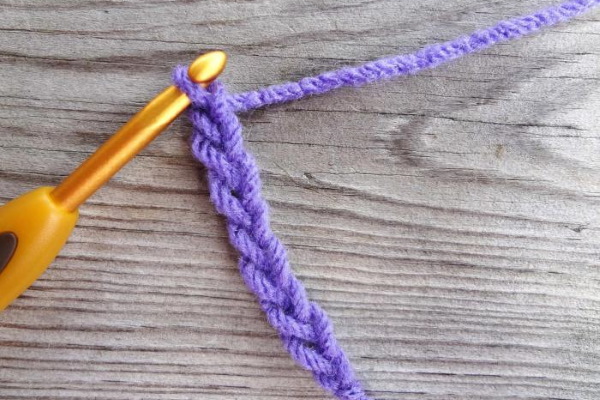
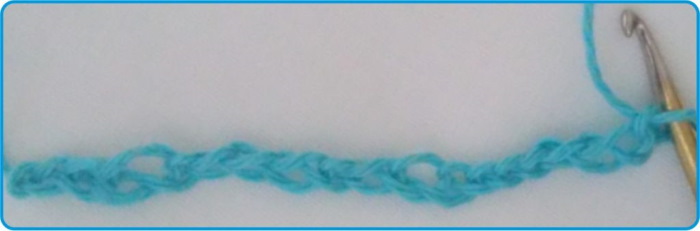
As a result, a chain should be formed. It should be knitted to the length needed to create the required width of the product. At the stage of calculating the number of knots, each air element will act as one element. The initial knot and loop on the tool should not be taken into account.
Although the chain of knots serves as the basis for the first row, it is not considered a row. It should be knitted loosely, without tightening the knots.
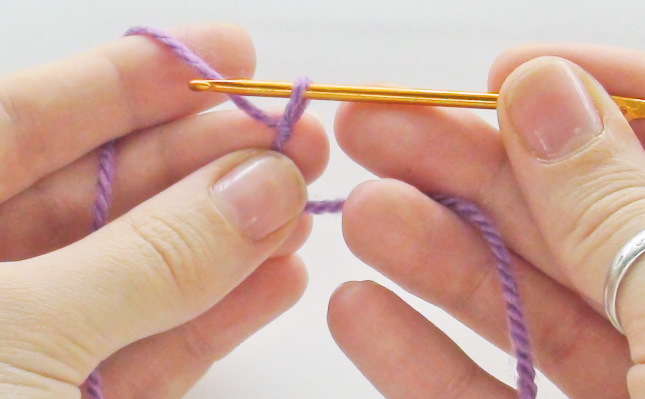
Thread position
When holding the tool in the right hand, the left hand must control the flow of working yarn. The thread must be constantly and evenly in a taut position. It is recommended to fix the yarn on the left index finger, grasping it with the little finger and ring finger. At the stage of knitting the chain, the yarn should be held with the middle and thumb fingers.
Application
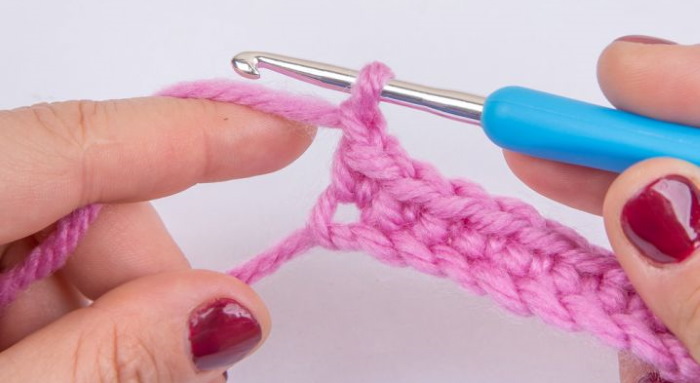
Air loops are used to construct columns. The latter are included in the nodes of the previous row, and at the very beginning of the work, in the absence of a row, its function is performed by a chain.
For lifting
To obtain a neat edge on the sides of the product, lifting loops are used. They are represented by the initial knots of each row of the product, allowing it to rise to the height required to create another row. Initially, the number of lifting loops will be added to the required number of knots of the initial chain.
The volume of lifting elements will be different for the columns, since their length will always be different: the connecting column will be short, with a yarn over – high. The longer the column, the more lifting loops will be needed. If there are not enough, the product will be pulled together on each side. If there are too many, the side edge will be uneven.
The optimal volume of lifting loops is set relative to the height of the column:
- half-column - not needed for it;
- single crochet – 1 element required;
- Column with yarn over – requires 2 elements.
The counting on the chain must be carried out from the leading node, which is located on the tool. However, it should not be taken into account. If the new row consists of single crochets, the first column will be knitted into the second braid knot.
Performing a Double Chain
Air loops crochet (for beginners step-by-step technology of creating a double chain is described) can act as an independent element in the form of a cord or connection for patterns in Irish lace. They can also be used to thicken the end of the fabric or to give the product more volume.
For these purposes, it is necessary to make a double chain, which requires a very long tail. To calculate its length, it is recommended to tie 10 air knots. The place where the work is finished should be marked. When unraveling the fabric, it is necessary to monitor the area where the chain began.
It is necessary to determine the size of the tail required for 10 knots, and then recalculate its size, taking into account the required quantity. It is advisable to make a small reserve.
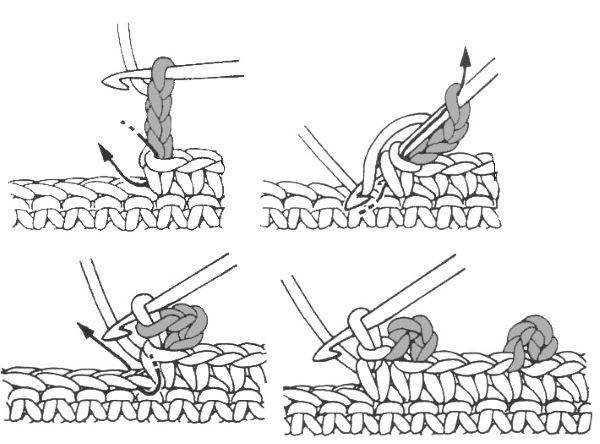
To make a double chain, you need to do the following:
- Leave a tail and make a starting knot.
- Intercept the yarn so that the tension of the working thread is controlled by the first and third fingers, and not the working thread by the last two fingers.
- Place the canvas on the second finger of your hand.
- Insert the tool between the threads under the idle one. Grab the working one and pull it through the knot located on the inventory.
Ring
For circular knitting, it is acceptable to start with a circle of air knots or a sliding loop. In the first version, the fabric will be openwork, in the second, the knot is tightened without leaving a hole in the center.
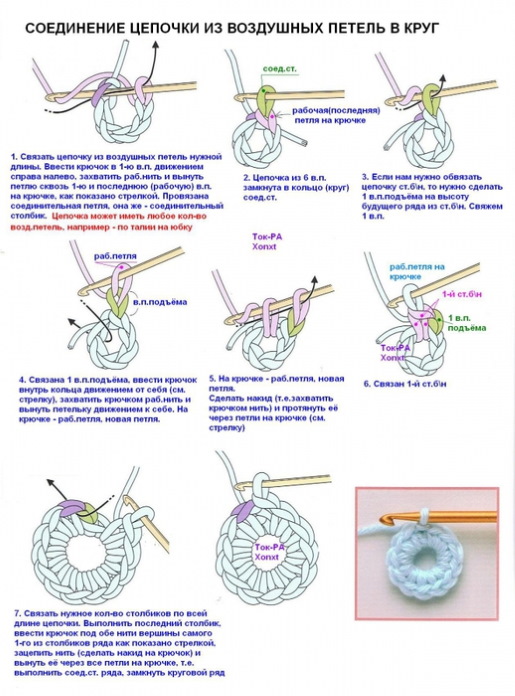
To create a ring, you need to knit the required number of knots and connect them to the first loop with a half-column. According to the diagram, the columns of the first row can be knitted into the middle of the ring or directly into the knots.
Pico
A picot is a small decorative element used in the creation of napkins. To create it, first knit the column required by the image, and then a chain of an odd number. Finally, a half-column is knitted into the base. The decorative bump that appears as a result is called a picot.
If this element ends with a single crochet that was tied into the first knot, it will end up asymmetrical. Therefore, it is necessary to study the image in detail, how and where it should be closed.
Fillet mesh
To create an openwork ornament in the form of a grid, it is necessary to alternate small columns with chains.
It can be made in any form or geometrically correct. This technique is often used in filet knitting and making interlocking guipure.
Common mistakes
Beginners often make common mistakes, which result in loops of different sizes, a twisted braid of air knots, or the thread is not completely captured. To avoid such mistakes, it is necessary to make about 50-100 such knots.
Loops of different sizes
Uneven knots are not a serious mistake. In this case, the product will be uneven and sloppy. Only practice helps to achieve identical knots in size. In this case, it is necessary to feel how many and with what force it is necessary to pull the yarn from the previous knot. The height of the loop should be such that only the tool can pass through it.
To make knots identical in size, you need to use 2 fingers: the right middle finger and the left thumb. The latter is required to hold the finished fabric or the previously tied knot.
The middle one fixes all the threads that are on the hook. It is he who does not allow the knots to stretch. Due to this, the following elements do not move apart, and the same amount of yarn comes out. As a result, all the loops will be identical in size.
If the braid is twisted
If the chain of air knots is twisted, this is considered a serious mistake. As a result, you will have to completely unravel the twisted section.
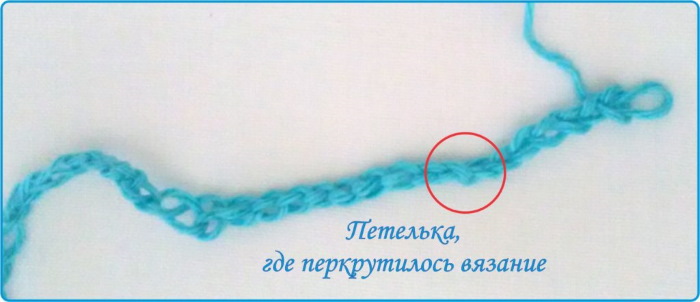
There are several reasons why this error occurs:
- knitting was stopped while forming air knots, which after resuming the process were not straightened out, and the hook was inserted from the wrong side;
- there is no fixation of knitting with the left thumb;
- While knitting the chain, the tool popped out and was subsequently inserted from the wrong side.
The tool must be inserted exclusively from the front side of the knitting. When pulling out the knot, the knitting must be facing the front side. The hook must be inserted into the element away from you and not inserted from the back side of the knot.
When knitting, the thread is not captured completely
The yarn may not be completely captured if one strand is not caught in the grip, or the yarn on the tool has not been pulled through all the strands in the knot.
To fix the problem, you can break the strand and pull out the thread, which will not be very noticeable in the image. However, this can cause other serious consequences. It is not recommended to use force when knitting. All knots should be easily and effortlessly pulled out. If force is applied, it means that the strand is going along the wrong trajectory.
Tying such a knot indicates that the strand is breaking and the thread is being pulled through the knot. As a result, a hole will appear on this section, because the thread has become much thinner. At the same time, this section will be much more difficult to unravel. For these purposes, it is not recommended to use force, you need to try to untangle the yarn. If you pull hard, the thread may break.
Beginners, in order to create any crocheted fabric, initially need to master the main elements of knitting - air loops and chains of them. For these purposes, you can follow step-by-step master classes, which describe in detail the technique of knitting.
Video about knitting
Crochet air loops for beginners: