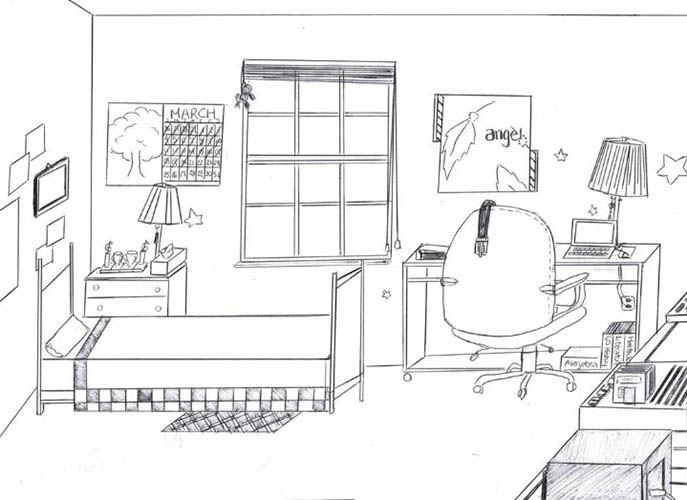
You can draw a schematic of your room (a plan of a living room) by hand using a pencil.
Drawing in 2D will do for a figurative representation of the furniture arrangement. But for a technical understanding of which side has lighting, where there are partitions, electricity, wiring and the height of window openings, it is necessary to draw up an architectural project with developments. It is important to maintain the scale in the projection in order to correctly display all the features of the layout.
How to draw a room with a pencil
To project a room plan, it is enough to know approximate data that will allow you to display the location of the walls, their length and height.
A regular sheet of paper will do for a sketch. And for a project created in a reduced scale, you will need paper with lines (graph paper). It is needed to accurately display the components of the drawing - furniture, electrical outlets, dimensions and more.
When creating a simple or perspective drawing, you need to understand that all lines must be straight and clear.
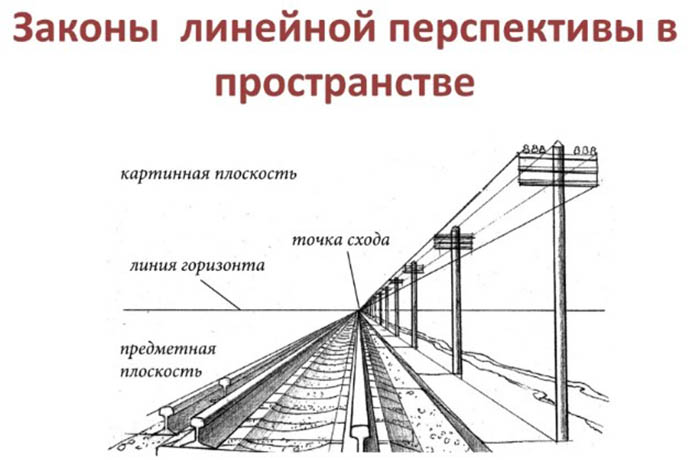
There are three necessary lines to construct perspective at one point:
- Diagonal lines that converge to the point where all the guides merge.
- Perspective drawings include straight vertical lines that intersect the horizon line at a 90° angle.
- Horizontal lines that remain parallel to the horizon line.
- Additionally, lines drawn at an angle of less than or more than 90C are highlighted.
To build a room, you need to understand the principles of working with perspective, and for this you need to study it in the image, as well as understand the concept itself.
Necessary materials and tools
The main tool that you must have at hand is a ruler, since you will have to draw many straight lines and measurements for the image. You will also need a pencil or a 0.1-0.3 mm liner. For convenience, you will need graph paper or A4 paper (office, watercolor).
You may also need:
- tape measure for measuring the length of the walls of a room;
- ruler for drawing lines;
- scale symbols (1:50, 1:100);
- a simple pencil or artist's lead;
- eraser;
- calculator to save scaling.
As a rule, a room plan can be drawn from different points – the observer can stand opposite the center of the room, in the corner, or above/below the center. The work is complicated by the fact that it will not be possible to draw the furniture right away. It is necessary to build a perspective. To do this, you should make a top view in the form of a plan, and then start creating a drawing in three dimensions.
Room plan
You can draw your room only if you know its dimensions. Measurements are taken in the same way as when drawing up a plan for ordering furniture, buying interior decor. Designers do this using a regular centimeter tape measure and millimeter paper.
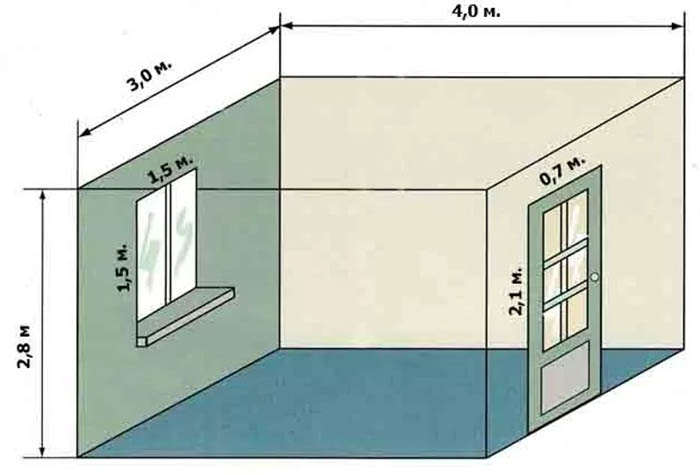
A schematic plan can be drawn up, starting with measuring the lengths of the walls:
- You need to draw a top view - measure the lengths of all the walls.
- The dimensions need to be transferred to the drawing in scale. For example, 1:8.
- If the wall is 198 cm, then on a scale of 1:8 in the drawing the wall will be 24.7 cm long.
- While maintaining the scale, it is necessary to transfer the measurements of all lengths.
- The height of the walls will be transferred taking into account the drawing plan.
- If there are corners and niches in the room, they should be marked on the drawing with a top view.
- All sockets, radiator mounts and small items should also be schematically marked on the plan. This will help to adjust the choice of furniture.
- The height of the window sill, its dimensions and the window layout plan should also be transferred taking into account the scale.
- By maintaining the correct angle, you can transfer the image of a room onto paper with incredible accuracy.
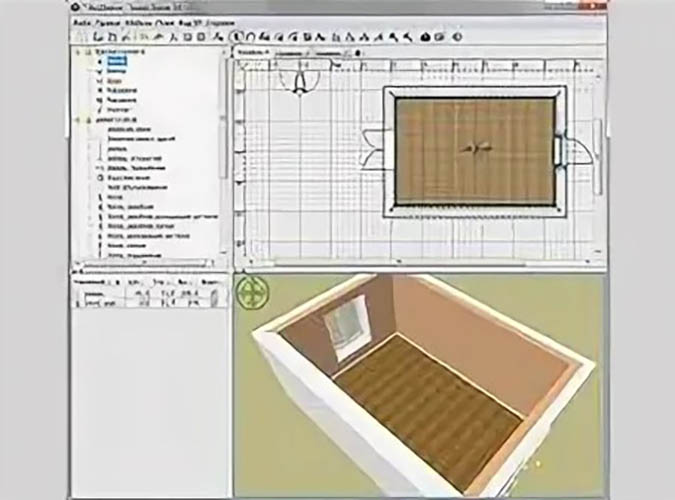
If it is more difficult to work with a pencil at first, you can use programs with a room planning function. They use a virtual mode in 3D format, and it will be easier to visualize the room from the inside.
When working with graph paper, it is important to observe not only the scale of the room size reduction, but also the dimensions of the drawing. For example, 1:3 mm allows you to make a small drawing, but taking into account the reduced size and schematic reflection of cm in mm.
Next, you need to create a configuration:
- Make a list of all the furniture in the room.
- Take measurements of each piece of furniture.
- Schematically display the furniture arrangement on the plan.
- Transfer the furniture layout sketches to the main plan.
- Next, you need to construct a drawing in perspective.
To draw furniture in the interior in detail, you need to build a plan correctly. This can be done only by understanding the concept of what perspective is and how to work correctly in this direction.
Basic concepts of perspective drawing techniques
An image created in perspective is an academic drawing that is usually created by artists and designers. A realistic image involves gaining knowledge of the basics of perspective, constructing a composition, and working with proportions. There are several types of perspective:
| Reverse perspective | Direct linear perspective | Aerial perspective |
| This is the principle of transferring an image with distortion onto a flat surface, taking into account the reality of the world. | There is a single vanishing point here for all the lengthening and receding lines. They converge to a point on the horizon line. | The elements are not clearly defined on the sheet of paper, but as they move away they reveal the depth of the painting. Artists use this technique for accents and to add volume. |
| The peculiarity lies in the discrepancy between relative forms and projection. It is more common in painting and icon painting. | Previously, the technique was used in monumental paintings. Today, it is the basic principles of constructing space in a linear painting. | Combines with linear technique in perspective. The first to use it in painting was Leonardo da Vinci. |
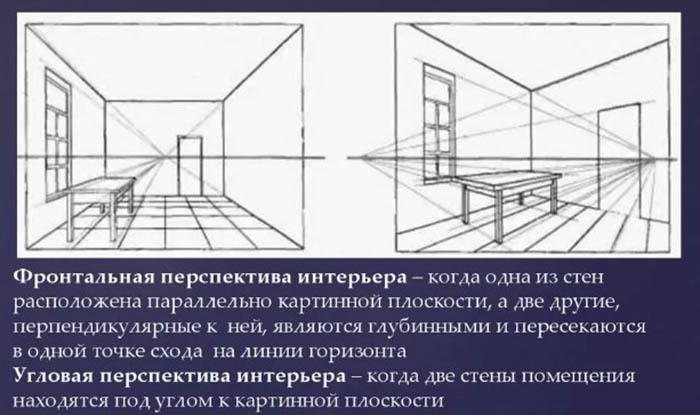
You can draw your room in different perspectives, but the most convenient for creating a room plan are considered to be frontal and angular. The principles of constructing a room in these drawing methods are based on linear and aerial perspectives, so you will have to have knowledge in all these directions.
The basic principles of drawing construction are based on such principles as:
- linear change of objects in space;
- light change and shadows;
- color reflection;
- tonal distortion;
- color contrast;
- dimensional changes in contours.
In constructing building plans, volumetric drawing is most often used – direct and angular perspective. The latter shows the location of a person relative to the image. If objects are at an angle from different angles, you can see edges, planes and ribs. They are not visible in frontal perspective, when the object is depicted in one plane.
There are laws of linear perspective:
- Depth of space is achieved by overlapping a distant object with a nearby one.
- The foreground (the closest object to the observer) is always larger than the object in the background.
- Visually, you can achieve a smooth movement of objects away by layering three perspectives.
- The closer the object is to the observer, the closer it is to the edge of the sheet. The further it is, the higher it is from the bottom edge.
- The bases of distant objects are higher than the bases of those that are closer.
- The vertical guide lines are not distorted, always remaining vertical. The exception is the lines that a person looks at from the bottom up. Then they need to be drawn in perspective to the center of the upper edge of the sheet.
- The horizontal edges in the angular rotation are located at an angle. They are also shorter in the angular position than in the frontal perspective.
Frontal perspective depicts objects without linear changes. Angular perspective shows these changes. Horizontal lines of the same size as vertical ones will be shorter in the drawing. In this regard, objects will also appear shorter due to the linear reduction in space in relation to the artist.
It is also important to see the horizontal direction of the ribs:
- The closer they are to the horizon line, the shorter they are in the drawing.
- The plane lying on the horizon line remains straight.
- A circle placed in angular perspective looks like a ball, but you need to draw an ellipse with the addition of shadows.
- If the ball is turned to one side, the far side must be pulled out. The same applies to the location above/below the center of the picture.
All these principles are based on the laws of aerial perspective, which are also important to understand when creating a drawing:
| Nearby objects | All are located in the foreground, detailed and described in detail. |
| Removed items | Without drawing, it is necessary to arrange without details, in a generalized manner. |
| Definition | Drawing the foreground to the center of the drawing. Distant objects are outlined with a blurred outline. |
| Light | The further away the object, the lighter it is. The closer, the darker it is in aerial perspective. |
| Sharpness | The contours are made in contrast - the closer the object, the clearer and larger its contours. |
| Volume | Nearby objects will always have volume and depth, while distant objects will be in chiaroscuro. |
| Shadows | The front objects are highlighted by chiaroscuro, the distant ones by flat shadow. |
| Color rendering | Distant objects seem smoky, blue, gray, violet shades are used. Nearby objects are distinguished by their multicolor. |
| Height | Nearby objects have clear variations in height, while distant objects (even those that differ greatly in height) are depicted with little difference. |
You can draw a room in linear perspective with elements of angular and aerial. To learn how to display furniture in your room on a plan, you should learn to draw the simplest thing - rails that go into the distance in direct perspective without angular distortion.
Here the horizon line will be conditional, located at the level of the artist's eyes. Of the elements of aerial perspective in such a landscape, only color changes are taken as a basis. The further the rails, the less brightness and saturation.
Image of the room step by step
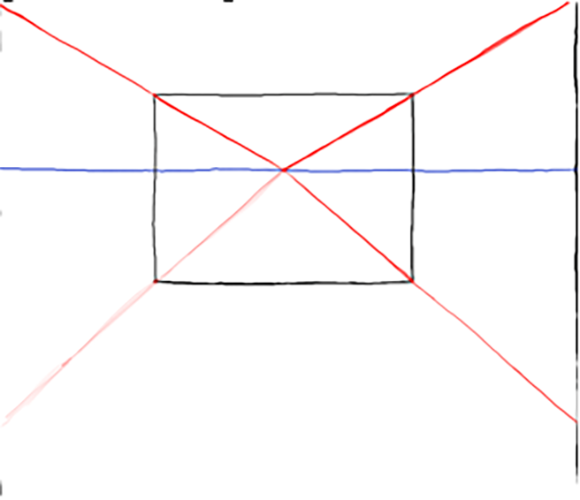
A geometric figure – a cube – can be used as the basis for the image of the room. The other objects located nearby are the same figures in space, close to the main cube. No matter how complex the interior may seem, it will always be seen as a rectangle due to the height of the ceilings and the width of the walls.
To draw a room, you need to construct a frontal drawing with linear perspective:
- The center and horizon line are located relatively at the artist's eye level.
- Taking into account the scale, you need to mark the points where the furniture will be located.
- Linear-constructive construction taking into account the regularity is a method of reflecting clear lines. It is necessary to highlight the darker distant corners and edges with these edges.
- All side walls, windows, interior items will be removed, so horizontal lines need to be drawn at an angle. To maintain the angle of inclination, you need to draw many solid lines from the center slightly to the edges of the drawing.
- After this, you need to start depicting large elements that are as close as possible to the observer.
Here it is important to understand which side the observer will be on, and whether he will always be looking directly at the center of the room.
In the picture, the horizon line is located above the relative center of the sheet. The perspective of the convergence of all points will be located approximately on 2/3 of the image.
The wall will look like a rectangle in one plane, since this is a linear perspective.
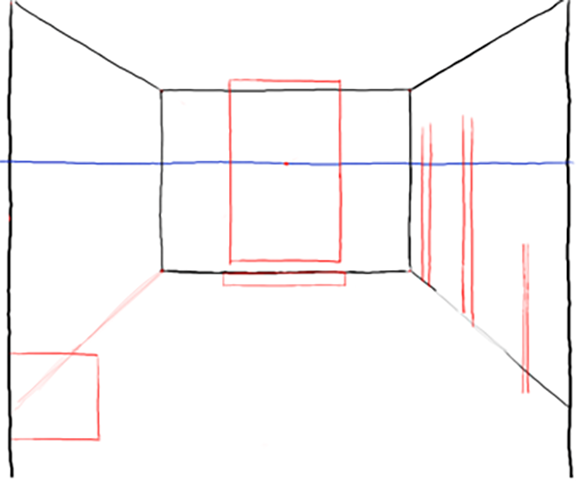
Drawing details in linear perspective
You can draw your room without a ruler after constructing the vanishing lines, taking into account the direction of the corner edges. All the details will also have an angle of inclination equal to the angle formed at the edge of the sheet. The construction line can then be erased, leaving only the edges of the room.

Next you need to fill the room with furniture.
- Knowing the height of the window and door, you can mark it on the drawing. And from the center of the convergence of the lines, draw guides at an angle to constructively mark the distortion of the horizontal lines.
- Next, you can draw large objects – a sofa, a table and a bed (if there is one).
- All volumetric objects have depressions, recesses and depths. They also need to be displayed in perspective.
- Vertical lines should be drawn at the end - they go at an angle to the horizontal lines.
- The vanishing points to the tops of vertical objects should be drawn from the center.
- Round and oval objects should be used to draw lamps and lights.
- Next, you need to work out the details of the objects that have already been transferred to the plan - chair legs, sockets, and other small things.
- Some pieces of upholstered furniture have rounded edges. To do this, you need to draw a corner piece and then round it.
- If the piece of furniture is turned sideways to the observer, stands at an angle, then you need to draw additional vanishing points from the point where the piece of furniture is turned (at the horizon level).
Once the drawing is technically complete, you can begin to work on the details and drawing elements such as the fireplace masonry, baseboards, wires, door handles, and so on.
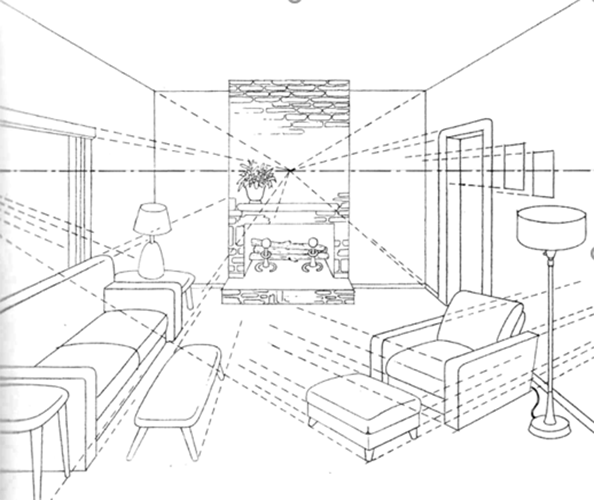
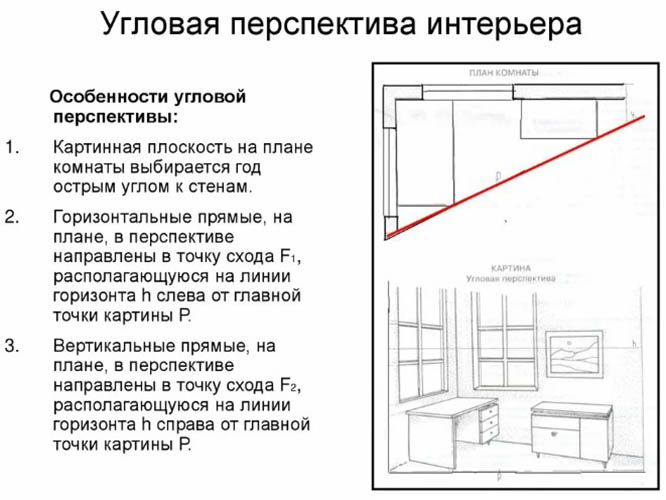
Constructing angular perspective
It is also possible to draw your room in an angular perspective, but you need to follow the laws and principles of constructing such a perspective. To depict it at an angle means shifting the center of convergence of lines. To create an interior environment, you need to determine from which side you should observe, and then mark the center point and the horizon line.
From the given point, you need to draw the following step by step:
- In the room plan there will be one horizon, provided that aerial perspective and its elements are not used. If you need to show the fireplace masonry in detail in frontal perspective, as well as draw the details, then you need to build two horizons and two convergence points of the lines.
- From the vanishing point, you need to draw lines to the edges of the drawing, and perform all the actions described earlier.
- The angle of the lines closer to the vanishing point will be steeper than the angle of the lines further from the vanishing center. This means that the observer is closer to the left corner.
- All horizontal lines will be angled and directed in the direction in which the line leaves the vanishing point.
- The foreground details need to be worked on more softly, and the background details need to be made darker.
- Some items will have a shadow image that is at an angle.
After drawing the details, you can proceed to the shadow painting technique. Such methods of constructing an interior plan are convenient for creating styles and creating accents.
A beginner artist or even a person who is unfamiliar with drawing and fine art techniques can draw a plan of his room. Nowadays, modern programs are available that do not require special skills and knowledge in the field of applied art.
However, most often, plans of buildings and premises are drawn by hand, where there is no opportunity to see the project in a three-dimensional image. Therefore, sometimes technical plans and style solutions are designed by architects and designers in pencil, where each viewing angle gives birth to a new project, but from a different angle.
Video about drawing a room plan