For Beginner Artists Trees seem like easy objects to draw if you depict them, for example, a pine tree, schematically. Careful drawing of the trunk and branches, decorated with realistic needles, will take much more time.
Moreover, the drawing itself will require a certain level of skill from the artist, and for children just starting to draw, the rules for composing a composition will be quite complex. Therefore, it is worth starting with simple techniques, improving them as you progress towards mastery.
General rules for drawing a pine tree
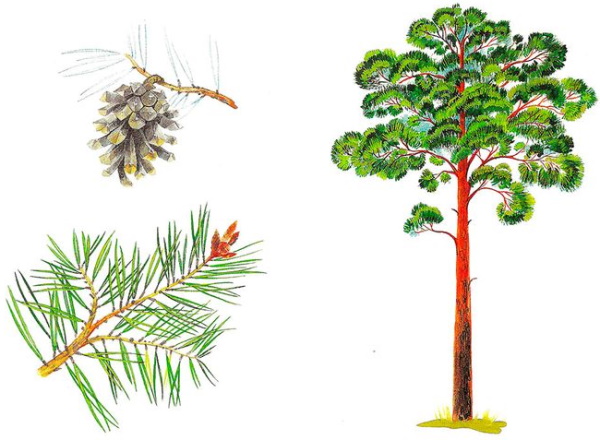
A tree like pine is familiar even to little children, because its large sharp needles can prick a finger, unlike the small needles of a fir tree. A pine tree is usually an element of a landscape painting. In this case, you will need the ability to compose a composition, taking into account that the pine will be drawn surrounded by other trees and objects.
To obtain a realistic image, you need to take into account a number of general drawing rules, presented in the table below:
| What to draw | Secrets of the image |
| Trunk | Since the pine tree has a much smaller crown of branches with needles than the fir tree, the image of the trunk comes to the foreground. The trunk should be straight and tall, but not wide, like other trees. It is necessary to decide in advance what kind of plant will be drawn, because the field variety of pine often has a trunk that forks in the area of the first quarter from the ground level. |
| Bark | The texture of the bark is applied with short, chaotic strokes. Pine branches growing at a slight angle to the trunk should not be straight. To achieve a natural display, it is better to apply them with fancy bends, and provide large branches with small shoots. With distance from the trunk, their number increases, then the cap of needles will look solid. |
| Crown | The crowns of different types of pine look different. For example, the field variety has a very dense halo of needles, located approximately 2 m from the ground. At the same time, the forest pine does not have a solid cap, and the branches decorating the top are almost devoid of small twigs. |
| Branches | Despite the fact that the drawing is a flat projection, to give it volume, it is necessary to draw not only the side branches, but also the shoots located in front and behind. Moreover, the density of the front branches should be increased, but they should be made shorter than the branches in the background. They can be not particularly detailed, but drawn with schematic lines. |
| Needles | To depict the needles of the conifer, hatching is used. The side parts of the trunk should be hatched more deeply to give it the effect of a cylindrical shape. In nature, the branches of the lower tier of adult trees are usually dry and broken, completely devoid of needles. This aspect, which gives the image a touch of reality, should be displayed in the picture. |
The pine tree (a drawing for children learning to draw will look natural if you teach the beginning artist the main secret - to follow the sequence when drawing the elements of the tree) is done in stages, starting with large details of the composition, gradually moving on to smaller ones.
However, the coloring process is done in reverse order - from small elements to large ones. Knowing simple rules will help children successfully implement their ideas on paper.
How to draw a pine tree easily with a pencil
The technique of drawing with a pencil is not complicated, children can easily cope with this task, but first you need to prepare the materials for work:
- paper - several sheets, you can stock up on an album;
- you will need pencils of different softness (hard HB, medium 2B, soft 5B);
- eraser and sharpener to keep pencils sharp.
If this is a trial drawing, you don't have to think about the idea of the composition, then you can immediately start artistic creativity, observing the sequence of stages. You won't need pencils of different softness for drawing, a simple pencil and two colored pencils (green, brown) are enough.
Step-by-step diagram of the pine tree image:
| Stages | How to draw |
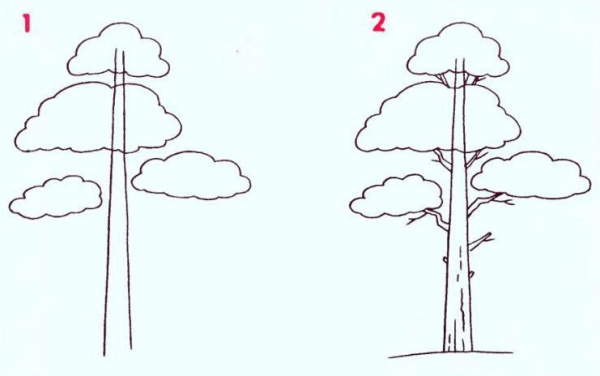
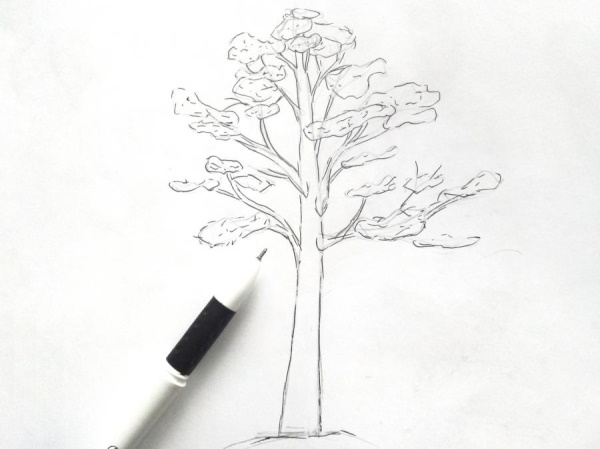
| 1 | In the chosen place, use a simple pencil to draw 2 lines of the trunk on a sheet of paper, which in the upper part tend to each other. Moreover, the lower part of the trunk should be much wider than the top. |
| 2 | Draw 4-5 "clouds" of needles so that the top of the pine tree is crowned with a small cap, and the remaining "clouds" can be placed on the sides. It is better if the middle "cloud" of needles is large and crosses the trunk. |
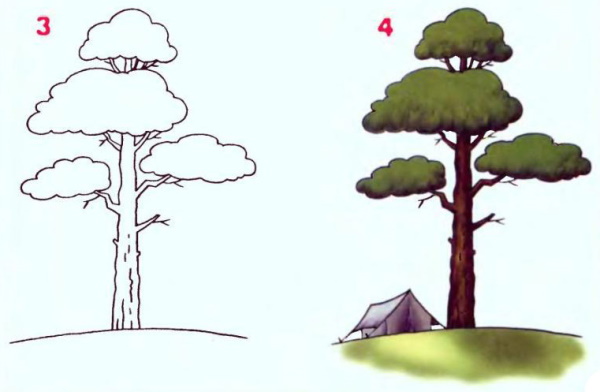
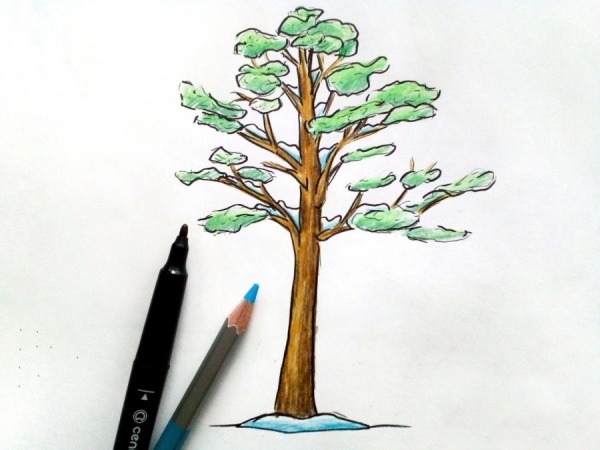
| 3 | Since the needles on the pine tree are not visible from afar, the coniferous caps can be shaded with a green pencil, without going beyond the contour. The coniferous "cloud" covering the trunk in the drawing should also be completely painted green. |
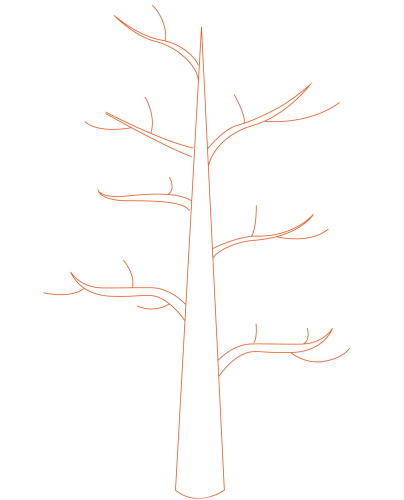
| 4 | Trees are never without branches, their narrow contours are drawn with a pencil, but the branches are thicker at the bottom. They need to be drawn curved, with an abundance of small shoots, because in nature, pine trees have many dried branches in the lower tier. |
| 5 | It is worth drawing the inner part of the contours of the trunk and branches with a brown pencil. It is important not to go beyond the boundary lines, but also not to intrude into the contours of the green "clouds". |
This pine tree drawing scheme is not difficult for small children, since the brain first fixes the general plan of the picture, without paying much attention to the details. As the child gets older, it will be easier for him to understand the techniques of composing a composition involving a pine tree.
How to draw pine needles
Pine is not a very branchy tree, like oak or birch, its drawing will not be difficult for young children. After mastering the techniques of schematic representation, future artists are interested in learning how to draw more realistic and complex compositions so that the pine looks as natural as possible.
After all, in nature, its needles are not solid green "clouds", but rather long and sharp needles, which should be depicted more realistically. Moreover, they are not always straight, not equally densely located on the curved branches of the giant forest tree.
Pine branch
When starting to draw, it is better to stock up on a photograph of the object being drawn or simply put a pine branch in front of you, then it will be easier to reproduce its image on paper. In this case, it is allowed to use felt-tip pens along with a pencil.
If children decide to paint with paints, they first choose shades from the color palette, having prepared paint mixtures in advance.
How to proceed further:
- Use a simple pencil to outline the branch. From its uneven outline, draw additional branches on different sides. They can come out of the nodes, be single shoots of different lengths, but also without a hint of straightness.
- Using the prepared brown paint, carefully fill in the outline of the branch drawn with a pencil. When it dries, you can start working on the needles of the pine needles. They should be painted immediately with green paint.
- Pine needles, unlike the ordered needles of spruce, rarely grow singly, but more often in pairs. Green paint is used to draw the needles extending from the branch, both straight and wavy. Although their length is the same, they should stick out quite out of order.
For a simpler drawing of a pine branch, prepare a fork. On a sheet of paper, draw the base - a curved line - with diluted brown gouache. In a flat container, dilute green paint and dip the fork tines into it.
Then, on paper, place the imprints of the teeth at an angle to the drawn branch, stretching them towards the base so that the needles are elongated. Now you can place the imprints of snow on top of the drawn needles using cotton swabs soaked in white paint. You get neat balls of falling snow.
Crown of a pine tree
A coniferous tree with large needles can be young or mature. The crown of a young pine tree is usually conical, and the tree itself resembles a spruce.
Therefore, a young pine tree can be drawn according to the pattern for a Christmas tree:
- Using a hard pencil, outline a triangle – isosceles and large. From the top of the geometric figure, drop a perpendicular, extending it beyond the triangle. This will be the base of the trunk.
- To the left and right of the central line, mark the contours of the crown, drawing them with wavy lines. As you move downwards, the imprints of the contours may extend beyond the triangle.
- The auxiliary lines used to construct the figure are removed with an eraser. At the bottom, in place of the end part of the perpendicular, draw the trunk, it will be short but wide.
The pine tree (a children's drawing in a schematic version together with a coniferous crown will become much more beautiful if it is depicted in color) can be colored. The trunk can be made brown, and the triangular needles - green. Often, solitary pines grow at an angle, and their crown is directed mainly towards the slope, where there is more sun.
It is easier to draw such a tree - its trunk is drawn at an angle, on one side a triangle of the crown with a semicircular base is indicated. Inside the sketch, curved branches (large and small) are drawn, which are supplied with many needle-like strokes.
Pine cone
Conifer cones are modified shoots covered with wood scales. Unlike Christmas tree cones, pine cones have a more elongated shape. To draw a pine cone, you will need pencils, and the pencil sketch can be colored with watercolors.
Scheme of drawing with a pencil and subsequent coloring with watercolors:
| Stages | What to do |
| 1 | Using a simple pencil, draw a vertical arc in the center of the sheet to mark the center of the future cone. Draw arcs on both sides of the figure, closing them into an oval. |
| 2 | Drawing of small scales starts from the base of the figure, moving upwards. The first scale should be placed in the center, the rest move away from it. |
| 3 | After filling the oval with scales of a peculiar shape, traces of auxiliary lines will need to be removed with an eraser. |
| 4 | Cover the figure with a thin layer of light brown paint. The base layer should be translucent. |
| 5 | By mixing green with light brown, we get a darker color. It should be applied as a second layer, leaving light spots. |
| 6 | It is worth adding a little brown color to the remaining watercolor on the palette. This mixture will be needed to draw the shadow areas. |
The pine tree with cones should look more natural. Therefore, when the drawing dries, it can be worked with black liners. The scales should be edged with a thicker liner, and the hatching inside them should be done with a thinner liner. The base of the cone can be decorated with green highlights of long pine needles.
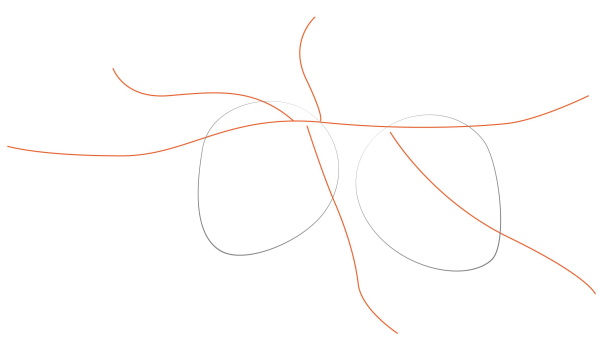
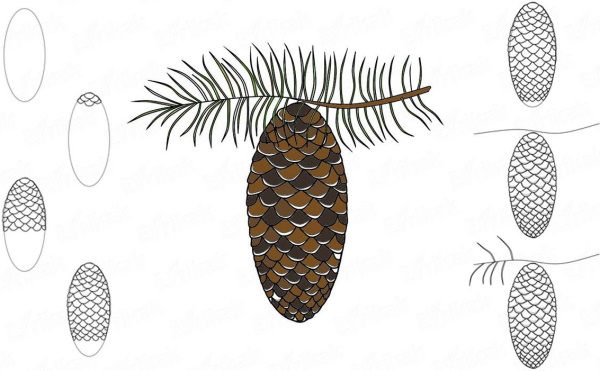
Pine branch with a cone
It is better to draw from life, it is not difficult for a child to imagine what such a composition looks like in nature. You should start working on the drawing with a schematic sketch of the future branch with a pine cone attached to it in the chosen place.
How to proceed further:
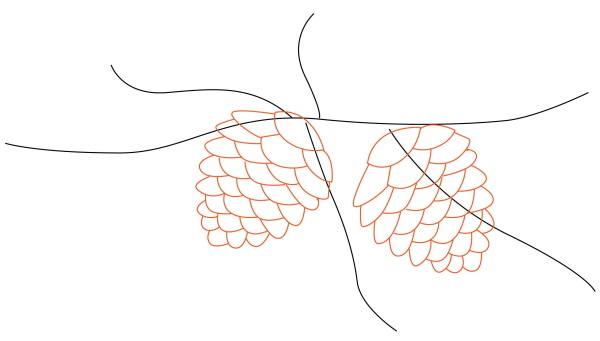
- Sketch of a pine cone. Using the techniques already learned, draw a pine cone step by step with densely placed scales of different sizes. The figure should be facing downwards with the sharper end, the layer of scales at the bottom should be slightly thickened. The extra strokes on the picture are erased with an eraser.
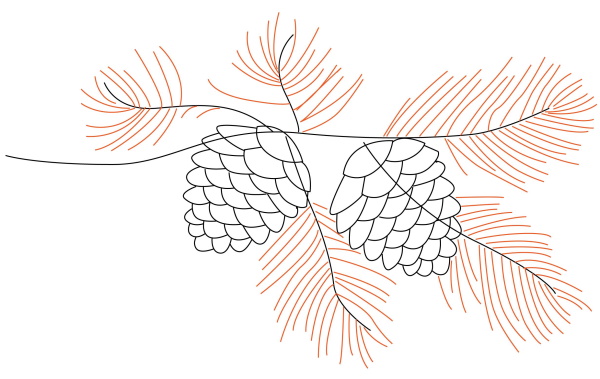
- Working on the branch. On the curved skeleton of the branch (sketch) draw the needles, taking into account whether they will cover the cone or the shoot will come to the foreground. Long needles extending from the branch are applied in chaotic directions. To make the branch seem fluffy, many needles are drawn thickly.

A pine tree (a full-size drawing for school-age children using a schematic method will be a simple task) can be depicted partially. A pine branch with one or more cones is more difficult to draw, since you need to know the rules for applying shadows.
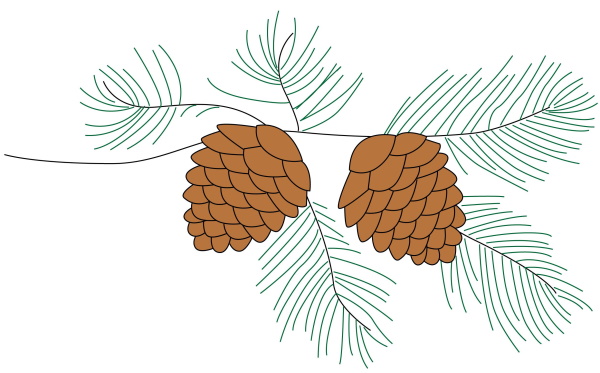
At the final stage of artistic creativity, children begin to color the sketch at their own choice - with paints or pencils, but taking into account the shades of needles and scales. If the child has mastered the skills of drawing a pine cone well, the pine branch can be drawn longer, placing several cones of different types on it - with open or closed scales.
How to Draw a Lonely Pine Tree
When starting to create, you should think about the composition together with all its details. It is advisable to prepare a sample image with a pine tree (picture, photo).
For less experienced artists, it is better to start with unsaturated landscapes, where the pine tree is depicted as a solitary tree.
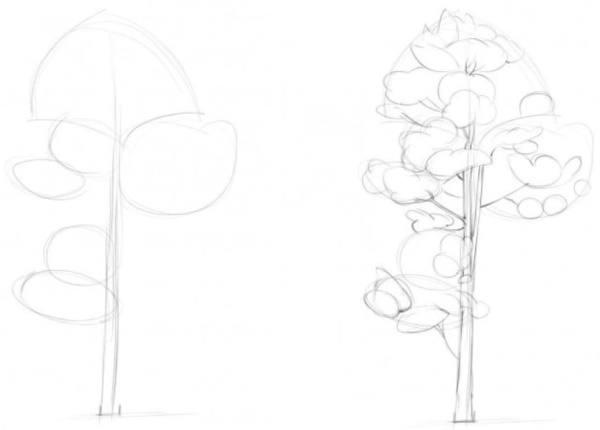
- First, in the chosen place (taking into account other elements of the composition), you need to mark the general outline of the tree using dots. Using barely noticeable strokes and dots, mark the line of the trunk, branches, and crown. This can be done with a hard pencil, then the sketches in the drawing will be barely noticeable.
- At the next stage, "clouds" of coniferous caps are placed on the branches. They should not be even. The contour line is drawn broken, leaving more free space between the "clouds" themselves. The coniferous caps can overlap the trunk or branches to make the picture look more natural.
- Next up is the image of a narrow outline of a long trunk. Having drawn it with a hard pencil, darken the trunk with a soft 2B pencil, and then shade the side that is in the shade with a softer 5B pencil. The tree branches also need to be shaded, without intruding into the caps of the future needles. Use an eraser to remove the lines that go beyond the outline.
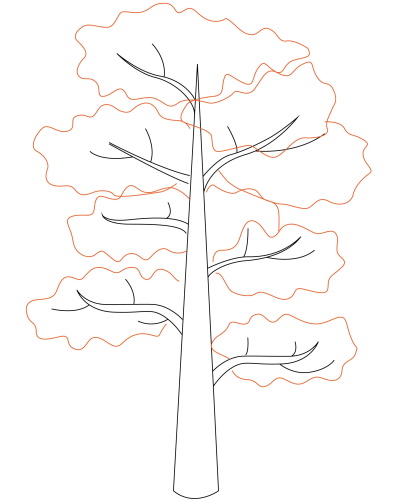
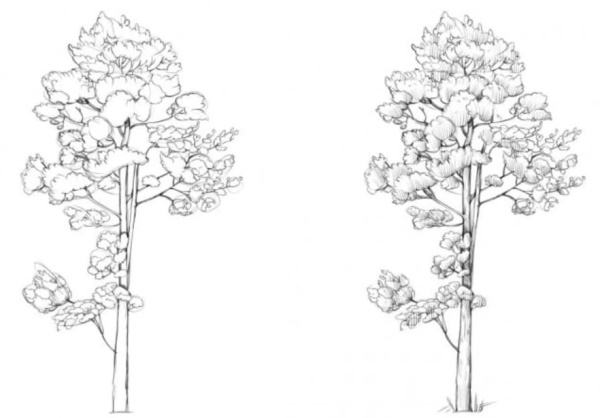
- When filling the "clouds" with needles, it is worth giving them a tousled look. The effect is achieved by hatching, but not with straight, but curved strokes, because straight lines are rare in nature. Therefore, it is better to apply the needles chaotically with sharp hatching with a pencil.
- Next, start to mark the needles along the contours of the "clouds". For this, you will need a 2B pencil, since you will have to draw thin strokes with sharp tips. If the pine does not look fluffy enough, you can use the same pencil to add needles inside the coniferous caps.
- At the final stage, the "clouds" with the needles should be slightly darkened with the softest pencil. However, it is better not to shade them completely, otherwise the green caps will look too schematic. Only those "clouds" that are between the lines of the branches should be completely darkened.
The pine tree (a drawing for older children) is often the main element of the painting's composition. Having finished working on the key figure, they begin to designate the components of the background. It will not be difficult for teenagers to cope with the plot of a lonely pine tree on the deserted shore of a reservoir (sea or river).
In this version of the landscape, the lonely tree should be already mature, growing at an angle to the shore, and the crown of the pine will be dense mainly on one side, where there is more sun. On the leeward side of the trunk, only dry, broken branches without needles are drawn.
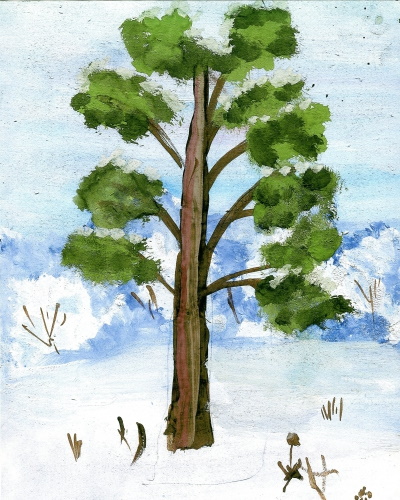
Pine tree in winter
In a winter forest, against the background of white snowdrifts, the typical features of all tree species look especially distinct, which requires careful drawing of details. Children who have not yet mastered the technique of depicting other tree species find it easier to draw a landscape of a winter forest with a predominance of conifers.
Work on the drawing begins with drawing low snowdrifts in the foreground, the height of which increases as they move further into the depths.
Next, schematically mark the locations of the trees, these will be spruce and pine trees mixed together, of different heights. Moreover, short spruce trees are shown schematically with a triangular crown, and tall pines - with a "cloud" type crown.
In this version of the landscape, the trunk will be partially visible due to the snowdrifts, which makes the work easier. The needles of the fir and pine trees should be decorated with snow caps, having marked them in advance before painting the crown, or the already painted greenery of the needles should be “sprinkled” with snow from white strokes of watercolor.
From the fairytale forest
Children will love the idea of drawing a pine tree from a fairytale forest or its branch. A similar fragment can be used to decorate a homemade New Year's card.
How to quickly paint a pine tree with paints:
- Prepare a sheet of colored paper and gouache, brushes. To obtain a light green shade on the palette, add a little green to the white paint. With the resulting paint, outline the contours of the pine tree or its branches with shoots in the chosen place.
- Using the same light green tone, draw the initial "layer" of pine needles, using a wide brush. However, each needle in the pine needle caps should not be thin, this is the basis for further work on the drawing.
- Having prepared the dark green paint, add a little blue to the green gouache. Using the thinnest brush, carefully draw thin strokes over the light green base to create a play of light and shadow.
- The surface of the trunk or branch of the pine tree should first be painted with light brown paint, using a thick brush. Then, using a thinner brush, draw dark brown strokes on top, their thickness will resemble natural bark.
To achieve a festive feeling, you can decorate a branch or the entire tree not only with images of pine cones, but also with colorful Christmas balls.
It is better to think about their placement in advance in order to mark the contours of additional elements at the marking stage. The branches of the fairy-tale pine, sparkling with bright balls and scaly cones, can be sprinkled with snowflakes if the child has learned to draw them.
The composition of the drawing should be discussed with the young artist in advance so that the image of a pine tree or pine branch with cones, made with pencils or paints, is expressive enough. It is also worth considering that for children of different age groups, it is necessary to choose a drawing technique in accordance with the acquired skills of step-by-step drawing of details.
Video about drawing a pine tree
Drawing trees with paints: