Bees are amazing creatures, giving people healing and sweet honey. They can be seen not only in nature, but also captured in a drawing. Images can be with honeycombs or limited to insects with bright black and orange coloring.
How to make a graphic drawing on a bee theme step by step
In a painting where bees are the main characters, there are often honeycombs, hives and flowers. Therefore, it is important to learn how to draw these objects.
Hexagon
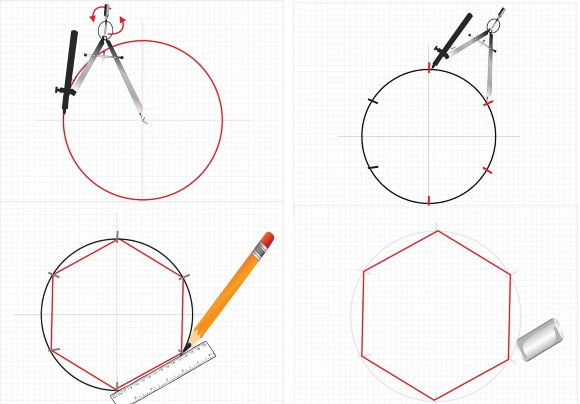
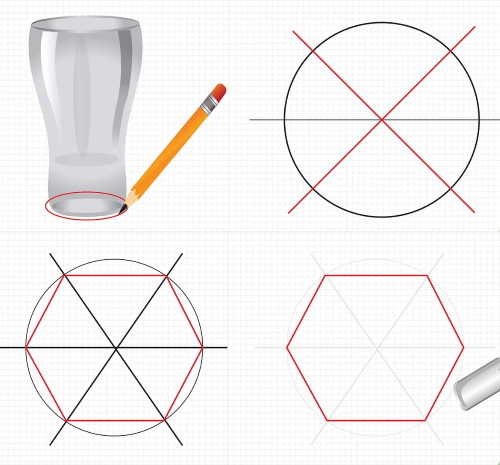
Honeycombs (their design is based on the rules of geometry) have the shape of hexagons. This is a figure on a plane that has 6 angles. A regular hexagon has all angles equal, the same applies to the sides. To draw it, you should use a protractor and a tape measure. A rough hexagon can be drawn using a ruler and a round object.
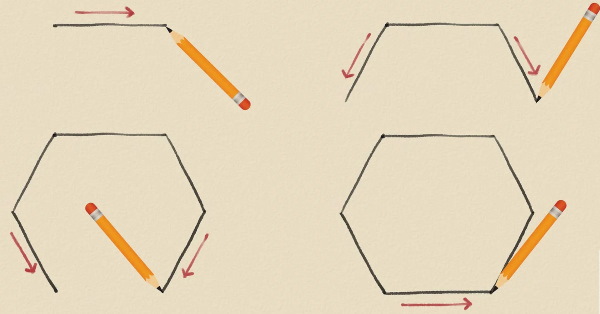
There are 3 ways to draw a hexagon:
| Way | Sequence of actions |
| Using a compass |
|
| Using a ruler and a round object |
|
| Using only a pencil |
|
Honeycombs
Honeycombs (the drawing always starts with a 6-sided figure) are formed from the union of many 6-sided figures. When drawing them, it is important to ensure that all the honeycombs are the same size.
Bee
Once the honeycombs are drawn, you can move on to drawing the bee.
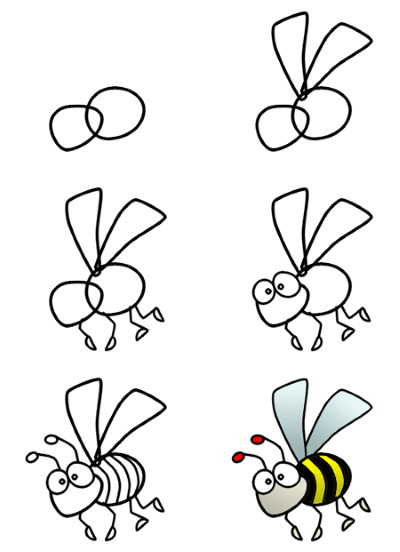
This can be done in 5 steps:
| Stage | Description |
| Head image | On the left side of the paper, you need to draw a figure that looks like an oval, but differs from it by having a point at the very bottom. This is where the insect's nose will be located - its proboscis, designed to collect nectar. |
| Drawing the center and back of the bee | Each of the parts should be marked with an oval. The oval representing the central part is located to the right of the head. It is approximately 2 times larger in size. It is better not to draw its lower part. The back is another oval. It is located even further to the right and should be even larger. It should stretch from left to right. |
| Drawing legs | There will be 3 of them. Each of the legs has its own pair, which is located on the other side and therefore is not visible in the picture. All 3 legs start from the middle part of the bee's body, where space was left for them in the previous step.
The legs of the bee are not straight lines. They should have smooth curves. The front leg should be the most curved. The line denoting the leg should look like the letter "S" in its curves. The 2nd leg looks about the same, and the 3rd (back) one is more like a straight line. Starting in the middle part of the bee's body, it goes down and to the right and ends under the back part of the body. To give depth to the legs, additional lines should be drawn to them. |
| Image of eyes, antennae and sting | The eye can be represented by a small oval located on the head. A pair of antennae emerge from the top of the head. Each of them can be represented by a short arc. At the end of the antennae, small "droplets" should be drawn.
The sting is drawn to the right of the oval, which is the back of the insect. Drawing the sting is simple: just draw 2 short straight lines, the ends of which converge at one point. The result will be something like a small triangle. |
| Adding missing elements | It is necessary to draw a pair of wings and draw several stripes on the body of the insect. The wings begin in the middle part of the body. In this case, the right wing will not be fully visible, because it is hidden behind the left one.
There should be 3 stripes on the back of the bee. They are drawn with lines that are slightly rounded. This gives the body of the insect volume. |
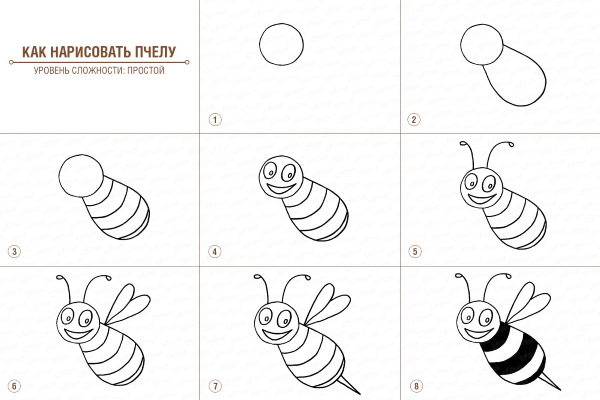
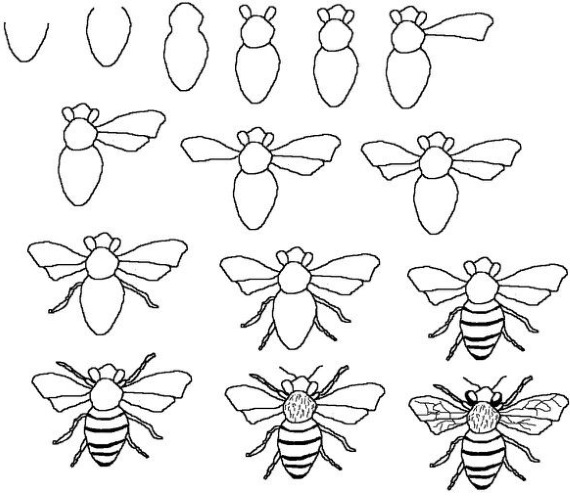
Now all that remains is to color the drawing with colored pencils, using yellow and black colors.
Bee on a flower
A bee, being a bright insect, is beautiful in itself, even without the presence of honeycombs. For example, if you draw it sitting on a flower, you will get a colorful and interesting drawing.
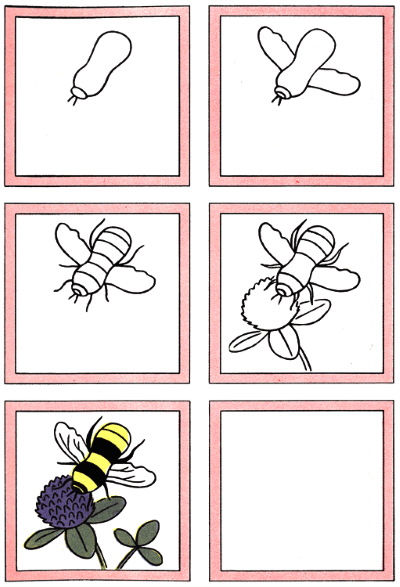
The creation of such a picture can be divided into the following stages:
- Draw an axial arc line. It should start at the bottom left of the paper, go to the right, rise slightly upwards and end at the right side of the paper approximately in the middle.
This will be an auxiliary line, so do not make it too distinct. The drawn line will indicate the location of the 3 main parts of the bee's body - the round chest, abdomen and head.
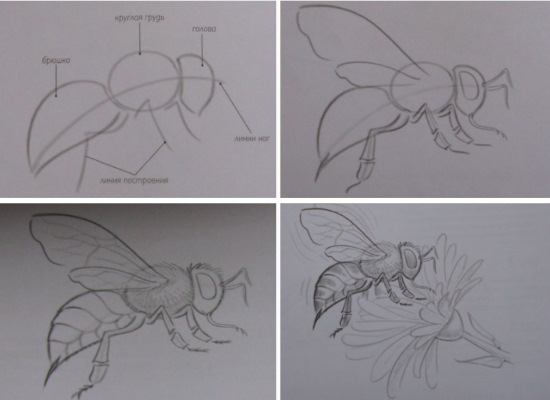
- Add 3 broken lines coming out of the round chest of the insect, which will indicate the legs.
- Finish drawing the wings, eye, antennae, proboscis, and sting.
- Draw the legs, making them voluminous.
- Draw a lot of broken lines on the wings, which will indicate the veins.
- Decorate the belly with a wavy pattern.
- Draw a line at the bottom of the abdomen to indicate a sharp sting.
- Draw small hairs on the entire surface of the chest. This is done with small strokes.
- Add “brushes” to the ends of each leg and to the trunk.
- Draw a flower with a bee sitting on it. You can draw many petals. Place a stem with several leaves under the flower itself.
Pencil Drawing Ideas for Kids about Bees
Drawings of bees are not limited to images that are close to realistic; there are options for preschoolers and schoolchildren.
Maya the Bee
A bee named Maya is very popular with children.
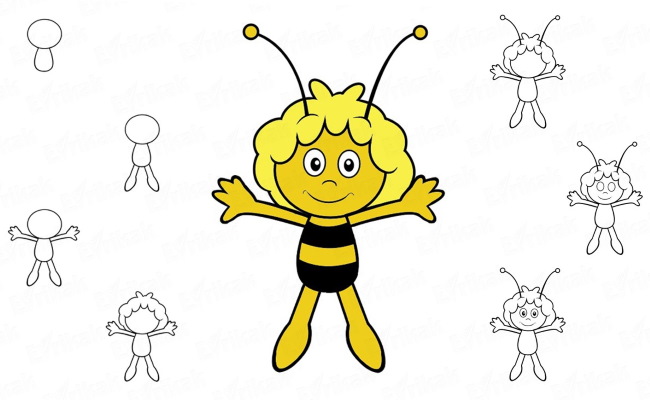
To depict it you need:
- Draw a circle and intersect it with 2 lines.
- Mark the location of the main parts of the head - eyes, nose, mouth.
- When the sketch is ready, move on to detailing. Add pupils and shade them with a pencil. Finish drawing the hair and mustache on the head.
- Draw the bee's body as an oval. Divide it into an equal number of parts by drawing several horizontal lines.
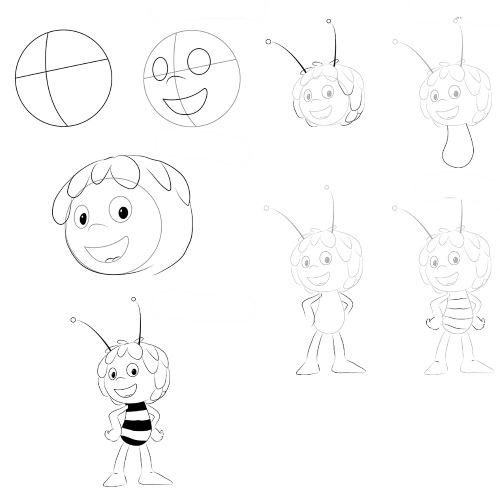
- Add arms and legs, keeping in mind that they are human-like.
- Color the insect. The bee itself is mostly orange, and has 3 black stripes on its body. Maya's hair is yellow, her eyes are white, and her pupils are black.
Honey insects on honeycombs
Honeycombs (the drawing in this case is created using a cellophane bag with bubbles) can be depicted without pencils and brushes. It will be easy to perform for children.
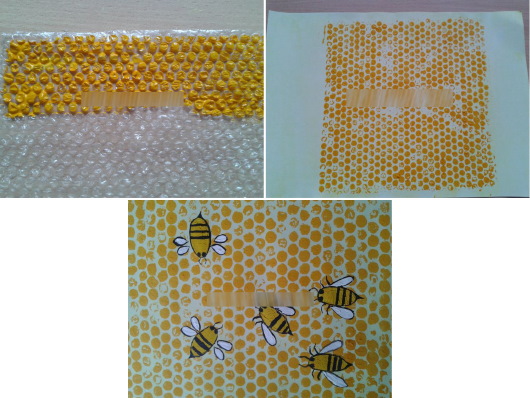
To work you need:
- Take cellophane with intact pimples.
- Make a blank for printing from an eraser. To do this, draw an oval on it and cut it along the outline with a knife. This will be a blank for the insect.
- Dilute yellow gouache on a saucer and apply the paint to the paper using a sponge.
- Using a sponge, cover the pimply side of the cellophane with orange paint and then press it onto the tinted sheet.
- Use a similar method to depict bees, using the prepared eraser.
Beehive with bees
It is easier to draw a hive with bees than the bees themselves, because in this case some parts of the insects' bodies can be neglected. The main element of the picture will not be the bee, but the hive.
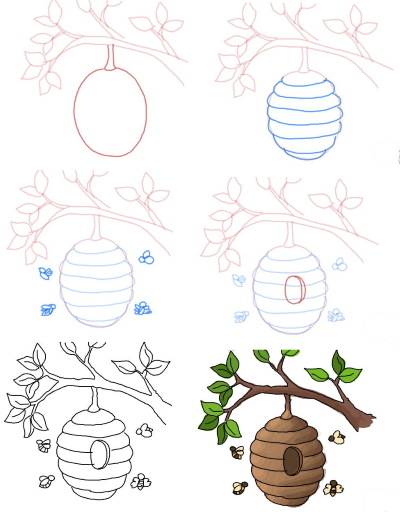
Its image is performed as follows:
- Draw lines that will indicate the tree branches where the hive hangs. The line indicating the branch goes from left to right. From it, a vertical line goes down, which will indicate the hive itself.
- Mark the places where the flying bees will be located. There are 2 of them: one bee will be located to the left of the hive below, the other - to the right above.
- Make the tree branch wider by drawing another line.
- Add a beehive shape around the vertical line. It is usually an elongated shape from top to bottom, similar to an oval, but different from it in its waviness.
- Start detailing the branch. To do this, add leaves to its ends.
- The hive is also detailed by drawing horizontal but slightly rounded stripes on its surface. In the lower left part of the hive, depict a passage for bees. It can be designated with a small semicircle. Add several leaves above the hive itself.
- Draw 2 bees. Considering that they are far from the viewer, each of them should be represented as a small oval with a pair of stripes, wings and antennae.
- Delete all previously drawn auxiliary lines.
- Color the picture.
Apiary
Bees can live not only in a house that they created themselves, but also in a hive built for them by a person.
The shape of these artificial wooden houses is simple:
- To draw an apiary, you first need to draw several hives.
- Each of them can be represented by a rectangular parallelepiped.
- It is important not to forget to mark the entrance location on each such hive.
- There should be lots of bees flying around. They can be represented as small ovals, adding 2 stripes, wings and antennae to each.
Cool and funny pictures
It is not necessary to make all drawings of bees realistic, like in a photograph. Insects can be presented as cartoon characters.
Little cartoon bee
A funny bee can be drawn by both an adult and a child.
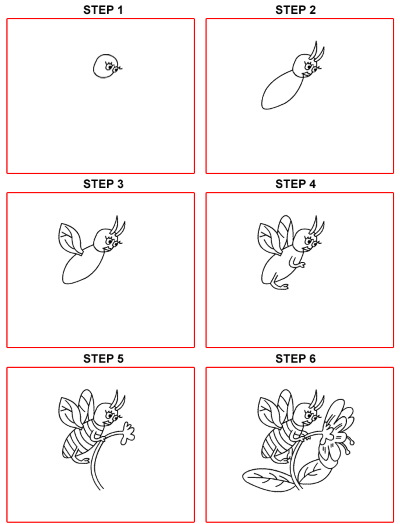
To draw it you need:
- Draw a circle and draw a line segment through its center. It should be at an angle of 45° to the bottom edge of the sheet.
- Draw 2 small circles on the segment. These will be the bee's eyes. Place the mouth below, represented by a pair of small arced lines.
- Using a soft pencil, outline the outline of the head. Add a pair of antennae on top, rounded at the top.
- Draw an elongated body with transverse stripes on it. The shape of the body of this bee should resemble an inverted drop.
- Add 2 pairs of wings. The upper wings should be larger than the lower ones.
- Carefully outline all the contours. For this, use a soft pencil.
Chibi Bee
The cartoon bee in chibi style looks funny.
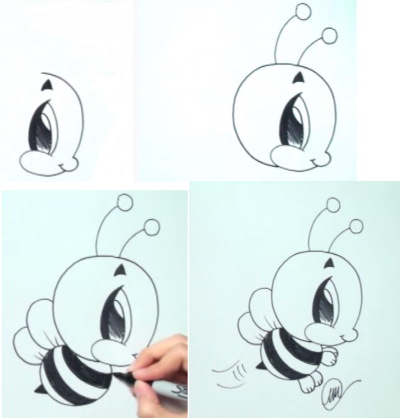
To depict it, you need to:
- Draw the head. It can be represented as a semicircle, at the bottom of which is the nose. This part of the body is indicated by a small semicircle. In this example, the bee is located in profile, which should be taken into account when creating the drawing.
- Draw a large eye that is stretched from bottom to top. It is also important not to forget to add an eyebrow above it. The eyebrow can be represented by a small triangle.
- Finish drawing the back of the head. At the same time, it is necessary to depict a cheek under the eye and a pair of whiskers above the head.
- Proceed to drawing the body. It can be represented as a small oval, which is several times smaller than the head itself.
- Decorate the body with stripes and add a sting at the bottom.
- Paint 2 stripes on the body black.
- Add a couple of wings on the back.
- Draw small paws located in the front part of the body. In this bee they can be represented by small ovals.
- Draw a couple of small strokes at the end of the legs.
Realistic image of an insect
Those who want to create a realistic image of a bee with a pencil should remember some rules for its creation.
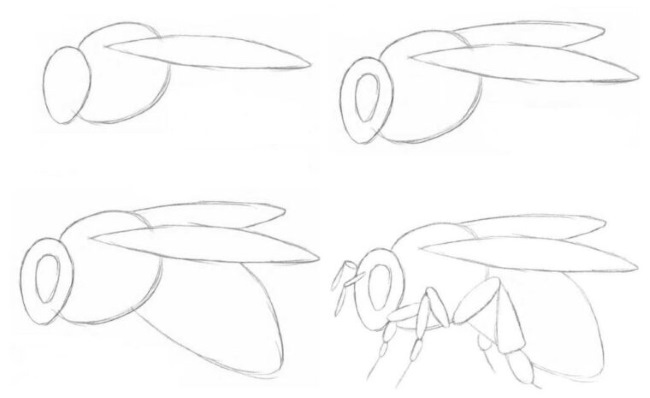
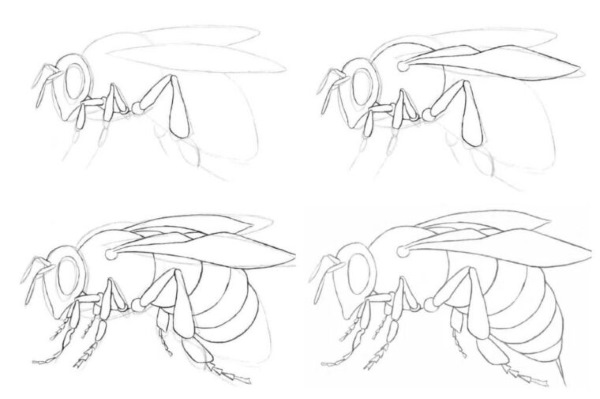
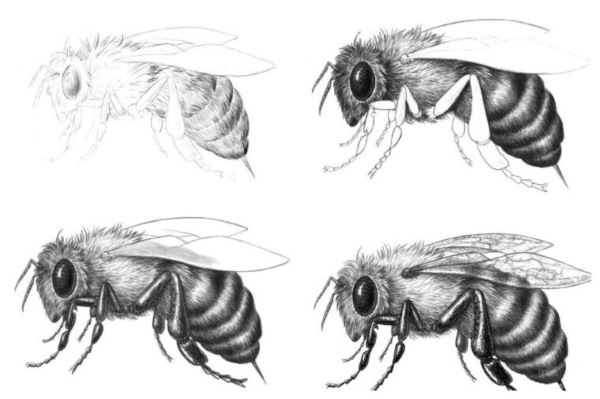
This:
- The bee's chest and abdomen are small, but these parts of the body appear large due to the thick hair covering;
- a bee has 4 wings, but only the top 2 are visible;
- The insect has 6 muscular legs, each of which is covered with hair. Moreover, the hairs on the hind legs are longer;
- On the insect's head there are 2 large eyes, as well as a pair of antennae that resemble antennae;
- The mouth apparatus of a bee is represented by a proboscis. It has a complex structure, but looks like a tube;
- You need to draw the outline of the bee with a hard pencil, and those places that should be the darkest should be colored with a ballpoint pen;
- Use a soft pencil to draw the wings and shadow.
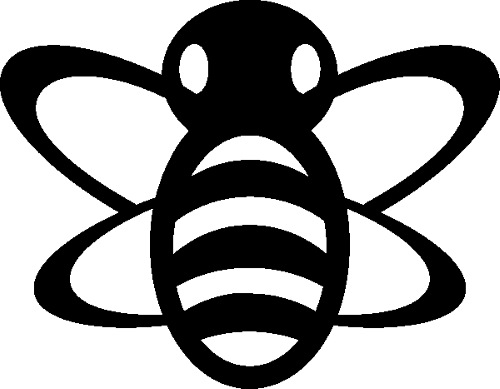
How to Make a DIY Bee Stencil
Honeycombs (the design is often created using stencils) and insects can be depicted using various stencils.
You can use them to decorate a table in the garden or decorate a fence. A manicure with a "bee" theme will look great.
To create a stencil, you can use simple materials, such as:
- thick paper;
- thin cardboard;
- whatman.
To make it you need:
- Draw a sketch. Use a thick felt-tip pen to highlight the contours that you plan to cut out. There shouldn't be too many small elements. The number of sharp corners should also be kept to a minimum.
- Use sharp tools to cut out elements. It is recommended to use scissors, a scalpel, a construction or stationery knife. Do not forget about a good backing, otherwise there will be a high risk of cutting the surface. You can use a cutting board.
- Before applying the image, carefully fix the cut out stencil to the surface. You can use masking tape for reliable fixation.
Drawing a bee and honeycombs with a pencil is not difficult. The main thing is to follow the instructions and maintain proportions.
Video about drawing honeycomb
Honeycomb drawing: