Crafts for kindergarten and school help develop a child's imagination and improve their motor skills. Parents and older generations should definitely be involved in the process of making crafts. This will help establish closer contact with children and, perhaps, start a good family tradition. Let's talk about what crafts for children can be made with your own hands at home.
Crafts for children in kindergarten
Most often, crafts have to be made for kindergarten.
Parents and children are asked to bring something made together and with their own hands for holidays such as:
- the first day of autumn;
- New Year;
- Christmas;
- Easter;
- March 8th and Mother's Day.
When creating a craft, the main thing is to choose an idea and a suitable, safe material. Let's look at two easy-to-make crafts for kindergarten.
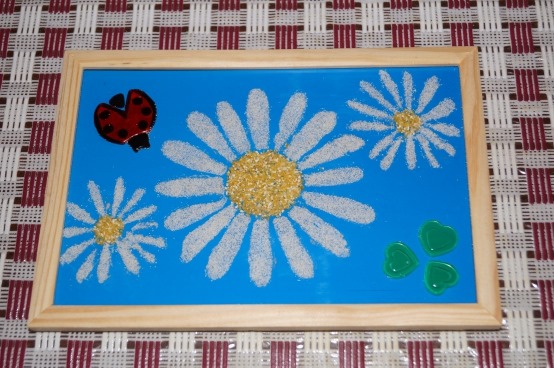
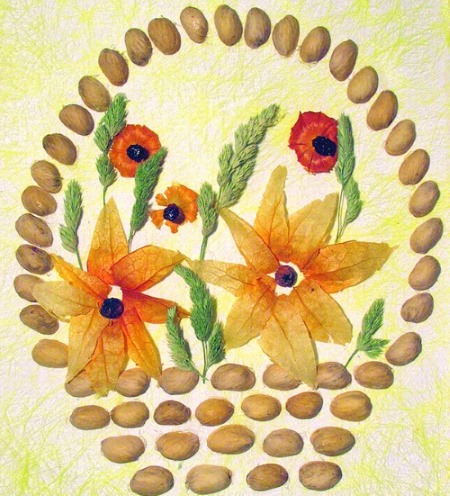
Sprinkle craft made from grains and seeds
To make it you may need:
- thick cardboard;
- colored paper;
- cereal, grain;
- a white sheet of A4 paper, preferably thick - landscape;
- cotton wool;
- PVA glue;
- double-sided tape;
- photo frame A4;
- simple pencil.
The choice of materials depends on the idea and theme. So, if in kindergarten the child was asked to make a craft on the theme of nature, animals, plants, then you can safely take colored paper and get to work. The easiest way is to make flowers and plants, for example, a chamomile in the form of an applique.
DIY crafts at home are made from the following components:
- white beans or rice;
- yellow and green peas;
- double-sided tape;
- paints;
- brush.
The process of creating the craft looks like this:
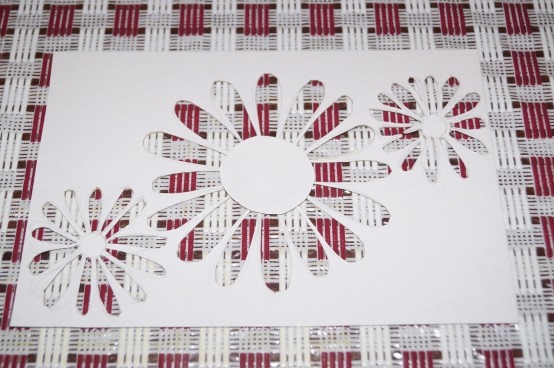
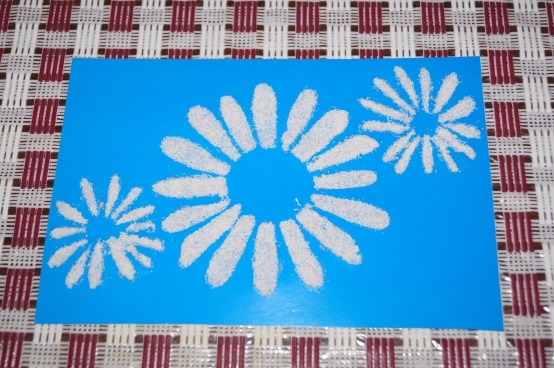
- In the center of a white sheet of paper, draw a circle with a diameter of 2 cm. Around the circle, draw the petals of the chamomile. They can be made slightly smaller in size than the sheet itself. You will have to step back 3-4 cm from the edges of the sheet. After the flower is drawn, draw a stem and leaves to it.
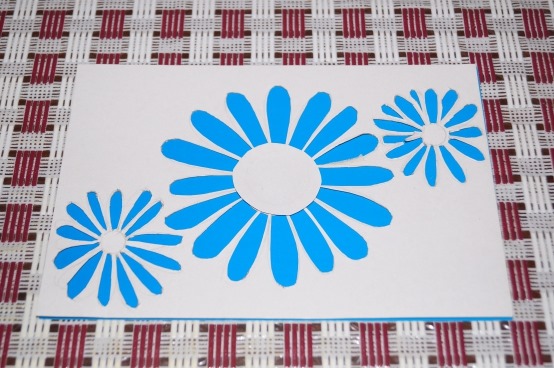
- The space free from chamomile is painted over with watercolors.
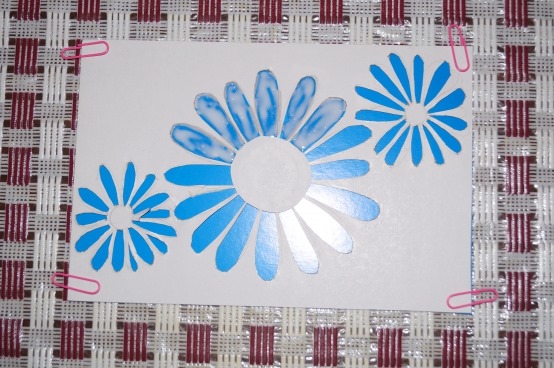
- As soon as the leaf dries, the chamomile is sealed with double-sided tape, attaching seeds and grains to it in accordance with the translucent outline. The core of the chamomile is laid out with yellow peas, the petals with beans or rice, the stem and leaves with green peas.

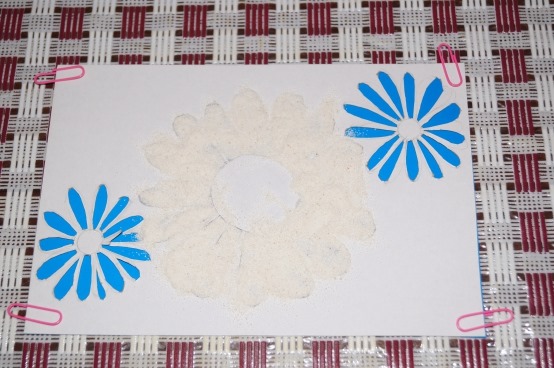
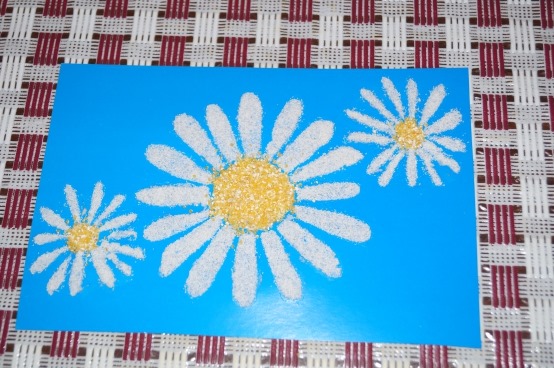
The craft is ready. If you have red beans, instead of painting the free space around the chamomile with paints, you can fill it with beans. The resulting picture is glued to a sheet of cardboard and inserted into a photo frame.
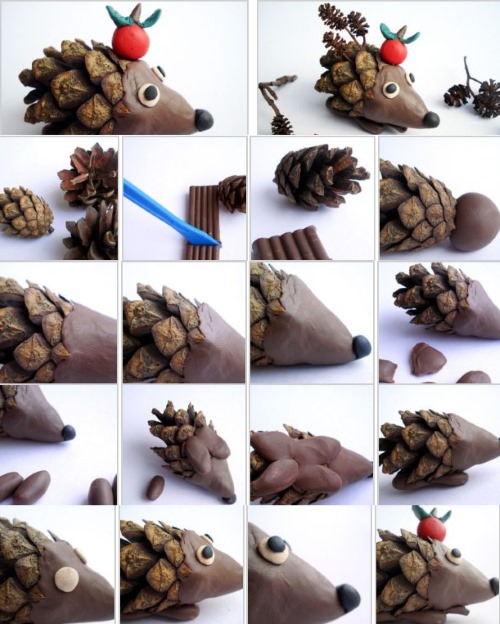
Crafts from pine cones
You can quickly make DIY crafts at home from pine cones. So, you can make a sparrow or a bullfinch from a pot-bellied pine cone.
In addition to the pine cone itself, you will need:
- good paints, preferably gouache, in different colors;
- tassels;
- plasticine;
- wire;
- thick branch;
- paper napkins;
- black peppercorns;
- pliers;
- double-sided tape or a gun with helium sticks;
- cardboard.
| Sparrow from a pine cone | |
| Materials, name | Quantity |
| gouache | 1 pack |
| brush | 1 pc. |
| plasticine | 1 pack |
| wire | 15-30 cm. |
| branch | 1 pc. |
| paper napkins | 2 pcs. |
| peppercorns | 2 peas |
| cardboard | 1 sheet A4 |
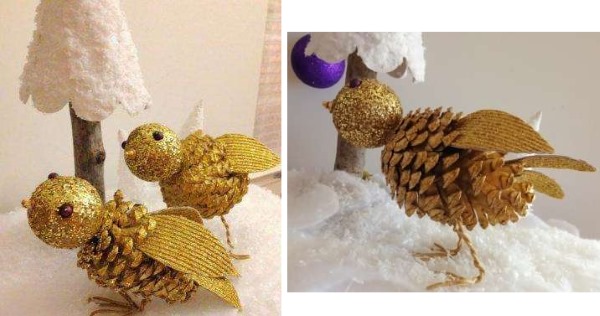
They make a sparrow like this:
- The body of a bird. The cone is painted gray, alternating shades of gray, from dark on the back to light in the area of the sparrow's chest.
- Head. Roll a ball of 1 cm in diameter from plasticine, wrap a thin layer of napkin on top, then cover everything with plasticine again. The resulting ball, once again wrapped in a napkin, is painted gray, and set aside to dry.
- Wire legs. You don't have to worry too much about their curvature and the impossibility of achieving a match with the original; it's enough to bite off two pieces of wire with pliers, each 5 cm long.
At one end, the wire is twisted so that something like a loop is obtained, the other end is left straight. Both pieces are painted light yellow. If this color is not at hand, then the wire, stepping back about 1 cm from the smooth base, is wrapped with threads of the same color, previously dipped in PVA glue.
- Beak. A small piece of cardboard will do for the beak. Cut out an isosceles triangle, coat the front part with glue, fold it in half and paint it yellow or orange.
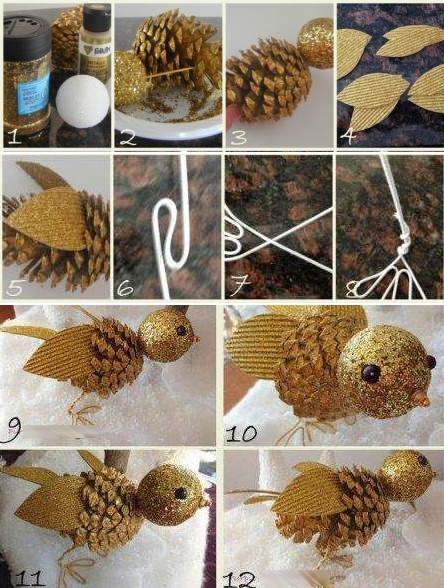
- Eyes. Black peppercorns are perfect for the eyes. 2 peas are attached to either side of the beak using hot glue.
- Wings and tail. For the wings, you need cardboard. Draw two identical wings on it. The tips of the wings cut out of cardboard are thinned with scissors so that the person admiring the craft actually has an association with real plumage. The finished wings are painted gray. The tail is made in a similar way.
The finished parts of the bird are assembled. The parts are fastened together with hot glue. The wire legs are simply stuck into the sparrow's abdomen. To prevent the bird from falling, threads or wire are threaded through the looped legs and attached to a branch. The craft is ready.
Crafts for children for school
It is much more difficult to make DIY crafts at home for school than similar crafts for kindergarten.
But kids from grades 1 to 4 often receive homework related to making crafts, so in the fall and summer you need to stock up on various materials at hand for making them in advance.
These can be seeds and dried parts of plants - flowers, leaves, roots, berries. For crafts, they also use colored and corrugated paper, cardboard, various fastening materials - PVA glue, tape, hot gun.
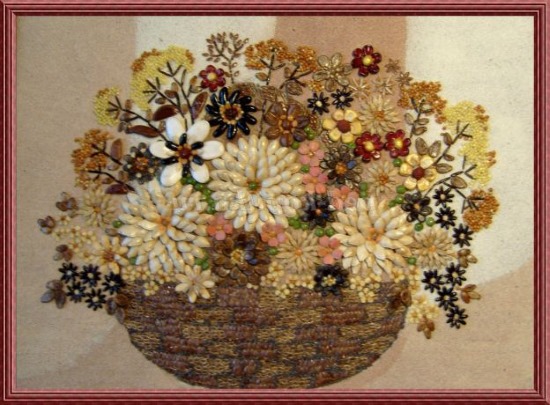
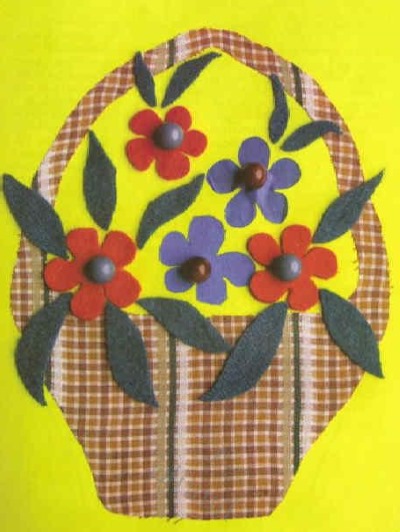
Applications from leaves and plant parts
Schools often hold a holiday dedicated to the first day of autumn, the first yellow leaves, or harvesting. It is common to announce a competition among junior classes for the best craft.
The simplest and most interesting thing can be made, if you only have:
- thick cardboard, A4 paper;
- maple and rowan leaves;
- rowan berries, rose hips;
- chestnuts;
- nuts;
- tree branches;
- corn and wheat seeds;
- dry green peas, halves;
- simple pencil;
- double sided tape;
- rice;
- hot gun.
The craft is made like this:
- On a piece of cardboard, draw a basket, grass rising above it, draw a line symbolizing the earth. The basket should occupy the entire surface of the sheet, but the basket itself should not be large, it is made deep to fill with contents.
- The drawing and the entire sheet are covered with double-sided tape.
- First, the components of the basket are attached to tape. It is made from corn and wheat seeds, trying to attach each seed to the surface so that it does not fall off when shaken.
- The grass is made from halves of dry green peas.
- The ground line is lined with chestnuts. Scotch tape will not hold the heavy chestnuts, so they are attached to the cardboard with a hot gun.
- The basket is filled with berries, leaves and twigs. The twigs are placed along the bottom of the basket, then the leaves are attached, and then rowan berries, rose hips and nuts (previously freed from the core) are attached to them with tape.
The remaining free space between the basket and the edges of the sheet can be filled with rice, attaching it with tape. The finished craft can be placed in a photo frame.
Hedgehog made of pine cones
Making DIY crafts at home from natural materials is more difficult, but more interesting.
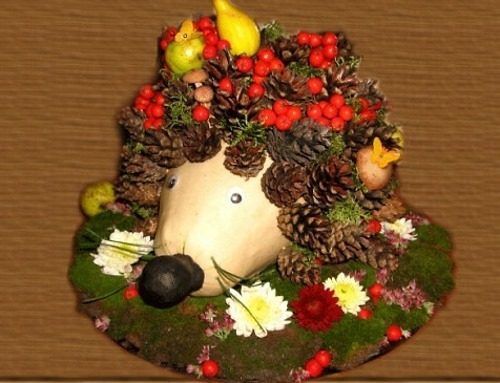
So, to create a hedgehog you will need:
- large and small maple leaves;
- pine cones;
- rose hips, rowan berries, viburnum berries;
- nutshell;
- gouache;
- brush;
- sunflower seeds;
- zucchini;
- A3 sheet of paper;
- hot gun;
- PVA glue;
- knife;
- scotch;
- a pallet or wooden board the size of the sheet.
The sequence of actions is as follows:
- A sheet of A3 paper is placed on a pallet or board.
- The paper is covered with PVA glue.
- While the glue is still wet, maple leaves are attached to the surface.
- The zucchini is divided into 2 parts horizontally and placed on the leaves with the skin facing up.
- The front part of the zucchini is lengthened by simply planing it in this way. To get an elongated nose.
- The body of the zucchini, in addition to the nose, is wrapped with tape.
- The first pine cones are attached to the tape. This is done using a hot gun.
- To make the hedgehog look realistic, new cones are attached to the already attached ones (using a hot gun).
- Berries and small leaves are attached to the cone-needles.
- The halves of the nut shells are painted red and also attached to the pine cones (the result is similar to apple halves).
The eyes and nose of the hedgehog are made from sunflower seeds. The craft is ready. The nose and body of the hedgehog, in the absence of a zucchini, can be molded from dough or plasticine.
Children's crafts for the New Year
Let's look at how to make small fir trees and a garland from scrap materials to decorate a real tree for the New Year.
Spruce made of cones
New Year is not complete without a Christmas tree.
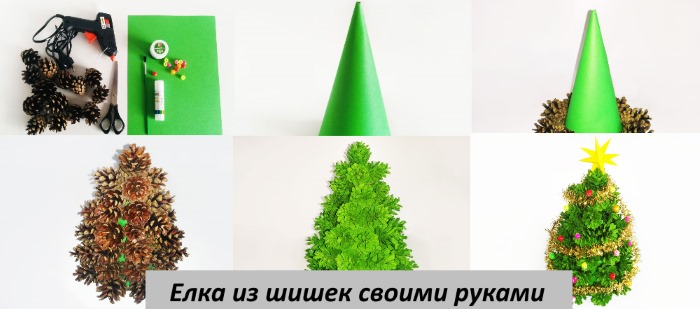
You can make it yourself using:
- pine cones;
- paints;
- brush;
- a cardboard tube (you can make your own, or you can use the one that paper towels are usually wound on);
- dough for crafts;
- glitter;
- hot glue gun;
- beads.
The craft is made like this:
- A large piece of dough is kneaded, rolled into a ball, and then flattened.
- A piece of cardboard is rolled into a tube, up to 5 cm in diameter, and secured with hot glue.
- The resulting tube is inserted into the dried dough.
- The cones are painted with green gouache, left to dry and laid around the perimeter of the tube, starting from the bottom, like a pyramid. The cones are fastened together with hot glue.
- The finished tree is decorated with glitter and beads.
The size of the DIY “pine cone spruce” craft at home depends on the number of cones and patience.
If you have enough materials at hand, you can make a truly giant New Year tree.
Garland of Kinder Surprise capsules
You can make a New Year's garland from Kinder capsules, all you need is:
- 20-30 capsules (the more the better);
- gouache;
- nylon thread;
- gypsy needle;
- hot glue gun;
- awl;
- glitter and small beads.
The manufacturing process takes a little time and comes down to the following:
- Using an awl, make holes on both sides of each capsule.
- A nylon thread is threaded through the resulting holes using a gypsy needle.
- The end of the thread is secured with a tight knot each time it passes through another capsule.
- The capsules are painted in different colors.
- Beads and glitter are attached to the dried surface using a glue gun.
The garland is ready and can be hung on the holiday tree.
For Birthday
A handmade birthday present is much nicer than a store-bought one. Together with your child, you can make flowers from corrugated paper or a beautiful card as a birthday present.
Basket with flowers made of corrugated paper
For such a gift you will need:
- corrugated paper of several colors;
- double-sided tape;
- wooden sticks;
- ready-made paper basket;
- polystyrene foam;
- glitter;
- hairspray.
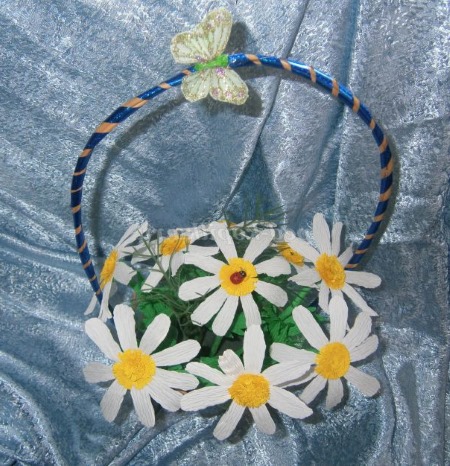
The colors of the paper are chosen depending on what flowers are planned to be made. The easiest to make are daisies.
To do this:
- Double-sided tape is wound around the top of the stick.
- Cut a strip of yellow corrugated paper 30-40 cm long and 2 cm wide. Then fold it in half horizontally and make a lot of transverse cuts without cutting the strip all the way through.
- Attach double-sided tape to the prepared strip and wind it onto a stick. This will be the core of the flower.
- From a white piece of corrugated paper, cut a strip 50 cm long and 10 cm wide, fold it in half and do the same as with the core of the flower.
- After gluing the petals to the core, wrap double-sided tape around the remaining free part of the stick and attach green corrugated paper to it.
- The flower leaves are also cut out of paper. They can be drawn on it beforehand to avoid mistakes with the size and shape. The leaves are attached to the stem with tape.
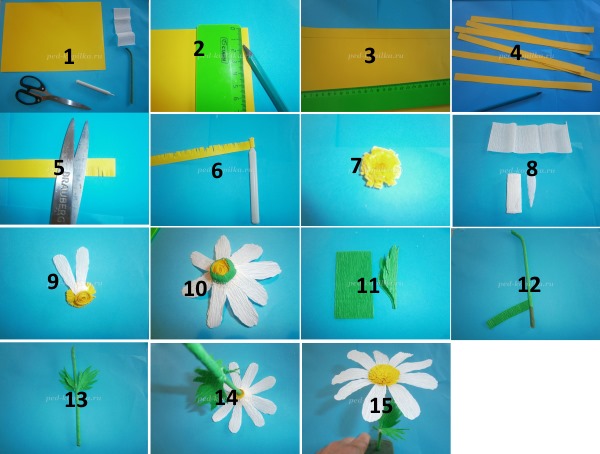
Place foam plastic in the currant, cover its surface with double-sided tape and glue green paper to it. Stick the stems of flowers into the resulting improvised soil. The number of flowers depends on the size of the basket. You can spray colored glitter over the bouquet, securing it with hairspray. The gift is ready.
DIY postcard
To make a postcard you will need:
- white sheet of cardboard A4 size;
- PVA glue;
- lace of different shapes, sizes and colors;
- beads;
- ribbons;
- colored pens;
- hot glue gun.
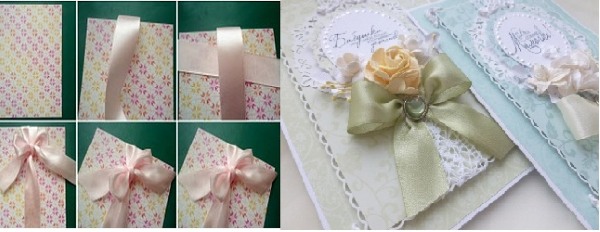
The postcard is made like this:
- A sheet of cardboard is folded in half.
- On the front side of one of the halves, write “Happy Birthday” with a colored pen.
- Under this inscription, lace strips are attached using PVA glue.
- Beautiful bows are made from ribbons. They are attached to the lace using a glue gun. A bead is placed on the glue in the center of each bow.
The number of bows and lace depends on your imagination. The card is left to dry, unfolded and a beautiful greeting is written on the inside surface.
On March 8th
For the March 8 holiday, you can make beautiful vases for flowers or a flower applique for the wall with your children.
Vase for flowers
For the vase you will need:
- plastic bottle;
- knitting threads;
- double-sided tape;
- beads;
- felt;
- glue gun.
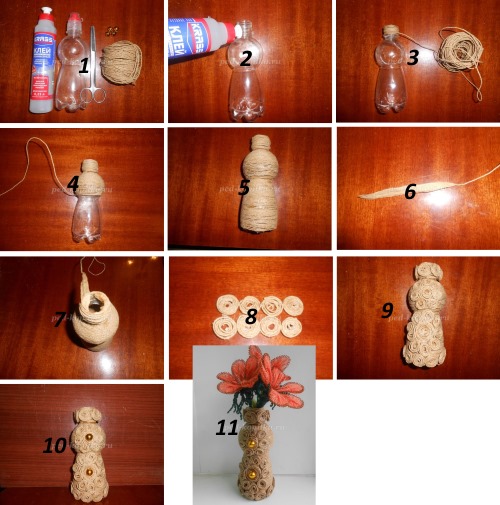
The vase is made as follows:
- The neck of the bottle is cut off and the entire bottle is wrapped with double-sided tape.
- Knitting threads are attached to the tape one by one.
- Petals for flowers are cut out of felt and glued with a glue gun to a bottle wrapped in thread. The core of the flower is made of beads.
The vase is ready. Its size and color depend on personal preferences. Flowers attached to the surface can be laid out in a figure eight. And then it will not be just a gift, but a thematic gift.
Flower applique
To create the applique you will need:
- a piece of foam plastic the size of an A4 sheet;
- plain thick fabric, approximately 45 cm wide and 50 cm high;
- buttons of different colors and sizes;
- colored threads;
- scissors;
- simple pencil;
- glue gun;
- pins;
- ribbons of green and yellow colors.
 The manufacturing process is as follows:
- The fabric is smoothed out and flowers are drawn on it, the stems of which extend to the base.
- Flowers are laid out from buttons along the outline of the design and sewn onto the fabric.
- The stem and leaves are made from green ribbons.
- The resulting bouquet is tied with a yellow ribbon, sewn on top of the green ones.
- You can attach a figure eight drawn or embroidered on fabric to the ribbon.
- The finished applique is stretched onto the foam and secured on the back side with a glue gun or regular pins.
The main thing when creating an applique is to remember that the colors must match each other.
For Mother's Day
You can also give your mother a beautiful craft, timed to coincide with, for example, Mother's Day, celebrated on the last Sunday of November.
Felt flowers
For this craft you will need:
- colored felt of any shade;
- scissors;
- simple pencil;
- tree branches;
- glue gun.
Flowers are made like this:
- On a piece of felt, draw a circle, and inside the circle, a spiral.
- Using scissors, cut out the spiral along the outline.
- The edge of the spiral is folded in a circle to form a rose. The lower edges of the flower are secured with a glue gun or thread.
- The finished flowers are attached to a stem, which is a tree branch.
- A few branches with flowers make a beautiful bouquet as a gift.
The craft is ready.
Paper sun
The child needs:
- colored paper, mainly pastel shades, double-sided;
- cardboard;
- PVA glue;
- brush;
- felt-tip pens;
- scissors;
- wand;
- simple pencil;
- ruler.
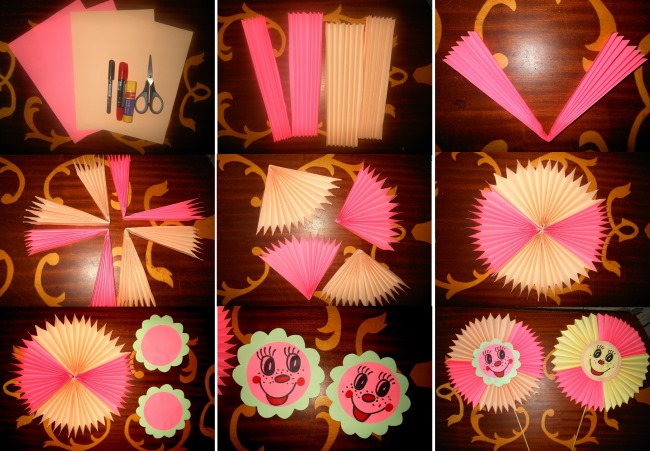
The sequence of actions is as follows:
- Take 2 sheets of paper - lilac and yellow, fold each of them into an accordion.
- The sharp end of the accordion is cut off, resulting in 2 fans.
- The resulting fan is folded in the middle, the edges are coated with glue and attached to each other.
- Both fans are connected to each other, creating a circle.
- A wooden stick is attached to the circle.
- From colored paper of a different shade, cut out 2 circles of different sizes. One is approximately 7 cm in diameter, and the other 5 cm.
- On the smaller circle they draw a funny face.
- Glue the circles together and attach them to the sun fan.
- Cut out another circle and attach it to the back of the fan, covering the place where it connects to the wooden stick.
The resulting sun can be hung above the bed or used to decorate mom’s dressing table.
On Easter
For Easter, you can make wonderful cards in the shape of Easter eggs or an Easter bunny.
Openwork postcard
For this postcard you will need:
- two sheets of thick white paper;
- colored paper;
- white lace;
- scissors;
- simple pencil;
- PVA glue.
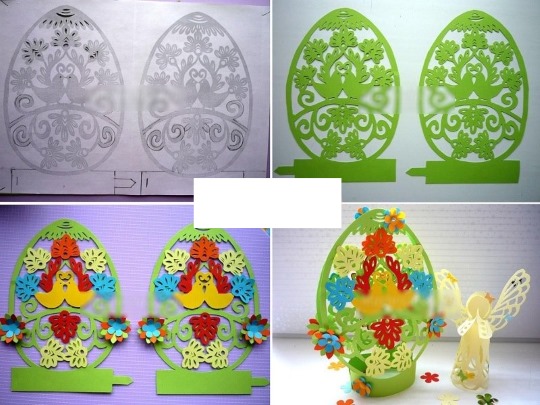
To make a craft from the presented materials at hand, you need:
- Draw a large egg on a piece of paper.
- Make the same drawing on the second sheet of paper.
- Colored paper is cut into small strips.
- Glue the finished colored stripes to the outline of the egg.
- Wait until the paper dries and glue the lace on top.
- From the remaining untouched sheet, cut out a drawing of an egg along the outline and place it on the second sheet so that the outline of the already decorated egg is visible through the resulting hole.
- Both sheets are glued together.
- You can write a congratulatory message on top of the egg.
The craft is ready.
Pom Pom Easter Bunny
For this craft you will need:
- white, gray or light pink knitting threads;
- beads;
- wooden stick;
- small rubber bands (2 pcs.);
- cardboard.
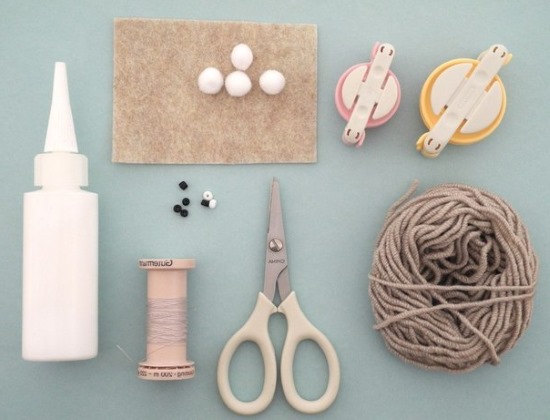
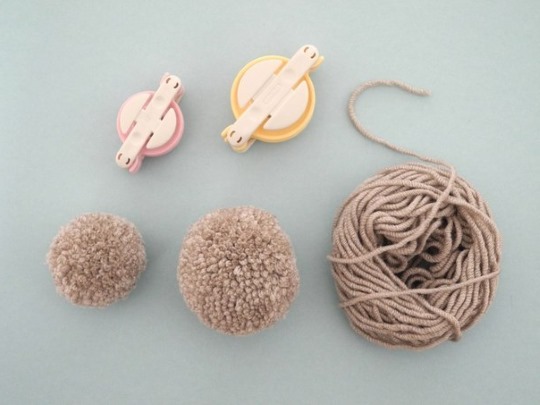
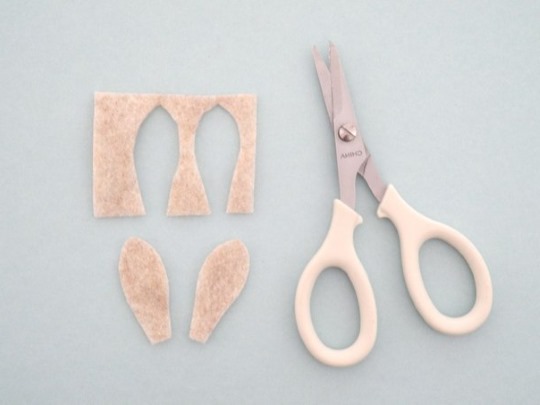
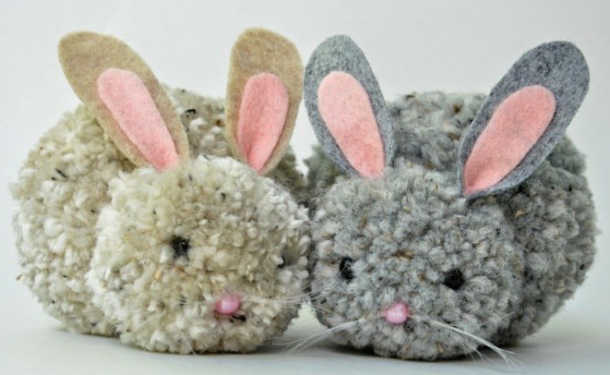
They make a rabbit like this:
- Threads from a ball are wound onto a 10 cm wide strip of cardboard.
- Carefully remove the threads from the stencil, tie them in the middle with another thread and cut them at each edge.
- Make exactly the same pompom, but smaller. It will serve as the rabbit's head.
- Both pom-poms are placed on a wooden stick.
- Using rubber bands, make ears on the head.
- Two beads are attached under the ears – eyes.
The rabbit is ready, but you can tie it with a beautiful ribbon to add a festive touch.
Making crafts at home with your own hands is a popular hobby. Using any materials at hand, you can make cards, baskets, flowers and many other interesting and useful things that you would have to pay a lot of money for in the store.
Article formatting:Natalie Podolskaya
Video about making children's crafts
DIY crafts for kids:
Happy Mother's Day! Good health to you and your families, happiness, prosperity, love and lots and lots of joy!