The result of knitting is clothing, interior items or souvenirs. After learning the basic techniques of this handicraft, there comes a time when it is necessary to determine the methods by which you can secure the loops, completing the production process of the product. How to finish the product if the last row performs the function of a fastening element is discussed below.
Scarf or hat
Closing a row of loops is an important stage in creating a product.
The final row performs several functions simultaneously:
- secures the loops;
- prevents the product from unraveling;
- helps to improve the appearance of the product using decorative techniques.
How to finish knitting, the last row of which is the final part of a hat or scarf, depends on several factors. Products made from different types of yarn have different density and structure. A thick thread with a double twist when closing the last row on a hat helps to create a dense seam that will be uncomfortable to wear.
Weak knitting of the last row of a hat made of elastic yarn will lead to stretching of the product, loss of its original shape. Therefore, when choosing a method by which you can finish knitting a hat, scarf or set from the same materials, take into account the structure of the thread and the features of the knitted product.
The traditional method used to finish a loop row involves using the technique of decreasing a loop row. Decreasing is a technique where loops on a certain area of the fabric are knitted together. This method achieves that from 2 loops you get 1. The main task of decreasing a loop row is to narrow the fabric.
This is a necessary step that precedes closing the loop row. To close a row on a simple hat model, it is enough to decrease the loops several rows before the planned completion of the work. When finishing the last row, use knitting needles, a crochet hook or a sewing needle.
| A tool used to finish the last row on a hat or scarf. | Work execution procedure |
| Hook | Using a hook of the same size as the knitting needles (which were used for knitting), make an air loop. It is obtained by pulling the main thread through the edge loop. Then knit each loop, removing it from the knitting needle, thus obtaining a chain of air loops. |
| Spokes | When closing a row of loops, the correspondence of the loops being closed in the row with the requirements of the main pattern is taken into account. |
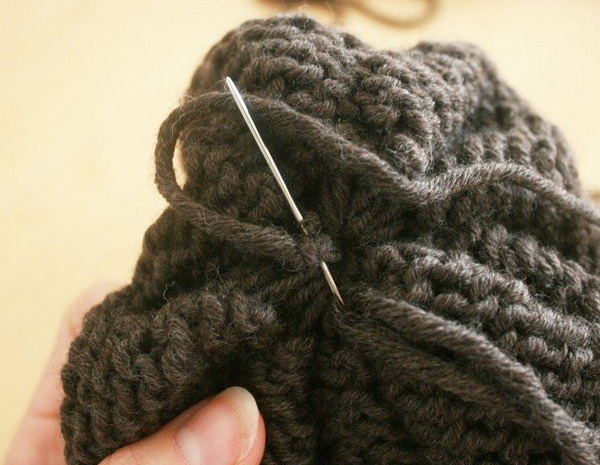
| Needle | The last row is knitted in a special way: the front loops are left as front loops, and the back loops are dropped onto the knitting needle without knitting them. Then the thread is inserted into the needle and the process of closing the loop row begins with the thread and needle. |
The method of finishing the loop row with a needle is considered the most labor-intensive, but the last row is neat and does not spoil the appearance of the finished product. After securing the final row on the hat and sewing the parts, if necessary, the top of the hat is often decorated with additional elements: pompoms, tassels, brooches.
Mittens or socks
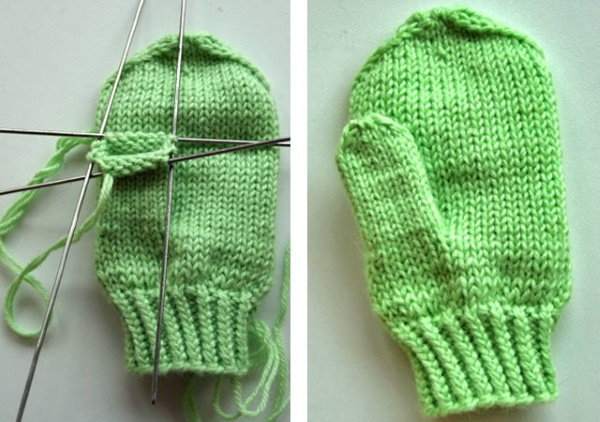
How to finish knitting with knitting needles, the last row of which determines the appearance of the finished mitten or sock. There are several options for securing knitting on mittens or socks. Mittens and socks, as a rule, begin to knit with an elastic band or cuff. This means that the last row must be closed at the toe of the product.
Knitting of mittens with knitting needles begins with knitting the cuff. For this, circular knitting needles are used, it is convenient to finish the last row on them, starting the decreases according to the pattern scheme. The stocking type of knitting is a traditional way of creating mittens with knitting needles. The circular method on 2 knitting needles implies knitting the loop row exclusively from the front side. This excludes knitting of edge loops.
The advantage of using the circular method when knitting a mitten is that you get a seamless product.
The main difficulty for beginners is knitting the thumb. At the stage of creating the main part, the place for the thumb is secured with a pin so that the row collected under the hole for the thumb does not unravel.
To design the last row of the mitten, use one of the following options:
- Pointed. The sharp end of the mitten is obtained by decreasing the row of loops, making a left tilt on one needle. On the second needle, the same steps are done in mirror image, making a tilt to the right. The decreases are repeated on the next second row until there are 6 loops on each needle. The outer loops are knitted according to the pattern.
- Spiral. On both knitting needles, 2 initial loops are knitted together with the front surface, from the bottom, decreases are made in rows until there are 2 loops on each knitting needle. The remaining loops are pulled together with a needle and thread, the excess ends of the yarn are masked from the back side.
- Rounded. This type of closing of a row of loops is used for mittens knitted exclusively with the front surface without using complex patterns. The loops are decreased according to a certain calculation scheme.
Knitting of a sock begins with an elastic band. The complexity of the work lies in knitting the heel. To create this detail on knitting needles, a technique of decreasing a row of loops according to a special pattern is used. The final detail of the sock is often called a ribbon toe. Its knitting involves decreasing 2 loops on both sides in each row. The decrease is carried out until there are 4 loops on the knitting needles. The remaining loops are pulled together with a crochet hook or a needle.
Neck and sleeve
The overall appearance of the finished product depends entirely on the choice of the neck processing type. When calculating before starting work, the neck type is determined, choosing from several possible options.
Scroll:
- triangular neckline;
- square neckline;
- round collar;
- stand-up collar with fastener.
After determining the type of collar area, design methods are selected:
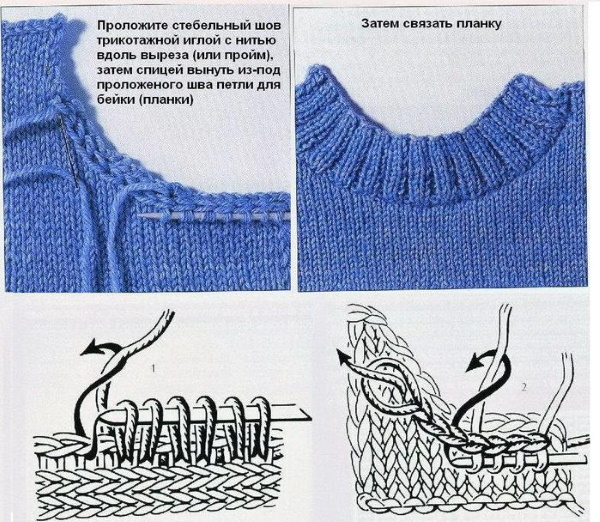
- Beika. When planning the work, the collar is divided into segments. All segments are knitted on circular needles, then the parts are sewn together one by one. To prevent the collar from being stretched, every fourth loop is skipped as you cast on.
- Double steering wheel. The method involves creating a piping about 5 cm high using a stocking stitch. The loop row is closed in the traditional way. The resulting roll is twisted so that the back side is turned outward. After this, the loop row is collected along the entire length. The finished roll is knitted with a stocking stitch and the loop row is closed loosely.
- Triangular neckline. The difficulty of knitting a triangular neckline is that the lower part of the neck is below the bust line. If the neckline starts 4-5 cm below the bust line, then the decrease is done in every fourth row 2 times. If the neckline starts 6-10 cm below the bust line, then the decrease begins in every sixth row 2 times and 1 time in every fourth row. The triangular neckline is decorated with various types of bindings, the option of using knitting with a middle loop is especially popular.
When creating a sleeve, the length of the armhole is taken into account. For simple clothing, it is customary to make sleeves of a rounded shape. Closing the loop row at the beginning of the armhole begins from the front side using the traditional method.
To do this, remove 1 loop without knitting it, and knit the next one according to the pattern and pull it through the removed loop. Knit the fabric according to this pattern until the end of the row. After completing the armhole, the finished row is crocheted to form a neat edge.
The classic way
How to finish knitting, the last row of which is important in forming the general appearance of the finished product. The answer to this question depends on what part of the product needs to be closed.
Among the options that involve finishing knitting a certain part of the product, there is a division into several methods. The use of each method involves following the established knitting patterns.
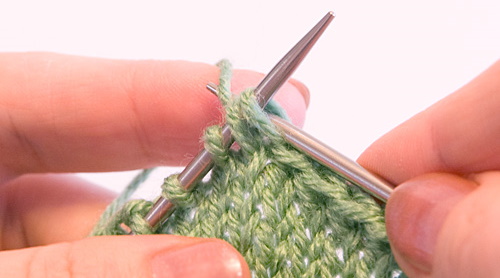
The classic or basic method is a universal option that is used more often than other options:
- Transfer the 2 outer loops from the left knitting needle to the knitting needle in your right hand.
- Using the knitting needle in your left hand, pick up the initial loop from the right knitting needle.
- The second loop from the right is pulled through the initial loop and dropped on the left side.
This is how the row is finished. When the work is finished, a long working thread is left. Its end is passed through the last loop. The knot is tightened.
Throwing over
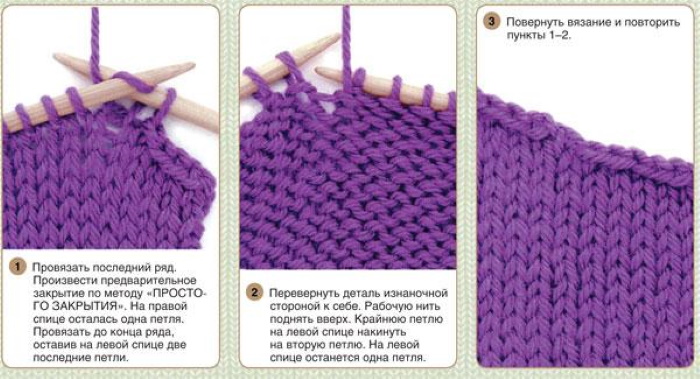
The throw-over technique is often referred to as the "backwards" finishing technique:
- On the final row, knit a number of loops that is one number more than required.
- The remaining loops, except for the 2 outer ones, are transferred to the right knitting needle.
- The penultimate loop is passed through the last loop, but not tied.
- Then pull the rest of the row of loops through each other until 1 loop is free.
- The last loop is knitted with the front stitch.
- Then they begin knitting the purl stitches of the final row.
With a stretch
A draw-through is a method of decreasing a row of loops. This term refers to a different number of loops for decreasing. A draw-through can be double, triple or simple. The method of completing a row with a draw-through depends on the conditions specified in a specific knitting pattern.
With a needle
How to finish knitting with knitting needles, the last row of which needs to be made more elastic, is discussed below.
The edges of the fabric remain quite tight if you use a needle to complete the row of loops:
- The knitted parts are divided into 2 knitting needles.
- The shelf on the front side should be placed first, followed by the shelf on the back side.
- Thread the yarn into a needle with a large opening.
- Insert the needle under the first loop of the front panel from the back side.
- Insert the needle into the first loop on the back knitting needle from the front side.
- The stages are repeated until the loop row is completely completed.
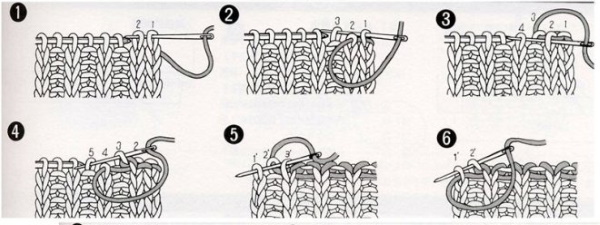
For ease of work, the row of loops is removed one by one, without waiting for the end of its closure.
Crochet
The crochet edge design looks neater. The edge does not pull the yarn together and does not create creases.
The knitting is secured from the front side:
- Place the tip of the hook under the first loop and remove the loop onto it.
- The main thread of yarn is placed on the hook.
- The yarn is pulled through 2 loops, thus overlapping them.
- The technique is used for the entire row, until it is completely completed.
Serrated edge "Pico"
The "Pico" treatment is a decorative type of binding for the last row:
- Using the knitting needle in the right hand, make a loop under the initial loop on the left.
- Knit a front loop, leaving it on the left side.
- The loop is held on the knitting needle in the left hand and a new loop of the second row is made from its base.
- Close 4 loops.
- Transfer the resulting loops to the left knitting needle.
- The technique is used until the end of the entire row, knitting 2 loops, then closing the next 4 loops.
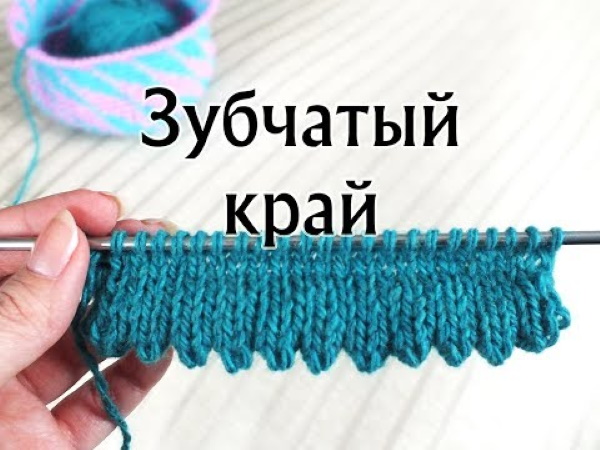
For decorative closure in the form of "Picot", a contrasting thread is most often used.
Decorative closure of a row of loops using a hook
Before starting work, make calculations. The estimated number of decorative loops in a row should be divisible by 4.
The row starts to close from right to left:
- Place the hook under the initial loop and make several chain stitches.
- Using a hook, pick up 3 loops from the left and tie them as one.
- After there are 2 loops left on the hook, the last loop is pulled through the first loop.
- The technique is used until the row is completely closed.
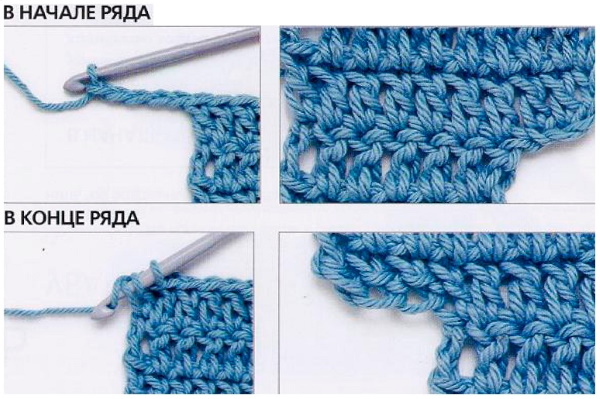
The main task in decorative knitting is to monitor the set of the same number of air loops of the row. If there are more, the pattern will be asymmetrical.
Delayed loop closing
The delayed method of finishing a row of loops is often used for openwork knitting:
- The left knitting needle is inserted under the initial loop, then the second knitted loop is pulled through it.
- Remove the initial loop from the right and transfer it to the left knitting needle.
- The next loop is not knitted, leaving the set aside initial loop on the left knitting needle.
- Both loops are dropped from the left knitting needle, then continue knitting according to the pattern until the end of the row.
Closing a row of loops with a cord
The method of finishing a row of loops with a cord is suitable for items knitted with a cable pattern.
The closing of the loop row is done on the front side.
- The additional number of loops needed to knit the cord are threaded onto the left knitting needle.
- Then knit the loop row of the cord with the front surface stitch until the final loop.
- The final loop of the cord is closed in the traditional way.
- The subsequent loops are connected together with a front loop, grabbing them by the back walls.
- All loops are transferred from the right knitting needle to the left knitting needle.
The sequence is observed until the work is completely completed.
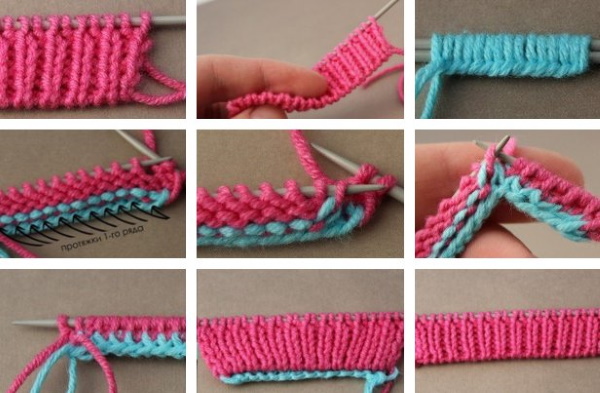
Tubular method
A popular method for closing a row of loops involves creating a knitted seam on an elastic band:
- The end of the closing edge thread is threaded into a tapestry needle.
- The loops are divided into 2 knitting needles.
- Start closing from the 2nd loop of the front post.
- The needle is placed on the right side under the loop, then the thread is pulled out and the loop is removed from the knitting needle.
- The needle is placed on the left under the first loop of the purl column, the thread is pulled out, and the loop is removed from the knitting needle.
After sewing, turn the elastic over with the wrong side up and repeat the connection again with a knitted seam.
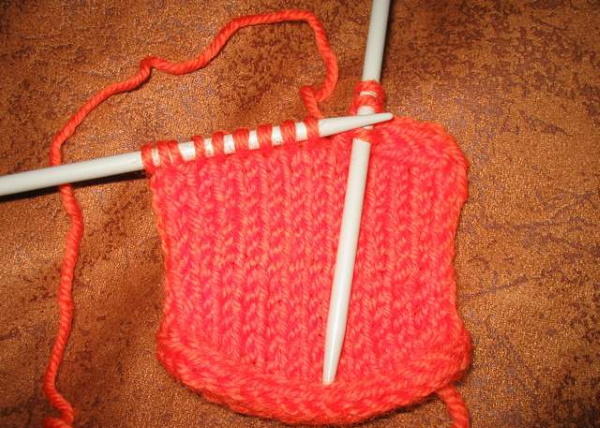
Elastic edge
An elastic finish to the elastic band with a straight edge implies an even number of loops in the final row:
- The elastic band is left on the left knitting needle.
- Using the knitting needle in your right hand, remove the initial stitch from the left knitting needle, but do not knit it.
- Knit a straight yarn over.
- The next part of the row is knitted from the left knitting needle, following the pattern.
- On the left, secure the yarn over together with the first loop on the right knitting needle and pull the third loop through these loops.
- The process continues until the final row is knitted.
The final step is to pull out the final loop and then pass the thread through the formed ring to secure it completely.
In circular knitting with a hollow cord
This technique is suitable for finishing the edge in a circular pattern.
An additional knitting needle is used for this:
- On the additional needle, make 3 loops using a simple set.
- The resulting loops are knitted with the front surface.
- The third loop is tied together with the next loop, securing it to the back wall.
- All loops are returned to the left-hand knitting needle.
- The remaining 3 loops are transferred to the knitting needle of the right hand.
- Thread the needle, remove the loop from the needle, and turn the item over.
- Then, pick up the loop of the opposite edge with the needle and pass the needle through the open loop again.
- The steps taken are repeated with the remaining loops.
A fascinating knitting process that requires certain skills and adherence to rules. An important place in the process of creating a specific product is occupied by the stage that involves closing the last row. To finish knitting with knitting needles, choose an option that suits the type of pattern, and also takes into account the type of product.
Video on how to finish knitting the last row
6 Ways to Close Loops with Knitting Needles and Knitting Needles: