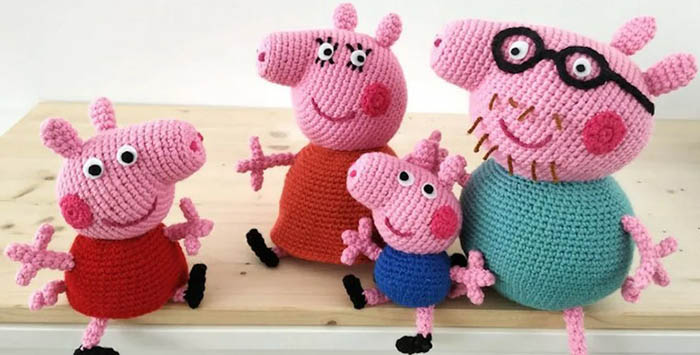
Peppa Pig is the main character of the animated series with the same name, which is widely popular among small children. A toy crocheted using the amigurumi technique will be a real gift for both girls and boys.
Necessary tools and materials
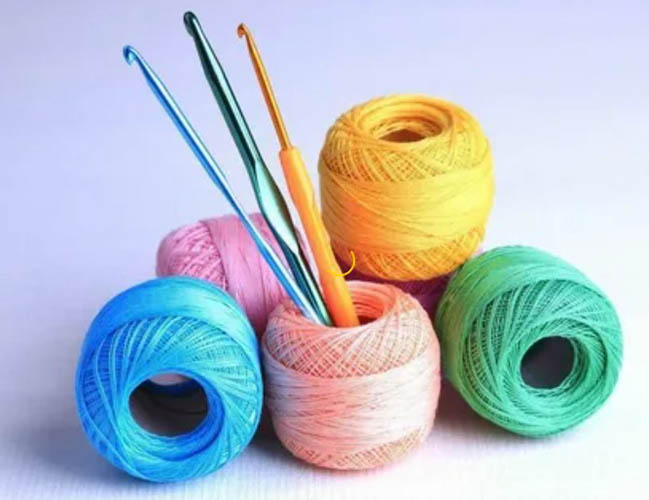
To knit a toy using the amigurumi technique, you need to prepare a minimum set of tools and materials:
- hooks size 1.75 and 3;
- thread material in shades of pink, red, black, white and dark pink;
- synthetic padding or holofiber for filling the toy.
Peppa Pig crochet can be stuffed not only with holofiber and synthetic padding, but also with synthetic fluff, so that the product is optimally rigid. If desired, the inside of the toy can be filled with special weights, beads or glass balls.
Semolina is also suitable as a filling. However, when choosing such a material, you may encounter some problems during washing.
The knitting tool must necessarily match the thread material in thickness. If the yarn is thin, then the hook should not be thick. When knitting tightly or loosely, it is advisable to select the tool taking into account the features of your own style. However, the hook should be thinner in diameter than the selected thread material.
As a result, the product will be denser, with no gaps between the loops through which the stuffing is visible. But the degree of density should not be too high so that the needle that fastens the parts of the product can freely pass through the fabric.
To make knitting tools, the following are often used:
- acrylic;
- bamboo;
- tree;
- metal;
- plastic.
In terms of shape, hooks can have a rubber or plastic handle, or they can be solid, made from only one material.
If the threads are hard and fluffy, it is advisable to use an aluminum or steel tool for better sliding along the yarn. If the material is smooth, it is recommended to prepare a plastic or bamboo hook so that the loops do not slide quickly.
To create toys using the amigurumi technique, it is permissible to use several types of yarn:
| Name | Material Features |
| Acrylic | The yarn will not split, and it is convenient to work with such material because it is not a source of allergic reactions, it retains its shape well and is not subject to unraveling. As a result, the knitted product will be pleasant to the touch and will retain its shape perfectly. At the same time, acrylic threads are presented in a variety of colors, which allows you to choose any desired shade. |
| Mohair | This type of material is very fluffy, so it is suitable for experienced knitters. As a result, the toy will be soft and fluffy. |
| Plush or velour | This type of yarn feels like a bathrobe or a soft towel. The thread material will be tightly connected, so there will be no gaps on the canvas. However, it should be taken into account that due to the characteristics of the yarn, the loops can be lost in the overall mass, so the craftswoman will have to work blindly. Experienced knitters can easily cope with these threads, and beginners need to be patient and have time. As a result, you can get a very soft toy. |
| Mixed | In this case, the yarn may consist of a mixture of polyamide with wool, acrylic with wool, or acrylic with cotton. Due to the addition of synthetic fibers, the material will not be subject to moth infestation, while being characterized by easy care, textured effect, stable shade and increased durability. |
| Cotton | It helps to create neat products, but only experienced knitters can handle such material. This type of yarn is often chosen to obtain perfectly neat work, because cotton is moderately dense and contains an optimal volume of liquid. For such yarn, all lines must be even, so cotton threads are not suitable for beginners. |
It is better not to choose wool yarn for work, because such material can become a source of allergic reaction. At the same time, such threads are very prickly.
Knitting pattern
Peppa Pig crochet does not require the design of complex elements. In this case, you need to perform increases, decreases, and also knit columns without yarn overs. You can start with the head or the body.
When making increases, you need to knit the thread into 1 loop twice. If the pattern indicates a decrease, you need to knit 2 elements together.
Body
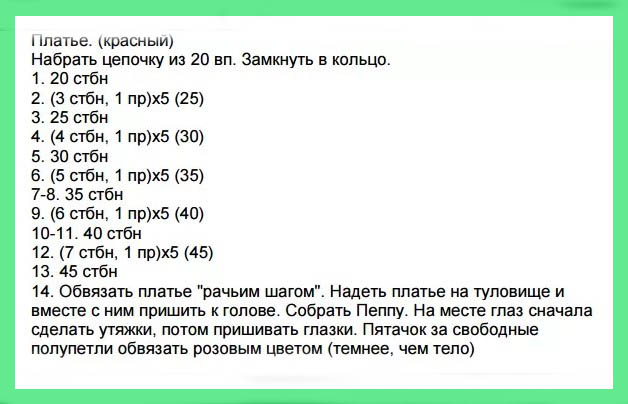
To decorate the body, you need to use knitting tool #3, as well as pinkish threads. Additionally, you will need to take red yarn. Initially, you need to start working with pink material.

Step by step description:
- Row 1 consists of 6 single crochet stitches worked into a ring.
- In the 2nd row, make 6 increases to get 12 loops.
- In the 3rd row, repeat the alternation of 1 increase and 1 column without a yarn over 6 times. There should be 18 elements in total.
- In the 4th row, as in the 3rd row, perform the same pattern 6 times. However, there should be 2 columns without a yarn over. As a result, there should be 24 loops.
- Row 5 consists of an increase and 3 columns without a yarn over. Repeat the pattern 6 times to get 30 elements.
- In row 6, make an increase with 4 columns without a yarn over 6 times in turn. There should be 36 elements in the row in total.
- Row 7 consists of an increase and 5 columns without a yarn over. To obtain 42 loops, repeat the pattern with alternation 6 times.
- In the 8th row, make a pattern of an increase and 6 columns without a yarn over in turn 6 times. In total, there should be 48 elements.
- Then change the pink yarn to red and continue working. To do this, in the 9th row, knit 48 single crochet stitches.
- Row 10 looks like row 9, but the columns are designed in a ring behind the back wall.
- From rows 11 to 16, knit 48 columns without yarn over. As a result, there should be 48 loops in each row.
- In the 17th row, make 6 times and in turn the pattern of decrease and 6 columns without yarn over. There should be 36 elements in total.
- In row 18, make 36 columns without throwing over.
- There should be 30 loops in row 19. To do this, perform the pattern of decreases and 5 single crochets 6 times with alternation.
- Row 20 consists of 30 columns without a yarn over.
- Fill the product with filling material.
- Next, proceed to row 21, knitting 6 times with alternating pattern of decrease and 4 columns without yarn over. There should be 24 loops in total.
- Row 22 consists of 24 columns without a yarn over.
- In row 23, repeat the pattern of decreases and 3 columns without yarn overs 6 times so that there are only 18 elements in the row.
- Row 24 consists of 12 loops. To do this, perform 6 times alternation of decrease and 2 columns without yarn over.
- Then make an increase and 7 columns without a yarn over. Repeat the pattern with alternation 6 times, so that there are 54 loops in total.
- Then knit 54 single crochet stitches.
The toy has a small tail, so after creating the body, you need to decorate this detail. To do this, you need to prepare pink threads and hook No. 3.
Step by step description:
- In the 1st row, make 15 air loops.
- In the 2nd row, initially knit a column without a yarn over into the 2nd element from the tool. Then make 14 columns without a yarn over.
- The finished piece can be sewn to the body.
Head
Peppa Pig crochet should have a head that is slightly larger than the body. To do this, you need to use pink thread material with tool #3.
Step-by-step description of the scheme:
- 1 row consists of 6 columns without throwing into a circle.
- Row 2 consists of 6 increases.
- In the 3rd row, knit the pattern of an increase and a single crochet 6 times in turn.
- In the 4th row, make 18 loops along the back wall in a ring.
- From rows 5 to 9, knit 18 columns without yarn over.
- In the 10th row, initially make an increase 6 times, then make columns without a yarn over in the amount of 12 pieces.
- In the 11th row make an increase and a column without a yarn over (repeat with alternation 6 times). Then make another 12 similar columns.
- Row 12 has 30 single crochet stitches.
- In row 13, initially repeat the pattern of the increase and 2 single crochet stitches 6 times. Additionally, knit 12 single crochet stitches.
- Rows 14-20 consist of 36 columns without yarn over.
- Fill the product with the selected filling.
- In row 21, first make a decrease and 2 single crochet stitches (alternate 6 times). Then make 12 single crochet stitches.
- In row 22, repeat the decrease and single crochet 6 times, alternating. Then make 12 similar single crochets.
- Row 23 consists of a decrease and 2 single crochets. Alternate 6 times to the end of the row.
- Row 24 contains a decrease and a single crochet. Repeat the pattern 6 times.
- In row 25, make 6 decreases.
To make the head look complete, it is necessary to make the ears with eyes, cheeks and nostrils. To make the ears, you need tool #3, for the rest of the parts – hook #1.75. The ears should be made with pink threads, the nostrils with cheeks – with dark pink yarn, the eyes – with black and white material.
Step-by-step description of knitting ears:
- In 1 row, make 6 columns in a circle without throwing.
- Row 2 consists of 6 increases.
- From rows 3 to 5, knit 12 columns without yarn over.
- In the 6th row, repeat 4 times alternating decreases and single crochets.
Step by step instructions for creating eyes:
- Row 1 consists of 6 single crochet stitches worked in a circle.
- Change the black yarn to white and continue working.
- In the 2nd row, make 6 increases. There should be 12 loops in total.
Detailed description of knitting cheeks:
- In the 1st row, knit 6 single crochet stitches into a circle.
- In the 2nd row make 6 increases.
- In the 3rd row, knit an increase and a single crochet 6 times, alternating.
To create the nostrils, you only need to make 1 row of 4 columns without throwing into a circle. After that, the finished head can be sewn to the body.
Hands
Step by step description of creating hands:
- In 1 row make 4 columns without throwing into a circle.
- Rows 2-4 consist of 4 columns without a throw.
- Without cutting the thread material, continue working, joining the fingers together. Knit in a circle.
- To do this, in the 1st row, connect the 1st finger with the 2nd, and the 2nd with the 3rd finger. Then make 2 columns without yarn over, continuing to connect the fingers: the 3rd with the 2nd, the 2nd with the 1st. In total, 8 loops should be formed.
- Row 2 consists of 8 columns without a yarn over.
- In the 3rd row, repeat the pattern twice, alternating decreases and 2 single crochets. The result should be 6 loops.
- From rows 4 to 10, knit 6 single crochet stitches.
- In row 11, perform 3 decreases.
- Sew the arms to the body.
Legs
Peppa Pig crochet must have pink feet, shod in black shoes. For work you need knitting tool №3.
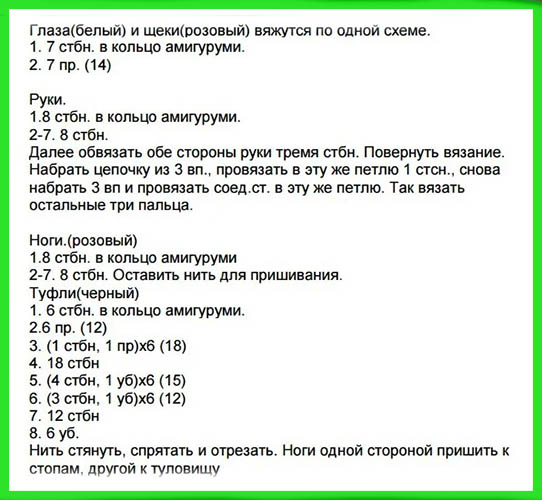
Step-by-step description of the leg creation scheme:
- 1 row contains 7 air loops, formed into a circle.
- Rows 2-11 consist of 7 columns without a throw. Each row should have 7 elements.
- Sew the connected parts to the body.
Step-by-step description of knitting shoes:
- In the 1st row, knit 6 single crochet stitches in a circle.
- In the 2nd row, make 6 increases.
- In the 3rd row, repeat the pattern 6 times, alternating an increase with a single crochet.
- Rows 4-7 consist of 18 columns without a yarn over.
- In the 8th row, knit a decrease and a single crochet. Alternate 6 times to make a total of 12 elements.
- Fill the part with synthetic padding or holofiber.
- Rows 9-12 consist of 12 columns without yarn overs.
- In row 13, make 6 decreases.
- In row 14, make 3 decreases.
Tips and tricks
You can crochet almost any toy if you have basic knitting skills.
When creating Peppa Pig, beginner knitters are advised to take into account several tips:
- The knitting tool should be thinner in diameter than the thread material. As a result, the product will be dense and there will be no holes.
- The size of the future toy depends on the thickness of the knitting tool and yarn. Separate parts should be sewn to the main product symmetrically and carefully.
- After some time, the stuffing may shrink. To prevent the toy from becoming thin after shrinkage, you need to use a lot of stuffing to tightly stuff the product.
- It is advisable to mark the beginning of each line with contrasting yarn or a marking ring. In this case, the work must be carried out strictly according to the scheme with the obligatory counting of the number of lines with loops. Otherwise, if a mistake is made, a certain part of the fabric will have to be unraveled.
- When creating a decrease, you do not need to skip the element to knit the next one, but thread the yarn through 2 loops at once to knit them together. As a result, there will be no holes in the fabric through which the filler can be seen.
- Cotton wool should not be used for filling, because the material is prone to compaction. As a result, the product may lose its original appearance in a short period of time. At the same time, cotton wool is able to absorb moisture and does not allow the toy to spring. For this reason, the product will be heavy and hard. Silicone or synthetic padding from old outerwear or from an unnecessary small decorative pillow will do as stuffing.
- If you make a mistake, it is advisable to immediately unravel the fabric to tie the line again. If you deviate slightly from the given pattern, the toy will not have the desired appearance.
- The thread material may twist during work. This may be due to the wrong choice of threads or a manufacturing defect, when the initial and final points of the skein were swapped during the twisting process. To correct the situation, it is permissible to pull the yarn from the central part of the skein and fix the outer end of the thread so that it does not interfere during work. You can also manually rewind the skein. You can pull the free yarn, which then needs to be fixed with a pin on the skein and lifted to swing. As a result, the material will unwind on its own.
Crocheting toys using the amigurumi technique is not difficult. In this case, you need to strictly follow the pattern with the description and try to notice mistakes in time so that you can correct them without completely unraveling the fabric. Using this technique, you can design Peppa Pig, which is popular among small children, as well as other cartoon characters.
Video about knitting