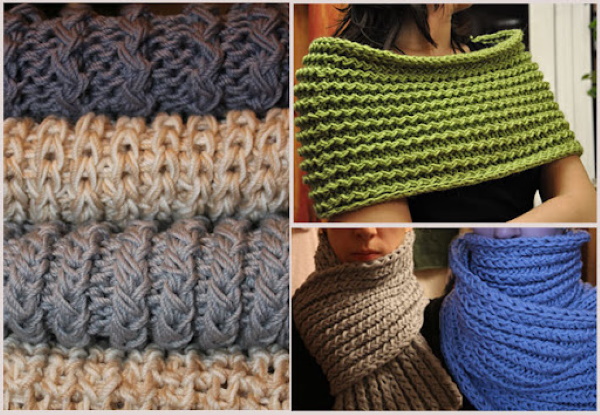
The French elastic knitting pattern will allow you to decorate a scarf, hat or mittens. This pattern is also popularly called "foreign", "Riga", "corrugated" or "faceted". The ornament belongs to the world varieties of elastic bands and is quite popular with many knitters in Russia. It can be knitted on both separate and circular knitting needles.
How to knit a French elastic band with knitting needles
French elastic knitting, the pattern of which often appears in thematic publications, is a simple and beautiful solution for decorating a snood or muff. Experts have established that its name comes from the place where the ornament appeared. Those who have already mastered knitting a simple classic elastic with a step of 1 by 1 or 2 by 2 can try a more complex pattern to decorate their wool products.
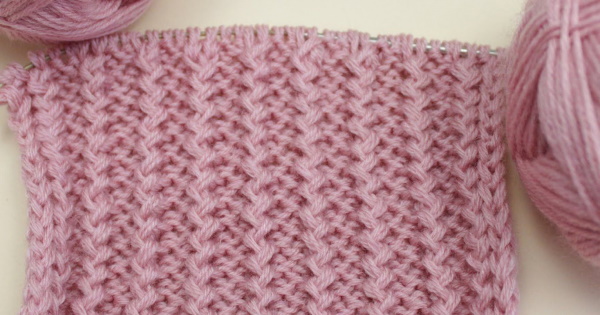
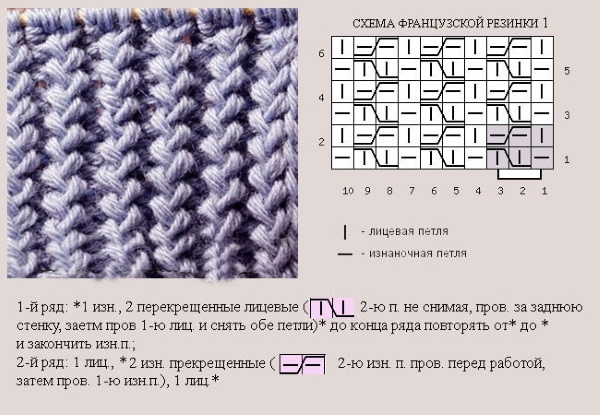
The basics of knitting are used in the work - front and back loops. In addition, here you can also find crossed loops, thanks to which the pattern on the canvas looks like a braid with frayed edges. In order to correctly read knitting patterns, you need to know the designation of loops and their abbreviated writing. This method of encryption is widespread throughout the world and can be understood by a needlewoman from any country.
| Name | Designation |
| purl | ip or izn. – "-" or "O" |
| facial | lp or persons. - "I" or "X" |
| edge | kr. or kr – «Ո» |
| crossed | skr. or crossbreed – «ɤ» |
Sometimes patterns contain yarn overs, which increase the number of loops. Experts note that before you start creating the main fabric, you need to practice on a small sample. To do this, knit a small copy of the pattern from the yarn selected for creating the item and see how it looks when performed with the selected threads and how easy it is to work with the yarn with knitting needles of the available size.
To tie up a foreigner, you need to:
- Start by casting on stitches.
- Create row 1, alternately creating 2 knit and 2 purl stitches. Repeat alternating stitches to the end of the line.
- Form row 2, repeating 1 purl and 2 knit stitches after the edge stitch. Work like this until the end of the row.
- Knit the fabric to the required length.
- Close the loops at the end of the work.
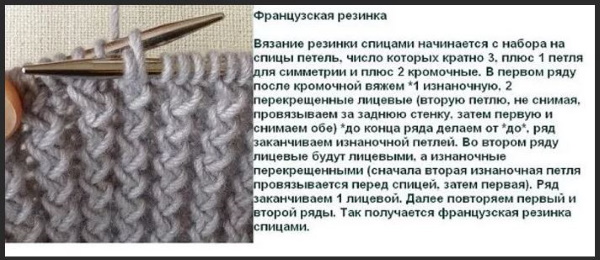
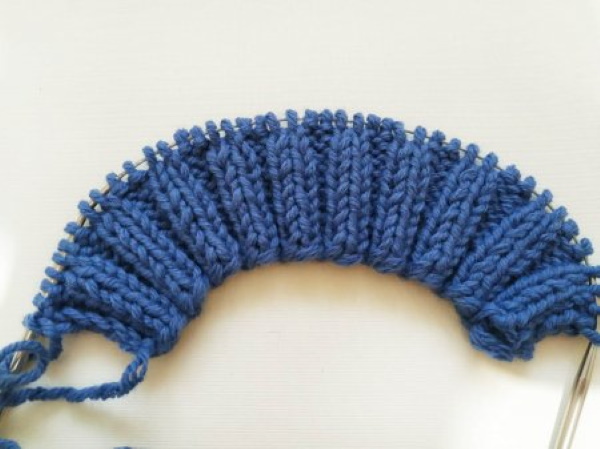
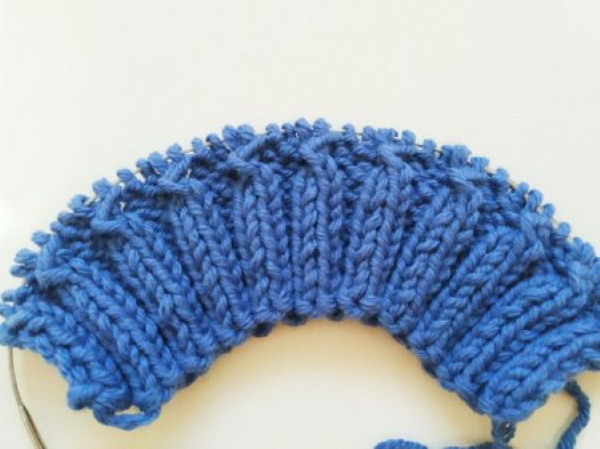
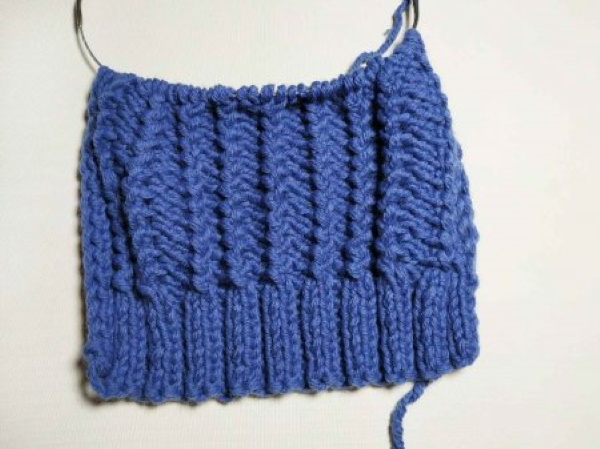
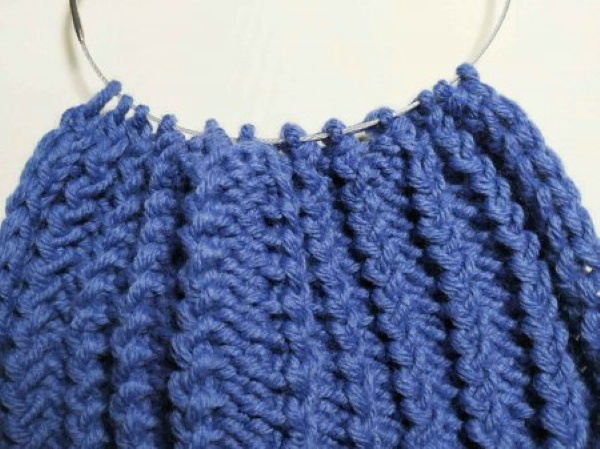
The corrugated pattern is not difficult to knit, and it looks more attractive than the classic version of the pattern. Separate knitting needles were used to create the ornament. Experienced needlewomen note that there are several secrets to foreign knitting that will make the work of every novice craftswoman easier.
Firstly, the first edge stitch in the classic version of the pattern remains unknitted and is simply transferred to the working needle. Secondly, the last edge stitch of the row is only knit stitch. Thirdly, the 2nd stitch should always be knit stitch, and the penultimate stitch should be purl stitch. Fourthly, the “body” of the row consists of alternating elastic bands with a 2 by 2 step.
Fifthly, you need to correctly calculate the loops for knitting, so that you can then hit the pattern along the entire length of the fabric. So, for example, if you need 90 loops for a snood, then there should be either 89 or 93 on the knitting needles. The specified amplitude will help you hit the pattern and not get lost in counting the sides and loops.
On circular needles
French elastic knitting needles, the pattern of which may contain recommendations for knitting on circular needles, looks beautiful on a seamless hat or skirt. The process of creating a faceted pattern on connected needles is slightly different from knitting on separate ones, and this is due to the fact that the work is carried out only on one outer row, which is in front of the eyes of the craftswoman.
To knit a corrugated elastic band on circular knitting needles, you need:
- Start by casting on stitches.
- Knit a row after casting on with knit or purl stitches to join the fabric into a closed circle.
- Hang a plastic marker where the rows join to indicate where the canvas begins.
- Make the next row by alternating 2 knits with 2 purl stitches throughout the entire strip.
- Make another row, shifting the loops. The pattern consists of 1 front and 2 back loops, the alternation of which is also repeated to the end of the strip.
- Knit the next row again with a 2 by 2 elastic band, as at the beginning of the work.
- Repeat the shift in the next row.
- Close the loops at the end of the work.
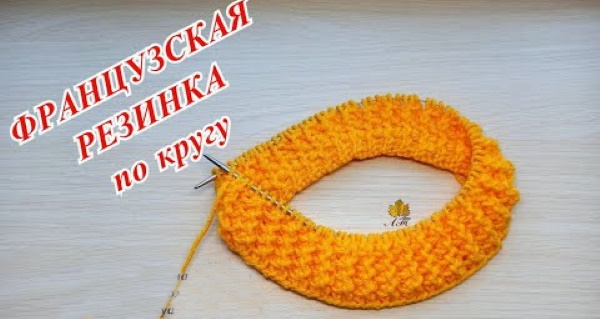
Circular needles are usually used to knit seamless items. They are often used for hats, snoods, gloves and high collars. Instead of circular needles, you can take an odd number of separate ones and work in the same way as described above.
Types of French elastic
The French elastic knitting pattern allows you to knit any item to wear in autumn or winter. The Riga ornament looks beautiful on bulky yarn, and on thin threads its "highlight" is almost invisible. There are several varieties of foreigner, which allows you to knit it in several ways.
Conventionally, they can be divided into:
- "Classical";
- "2-loop offset";
- "Crossed";
- "Children's".
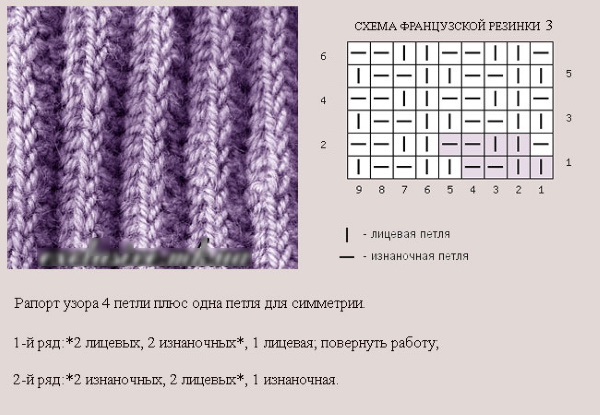
Most often, needlewomen use the classic technique of creating a corrugated elastic band. The process of creating it is described above. The ornament called "Offset in 2 loops" is also popular.
To create it you need:
- Start by casting on stitches.
- Knit 1 edge knit stitch in a row, then alternate the elastic with a step of 2 by 2. Finish the strip with a front edge stitch.
- Create row 1, starting with a purl edge stitch. Then follow 2 purl and 2 knit stitches. The row should end with a purl edge stitch.
Some people recommend a slightly different technique for knitting offset stitches.
To do this, after recruiting them, you need to ensure that:
- in the odd row the 1st loop after the edge was a front loop, and in the even row it was a back loop;
- The 2nd loop is always a front loop;
- 3rd - purl in odd row, and front in even row;
- 4th - always purl.
Experienced knitters note that this is one of the easiest ways to get a French pattern on the canvas. Foreigners are also knitted using crossed loops. This trick also allows you to create a braid-like ornament on the canvas.
To get the pattern you need:
- Start working with a set of loops and their number should be even.
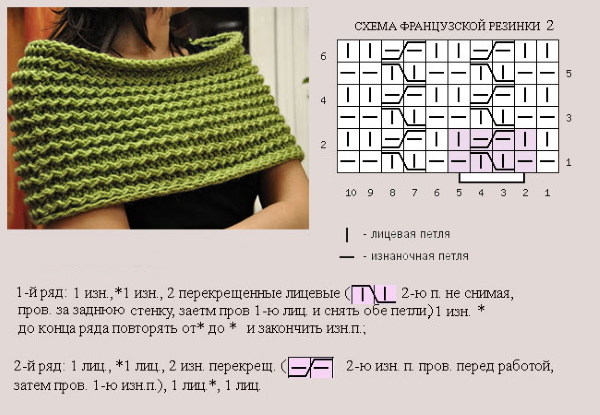
- Create row 1, alternately repeating the knitting of 1 purl and 2 front crossed loops (pp), for knitting which the 2nd loop is knitted behind the back wall, without removing it from the knitting needle, and the 1st - a regular front loop, after which remove the pp to the working knitting needle. Finish the row with an edge purl.
- Knit row 2, alternating 2 pp and 1 knit. In case of knitting the 2nd loop in pp, the thread is left in front of the work. After that, both knitted loops are removed, as in row 1. The strip must be finished with a front edge.
- Knit the fabric to the desired length and close the loops at the end of the work.
You can also knit a product using this variation of the faceted pattern on circular knitting needles.
To do this, after casting on the loops you need to:
- Knit row 1 in the same way as in the previous version of the work, only without edge loops.
- In row 2, create a pattern consisting of repeats of 1 purl and 2 knit sts.
The circular fabric is also knitted to the required length and the loops are closed at the end of the work. The children's version of the foreigner is loved by those who knit for little fashionistas. This is due to the fact that the variation of the ornament has the most rounded and not sharp corners of all the elastic bands offered above. It is also softer and more pleasant for the baby's delicate skin.
To knit the pattern you need:
- Start by casting on an even number of stitches.
- Knit row 1, alternating 2 purl stitches with 2 knit stitches.
- Create row 2, repeating the pattern of 1 knit, 2 purl, 2 knit.
- Repeat the work progress of the 1st strip in row 3.
- Knit row 4 the same as row 2.
- Alternate the patterns of strips 1 and 2 to the required length of the product.
- Close the loops at the end of the work.
Using one of the listed options for knitting French elastic, even a novice craftswoman can create a beautiful relief fabric.
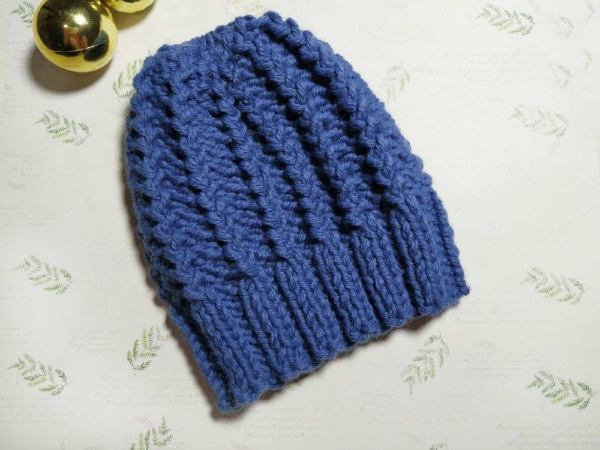
How to knit a hat
French elastic knitting, the pattern of which will allow any needlewoman to knit a hat, is suitable for decorating headwear. Before you start creating the necessary winter accessory, you need to take measurements from your head. The needlewoman will need the circumference of the head and the depth of the product. To get the first measurement, a flexible centimeter is applied to the most convex part of the head, it should pass over the eyebrows and along the back of the head.
It is recommended to measure the depth of the product by placing a centimeter from the middle of the crown to the beginning of the earlobe. If the headdress is planned to be longer than the skull data, then the necessary "plus" is included in the calculation to the centimeters obtained. To calculate the number of loops required for casting on, you need to knit a test sample and measure how many loops there are per 1 cm.
For example, the head circumference is 56 cm, and 2 loops fit into a centimeter, then 56 * 2 = 112 loops need to be cast on and do not forget to add 2 edge loops. In order to understand how many rows will form the required fabric, you need to multiply the depth of the product by how many loops are in 1 cm of the sample. You get 22 * 2 = 44. If the hat should hang slightly back, then add a few additional rows.
Before you start working, you need to select yarn and knitting needles of the right diameter. Experts recommend knitting winter hats from warm types of threads that contain wool from mountain goats, llamas or sheep. Yarn made from camel wool is also suitable.
But it is not recommended to create winter hats based on French elastic from angora and other types of fluffy material, since the fluff can unpleasantly get into the eyes, ears and nose and cause irritation. In addition, the protruding villi will quickly come out of the fabric, and it will not look as expected.
Before buying, it is recommended to apply the skein to an open area of the body and smell it. The first test will show how sensitive skin reacts to the material, and the second - whether there are any chemical elements in the composition that may have a negative effect on the skin and human health in general in the future.
Also, before purchasing skeins, you need to carefully read the data on the label. Here, the manufacturer usually indicates not only the composition of the yarn, but also the length and thickness of the fibers. Also on the label there are recommendations for choosing the diameter of the knitting needles or hook and how to care for the item in the future. Fans of the "Beanie" hat can knit this headdress using a corrugated pattern.
To do this you need:
- Start by casting on 113 stitches.
- Knit row 1 after the removed edge knit stitch, then alternate 2 purl stitches with 2 knit stitches. Make the last stitch of the row a purl stitch.
- Create row 2 by knitting a knit stitch after the edge stitch, then alternate 2 purl stitches with 2 knit stitches. Finish the line with a purl stitch.
- Alternate the pattern of rows 1 and 2 throughout the entire length of the fabric.
- Start tightening the fabric at the crown. To do this, reduce the number of loops by knitting 2 together at the beginning and end of the line after and before the edge loops.
- Pull the stitches together when there are not many stitches left on the needles.
- Tuck the tail of the thread inside.
If desired, the headdress can be decorated with a pom-pom made of threads or faux fur. Those who prefer the cap lapel to be knitted from classic elastic and the rest of the fabric - foreign, can combine these two patterns.
To create a warm hat you need:
- Start by casting on stitches.
- Knit row 1 with a 3 by 3 rib pattern.
- Design row 2 following the pattern prompt.
- Alternate row 1 and row 2 until the height of the piece is 6 cm.
- Proceed to create the main fabric with a pattern from a foreigner. To do this, knit 2 purl loops after the removed edge, then knit as in the crossed variation described above, the 2nd loop as a front loop, and the 1st also as a front loop, then transfer to the working knitting needle. Repeat the rapport to the end of the line.
- Form the next row by knitting 2 knit stitches after the edge stitch and 2 pp so that both are purl stitches.
- Alternate the pattern of rows until the end of the fabric.
- Start decreasing the loops. To do this, decrease in those rows where there are 2 purl loops from which 1 is formed.
- Knit in the row where there is 1 loop between the edges, combining 3 (1+2 on the sides) into 1.
- Reduce the number of loops to a minimum and close the work.
The product can be pulled together or the seam can be sewn, hiding it inside.
Scarf
French elastic knitting, the pattern of which is easy to read and remember, looks noble on knitted scarves of any width and density. Beginning needlewomen in most cases try their hand at first, in creating neck accessories. This is due to the fact that here you do not need to take measurements, and knitting consists of working on a solid long piece of fabric.
To knit a fashionable accessory, you need:
- Start by casting on stitches.
- Knit an odd row, alternating 2 purl stitches with 2 knit stitches.
- Create an even row by repeating the pattern of 1 knit, 2 purl and 2 knit.
- Repeat the work procedure of the 1st strip in all odd rows.
- Knit all even rows in the same way as row 2.
- Alternate the patterns of strips 1 and 2 to the required length of the product.
- Close the loops at the end of the work.
When casting on stitches, keep in mind that the wider the scarf, the less comfortable it will be to wear. Such a product is usually folded in half, so fans of single fabric should better monitor the width of the product. Also, experts recommend carefully checking the pattern when creating each new strip.
A scarf made with corrugated elastic can be complemented with a fringe decoration. To create it, you need to pull empty long loops through the finished fabric from the closed ends of the product with a crochet hook or knitting needle.
You can additionally secure the row by knitting it with knit or purl stitches so that this does not affect the length of the loops. After that, each of them is cut into 2 parts. Some needlewomen prefer not to cut the loops, but to twist them, threading them into each knitting needle and tightly pulling the threads with the knitting needle so that it resembles a “helicopter propeller”.
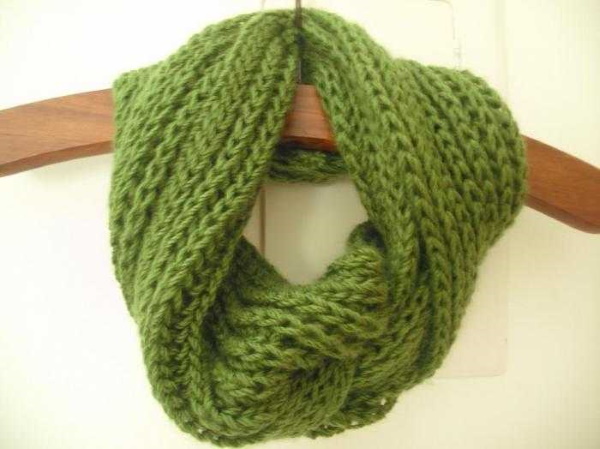
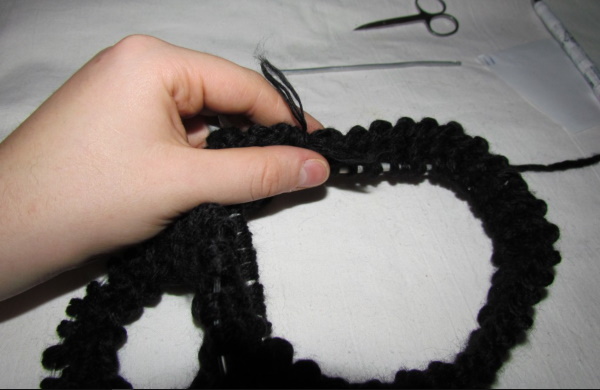
Snood
Fans of voluminous scarves that have come into the modern world from northern countries can knit snoods using foreign elastic in its various variations. Those who like seamless items are better off using circular knitting needles, while others can knit a collar on the neck the old-fashioned way, using 2 auxiliary tools. Before you start working, you need to figure out how wide the product should be and how many turns it will be worn. The length of the accessory depends on the latter indicator.
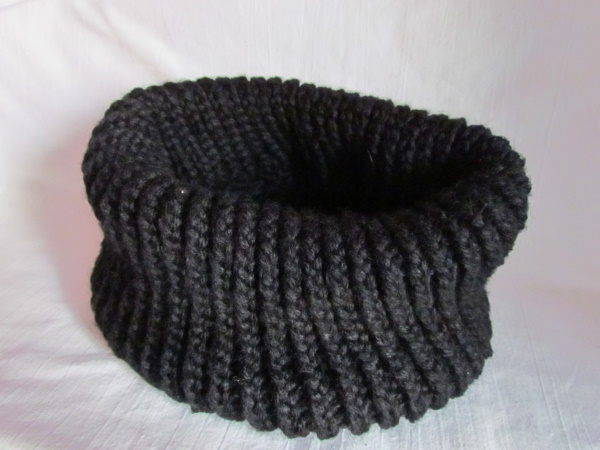
The needlewoman will also need to measure her head circumference if she is knitting the product for herself. This is necessary so that the closed scarf can be easily put on and taken off. It should be taken into account that for 1 turn of the product for an adult there are from 50 to 65 cm. To these figures add another 3-4 cm. If the snood is several turns, the length should be at least 135-140 cm, and the width - 23-26 cm.
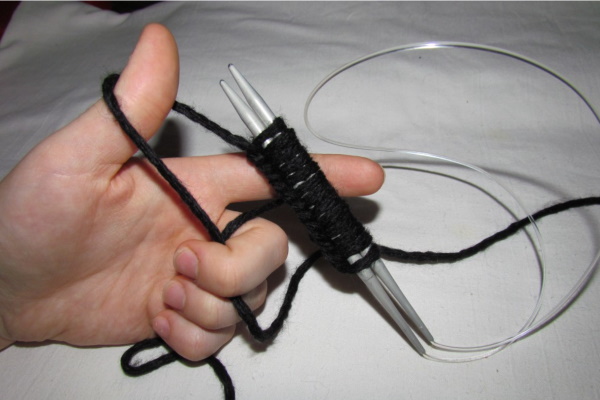
To knit a tube scarf, you need:
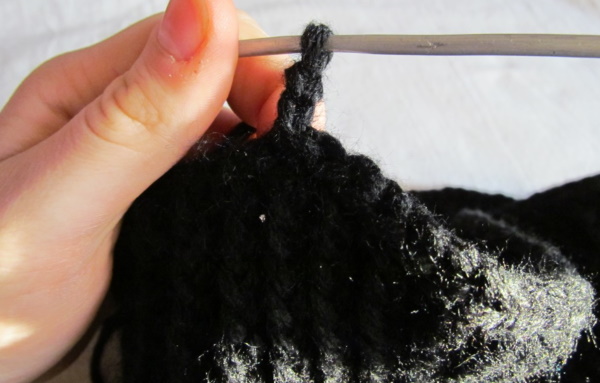
- Start by casting on stitches on circular needles.
- Knit the first row after casting on with only knit stitches or only purl stitches to close the line.
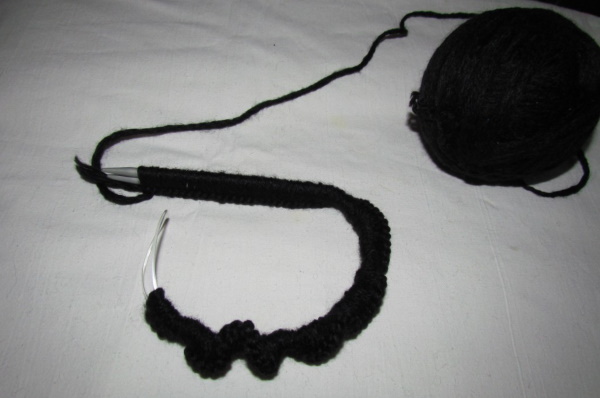
- Mark the place where the canvas joins with a plastic beacon. This is necessary so as not to get lost when making the pattern and to get into the drawing.
- Start working with the French elastic technique in the chosen variation, for example, with an offset.
- Work row 1 with a 2x2 rib pattern, where 2 purl stitches follow 2 knit stitches.
- Create the necessary offset in row 2, where after the edge stitch 1 loop will be a front loop, and after it there will be 2 back loops and 2 front loops.
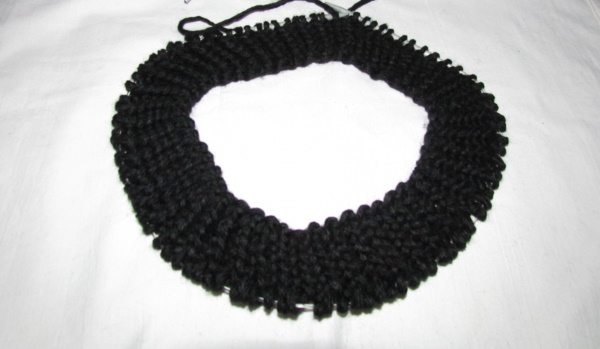
- Knit the product to the desired width and close the loops.
The finished product is tried on, washed and worn. In the case of a snood scarf, before starting the main work, you also need to knit a small sample and see how the thread behaves in work. The test will also help you understand how many layers to fold it into so that the fabric turns out more comfortable and warmer.
The French elastic knitting pattern has been popular with needlewomen for centuries. During this time, the knitting material and the technique of creating things have improved and become better and more diverse.
Video about knitting French elastic with knitting needles
How to make a French elastic with knitting needles: