Since ancient times, a snowman has been considered a winter New Year character. In most countries, it is made of snow, and in its historical homeland (Switzerland) from cotton wool or fabric. But there is another option - make it from plastic cups and put it at home.
Tools and materials for manufacturing
To make a snowman at home, you will need to prepare in advance:
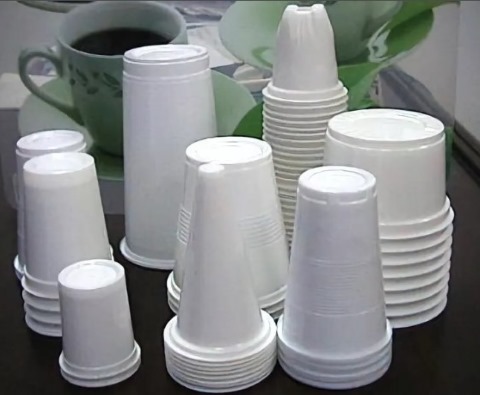
- Disposable plastic cups that can be easily purchased at any supermarket or hardware store.
You can use cups of the same size or different ones (at the discretion of the master or based on the assortment of the store).
Approximate amount of plastic dishes:
| Snowman component | Volume of suitable cups | Approximate quantity of containers |
| Head | 50 or 100 ml (coffee) | from 50 to 100 pcs. |
| Middle part of the body | 200 or 300 ml (tea) | 150 - 200 pcs. |
| Lower torso | 300 or 500 ml (beer) | 100 - 150 pcs. |
Different cup sizes will allow you to “sculpt” parts of the snowman of different diameters (which makes the finished work look more beautiful), and if you use only one type of dishware, the head and body will be the same.
Variations in the sizes of snowman cups are shown in the photo.
The color scheme and size of the finished snowman are planned in advance, the required amount of purchased containers will depend on this.. For example, to make a snowman about 1 m high and consisting of 2 spheres, you will need about 300 cups. If you plan to make it higher, then you should have another hundred in reserve. For the smallest snowman, 150 - 200 cups will be enough.
The most suitable are considered to be soft plastic cups with a narrowed bottom (it is not recommended to use rectangular containers, because it will be difficult to form a sphere).
- A stapler and staples (you will need about 3 times more than cups).
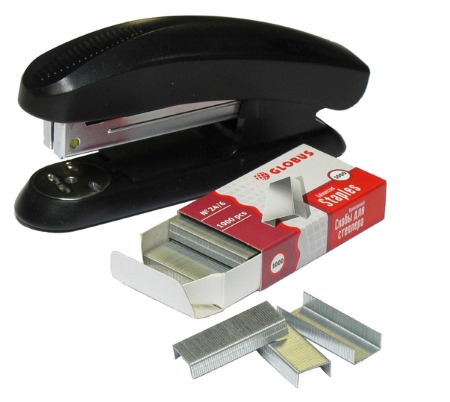
The stapler is selected to pierce the double plastic. You can replace it with a glue gun, but in this case, fastening all the parts will take a little more time.
- New Year's glowing garland.
- Snowman headwear (hat, cap, top hat, plastic children's bucket, cap with a pompom). You can make it yourself.
- Colored cardboard (for decoration and face formation).
- Scarf or Christmas tree tinsel.
- Gloves for creating hands (rubber or fabric).
- Scissors and tape.
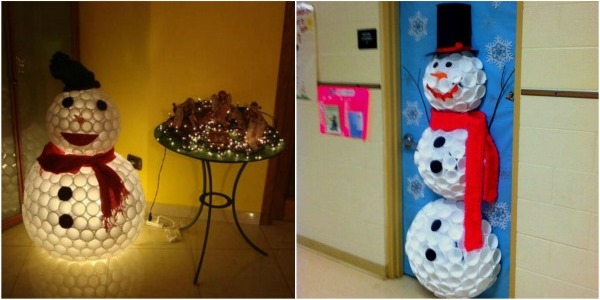
A snowman made from plastic cups (it's quite easy to make) will be a wonderful and safe home decoration for families with small children, instead of a traditional New Year tree.
The snowman is light, springy and mobile in movement. Children will be able to move it to their playroom without fear.
This idea of decorating an apartment will also be appreciated by pet owners, who are often afraid to decorate the New Year tree because of the risk of it falling during active interest from their pets. A plastic snowman in this case is absolutely safe and creates a festive atmosphere in the house.
Instructions for creating using a stapler
A snowman made from plastic cups (it can be made in 2 hours) will be a wonderful New Year's craft for kindergarten if you involve children in the creative process and create the toy together.
Scheme
According to the diagram below, you need to prepare all the materials and start manufacturing.
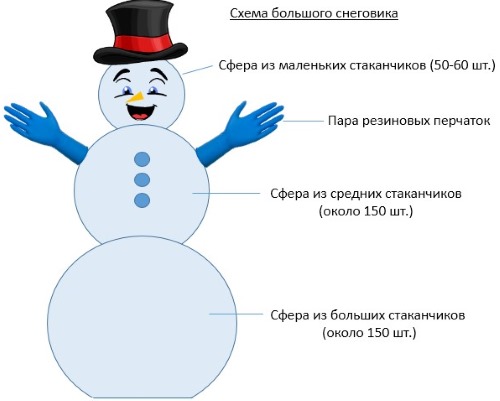
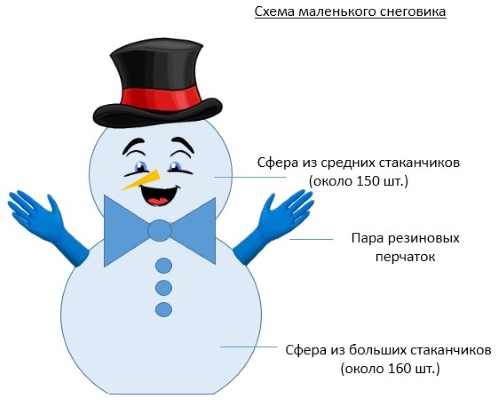
Brief algorithm for making a large snowman (3 parts):
- Making the lower part of the body from large cups (the sphere is not made completely finished, and a hole is left in the lower part so that the snowman does not fall).
- Making the middle part of the body and head from smaller cups using the same principle.
- Fastening all 3 parts and giving strength to the structure.
- Decorating a snowman.
How to make a head
The principle of connecting the cups to create the head and body is the same:
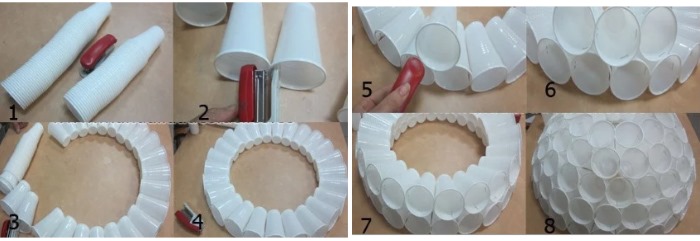
- Place 20 cups in a closed circle on a flat surface, with the bottoms facing inward into the circle.
- First, staple 2 cups together along the inner walls (1-2 staples are enough).
- Then fasten the rest, resulting in a fixed circle (this will be the base).
- By placing new cups on top of the resulting circle and securing them with staples, a hemisphere will be formed (each cup will ultimately be secured with 4 staples).
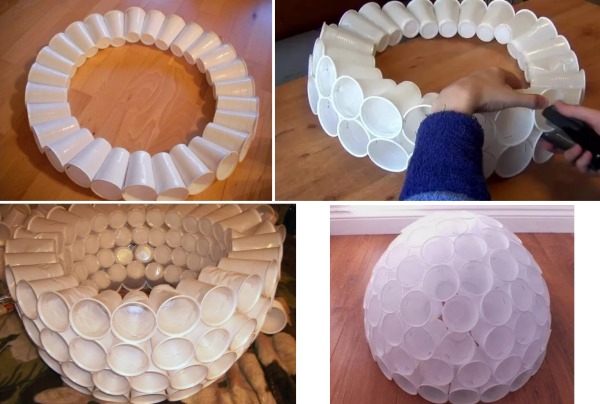
- Do not stop the process until the shape is rounded (it is formed automatically as a result of the narrowed design of the cups).
- Turn the work over and build up the workpiece with new cups, attaching them in the same way (it is important to leave a small hole at the end (the size of 1 cup), which will facilitate the process of attaching the head to the body).
In the same way, construct 2 more spheres (the middle and lower parts of the snowman's body), taking large cups. You should get 3 spheres of different diameters. If you plan to make a small snowman, then you need to make only 2 unfinished spheres of different diameters (the head and the body).
How to make a snowman
Once you have assembled all the parts of the snowman, it is important to secure them securely to give the structure stability and strength.
There are two ways to do this:
- Fasten with a stapler using the same principle (convenient if the snowman will be located indoors).
- Insert a rigid base in the form of a stick and secure it to the floor (if you pass the stick through the spheres, you will need to cut out the bottom of several cups). This mounting option is suitable for tall and voluminous snowmen, as well as for outdoor placement.
After assembling the head and body, start decorating the figure:
- Stuff rubber gloves with cotton wool or synthetic padding and attach them to the body with tape or staples (you can lengthen the snowman's arms by inserting cups into each other and then putting on gloves with cotton wool).
- Attach a homemade headdress or use a factory-made hat.
- Tie a scarf or bow on the snowman (this will hide the seams and add extra strength).
- Cut out eyes, a smile, and a nose from colored paper and glue them onto the head.
- Glue multi-colored buttons to the middle part of the body (they can also be made from colored paper or multi-colored plastic balls).
- An interesting idea is to place white paper (cut into a puddle shape) under the snowman to create the illusion of melting snow.
Using a glue gun
A snowman made from plastic cups (even a child can make one) can be glued together.
There are two ways to connect the cups: by gluing the sides of the walls or by connecting the bottom of each cup to the base (a hard plastic ball or a foam ball). If you choose to glue along the base, the spheres will be more even.
When gluing the cups together, apply a drop or strip of glue from a gun to the side wall of one cup and press the second one to it. Wait 1-2 minutes. If the snowman is made using foam or plastic balls, then the cups are glued to it in a chaotic manner, applying glue to the rim of the bottom and pressing it to the base.
Scheme
Using the above-described snowman patterns (large and small), prepare the required amount of dishes (300 cups for a small snowman made of 2 parts and approximately 400 pieces for a large one), as well as 2 or 3 spherical bases.
How to make a head
If you glue the cups together, for convenience, you should lay them out on the floor in a circle and start connecting. Then glue the cups in layers until the base is rounded. Turn the hemisphere over and glue new cups. Finish gluing the head, closing the sphere completely.
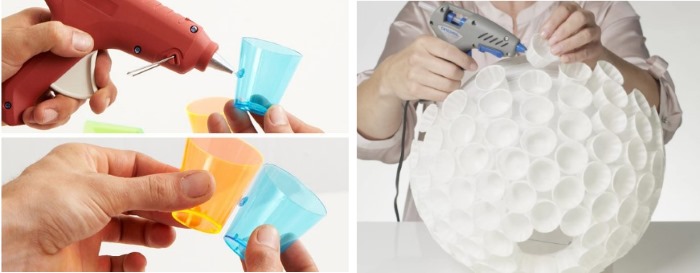
If the head is created on the basis of a ball, then the cups are glued with the bottom in a chaotic order. The advantage of this method is the greater strength of the snowman parts and the neat appearance of the cups (they do not wrinkle when fixed).
Make the snowman's body in a similar way, but use larger cups. The resulting spheres do not need to be rounded to the end, so that it is easier to connect them together.
How to make a snowman
The plastic cups for the snowman's head and body are glued together along the top edges.
To prevent the spheres from moving when connected, you need to do the following:
- Turn the chair over and place it on the edge of the table, legs up.
- Place the bottom of the snowman's body between the legs of the chair with the hole facing the seat (this way it will be securely fastened).
- Apply a thick layer of glue to the edges of the cups in the central part of the sphere.
- Attach the middle part or head (depending on the type of snowman).
- Fix for a few minutes.
After gluing all the spheres together, wait 1-2 hours and turn the snowman over. Finish assembling it, attach the arms and decorate the head.
Accessories and jewelry
To “revive” the snowman and give it a festive look, you can use the following decorations.
Paper Top Hat
To make the headdress yourself, you will need to cut out 3 pieces from cardboard (the sizes depend on the diameter of the snowman's head). The cardboard can be white (Whatman paper) or colored with glitter.
Next, glue the rectangular strip with teeth, rolling it into a cylinder. Glue the circle to one side of the hat. Finally, put the round part with the hole on the resulting shape and fix it with glue. The sequence of actions is shown in the pictures:
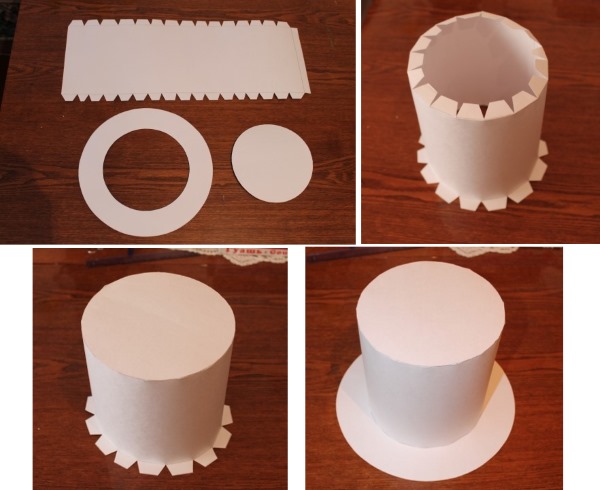
Next, it is recommended to paint the cylinder with paints or cover it with colored paper and put a ribbon or tinsel on top. Decorating the hat with cut-out snowflakes looks original.
Hands-branches and a broom
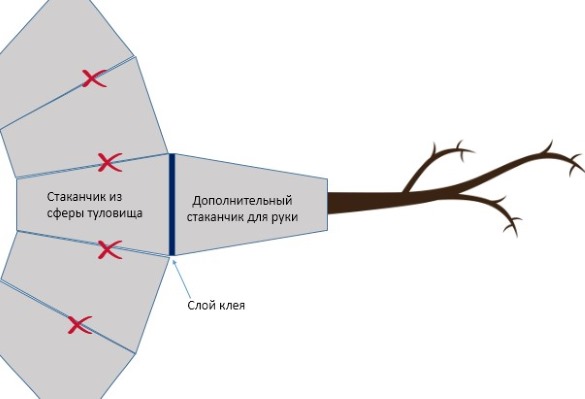
In cartoons and children's fairy tales, a snowman is often depicted with branch-shaped arms and a broom. Making arms is very simple - you need to find suitable branches on the street, rinse them with water, dry them and attach them to the snowman's body, using the diagram below as a guide.
According to the drawing, you need to cut out the bottom (or part of it) of the additional cup and glue it to the rim of one of the cups of the body. Then insert the branch (it should be light and thin) into the cut hole of the additional cup.
The snowman's broom is made from a mop or a straight branch, wrapped in ribbon and decorated with a bow.
Eyes, nose and smile to form the snowman's face
Methods for creating eyes:
- Cut out black and white circles from colored paper and glue them to the head.
- Use multi-colored tennis balls and glue the pupil with eyelashes onto them.
- Use plastic bottle caps.
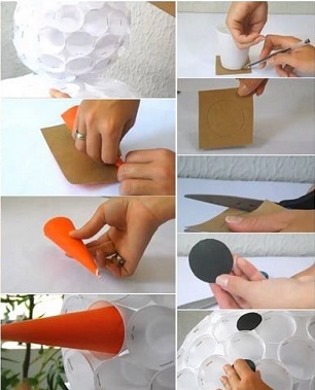 Methods for making a carrot nose:
- Cut a triangular shape out of a piece of orange cardboard, roll it into a cone and glue the edges.
- Form a cone out of white paper, coat the outside with glue and wrap it with orange thread.
- Use a red cup.
Attach the finished nose to the head with a stapler.
To create a smiling snowman, you should find a smile you like on the Internet, print it out and glue it to your head or cut it out of colored paper.
Hair or bangs
Sometimes children use so-called "hair" to decorate snowmen, which is very easy to make from paper. To do this, you need to cut narrow strips of black or brown paper and curl them with scissors.
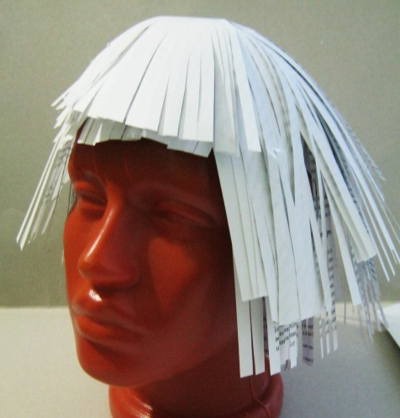
Paper confetti-tinsel will also work. For a secure hold, the hair should be glued to the hat or secured to cups.
Belt
The snowman with a belt and red pants looks interesting and New Year-like. In this case, pants refer to the lower hemisphere of the snowman, made from red cups.
A real belt or one made by hand from scrap materials (faux leather, fabric, dark-colored oilcloth) is quite acceptable as a belt.
Scarf or bow around the neck
This accessory is usually borrowed from the family wardrobe or a piece of red or blue fabric is used.
An alternative to a real scarf is New Year's fluffy tinsel, wrapped several times around the snowman's neck.
Mail bag
Everyone knows that the main function of a snowman is to help deliver children's letters to Santa Claus. Therefore, it would be appropriate to sew a small postal bag on a long handle and hang it on the snowman. If there are children in the family, then it is worth asking them to write a letter to Santa Claus and put it in the snowman-postman's bag.
And when the child falls asleep, carefully take out the letter and replace it with a reply from the grandfather and put the wished gift next to it. In this way, you can create a fairy-tale atmosphere in the house with the fulfillment of a wish.
How to Make a Snowman from Plastic Cups and LED String Lights
A snowman made from plastic cups and garland is a great option for decorating an office or study.
A budget and original idea for preparing for the New Year's holiday will please colleagues and management, considering that plastic cups are available in almost all office establishments.
To create a glowing plastic snowman, you will need to make 2 bases - hemispheres with holes (using the template described above from cups and a stapler) and insert an LED garland inside both structures. Then connect the parts of the snowman, leaving the switch outside, and connect it to the electrical network.
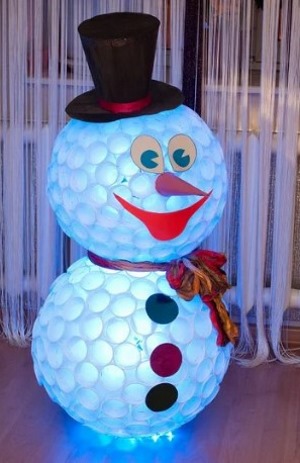 A snowman made from plastic cups (you can make Father Frost and Snow Maiden in the same way) looks unusual and colorful.
You can use a colored or glowing snowman at a children's or adult's party, celebration, or exhibition.
Possible color variations:
- classic white (from opaque white cups);
- multi-colored (from a mixture of red, blue and yellow cups), suitable for celebrating the New Year in kindergarten or winter birthdays;
- transparent snowman with backlighting – an interesting and non-standard idea for offices;
- blue (made from light blue or blue transparent cups), looks great outdoors in the snow, especially with lighting in the evening;
- white snowman with blue inserts (the base of the snowman is made from white containers, and some elements (belt, buttons, eyes) are made from blue glasses), a good idea for decorating stores;
- Red Snowman – suitable for adult themed pre-New Year parties.
A snowman of any size made of plastic cups is a fashionable and original idea for interior decoration. And if you make it in the family circle or for a children's party, delight and a sea of emotions of household members and guests are guaranteed.
Article formatting:Natalie Podolskaya
Video about making a snowman from plastic cups
Video on how to make a snowman from plastic cups: