A stylish hat with arans is a warm knitted accessory that came to the world of fashion from Ireland. The patterns of such arans are varied: braids, honeycombs, plaits. In ancient times, they were used to "recognize" a person, where he is from. Now Irish knitted patterns are a popular decoration for hats, sweaters, socks and other products.
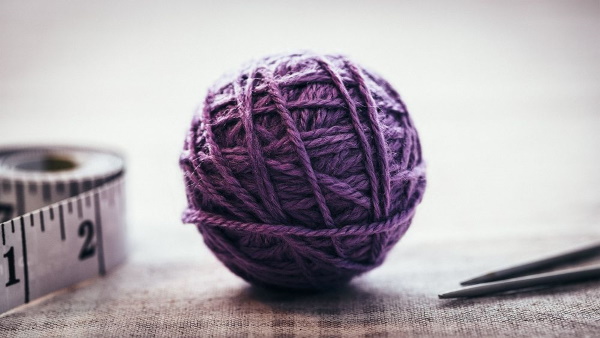
Materials for work
Aran hat with knitting needles (the pattern for beginners may seem quite complicated) is an accessory that has roots in the lands of Ireland. Today, any needlewoman can knit it using the pattern. However, it is worth considering that the Aran pattern is quite complex, and it is best for beginners to take a simpler version for their first work.
Or you can use video tutorials, where the process is shown in more detail and with explanations. To create such an accessory, you will need a little more knitting needles than for the simplest knitting.
To knit a hat, you need:
- circular knitting needles (40 cm);
- a set of double-pointed knitting needles;
- auxiliary spoke;
- 1-2 skeins of yarn of any color (a combination of bamboo and wool or pure wool is often used).
Sometimes a stitch marker is used in the production. Of course, another mandatory element for beginners (and not only) will be the diagram of the chosen pattern. There are several types of Arans, the complexity of execution depends on the chosen one. Often the types of knitting are combined.
| Type of pattern | Description |
| Simple honeycombs | The butterfly pattern is formed by two strands going in different directions. They are symmetrical and form a chain when connected. The arrangement of several such chains (the shape resembles a hexagon) forms a grid or honeycomb. In Ireland, it was believed that such a motif brings a person well-being in work and household chores. |
| Tourniquet | This is the simplest knitting motif, and the most common today. It can be combined with other patterns, forming a complex picture. The cords look like laces, crossed between themselves, "twisted". The smallest is usually knitted on 2 front loops. In cords, the loops always cross in one direction. The pattern from left to right will be completely identical to the pattern from right to left. This motif can be both thin and wide, it depends on the number of loops taken and the number of crosses. |
| Scythe | Another popular motif in Irish knitting. This element of Aran is usually woven from 3 strips, but there can be more - up to 6. The braid is somewhat similar to the plaits - its density will depend on the crosses in the pattern and the thickness of the cords. This type of pattern does not need to be combined with others - it can be unique in itself. From the cords, diamond-shaped braids are woven, oval, round and others. |
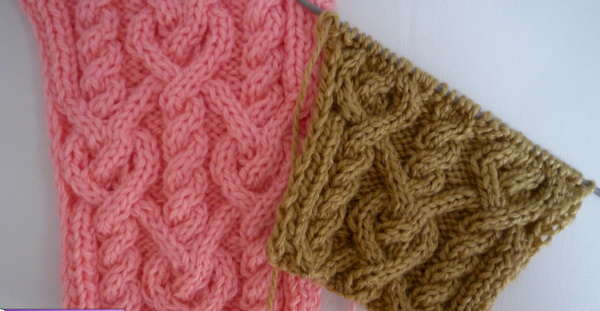
One of the most famous Aran patterns is the "Celtic braid". It can be seen not only on hats, but also on many other knitted items.
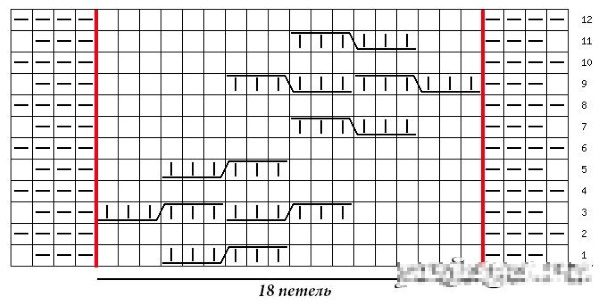
From 18 loops, such a braid is knitted as follows:
- Cross 5 loops to the left - slip 3 loops onto an additional knitting needle, then 2 front loops, slip the purl loop onto the left knitting needle and knit. Knit 2 loops from the additional knitting needle as front loops.
- 1 row (face) – 2 purl stitches, 2 face stitches, 1 purl stitch (5 times), 1 purl stitch.
- Row 2 and all subsequent purl rows are knitted as follows: 2 knit, then 2 purl, 1 knit (5 times), 1 knit.
- 3rd row: 2 purl, 2 knit, then 1 purl and cross 5 loops to the left, 2 purl times.
- Row 5 is knitted in exactly the same way as row 1.
- Row 7: 2 purl, 5 cross stitches to the right, 1 purl, 2 times 2 persons, 2 purl.
- Row 8 repeats 2.
- Repeat all 8 rows.
The "corduroy" pattern is knitted a little easier. To start working (with 18 loops in total), you will first need to remove 3 loops to an additional knitting needle, knit 3, and then knit those that were removed. To move into the corduroy, remove 3 loops to an additional knitting needle, knit 3 again, and also repeat with the removed ones.
The order is important. And finally, honeycombs are also a simple pattern, but there are more complex varieties. One option is honeycombs "in a circle" - they are well suited for hats.
This type of pattern is quite simple.
- 1 row: slip stitch, yarn over, yarn over, knit stitch 1. This should be repeated to the end of the circle.
- 2nd row: 2 purl (together), remove 1 loop (yarn under work), 1 yarn over.
- 3 row: 2 knit stitches, yarn over is removed (the yarn is still behind the knitting).
- 4th row: slip the loop, then 1 yarn over again, 2 loops together purl.
- Row 5: 1 knit, yarn over from bottom row is removed, 1 knit.

Knitting is repeated from the 2nd row. Each type of pattern, even the simplest, requires practice, so it is recommended to buy a sufficient amount of yarn - not only for the hat itself, but also for knitting the motifs. You also need to consider what shape the accessory will be - will it have "ears" or will it be elongated.
The volume of material will also depend on this. Beginners should always take yarn with a surplus. The pattern can either be transferred to paper, or printed out or taken out as a separate insert so as not to lose it. The thickness of the knitting needles can vary. Usually these are 4.5 mm and 5 mm knitting needles. If desired, you can add decor to the future thing. These can be buttons, beads, pendants, decorative pins.
An interesting version of hats with a pompom, which is made from leftover yarn (or specially prepared for this). For children, bright pompoms made of artificial fur or plush, which can be purchased in handicraft stores, are suitable.
How to calculate the required number of loops
A hat with arans in combination with patterns is knitted in the same way as any other thing, that is, you always need to start with taking measurements and casting on the right stitches. Accurate casting is very important, because a hat that is too wide or too narrow will be problematic to fix.
You need to unravel and start over. That's why measurements are taken first. They can be measured without outside help. Taking measurements correctly will help when casting on stitches.
Using a tape measure, measure:
- head circumference – from the eyebrows to the back of the head;
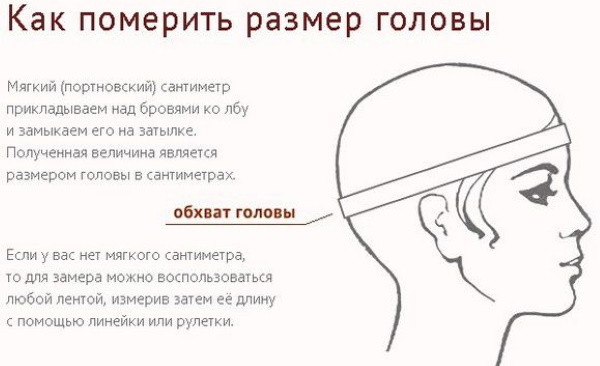
- from the crown down to the most protruding part of the head;
- from the occipital cavity to the forehead;
- from the top of the head to the ear.
To calculate correctly, you need to cast on a certain number of loops (for example, 20) and knit about 8-10 cm. This sample is measured in width, then stretched a little and measured again. Then the calculation is made in the form of a proportion. Let's say the width of 20 loops is 15 cm, and the required size is 56. 20x56/15 = 74.6. You will need to cast on 75 loops for the hat.
If the accessory is planned to be knitted with an elastic band, its number of loops is calculated in the same way - first a sample is collected, and then the proportion is calculated.
One should not forget about such a measurement as the height of the hat. There are 2 heights: the product itself and the beginning of the decrease. The first is measured by placing the tape from ear to ear and dividing the resulting figure in half. This is a shortened model.
If the hat is planned to be extended (cap), then this feature of the model is taken into account.
There is also a formula for determining the decrease. To do this, measure the distance from one earlobe to the other (through the crown) and the circumference through the forehead and the back of the head. Using the second value, find the radius of the head: circumference / 3.14, and then divide it again by 2. The distance from ear to ear is also divided in half, and then the radius is subtracted from the result.
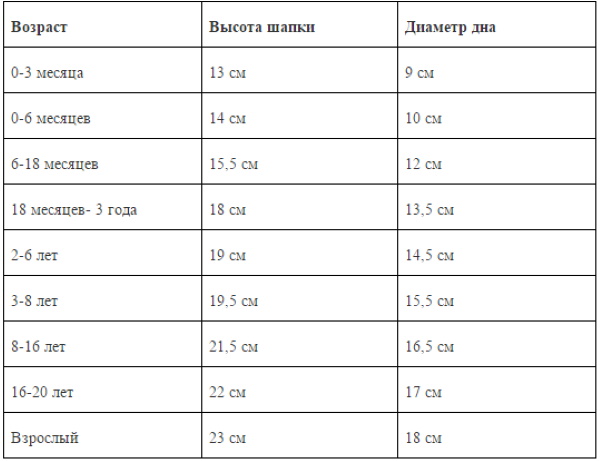
The final figure is the centimeters that need to be knitted before the decrease begins. In cases where it is not possible to take measurements, the depth table will help.
| Head circumference in cm. | Cap depth in cm. |
| 50 | 16 |
| 51 | 16.2 |
| 52 | 16.5 |
| 53 | 16.9 |
| 54 | 17.2 |
| 55 | 17.5 |
| 56 | 17.8 |
| 57 | 18.2 |
| 58 | 18.5 |
| 59 | 18.8 |
| 60 | 19 |
This table will help you quickly determine the depth without additional measurements.
This method is suitable for knitting and hats with arans. Before starting, always knit a sample, and based on it, then loops are collected taking into account the elastic and patterns.
Hat with ears
A hat with knitted arans (the pattern may also include the presence of "ears") is not only of the classic form, on the head, but also of other types. Some of the most popular are caps and headwear with an extension that covers the ears. The second option is very suitable for a cold winter or just windy weather, because the presence of ears protects from cold and blowing.
This is also true for children's items. For an older child (teenager), you can also knit an interesting option with pompoms, bows and other decorations - the headdress will become a stylish accessory that also protects from the cold.

A practical and fashionable hat with a braid pattern and 1x1 elastic is knitted from:
- medium thickness yarn – 100 g;
- knitting needles No. 5 and 1 additional knitting needle for braids.
In this model, first the ears are knitted, and then the hat itself:
- For 1 ear, 3 loops are cast on. They are knitted with a 1 by 1 elastic band, while 1 loop is added on each side (they are immediately included in the pattern). In this way, 8 increases are made. 4 rows are done straight and at this point 1 ear is ready.
- The 2nd eye is knitted in exactly the same way.
- For the back of the head, cast on 15 loops, attach 1 ear to it. For the front, cast on 25, and attach 2 ears. The item is joined into a circle and knitted with a 2 cm elastic band.
- Knitting continues according to the chosen pattern. In this case, the "braid" pattern is chosen.
- Following the pattern (or video tutorial), knit approximately 18-20 cm of hat. The length can be increased if you want to make a cap-hat. Then knitting again goes to the 1 by 1 elastic band and the decrease begins. It is done by decreasing in every 4th row, knitting 3 loops by 3 with purl. The decrease is done 4 times.
- Next, all the loops are knitted 2 at a time together. At the end, everything is pulled together with a working thread.
- The ear ties are knitted as follows: chains of air loops are knitted from a double thread (approximately 24-27 cm). They are sewn to the headdress.
- If desired, use the remaining yarn to make pom-poms.
Another, no less interesting option, is ears located on top. They resemble cat ears. The author of this idea is designer Anne Sui. The pattern for such a thing resembles a rectangle.
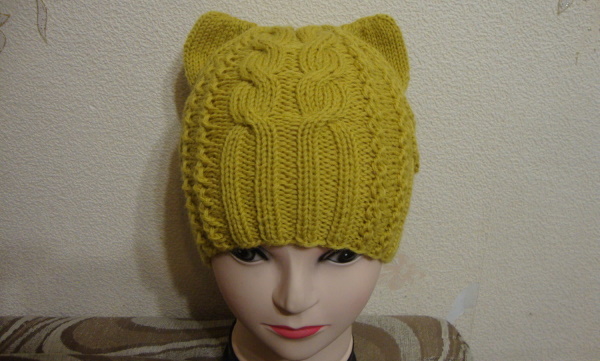
To knit this hat, you will need knitting needles of size 3.5:
- The hat is knitted using the "braid" pattern. Row 1 - knit stitches, starting from row 3, 4 loops are transferred to an additional knitting needle in front of the work, and from there knitted as knit stitches.
- The height of the product is 24 cm. You need to add another 44 loops to the required set of loops. The pattern is arranged as follows: 3 loops with a 1 by 1 elastic band, 7 front loops (garter stitch), 1 braid - 8 loops, 6 garter stitch, 2 braid, 12 garter stitch.
- All 24 cm are knitted straight. Then shortened rows begin. The elastic is on the front side, and short rows are knitted on the opposite side. Knit a row, then turn the product over and repeat the same. Subsequent rows are made with an increase of 1 loop.
- In this way, the required volume of the hat is knitted (24-25 cm). It is recommended to try on the work at this point.
- The headdress is sewn on the short side. It is folded in half and the top seam is sewn. A stitch is made in the corners at 5-7 cm to fix the ear.
There are also many other varieties of hats that combine arans and earflaps.
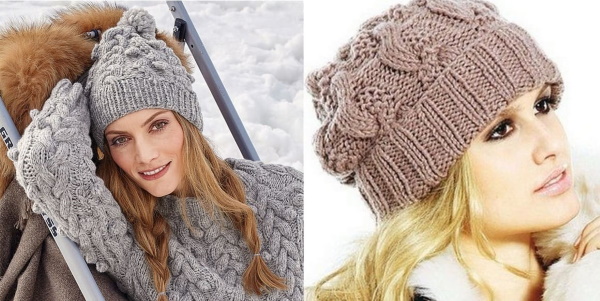
Fashionable hats with arans
Aran knitted hat (the aran pattern can also be used to knit other warm items) is an accessory that people of all ages will love. Fashionable aran patterns are used to make children's hats, sweaters for women and many other items. They are used to decorate mainly items for the cold season.
Arans are quite complex and working with them may seem difficult for a beginner. However, the result will definitely please. This element came from Ireland, famous for its handicrafts. In the past, this pattern was used by fishermen, and it had a certain meaning. They could be used to determine the clan of a particular person.
Today, Aran patterns are used almost everywhere. The Irish element has been in fashion for many years. The combination of braids and Aran knitting is especially popular – it is often used in making hats. Among teenagers and older women, the “Beanie” hat is considered fashionable. It is a component of urban style, giving the image carelessness and boldness.
Such hats can also be knitted using Aran patterns. In this case, a combination of different colors will be interesting. Sets of a hat and a scarf (sometimes with gloves) always remain fashionable. Items knitted in the same style and in a single color scheme bring together the image and are very convenient - there is no need to match the headdress to the scarf or vice versa.
A beautiful hat with arans is a warming headdress. Knitting it with knitting needles using patterns may seem difficult, but practice will help you master more and more complex patterns. As your skill grows, you can use a combination of patterns or add some new, unique details.
Video about knitting hats with arans
The principle of knitting a hat with arans: