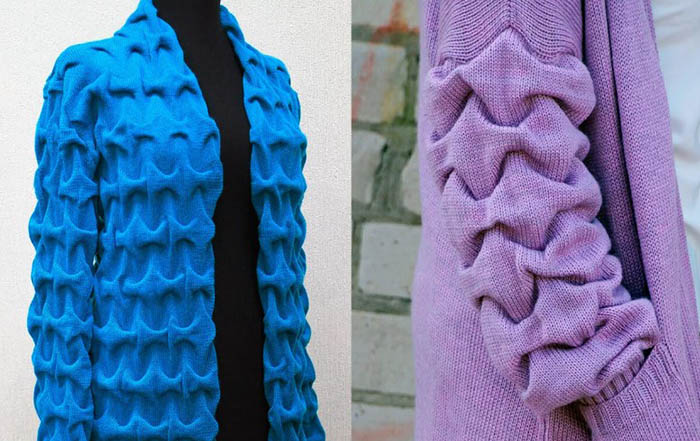
Cloquet style is a knitting principle using wool or silk thread, where one side of the product has a smooth pattern, and the opposite side has a relief volume with a pattern or weave. Clothes and accessories in this style look very attractive and extraordinary.
Most often you can find rapport patterns for knitting, but you can also choose patterns for crocheting. Common patterns can be used for cardigans, hats or sweaters.
General characteristics of the style
Knitting in the Cloquet style with knitting needles or crochet involves garter or stocking stitch, where pinches are used to add volume. If you look at all the pictures and diagrams, you will notice that rows that are multiples of three are knitted through the loops of the penultimate row. Such a pinching through the row allows you to tighten the thread, resulting in a pattern.
Its height and fluffiness will depend on the thickness of the threads, the height of the stitches and the level of the knitting lift.
There are several patterns:
- checkerboard cloquet;
- wavy pattern;
- basic fold pattern;
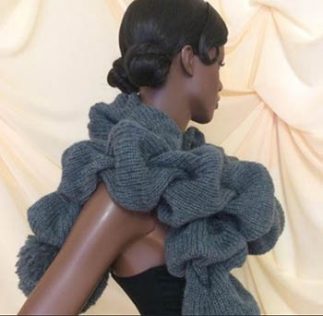
- bows;
- honeycombs;
- network.
Thanks to the simple knitting technique, you can create original patterns, creating a unique style in clothing.
Necessary tools and materials
Cloquet's multifaceted designs can be achieved with knitting needles and crochet. For knitting, you will need an additional 3rd, and with a crochet hook, it is enough to knit any elastic pattern. In master classes, only wool and cotton threads with a ratio of at least 30% in the composition will be used. That is, you can buy a relative cotton composition for knitting in two ways.
You will also need:
| Materials and tools | For knitting | For crocheting |
| Yarn | Linie 16 Light Starwool numbers 2-8 (250g), 100% sheep wool (optional) Merino Extrafein (50g/150m) | Linie 8 Starwool Maxi (manufacturer Wolle Online) - No. 4 or No. 6 up to 500 g, 100% Merino Extrafein sheep wool (90 m/50 g) |
| Spokes | №3-3.5 for Light Starwool yarn and №5-6 for Maxi Starwool yarn +1 additional needle | |
| Hook | No. 3-8 depending on the thickness of the yarn and the desired effect |
To create a hat or scarf, you will need up to 80 g of wool yarn. To knit a cardigan or a long warm scarf, you will need twice as much thread. You also need to consider the size and volume of the patterns - the larger and wider they are, the more material will be needed to create this effect. To achieve uniformity, do not forget about the principles of the Cloquet technique.
The pattern is created in width, not in height, so the length of the product will be unchanged, taking into account a small or large number of patterns.
Schemes with description of works for beginners
When working with knitting needles, you only need to remember the front and back loops. Most patterns are based on two types of loops.
There are some peculiarities in the technique of working with a crochet hook – the designations can be letter and symbolic:
- 0 – loop on the hook;
- * — air loop (AL);
- MS – pattern rapport;
- horizontal "c" - connecting loop (connecting loop);
- | – one loop of the main pattern: dial actually 1 VP in the forward row and knit in the reverse row;
- – the base place for the VP in the main pattern.
Knitting in the Cloquet style with knitting needles or crochet hooks will require a thorough understanding of the patterns. Having learned to read them, it is quite possible to independently change and create rapports of drawings and complex patterns. In order to arrange the pattern symmetrically, the rapport usually indicates its size - the width and length of the first chain stitch.
If the rapport is the same width at the bottom and top, the pattern is considered easy. The absence of knits allows you to knit an oversized sweater, the absence of armholes allows you to quickly fasten the sleeves and the back of the product. All these points make the knitting process easier.
Braiding with knitting needles
The most popular pattern is considered to be the braid. It is suitable for knitting accessories - hats, scarves and gloves. The patterns look beautiful in combination with satin stitch, front and back knitting patterns.
To create a rapport you will need:
- The first row should be knitted with knit stitches. The length of the pattern according to the rapport is 13 cm, as is the width. The pattern can be repeated without any indentation from the last knitting pattern.
- In the second row, all loops must be knitted purlwise.
- The entire 3rd row also has knit stitches.
- In the 4th row, you need to repeat the rapport - remove the first loop, then knit 3 purl sts and 12 knit sts. Then you need to repeat the rapport to the end of the row - 4 purl sts and 12 knit sts.
- The entire 5th row must be knitted according to the rapport pattern - where there are purl loops, you need to knit all the front loops. Where there are front loops, you also need to knit them as front loops. As a result, the row will contain 4 front loops and 12 back loops.
- According to the rapport pattern, you need to knit 8 such rows with loop repetition. All knitted rows should be taken into account.
- In the 13th row, you need to repeat the rapport according to the scheme: 4 out. p., then 5 front. p. After this, you need to lower it down to the junction of the pattern, pick up the loop, return it to the first knitting needle. Then both loops need to be knitted out. p.
- Then the same thing needs to be repeated with the next loop.
- Next, knit 5 front sts. Then, in a row, knit 4 front sts, 5 purl sts, then 2 sts connected to the bottom row and again 5 front sts in the current row.
- The work needs to be turned over to the other side and start knitting from the first row – 3 rows of front stitch.
- Then you need to knit the vertical stripes of the pattern. But in the next fragment they need to be knitted in a checkerboard pattern. Alternate 12 front sts, and then 4 out. sts. So you need to knit 8 more rows.
Knitting in the Cloquet style with knitting needles of this pattern will require a lot of time. The thread consumption is greater than for simple patterns. The pattern turns out to be relief and voluminous. If you have circular knitting needles, you can finish knitting the back and sleeves, creating a cardigan or sweater.
This pattern looks beautiful on warm winter clothes, as the style itself suggests creating warm things. If desired, you can knit a children's hat, complementing it with an elastic band with any pattern.
Symmetrical wave knitting and crochet
To create such a symmetrical pattern, it is easiest to take stocking stitch as a basis. In this case, all the knitted loops in one row will alternate with purl loops in adjacent rows.

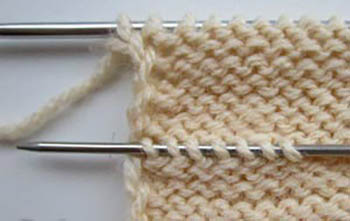
Additionally, a technique will be applied to the back side of the loops, when several of them will be collected on an additional third knitting needle from the lower rows. Then they need to be combined with the front loops in the working row.
This knitting of all the loops together will create volume and relief in the pattern.
- The pattern rapport contains front and back loops with additional knitting in a symmetrical arrangement.
- To see how the pattern will look on clothes, you must first knit a sample.
- In the first rows you need to knit with the front surface.
- The purl rows will be repeated.
- Alternation next to each other - in the front sts, front sts remain, in the back sts, only back sts are knitted.
- The placement of the fold can be done in any variant. It is necessary to mark approximately where the beginning of the pattern will be. In that place, a pinched loop should be made in the bottom row.
- Before knitting the next row with knit stitches, you should take a loop from the wrong side to pinch an additional loop.
- The loop from the pintuck is the beginning of the pattern. With the third knitting needle, you need to cast on a few more knit stitches, which will form the volume of the pintuck.
The rapport can be knitted in a checkerboard, linear or free format. For this pattern, a linear knitting option was chosen, which allowed for the creation of uniform "swellings" on the pattern.
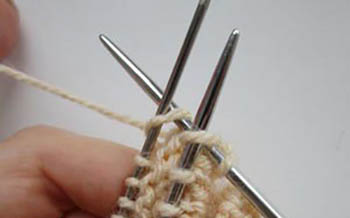
Next you need to turn the work over:
- From the front side, you need to combine the left and auxiliary knitting needles, and then remove the edge loops.
- The main front stitches should be knitted on two knitting needles using the front stitch.
- The remaining loops on the additional needle must be knitted to the end of the row to close the row with a tuck.
- The remaining pinches must be made in the same way, stepping back from the pattern as many loops as are needed to create the rapport.

Knitting will be slightly different from the crochet pattern. To create a pattern in the Cloquet style, you need to draw a diagram for working with a hook so that there are free air loops in the places of the clamps.
For work you can take wool yarn, hook No. 3-5 for a specific model of thread.
- First, you need to dial a chain of air loops of the desired width. The top and bottom match according to the rapport.
- At the end of the first row, you need to dial 1 VP for lifting.
- In the 2nd row, knit 5 sl sts, 5 half-columns BN. You need to alternate them until the end of the row.
- In the 3rd row, make a double VP and dial 4 half-columns BN behind the back wall (half-loop), 5 VP, 5 half-columns and 5 VP, and at the end knit 5 half-columns behind the back wall.
- In the 4th row, make a double VP, knit 4 half loops, and then, alternating, knit 5 half loops behind the back wall and 5 VP to the end of the row.
- In the 5th row, make 1 VP, 5 half loops behind the back wall and 5 VP until the end of the row with alternation.
- On the 6th row, knit 1 VP, and then repeat the steps in the 5th row, but make half loops over the VP behind the back wall.
- In the 7th row, make a double VP, perform 4 half-columns behind the back wall, and 5 VP, alternating them with 5 half-columns behind the back wall until the end of the row.
- In the 8th row, make a double VP and repeat the previous row.

The crochet pattern is denser. To weaken the pattern, you need to use a thin hook and threads. A similar pattern is the wave knitting pattern - the technique consists of creating the depth of the tucks. They can be located at various levels.
Depending on this, the pattern will look more voluminous and deeper, or lie on the surface, easily bending due to the movement of clothing on the body.
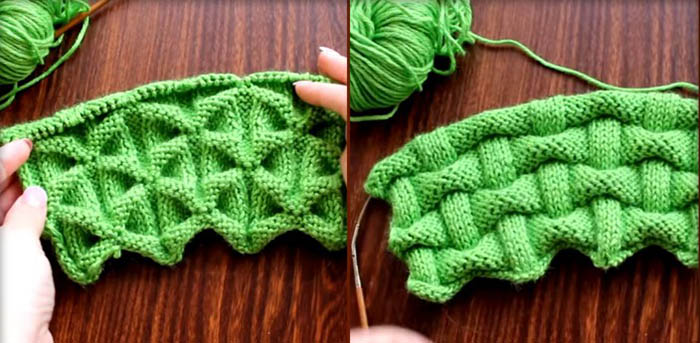
Folds with knitting needles in stocking stitch
This pattern must be done strictly according to the rapport, having decided what size of the puff and the bend of the wave will be appropriate for the cardigan. In this master class, the width of the rapport is 14 loops, 2 VP for the capture and 12 loops between the patterns are separately allocated.
The height of the pattern is 20 VP. The knitting density is 2 VP in 1 cm. The width of the wave puff is 7-8 cm. There will be up to 10 patterns in total. The conditional final value is 70 cm, the POG is 35 taking into account the stretch of the thread.
For the cardigan you will need 100% acrylic or cotton with acrylic yarn. 150 m weighing 50 g is enough for a small size (children's). To knit a two-color cardigan, you will need 3 shades of thread (including seams), weighing up to 300 g. You need to work with knitting needles No. 2.5-2.75. The rapport for the puff is 14 sts. 14 * 10 and 2 additional. For the outer 146 sts, you will need 2 more sts for pinches.
For large puffs, you can make clamps on 4 loops, so they will look wider.
- Cast on 146 sts and knit 3 rows in stockinette stitch.
- You need to start with knit stitches, then purl stitches and knit stitches. Come out to the wrong side from the other side and hook 1 and 2 stitches in the 2nd row.
- After 12 sts, take 2 sts again. Alternate until the end of the row.
- Repeat the steps in rows 13 to row 14.
- In the 15th row, all front loops must be picked up with an additional knitting needle.
- After picking them up, you should knit them together.
- Next you need to knit 4 rows.
- Before the last row, you need to pick up all the loops again on an additional knitting needle. You can leave them on the thread and then transfer them.
- To pick up the middle puffs, you need to count the 7th loop and knit it with 2 sts from the edge.
- Next, you need to move to another color in the row where there are hooks for additional knitting needles. The loops are prepared.
- The row must be knitted to the end so that the thread of the other color comes out at the edge on the front side.
- After knitting, you need to move on to the back to make the shelves. Divide the loops into 40 pieces for the shelves, up to 70 for the armholes. Make a cutout on the back from 3, 2, 1 sts, and then continue knitting puffs (4 pcs.), then close the row of persons. sts.
- Next, you need to knit the front. There are 32 sts left for the armhole. Up to the shoulder - 4 puffs. You can close the shoulder edge with 14 front sts, and on the 18th st (the entire puff) you need to knit 2 patterns in length. Immediately close the edges to the shoulder and make a pintuck in the middle of the puff to the edge.
- Turn the product over to the front side and cut the thread along the seam line. The loops remain open, so they need to be transferred to a pin.
- On the right, you need to knit a shelf so that after closing the shoulder, you can knit 1 puff. To do this, you need to make 2 pinches from the edge and cut the thread 10 cm longer.
- The collar needs to be sewn along the loops so that the seam remains inside. This can be done from the inside.
Knitting in the Cloquet style with knitting needles is an exciting activity, so in addition to the main pattern for the cardigan, you can knit the sleeves. Since the shelves and armholes are already knitted, the pattern is located in the center, you can start to cast on stitches.
With separate knitting needles you need to knit a straight front stitch with a slight widening.
- You need to cast on 44 front sts and knit them in 3 rows.
- In the 2nd row, you need to mark the loops for the pins by hanging paper clips. Then the loops will be pulled out and put on a separate knitting needle.
- The expansion will be in every 10th row, therefore, up to and including the 9th row, the knitting technique remains the same, taking into account the location of the pattern.
- In the 9th row you need to make an increase, duplicating it in the 10th three times, in 8-10-12, and then three more times in the 10th row.
- After adding about 20 persons. p. you need to make a rollback.
- Place the sleeve to the armhole and align the pattern. Armhole 3, 2, 1 can go down to 1, 0, 1, 1, 0 loops, repeating the pattern in each subsequent row to 1, 0, 1, 1, 2 rows up to the 8th. They need to be closed.
- To sew on the collar, you need to knit the front stitch from the wrong side on the shoulder, and use a needle to hook the collar onto the 2nd shoulder through the seam.
- From shoulder to shoulder, you need to fold the edges and sew them with a needle and thread.
- The zipper can be sewn in using the stocking stitch up to 80 knit stitches.
Once the cardigan is knitted, it needs to be washed and hung up to straighten the threads. You can knit a hat or a scarf using the same principle. The pattern is simple, but it takes a lot of time, especially when knitting clothes for adults.
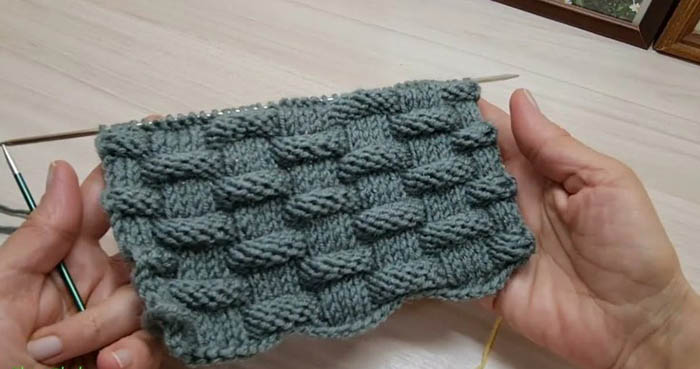
Folds in turning rows using knitting technique
Most often, the knitting pattern in the Cloquet style is done with knitting needles on the front surface. Sometimes there are options using only purl loops. Large uniform folds can be made of different sizes.
In this master class, we will use 3 mm knitting needles for blue yarn (50 g per 145 m), as well as 2.5 mm knitting needles for another shade of yarn of the same volume. The rapport is 10 loops for 30 rows.
The following technique is used in rotary rows:
- You need to cast on a number of loops that is a multiple of 10.
- The first 3-4 rows should be knitted with the front surface. The preparatory rows are no longer repeated in the pattern.
- The next 12 rows should be knitted in stocking stitch as follows: 6 rows of knit stitches, 6 rows of purl stitches.
- In those places where the pintuck will be located, the knitting needles must be turned over to the wrong side.
- From the 1st purl st. at the place of the pinch, with the right knitting needle you need to pick up 2 loops from below in the 12th row and remove them to an additional knitting needle (the third one).
- The second loop should be located on the right in the same row as indicated in point 5.
- Both loops from the additional knitting needle must be knitted with the working knitting needle simultaneously with two loops in the front surface.
- The row must be knitted to the end with knit stitches, and the next row must be made with purl stitches.
- You also need to knit 12 more rows.
The rapport is repeated for each drawing, even if the tuck locations do not match the previous ones. Such long horizontal stripes are suitable for creating a pattern on clothing.
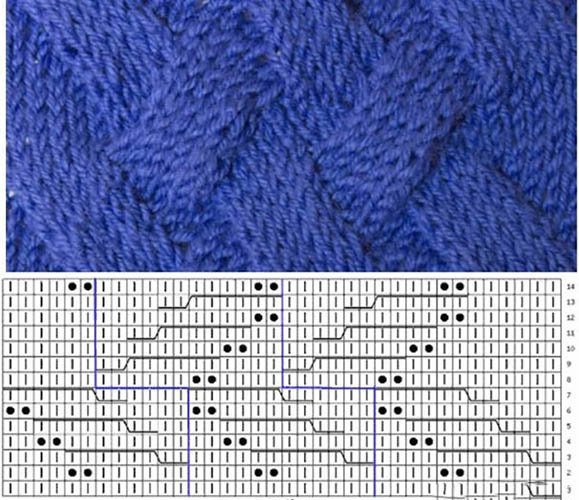
Knitting in the style of Cloquet with knitting needles allows not only to repeat beautiful patterns, but also to create them yourself. Another pattern will be made with knitting needles in the vertical knitting technique of folds. The pattern rapport has 20 loops and 16 rows. Initially, you also need to dial a number of loops that is a multiple of 10, knit the first basic rows with the front surface.
Next, you need to knit the pattern:
- First knit 6 rows of stockinette stitch: 3 rows of knit stitch, 3 rows of purl stitch.
- In the places of clamps you need to turn the knitting needles to the wrong side.
- From the wrong side of the 1st st on the right, you need to pick up the loops in the 6th row and remove them to the third knitting needle.
- The second and subsequent loops are located on the right in the same row.
- There are 10 sts left on the additional knitting needle. They need to be connected to the working knitting needle by knitting 2 sts together on both sides at the same time using the front surface.
- The row must be knitted to the end with knit stitches, and the next row with purl stitches.
- Then you need to knit 6 rows of front stitch again, after which you need to repeat the rapport with new places for the clips.

This pattern is suitable for knitting long items and accessories where you need to emphasize the pattern.

These can be scarves, capes, hats, cuffs and sleeves (gloves).
Sweater
This master class will present the entire process of creating a sweater with a Cloquet pattern. The size range is 36-42. The length of the product is 64 cm.
To work you will need the yarns listed in the “Tools and Materials” section.
- First, you need to knit an elastic band for the sweater - with knitting needles No. 3-3.5, you need to knit 2 front sts and 2 back sts one by one.
- From the bottom row, distribute the loops for the edge st, knit 1 purl st, 2 knit sts, 1 purl st again, repeat the loops except for the edge st.
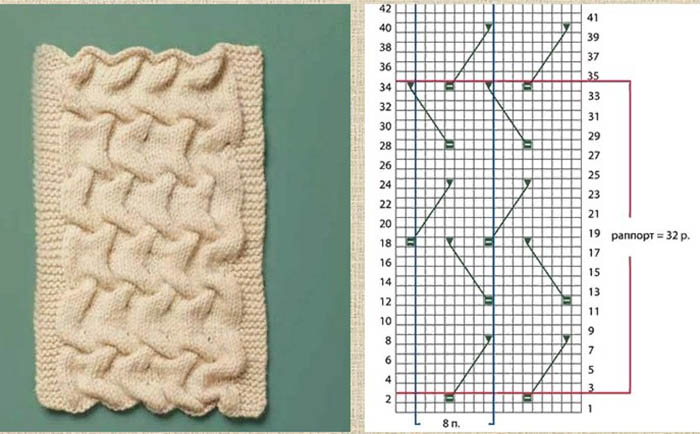
- The main pattern should be made with knitting needles No. 5-6. Start with purl stitch knit stitch, knit purl stitch on the front side.
- Knit the pattern according to the diagram with the same knitting needles so that the number of loops is a multiple of 8 without taking into account the edge st. It must be knitted separately. Knit the purl rows with knit sts, then knit all the knit rows with purl sts. Repeat the rapport from the 1st to the 16th rows.
- The back should be knitted with knitting needles No. 3 - cast on 122-146 loops and knit 16-18 rows with an elastic band of any pattern. Then take knitting needles No. 5 and knit 7 rows of faces. p. There are only 3 edges of the pattern left, which need to be knitted with the main pattern.
- The Cloquet pattern should be knitted every 20 sts from the front according to the diagram.
- When stepping back from the edge st, you need to start with a purl row and knit 4 sts to the beginning of the pattern.
- The pattern rapport will take 14 loops for a full row. Then you need to close it with an edge st.
- Continue the pattern according to the diagram in point 8.
- For the armhole, you need to knit 4 sts to close the edge, stepping back 26 sts on both sides. For every 2nd row, you need to decrease 2 sts and 4*1 sts on the sides.
- The neck should be located 46 cm from the strip. You need to close 34 sts, but knit every 3-4 sts together with the front st. Both sides need to be knitted separately.
- For the neckline edging, knit decrease stitches in every 2nd row 2*1 and 1*1 sts.
- The roundness for the shoulder can be made by closing 8 sts in 3 knits in every 2nd row. Every 4th loops should be knitted together in stocking stitch.
- Knit the front in the same way as the back. But for the neck, close 8 sts on both sides at 40 cm of indentation and finish knitting separately. To close the neck, knit the side loops at the same time.
- Knit the sleeves with knitting needles No. 3.5 - cast on 70-76 sts and knit with a rib pattern.
- The sleeves need to be beveled - after 12 cm from the edge, make an increase of 1 st in the 12th row for every 8 rows.
- Make the sleeve cap at 40 cm of indentation, closing 4 sts on each side, and in every 2nd row knit 2 sts. Then repeat knitting for 1*(3x) 2 sts, 4*1 st and the remaining 30 sts.

The rapport of the main pattern is 10*10 cm. For the Cloquet effect, you will need 26-28 rows of 18-20 sts. To assemble the product, you need to make shoulder seams. The bar needs to be raised by 130 sts and knitted with a rib band. All loops should be covered with the free edge of the seam, you can bend ½ of the seam bar and hem it by hand. The sleeves should be sewn in before stitching the side seams and sleeve seams.
Secrets for Beginners
For some reason, the Cloquet style can be difficult to knit with for some people.
However, there are some interesting notes that the masters share:
- "Bows" in the Cloquet style can be knitted using the "square" technique. Turning the product over, you can see the completed "bows" pattern.
- Large folds can be knitted with thin needles. The smaller the size and weight of the yarn, the more spectacular the patterns will be.
- Kloké does not have clear patterns and drawings. Rapports are made independently. They can be changed during knitting.
- The chaotic arrangement of the folds is considered the most difficult pattern. To implement it, you will need to calculate the arrangement of the "chaotic" patterns.
- Cloque patterns must be combined with other styles - with elastic, cuffs and a neckline.
- Tight knitting looks ugly. A loose pattern can be made by using the density of knitting and threads.
The cloque style in knitting and crochet techniques is similar, combining interesting patterns and schemes. The French fashion trend in knitted items can be combined with modern solutions in clothing. Combinations of patterns for creating patterns can be changed during knitting, and knitting methods can be developed in advance to increase or decrease the volume of patterns.
Video about Knitting style Cloquet
Knitting pattern Cloquet - knitting principle: