To give the finished item a finished and beautiful appearance, needlewomen use many options.
The following techniques are used to crochet various items:
- a narrow or wide border, knitted in the usual way, using the filet technique or Bruges lace;
- rows with pique loops;
- with a crab-like step;
- design with separately executed fragments.
You can learn more about each of them from this article.
Crochet Edge Binding Techniques
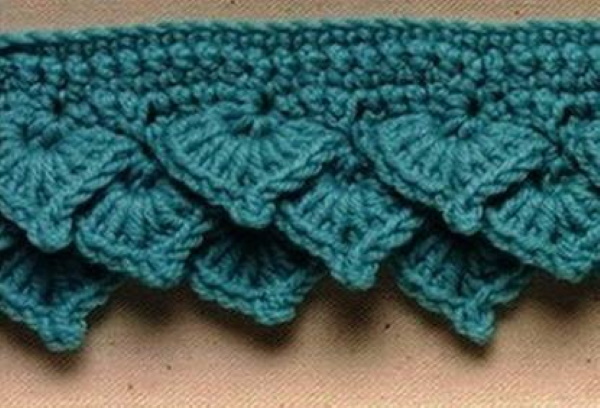
A crochet edging for tying items can look like teeth with a certain periodicity located on the edge of the parts.
It is made either in the same color as the main fabric, or as a decorative element from contrasting yarn.

This type of binding can be used both in thin, openwork items and in denser patterns.
The next type of edge design is the "crayfish step". It is so named because the movement during knitting does not occur from right to left, but vice versa, like a crab moves backwards. This type of binding is used to more firmly secure the edge of the finished item.
To decorate a knitted product and give it a delicate and beautiful look, a wide border is used. The most diverse patterns are used for it, from solid knitted ones to compositions of separately made motifs. This design is used for things with a uniform main pattern or finishing of finished fabric products.
In addition to the usual technique for knitting such a border, the fillet technique is also used. Bed linen or kitchen accessories decorated in this way, as well as summer openwork dresses, skirts, sundresses and covers for sewn products will give a special charm and femininity.
The next type of trim is also a border, but much narrower than the previous ones. It is used for tying smaller items such as tops, vests, children's items, handkerchiefs, napkins, and so on.
This design can be done in a color similar to the tone of the main fabric, highlighted with contrasting yarn or differ from the color of the product itself by 1-2 shades.
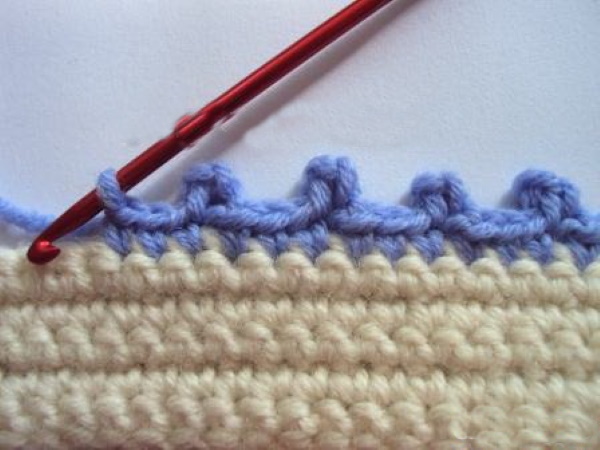
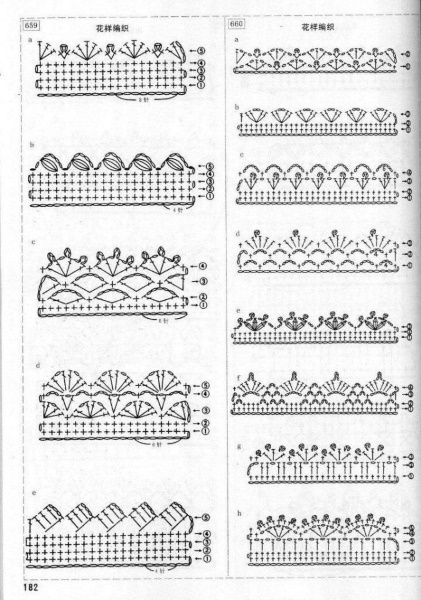
The simplest border for beginners based on "picot"
One of the simple techniques for knitting borders is patterns that end next to the presence of various types of "piqué".
It is not difficult to knit such a braid.
Its width varies within different limits. It depends on the model and type of finishing.
It is advisable to use cotton yarn with a small amount of synthetic additives when performing such a design of the edge of the product. This guarantees that the knitted work will remain in its original form after washing.
You can also use pure cotton threads, but remember that such things must be washed strictly at a certain temperature. Otherwise, using a higher degree of water, the edging is at risk of shrinkage. This will lead to unwanted deformation of the finished product.
The number of hooks selected can also vary from 1 to 3.5.
Some of the patterns for making such a border, shown nearby, differ from each other. But they have one thing in common: the presence of teeth ("piqué") in the outer row, connected in different ways. In the first pattern, they are made by making a chain of several air loops, closed in the same loop from which the "piqué" begins.
In the next diagram, the pique is made up of small arcs of chain stitches that connect the tops of the stitches, creating the appearance of triangles. The third diagram shows the pique made by pulling through the 1 crochet stitches of the previous row.
As a result, using the same knitting element, you can get quite a variety of pattern configurations and designs of finished items.
Classic version of the crab stitch pattern
The crochet edging for tying items presented below seems unusual and difficult to make to many.

But this is not so. Having figured out the technology of its knitting, it can become one of the favorite designs of necklines, sleeve caps and the bottom of blouses, vests, jackets, cardigans. And the essence of the process of this type of technique is in the direction of movement, opposite to the usual. You should knit each loop located to the right of the previous one, with single crochets.
When pulling out the next working loop, do not make it too big or tight. It should be of the optimal size to knit the next loop through it.
Don't be upset if the first time you try this kind of binding it's uneven and not so neat. It requires some skill to do it.
Therefore, experienced masters recommend practicing a little first and only then proceeding to the final version of the “crayfish step”.
Wide border
This type of border is used mainly to decorate the bottom of dresses, skirts, sundresses, sleeves. They can also be used as ruffles or flounces in the neck area or round yoke. One of the conditions for an effective combination of a wide border with the main pattern is the uniformity and density of its structure.
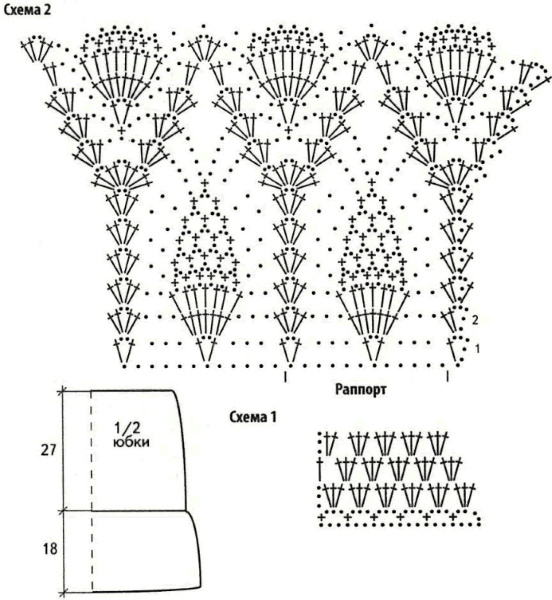
Then the focus will be on the beauty and elegance of the selected trim pattern. It is possible to use a border that is part of the main pattern used in the fabric. Knitting patterns that can be continued with a wide border are no exception. This method is great for widening the bottom of skirts or dresses.
It is recommended to use the same yarn for knitting such trims as the main fabric. You can also use a contrasting thread, but it should match the main one in thickness and structure.
If a wide border, depending on the style or model, needs to be used as a flounce or ruffle, it can be knitted from thinner yarn. But it is worth considering that its length will be shorter than from the main yarn. Therefore, at the beginning of the work, it is recommended to additionally calculate the appropriate length.
With the help of this type of edging you can not only decorate any detail of clothing, but also adjust its length if necessary.
Narrow border
The crochet edging for tying products, which is offered below, in its appearance suggests the simplest way of making a narrow braid.
But even such a simple pattern can be made using various methods:
- the knitting process is carried out from the edge of the product;
- the border is made separately in the vertical direction and is subsequently connected to the main part;
- by tying the initial row with the upper and lower rows, a certain pattern of the braid is created and when making the outer row, it is connected to the main fabric;
- It is knitted in straight and reverse rows, and when the first of them are completed, a connection is made with the edge being knitted.
Depending on the purpose and application of the crocheted edging, whether it is clothing or any other product, the required thread color, composition, thickness and appropriate hook number are selected. If the braid is used to decorate the edges of a woven material, it is advisable to choose yarn whose composition is similar to the fabric being processed.
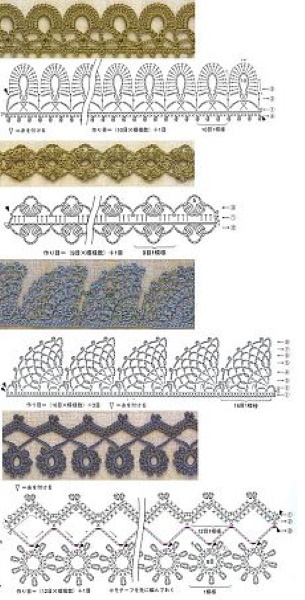
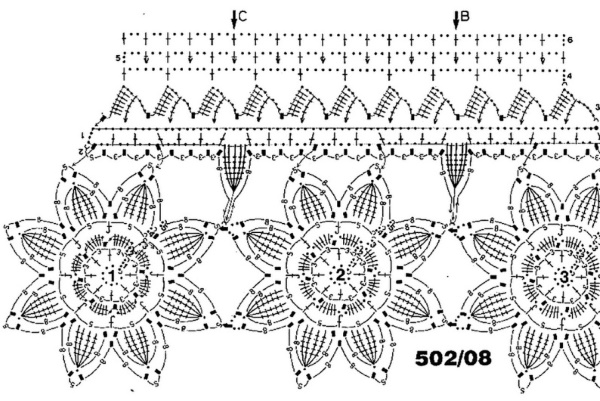
Two-tone
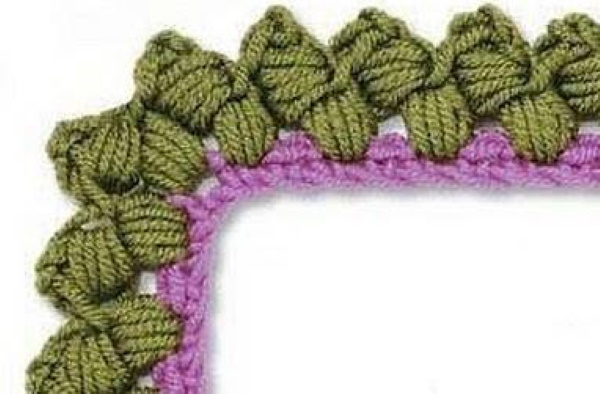
An interesting and imaginative option for decorating children's things, some products for adults, kitchen utensils and decorative elements is the use of a two-color border.
A successful combination of two contrasting colors or colors in the same range, but differing from each other by several shades in the border, can become the center of attention.
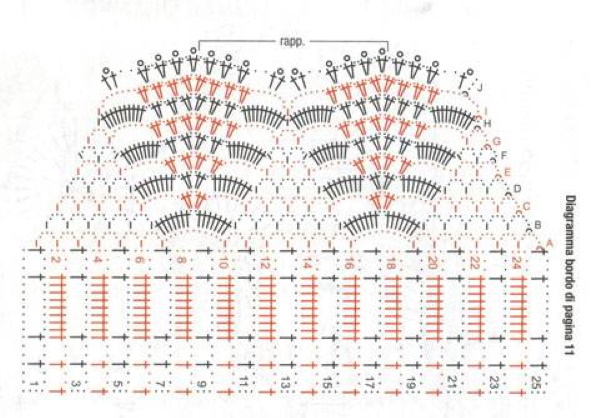
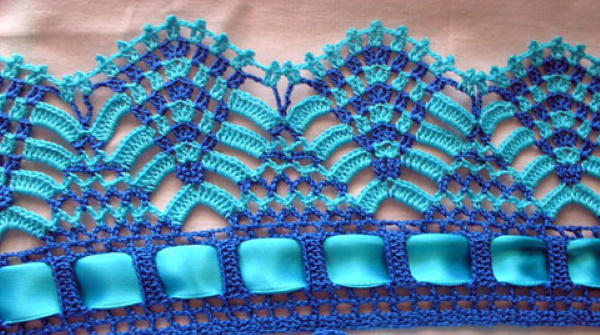
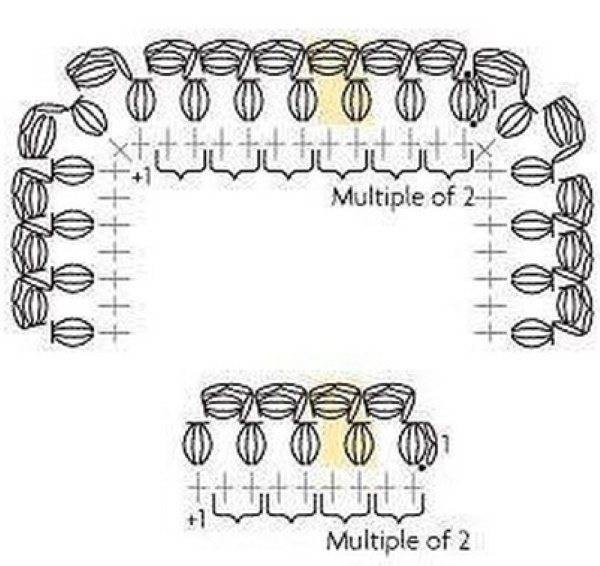
This diagram shows a two-color pattern made by alternating 2 rows of different colors, located horizontally in relation to the edge of the product. This border starts from the base of the fabric and is knitted from the bottom up. Its outer row is decorated with pique loops.
The next presented example of a two-color border is made of ribbon lace. The alternating combination of multi-colored fragments of the pattern, connected into a single whole, looks very impressive and will serve as an excellent decoration for a dress, a tablecloth, and a curtain.
For the convenience of connecting such a binding to the main product, after knitting the ribbon itself, according to the given scheme, several additional rows should be made. The structure of the yarn and its color should be chosen in accordance with the threads from which the product is made.
Depending on the required knitting density, use a hook that is 1 size smaller (if you need a pattern with increased density) or 1 size larger (if you need a more openwork fabric).
For medium knitting density, use a hook of the appropriate size.
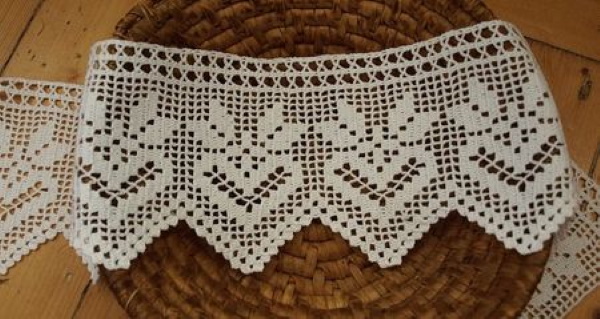
Fillet
One of the ancient techniques presented below is filet. A border made with a crochet hook from a regular mesh with a knitted floral or geometric pattern of various configurations serves as an excellent decoration for bedding and kitchen accessories: sheets, capes, bedspreads, tablecloths, napkins.
Basically, the binding in this technique is monochromatic, since the use of several colors will be too noticeable when transitioning from one to another. Although experienced craftswomen, using such a labor-intensive process, can create truly exclusive colored masterpieces.
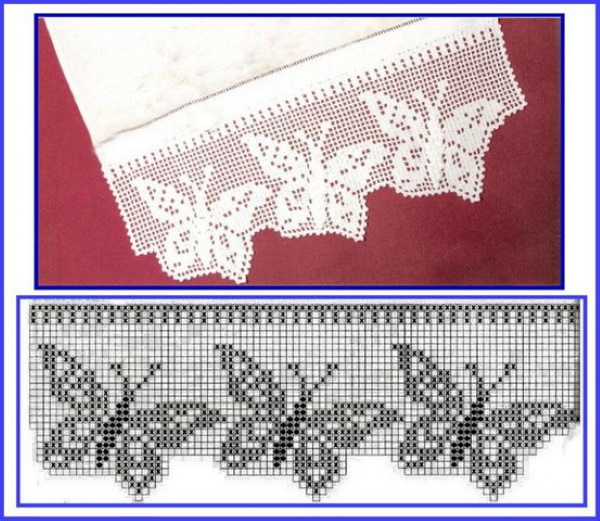
When filling the required cells of the fillet grid according to the pattern, it is recommended to knit 2 columns with 1 yarn over instead of one. A denser knitting of the ornament itself will allow it to clearly stand out against the main background. When performing this process, it is necessary to ensure that the top of the 2 columns being knitted is one.
If this is not observed, extra loops will be formed in the pattern, which will lead to distortion of the pattern and the entire canvas as a whole. The most difficult thing in the fillet technique is knitting several initial rows, when the composition of the pattern is laid. Later, the already partially formed ornament itself will suggest the direction of work.
When performing circular binding using the fillet technique, you should carefully connect the initial and final loops of the row without creating unnecessary voids.
If the border needs to be knitted in straight and reverse rows, then pay attention to the pattern in the opposite direction.
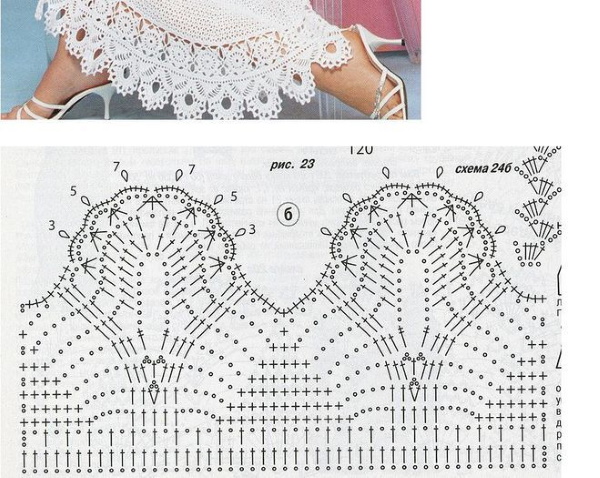
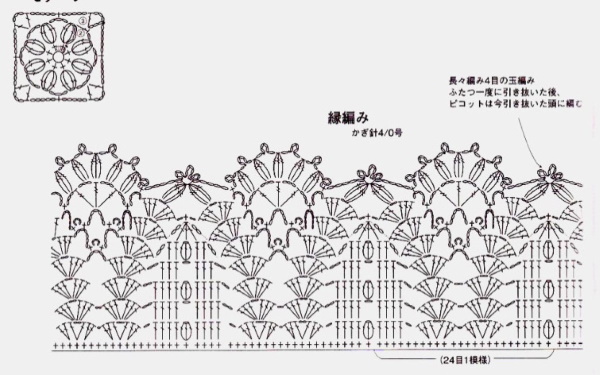
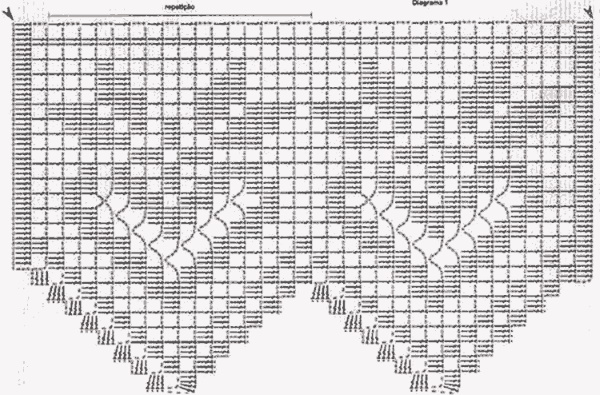
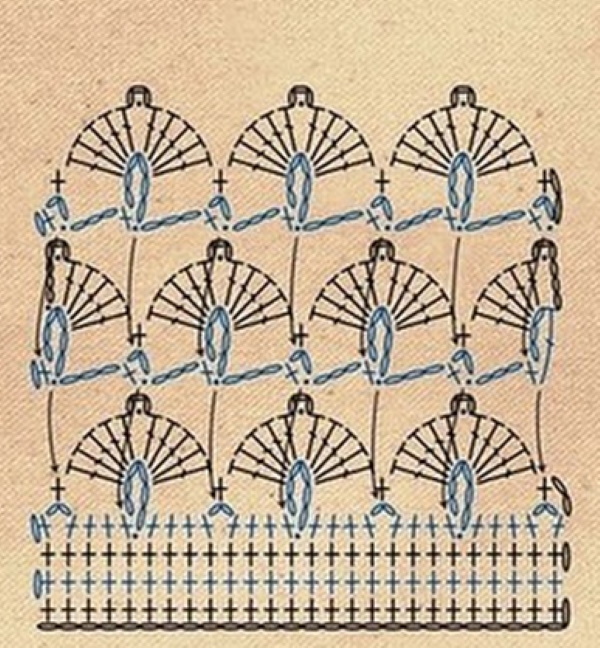
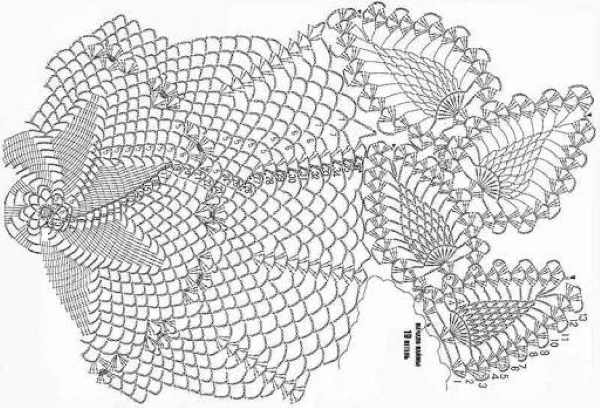
Openwork border
Crochet edging for tying products, having an openwork structure, can be used in the design of summer clothes, bed linen, decorating household items. It is used as an addition or decoration to details.
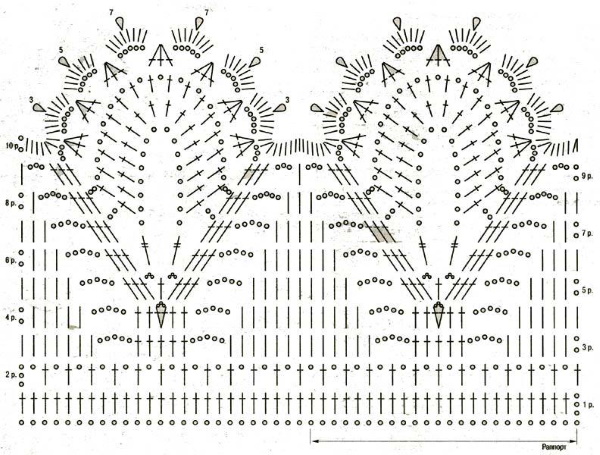
In order to fit harmoniously into the overall composition, it must match the color and yarn composition of the main thing. Basically, thin cotton thread is used for knitting, but depending on the requirements of the model or design, the choice of yarn varies in structure, content of impurities and color. In accordance with the thread used, you should also select a suitable hook number.
The presented patterns show that the openwork border can be solid and made to the required length, or it can look like a finished fragment. Such details can be seen when finishing cuffs, collars, belts, pockets and parts of yokes.
Before you start knitting an openwork border, you should carefully study the pattern diagram.
Correct determination of the initial row, the sequence of directions and calculation of the required number of its rapports will ensure a high-quality final result.
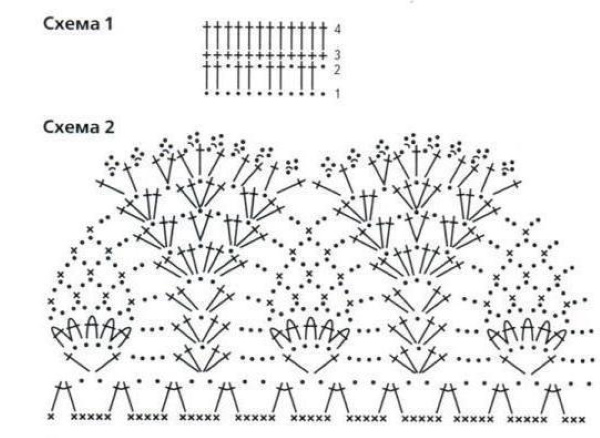
Dense border
The next type of edging is a dense binding that is used to decorate the edges of warm clothes:
- cardigans,
- sweater,
- jackets,
- coat,
- poncho.
This type of finishing is also acceptable for household items:
- blankets,
- bedspreads,
- decorative pillows,
- rugs.
The yarn used for knitting a dense border may differ in color from the main thread, but it is desirable that it be similar to it in its structure.
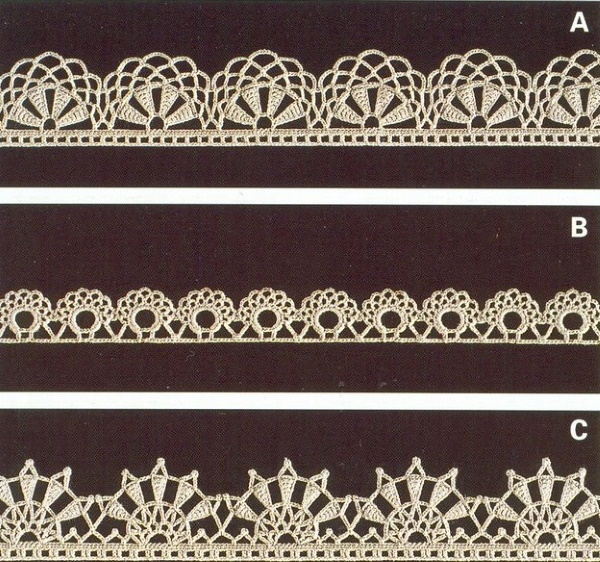
It is recommended to use the tape of the first pattern for finishing a product knitted with a dense uniform pattern, so that the decorative border does not disrupt the harmonious combination of the main fabric with the finishing.
The following sample is universal. It can be used as a decoration for blankets, bedspreads, rugs, and also as a decoration for the edges of coats, cardigans and jackets. Such binding ensures that the product retains its original shape and prevents deformation during use.
To make this type of border, it is recommended to use hooks with numbers 3.5 and higher, in accordance with the thickness of the yarn used.
According to experienced knitters, before you start knitting the product, it is advisable to make a trial version of the pattern on a small section of the cut. This is necessary in order to determine the density, frequency and combination of the selected version with the main fabric.
If all requirements are met, you can proceed with further work.
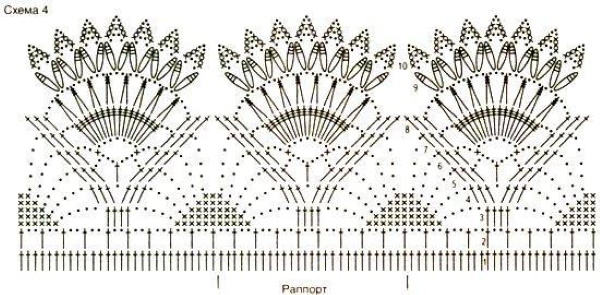
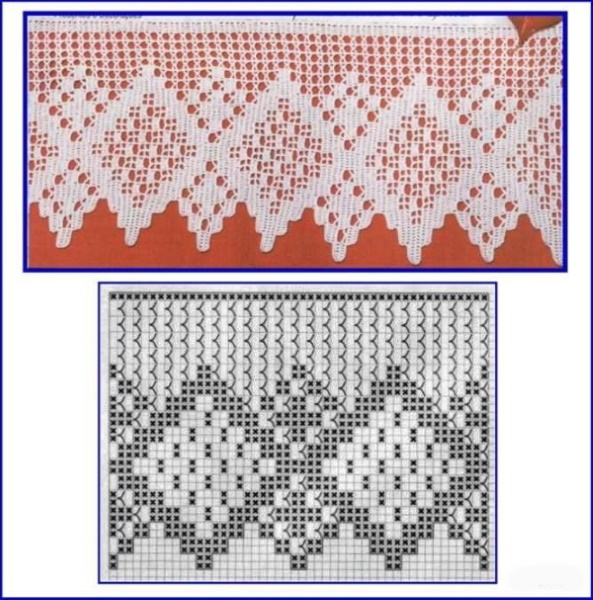
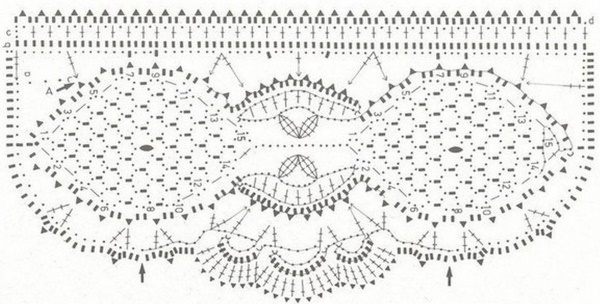
Original border
The following presented patterns are distinguished by their beauty and originality. They were used in previous years by women needlewomen to decorate kitchen utensils and bed linen.
To make them, it is recommended to use thin cotton threads and a hook of the corresponding number 1-2.5. The thinner the yarn, the more delicate and weightless the finished border looks. Preference when knitting such lace is given to the traditional white color. Although, at the request of the master and the required conditions, it can be different.
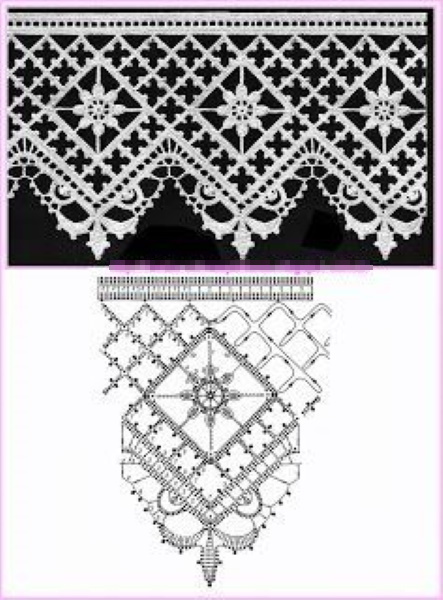
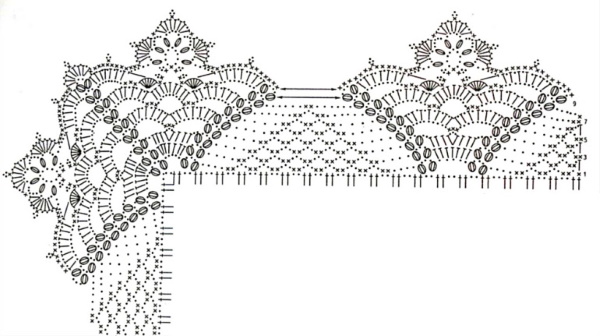
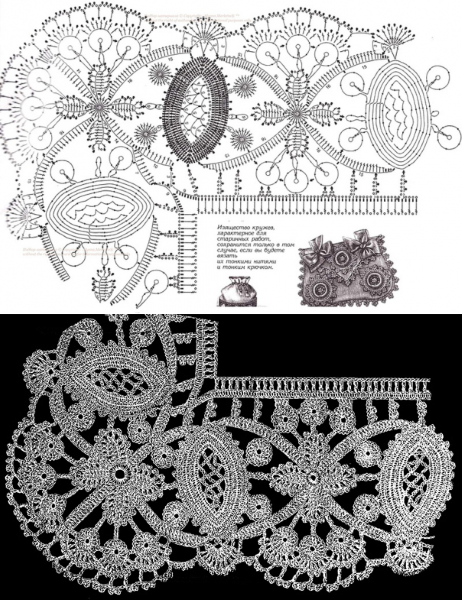
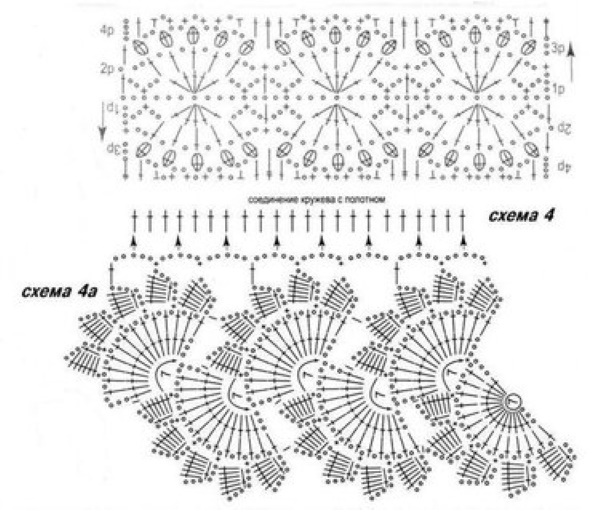
When tying square or rectangular objects, i.e. solid (circular) rows, as shown in the 1st diagram, work begins from the corner. This is a more convenient place to connect the initial and final loops. To perform the pattern according to the 2nd diagram, experience, skill and close attention are required, since this pattern consists of a combination of individual motifs inscribed in the overall design.
First, the flower fragments that make up the center of the composition are knitted, which are connected together in the process of making the outer row. After that, they begin tying the flower ribbon with an ornament with branches and leaves. The final stage of the work is making the fastening tape and joining it to the main border.
The result is a wide, openwork lace harmoniously composed in floral colors, which is used to decorate the prepared product.
Exclusive border
The crocheted border for tying products of this type is called exclusive. Any work of the master, composed of small individual elements, assembled into a single picture, is almost impossible to repeat. We are talking about Irish lace. One of the most difficult to perform, it allows you to create things in a single copy, which determines their uniqueness.
The variety of different parts and the ways of connecting them together provide enormous potential for the implementation of creative ideas.
The peculiarity and at the same time the complexity of work in the Irish lace technique is the composition of a single canvas. It must be done on a frame by fixing the fragments in the required sequence. After the general picture is laid out, they are connected by a method chosen from a large number of possible options.
This process also requires a lot of experience, since uneven tension of the working thread is not allowed. In case of a strong or weak connection, the parts become skewed, which leads to deformation of the pattern and the product as a whole.
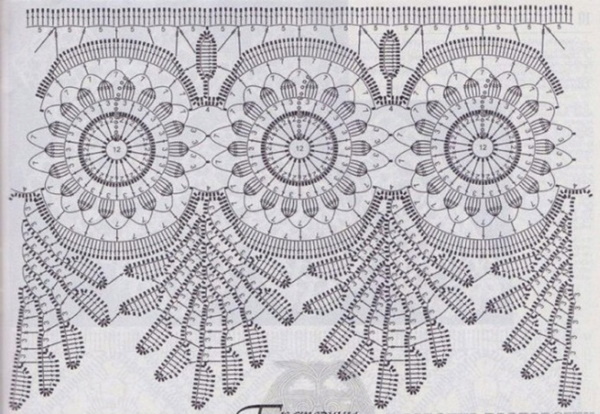
Therefore, before taking on such a border, it is advisable to practice on more simplified patterns. The following presented scheme can be such an example. It partially resembles the previous one, but is easier to perform.
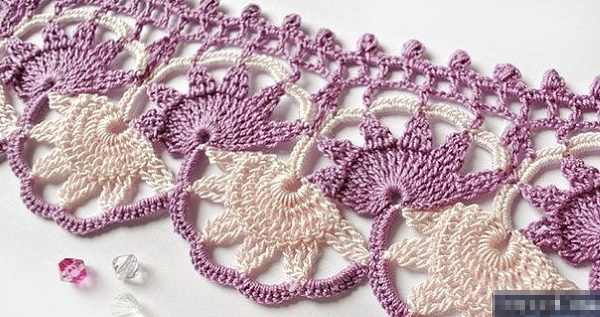
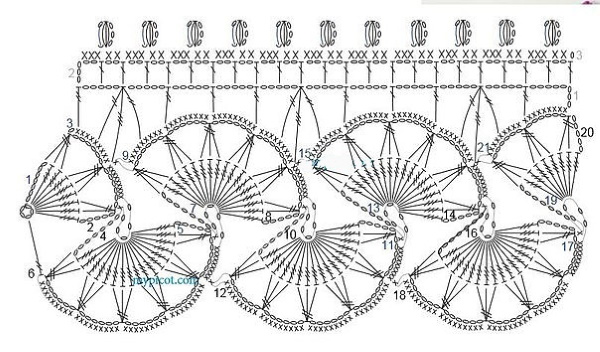
This braid consists of separately knitted flowers, which are joined together during the knitting of the last row. It is advisable to use floral fragments with an even number of petals for such a border. This is necessary to maintain the symmetry of the pattern and ease of connection.
The second stage of work is the production of fastening tape with its sequential adhesion to floral motifs.
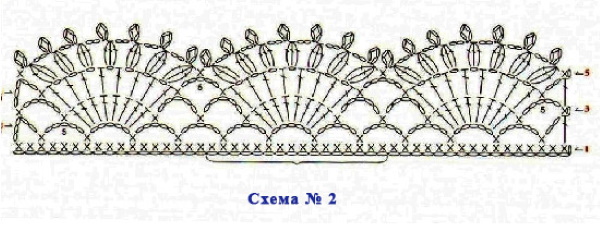
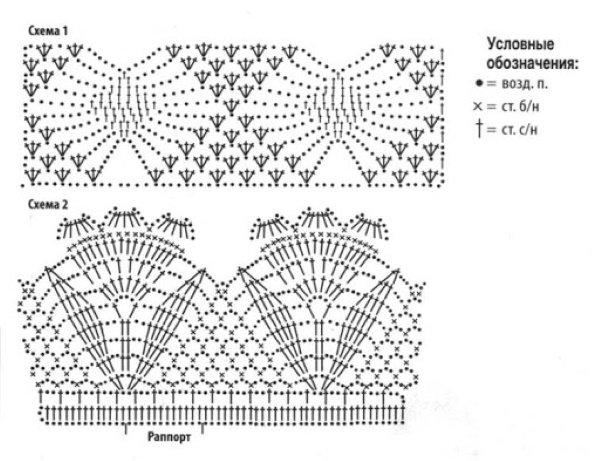
In rotary rows
This type of knitting of the border allows it to be made in the form of openwork ribbons. This is done in straight and reverse rows. Depending on the pattern of the repeating fragments of the tape, its edges can be well-smoothed and smooth, and vice versa, pointed and abrupt.
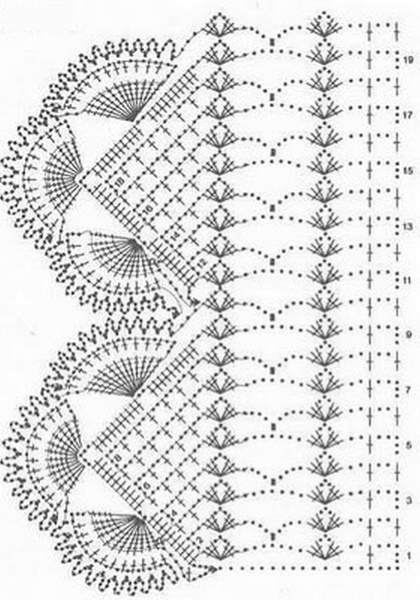
Therefore, when choosing a binding and its purpose, you should carefully work out the pattern used and the method of connecting the border to the main product. A mandatory condition before decorating the edges with such a border is to make a sample of it on a small area in the amount of one rapport.
Thus, having previously compared its length with the size of the product and having calculated the required whole number of rapports, you can correct small errors in advance and avoid mistakes in the work. Any yarn can be used for making a ribbon lace border, from thin to thick, but again, so that it matches the main fabric.
Also, do not forget that the thicker the threads used, the larger the hook number. Using the usual hook size for yarn of different structures, the knitting density also changes. This must be taken into account when doing the work.
The connection of the border-ribbon to the main product can be done either during the execution of each subsequent row, or using an intermediate tape.
To create a beautiful and high-quality item using a crocheted edging for tying items, it is not enough to just take the first pattern you like and start working. Using the advice of experienced craftsmen and the recommendations offered in the article, you can avoid possible mistakes and get a good result the first time.
Video about crochet edging for edging products
Crochet edge binding, step by step: