Round crocheted napkin, will be a wonderful decoration and will add coziness to the room. There are many simple schemes that are suitable even for beginners.
Necessary tools and materials
A round crochet napkin, schematically depicted in a magazine or on a website, may seem very difficult for beginners. But it is not. If you take into account the main points before starting to knit and understand the symbols, then knitting will be easy.
| Hook | Yarn/Thread | Scheme/Drawing/Pattern |
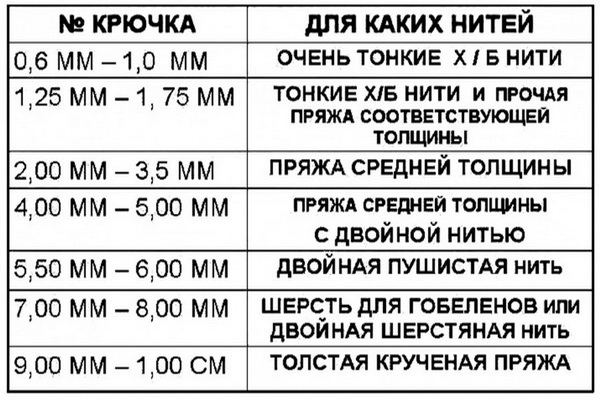
| The choice of crochet hooks is great. For beginners, this is a particularly difficult situation. Crochet hooks have a number that describes the thickness of the hook. This value is given in millimeters. Therefore, crochet hook #2 will have a diameter of 2 mm. The choice of tool directly depends on the yarn chosen. The labels of wool/threads usually contain recommendations on which hook is best suited. Hooks can be divided into two types:
Such hooks are always made of steel. Models are usually offered with an additional protective cover.
For a thin lace napkin on the table, you can choose hook No. 0.8 to No. 1.25. For a napkin on a stool, it is better to choose hooks No. 3 and larger. | When crocheting, using the right yarn plays an important role.
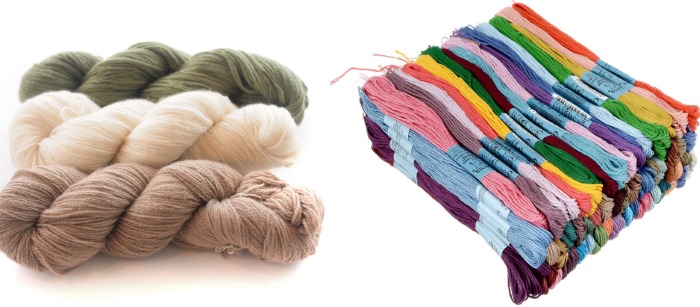
Yarn comes in countless variations and gradations. It can be twisted from several threads. In addition to yarn, wool thread is often used. The type of yarn you choose depends on what kind of napkin you need to knit:
Often in this case, fabric is used, cut into thin strips and twisted into a ball.
Napkins made from mercerized cotton, “Snezhinka” yarn, and even regular sewing threads #10 work well. There are also special threads for openwork knitting. | It is much more convenient to knit when you have a schematic image of the product in front of your eyes.
There are generally accepted designations of loops on a pattern and Abbreviations:
|
Schemes with description of works for beginners
The round crochet napkin, the diagram will be presented below, does not require a trial knitting of the pattern to determine the density and number of loops per cm.
In this case, this information is not needed. But you should still knit a few rows to see if the hook is suitable for the chosen yarn, if the knitting is too loose or, on the contrary, too tight. After trying, you can decide whether to take a thinner or thicker hook.
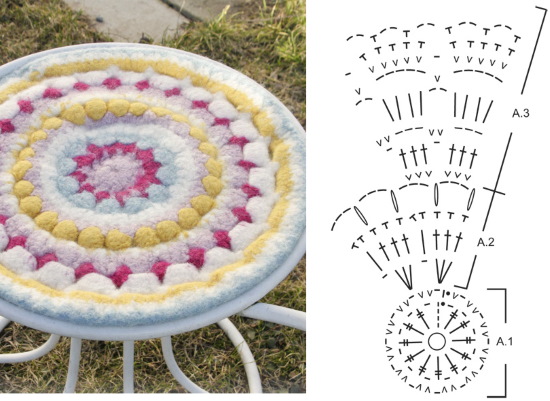
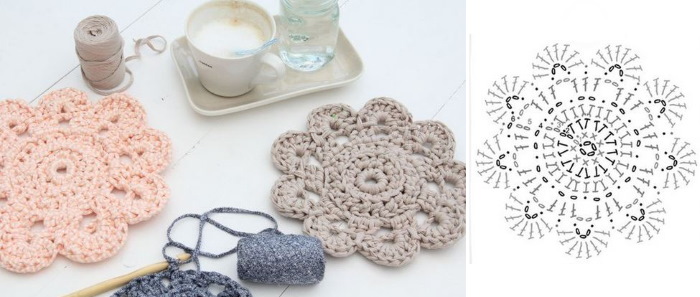
Simple napkin for a stool
A round crochet napkin, the pattern of which is very simple, is well suited as a covering for a stool. It is better to take thick yarn for this option, wool yarn and hook No. 3 will do.
You can start knitting in different ways:
- Knit 7 ch, connect them into a ring. And then knit sc, inserting the hook into the center of this ring.
- Or knit a chain of 4 ch, then knit 10 dc from the first ch. That is, the hook is inserted into the first ch. all the time.
- You can use not dc, but just columns. Knit 3 ch, and from the first knit 6 dc.
Regardless of which option for starting knitting is chosen, the row ends with a connecting sc (if this is the usual method), or a ch to raise the next row.
Then each loop of the previous row is doubled. That is, 2 sc are knitted from each loop. At the end of the row, either sl st or ch for lifting.
In the third row, every second loop is doubled. 2 sc from one loop, just sc, 2 sc from one loop, and so on. In the next row, every 3rd loop of the previous row is doubled. Then every 4th loop is doubled and so, by analogy, you can knit to the desired size. Each row should end with either sc or ch for lifting.
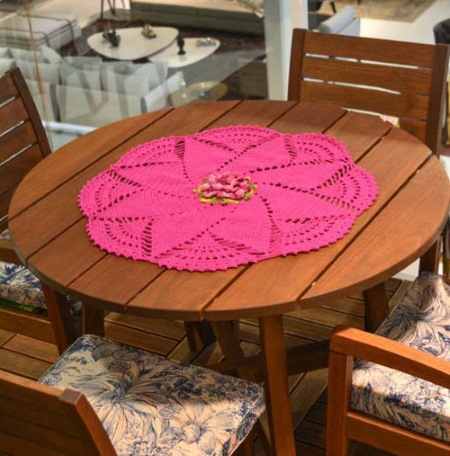
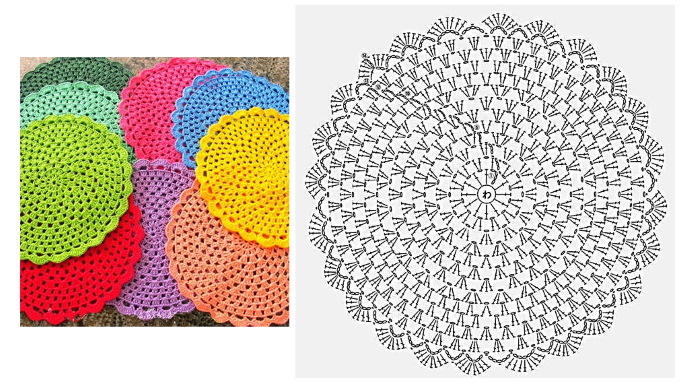
Simple napkin for the table
First, you need to prepare everything you need.
The yarn used for this napkin should be moderately thick so as not to get tangled in the thread. Semi-wool or acrylic yarn will work well.
You can take hook No. 1.
The work is done according to the pattern, each row of knitting is described below:
- It is necessary to make a chain of 12 ch. Then connect the beginning and the end with a half column. It turns out a circle. The napkin is knitted in a circle in one direction - from right to left.
- First, 3 ch are made for lifting. The entire row is knitted with dc/2n. It is necessary to make 32 columns (31 dc/2n and the first 3 ch replace the column). The last column should connect with the chain of 3 ch, dialed at the beginning of the row.
- In this row, you also need to knit 3 ch first. Then you need to knit 4 dc/2n, 3 ch, 4 dc/2n and repeat this to the end of the row. You do not need to connect the last loop and the first. The row ends with 4 ch.

- After 4 ch you need to immediately proceed to the next row. The pattern also consists of dc/2n. They are knitted from the previous columns. The difference from the 3rd row is that the number of columns has increased.
- 6 dc/2n (the first 2 columns are knitted from one column from the previous row, then just 2 columns, and again 2 columns from one loop of the previous row), then 4 ch. p., again 6 dc/2n, 4 ch. p. and so on.
- In the fifth row, 5 ch and 8 dc alternate. The columns are knitted from the column loops of the lower row. The first and last two columns are from one loop, as described above.
- In the sixth row, 9 ch and 10 dc are similarly alternated. The row should be finished with 11 ch.
- 4 dc/2n. The columns are knitted over the first 4 columns from the bottom row. Then 11 ch, and again 4 dc/2n. But these columns need to be knitted in the last 4 columns from the bottom, that is, skipping two columns at the bottom. Then there is an alternation of 11 ch, 4 dc/2n. You get peculiar "arcs". The end of the row is completed by 5 ch. They need to be connected with a half st. with the seventh ch from the previous row.

- 5 ch, 15 dc/2n are knitted under 11 ch (important - the hook is inserted under the air loop, and not into the loop itself), that is, from the first "arch". Then again 5 ch, dc in 6 ch of the previous row, in the second "arch", again 5 ch and 15 dc/2n, and so on. At the end, you need to knit 6 ch, and connect the beginning and end of the row with dc.
- The last row begins with 6 ch. Then the following pattern is knitted over the columns below: 1 dc/2n, picot, 1 dc/2n, picot. The columns are knitted through one loop from the bottom. Thus, there should be 8 columns and 8 picots.
A picot is a pattern of several loops. First, crochet 3 ch. Then, using a sc crocheted into the base of these 3 ch, form a ring. A picot is usually used along the edges of a piece to give it a nice relief.
Next, 6 ch, sc (this column is knitted in the middle, where in the bottom row a sc was knitted, dividing the “arc”). Again 6 ch. And then comes the alternation of the pattern with columns, 6 ch, sc, 6 ch, pattern with columns.
Small napkin
To knit this item, you will need a #1 hook and cotton yarn. The napkin will be approximately 9 cm in diameter. To make this round napkin denser, you can choose a #1.5 hook and a thicker thread. The pattern is described below.
Knitting sequence by rows:
- First, connect 10 air ch into a ring.
- 3 ch (they act as a replacement for the first dc), then 23 dc. Finish the row with 1 sl st in the third ch from the replacing dc.
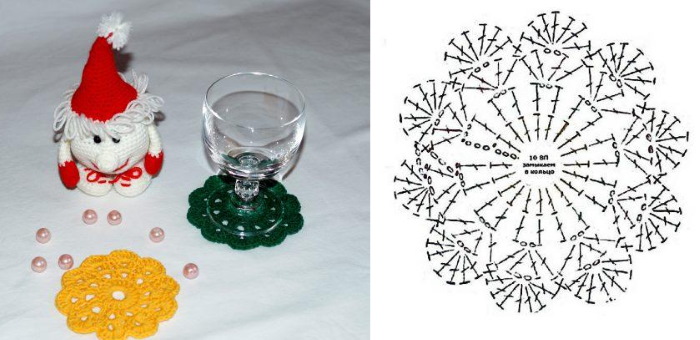
- Ch for lifting, then 13 ch, which form an arch. Then comes sc, 13 ch (arch), sc, 13 ch and so on. Scots should be knitted through one loop. As a result, in this row there should be 12 arches and 11 sc.
- Having knitted 6 half columns along the arc, you need to knit 4 ch, dc, 3 ch, 2 dc. The columns are knitted from under the loops in the middle of the arc. Next come 5 ch and again the pattern on the arc: 2 dc, 3 ch, 2 dc, then again 5 ch and so on.
- Having connected the last and first loops of the row, knit 3 half double crochets. Then, in the place where there were 3 ch. p. in the previous row, knit 3 ch. p., 2 dc, 3 ch. p., 3 dc (when knitting double crochets, the hook is inserted under the loops, not into them).
- Next, you need to knit 2 ch, sc (this column should be in the third loop of 5 ch of the bottom row between the arches), 2 ch. Then comes the repeating cycle. On the arch: 3 dc, 3 ch, 3 dc. Between the arches: 2 ch, sc, 2 ch. The row ends with 2 ch and a connecting half column.
- Using half columns, you need to reach three ch of the previous row between the dc. Inserting the hook under them, knit 3 ch, pique, dc, picot, dc, pique, and so on. In place of 3 ch of the bottom row, you should have 5 dc and 5 pique.
- Then 2 ch, sc (in the same place where there is a sc in the previous row), 2 ch again. Then the parts are repeated: 5 dc alternating with 5 picots (dc, pique, dc), 2 ch, sc, 2 ch. The row ends with 2 ch and a sl st.
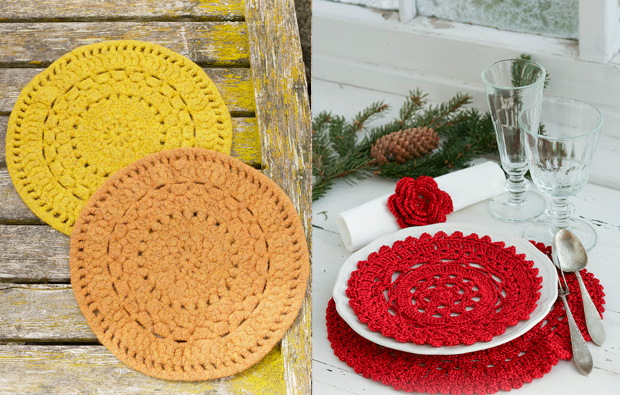
The napkin can be of one color. But if you want to knit a bright table decoration, you can choose 2 colors. For example, make even rows in red, and odd rows in white. Such small napkins are suitable as coasters for mugs, cups, or simply as an additional accessory.
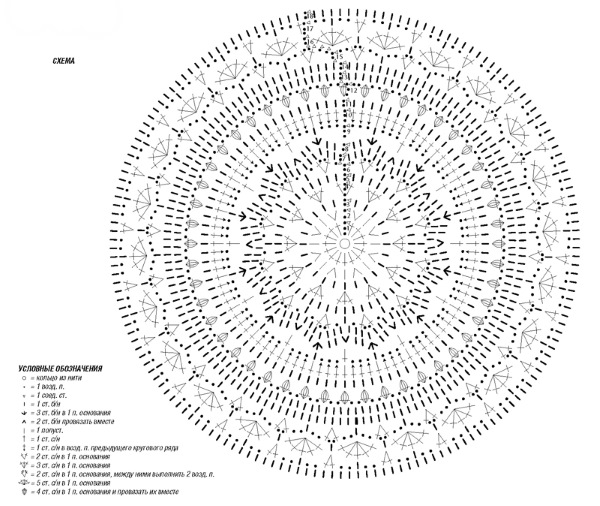
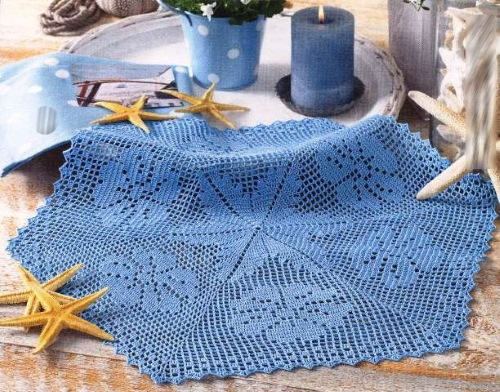
Large napkin
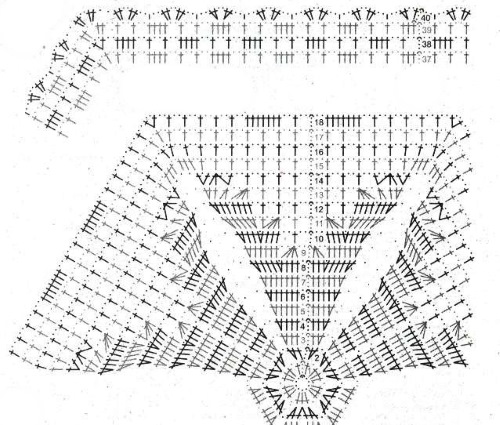
The round crochet napkin, the pattern of which is described below, is approximately 48 cm in diameter. You will need cotton yarn and a #1.5 hook. The napkin will look good both in a single-color version and using different colors.

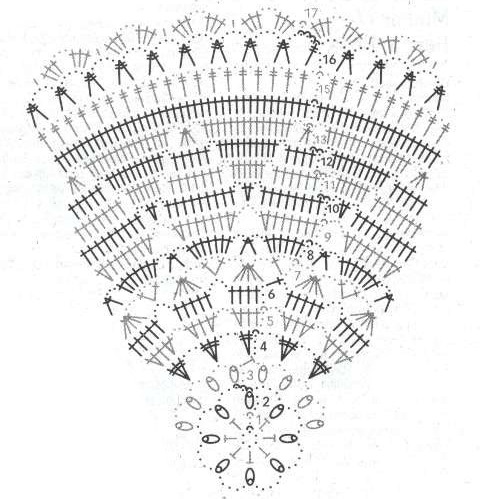
Step by step:
- You need to start with 12 air stitches, which are connected into a ring.
- Next, you need to knit 3 ch, as a replacement for one dc. Then 23 dc. When knitting, the hook is inserted into the ring.
- 5 ch, dc/2n, 2 ch, dc/2n, 2 ch, dc/2n. You should get 23 dc/2n. The row ends with 2 ch and a sl st.
- 3 ch, 2 dc/2n, joined together, 5 ch, 3 dc/2n, joined together, 5 ch, 3 dc/2n, and so on. The columns are knitted in place of the ch loops of the previous row. You need to repeat 24 times 3 dc/2n. The row ends with ch.
- Using 3 half columns, you need to be on 3 ch of the previous row. From this point, you need to tie 7 ch, sc (it is in 3 ch of the bottom row), then 6 ch, sc, 6 ch, sc and so on.
- The next two rows are knitted in exactly the same way, only the number of ch increases to 7. That is, 7 ch, sc, 7 ch. The result is a mesh of “petals”. 7 ch is one petal. This is the basic pattern of the product.
- The eighth row begins with 3 ch and 2 joined dc/2n, which are knitted in the center of the "petal" from the previous row. Then there are 15 ch, 3 dc/2n, knitted together, in the next "petal", 1 ch, 3 dc/2n, knitted together, in the next "petal", 15 ch. And so on until the end of the row. The row should end with 3 dc/2n and 1 ch.
- 3 ch, 2 dc/2n knitted together, 6 ch, through 2 loops of the previous row 3 dc/2n knitted together, 6 ch again, then skip 2 loops of the bottom row and knit 3 dc/2n together. Repeat this pattern to the end of the row. The row ends with 3 dc/2n.
- Knit 3 half sts. Then 9 ch, sc in the center of the “petal”, 7 ch, sc in the center of the “petal”. Finish knitting the row, alternating 7 ch and sc. At the end of the row, knit 3 ch and sc. Knit the next 5 rows according to this pattern. You get a mesh of “petals”.
- From this row, you need to knit according to the pattern in the same way as in points 6-8. That is, from row 8 to 16. Only in this case, the mesh of "petals" increases. The pattern will look like this: 7 ch, sc, 7 ch, sc. This pattern must be repeated 9 rows.
- Last row: 3 ch for lifting, 4 ch of the pattern. Then, skipping one lower “petal” (i.e. 7 ch), you need to knit as follows on the other “petal”: 3 dc/2n, knitted together, 5 ch, 3 dc/2n, knitted together, 5 ch.
- There should be 5 times 3 dc/2n and 4 times 5 ch between them. This is all on one "petal". Next 4 ch, dc in the next "petal", ch, dc in the next "petal", 4 ch. And again the pattern is knitted with 3 dc/2n and 5 ch. The row ends with dc, ch and half ch.
Secrets for Beginners
Crocheting in the round means always knitting in one direction, without turning as you do when knitting in rows. You can knit in simple circles or spiral ones.
The difference will be that with a regular simple circle you can see the beginning and end of the row. The row ends with a certain loop. And the connecting seam can be visible. With spiral knitting, one row flows into another unnoticeably, there is no clear border of each row.
The most common problem that a beginner faces is where to put the protruding ends of the threads at the beginning and at the end of knitting. If you cut these threads completely, the napkin may unravel.
Therefore, the thread needs to be shortened a little, and then hidden. The hook is inserted into any loop, next to the thread, grab it, and pull it out from the other side. Turn the napkin over and pull the thread through the hook again. Do this until the thread runs out.
Some more useful information:
- If the product does not turn out flat, but looks like a hat, you need to knit 2 loops from one more often.
- If the knitting is too loose, you can take a hook with a larger size, and vice versa. If the knitted part is too tight, you can change the hook to a smaller one.
- To make the napkin more delicate, you need to choose thinner threads.
- To make it harder, the napkin needs to be starched. If there is no starch at hand, some people use a weak sugar solution. You need to put the finished napkin in the solution, moisten it well, and then dry it in a well-straightened form. The product will harden.
A round crocheted napkin is quite functional. By knitting several items according to one pattern, you can combine them into one large tablecloth or a beautiful bedspread. A decorative pillow can be sewn from two tightly knitted circles. Small napkins can be used as potholders.
Video about crocheting napkins
Round crochet napkins - diagram: