As with any other handicraft, it takes some time to master crochet for beginners First of all, you need practice. In addition to significant savings on the purchase of quality items and the opportunity to create your own unique style, knitting has a therapeutic effect and is a profitable and exciting pastime.
Tips for Beginners: Crochet
This tool is used primarily for things that will not stretch. It is used to knit double-sided, denser fabric. It is also convenient to create flat appliques and patterns.
On crocheted items, you can start a new weave from any part of the fabric, which makes the process of finishing fabrics easier. Crocheting is suitable for knitting original belts, bags and skirts.
The chosen technique is determined by the ease of use, in connection with which there are a number of common nuances for beginners:
- You should not work with complex and intricate patterns; simple and primitive patterns will do for a start.
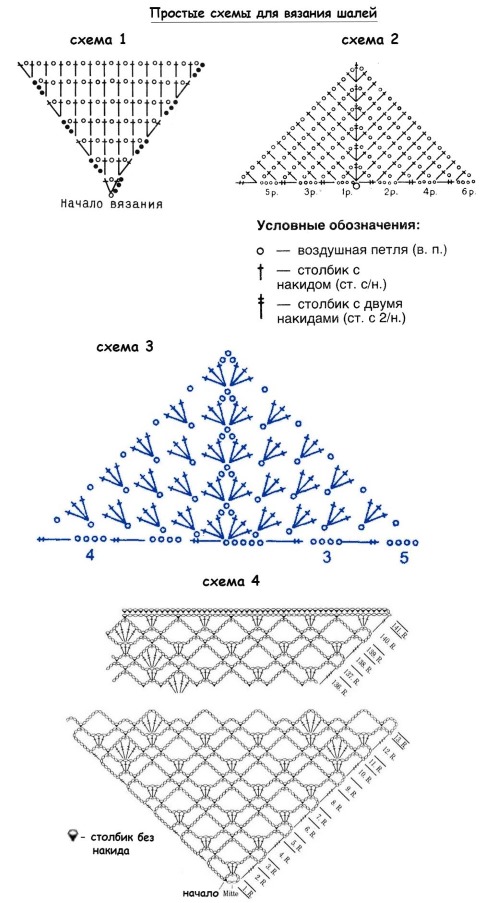
- Knitting patterns in rows are read from the bottom up and from right to left, with all even rows read from left to right. Knitting patterns in a circle are read counterclockwise from right to left. Pattern elements may have specific designations, so you should read the explanations carefully.
Common symbols used in knitting patterns:
| Term | Meaning |
| r. | row |
| prev. | previous |
| track. | next |
| persons. | facial |
| p. | Depending on the context, a loop, lift or increase, meaning 2 sts in 1 st. |
| v. p. p. | Air lifting loop |
| y. | Decrease - 1 st is made from 2 sts of the previous row |
| semist. | Half-column |
| Art. s. n. | Double crochet |
| Art. with 2 or more n. | Column with 2 or more yarns |
| conn. st. | Connecting post |
| sbn | Single crochet |
| sx. | Scheme |
| out. | Purl |
| vp or vzd. p. | Air loop |
| from *to* | The pattern is repeated until the end of the row. |
| before work | Thread on the front side |
| at work | Thread from the wrong side |
| marker | A pin, contrasting thread, or similar marking flag that is inserted into specific areas of a knitting pattern. |
| kr | Circular row |
- Hooks are classified by numbers representing their diameter in millimeters. The product is selected in accordance with the diameter of the thread; it is not recommended to start with too thin ones. In case of discrepancy, the material may turn out uneven, loose or overtightened.
- There are threads for hand knitting and machine knitting. The latter are thicker and usually sold in the form of bobbins wrapped with them. Threads for crocheting are sold in balls.
- Rapport is a repeating element of a knitting pattern. It is marked with 2 stars on the sides, it should be duplicated between the arrows in the pattern the specified number of times or knitted until the item reaches the width specified by the knitting plan.
- Socks, home textiles and similar items will require a high knitting density, while for children's clothing a loose one will do.
- It is recommended to leave improvisation until you get closer to an advanced level; at first, you should perform careful knitting without haste, strictly following the instructions.
- Loops outside the arrows are knitted only at the beginning and end of the row.
- One of the popular methods for determining the type of thread is to set it on fire. Synthetics begin to melt, forming a ball at the end, wool fades faster, leaving a lump, and cotton material is highly flammable.
- The indicator of the exact number of loops, rows and the correspondence of threads and hook is the density of knitting. Before knitting a large area, it is recommended to determine the density by first knitting a 10-centimeter square of the product as a control sample.
- Loops in crochet are divided into columns, woven with or without a yarn over, chains and half columns. The crochet method allows you to pause and change the color of the loops while creating them.
- As you gain skill, you can change the pattern by changing the knitting density or creating loops through the front or back wall.
Using a crochet hook uses up a lot of yarn.
- Once the work is completed, assembly is carried out. The item is placed on an ironing surface, to which pins can be attached. They fix the edges, festoons and teeth of the product, which is ironed through a damp cloth. Using an iron with a humidifier through a dry cloth has an identical effect. To preserve the shape of lace and napkins, they are pre-soaked in starch.
- It is not recommended to dry yarn and knitted items near a heater.
- To begin with, it is better to use simple and non-slip threads. Fluffy yarn can complicate the process with clinging lint, and slippery yarn can easily unwind if you weave carelessly.
- The column is a loop with a leg. The type of pattern when using a hook is determined by the way the columns are attached to the loops of the previous row.
The post is attached in 5 ways:
| Way | Explanation |
| Behind the front wall | The tool goes behind the wall of the loop, which is closer to the binder. |
| Behind the back wall | The tool goes behind the loop wall, which is further from the binder. |
| Arch | This is the name of the space between the posts, and this method involves passing the instrument through the arches. |
| Into the loop or through both half loops | The hook passes behind both walls of the loops of the previous row. |
| In the leg | All of the above methods slightly shift the hooks of the new row relative to the previous one. To prevent shifting, the tool passes through the foot of the post, not through the walls of its loop. |
Net
Crocheting a mesh pattern has a very wide application, its variations are used in knitting hats, tunics, dresses, blouses and many other things. Clothes created in this way have an openwork look and are mostly worn in warm seasons.
Simple grid
Knitting according to this pattern is done using sc and ch. The first ones are knitted using the “into a loop” method, this will contribute to the evenness of the knitting. A hook and threads of a small diameter will be optimal. The number of ch in the initial chain should be divisible by 3, not counting 4 lifting loops and 1 ensuring the symmetry of the loop. The first sc is made in the 5th loop from the hook.
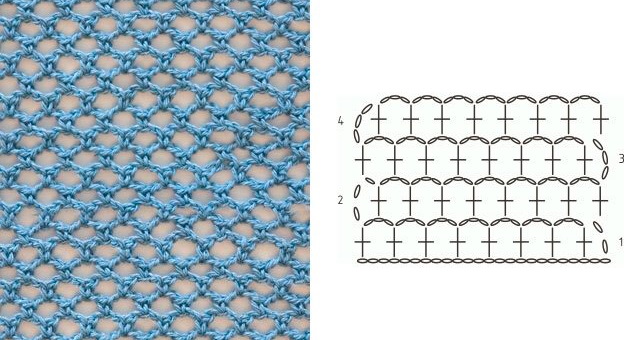
Knitting pattern:
- The 1st row begins with 4 lifting loops, then knit *sc and 3 ch, where 2 loops on the chain are skipped*, the row ends with sc.
- The 2nd row begins with 3 lifting loops, followed by *sc in the middle of the 3 ch of the previous row and 3 ch*, the row ends with sc in the lifting loop of the 1st row.
The knitting of the following rows is done in the same way as in row 2.
Grid of lush columns
This knitting pattern is made from voluminous type columns, which are woven in their own way, the construction of which is a pair of st. with 2 n.
The splendor of the columns of this category, having 1 top and 1 base, is provided by the number of columns in the bundle, not completely and differently connected, which are knitted through loops and arches. For a sample of a mesh knitted from splendor columns, a braid is made from the sum of VP divisible by 5, not counting 1 loop providing symmetry and another 4 VP.
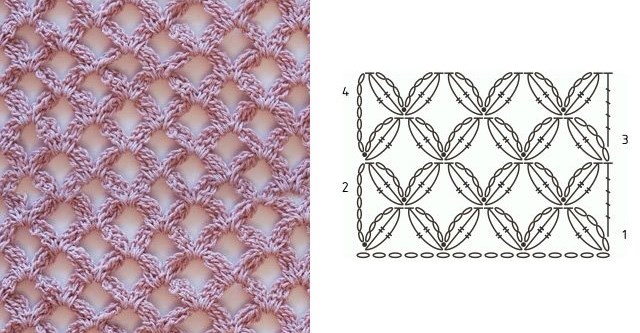
Knitting pattern:
- The 1st row begins with 4 lifting loops and a lush type post, going into the 5th loop of the braid from the hook, continues with *skipping 4 loops on the braid, a lush type post, 4 ch, 1 sl st. through the same loop where the lush type post went before, another 4 ch and a lush type post into an identical loop*.
- Next come 4 more braid loops, a lush column, 4 ch and 1 sl st in the loop where the lush column passed.
- At the beginning of the 2nd row, make 7 lifting loops, then knit *1 lush type column, passing through the arch of identical columns of the previous row, 4 ch, 1 sl st. through an identical arch, 4 ch and another lush type column passing through the same arch*. Then knit a st. with 4 n. in the outermost loop of the previous row.
- In the 3rd row, first make 4 ch, 1 dc in the outermost loop of the previous row, then *a dc is passed through the arch of the dc columns of the previous row, 4 ch are created, 1 sl st is passed through an identical arch, after which 4 more ch are woven and a dc in the same arch*.
- After the rapport, a lush column goes into the outer loop of the previous row, 4 ch are made and 1 sl st is passed into an identical loop.
From the 4th row, the 2nd and 3rd rows continue to alternate.
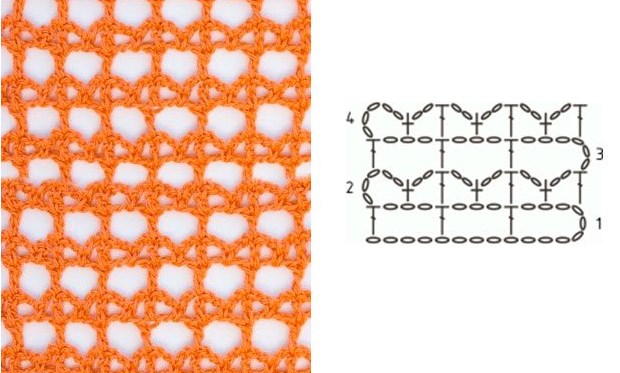
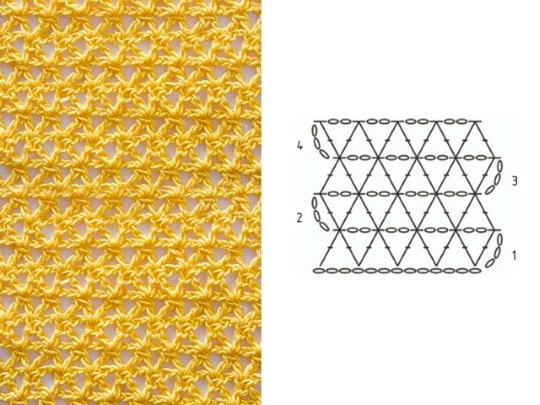
Fillet mesh
Knitting using this simple technique is used not only to create clothing, but also to make napkins, woolen rugs and blankets.
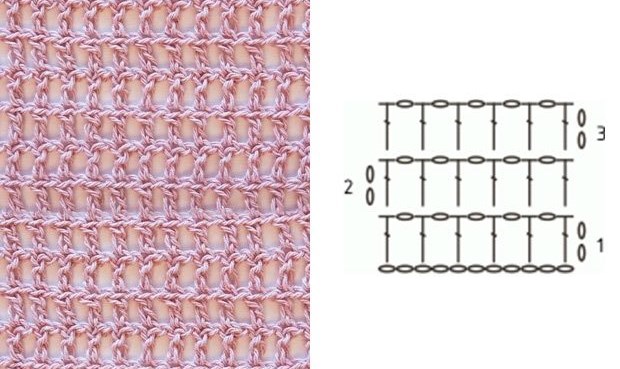
The method is based on alternating double crochets and ch stitches; the technique can also be supplemented with your own flat pattern, filling in certain gaps in the product on the dc stitches.
Knitting pattern:
- The fillet ligature begins with a chain of an even number of VP, calculated for the intended length of the item. The hook operates on both loop walls.
- Make 2 lifting loops, then dc, ch and another dc with a skip of 1 st in the base chain.
- All subsequent rows are knitted identically.
Mesh with picot
The ligature by this method is very similar to the classic oblique mesh, the pattern of which consists of VP, attached to the previous row by means of sc. The picot mesh is distinguished by special loops of the same name. They are formed from 3 VP, thin threads are used in picot patterns.
Knitting pattern:
- First, a braid is created with a number of loops divisible by 4, then 3 lifting loops.
- The 1st row is made by skipping a half-st. through the 11th loop from the tool, from 3 ch a picot is knitted, after which another half-st. is attached in an identical loop. Then 5 ch arches are formed, skipping 3 sts, knitting a half-st. and the rapport *picot and half-st.* begins, the last half-st. of which goes strictly into the last loop of the row.
- The 2nd row begins with 3 lifting loops and 3 ch. In the middle loop of the arch of the 1st row, a half st is made, just like in the previous row, then a picot is made and another half st, which continue throughout the row. It ends with 2 ch, after which a st with 2 n is attached to the outer loop of the previous row.
- The 3rd row begins with 6 lifting ch and continues with the same pattern as in the 2nd row.
- Knitting patterns for the 2nd and 3rd rows alternate throughout all subsequent rows.
Pico is often used for beachwear and children's wear.
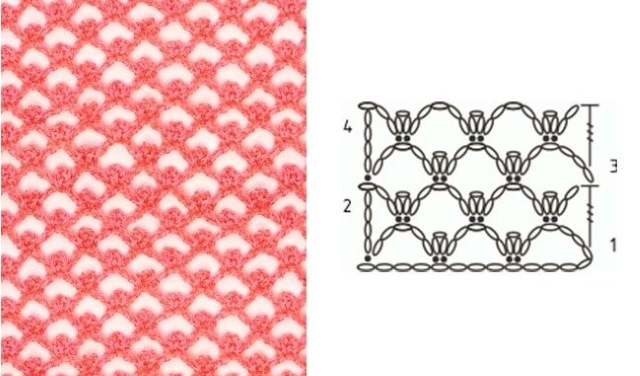
Openwork mesh
To knit a control sample of the pattern, form a chain of VP, the number of which is divisible by 4, not counting 3 lifting loops.
Knitting pattern:
- In knitting the 1st row, dc is inserted into the 10th loop from the hook, *3 ch are made, 3 loops are skipped on the chain. The rapport ends with dc.*
- The 2nd row begins with 5 ch, continues with *dc in the middle of the 3 ch of the previous row, 2 ch, 1 dc in the loop of the dc of the previous row, 2 ch*, and ends with 2 ch and 1 dc in the 4 ch of the previous row.
- The beginning of the 3rd row is formed from 6 ch, followed by a rapport of *sc in the loop of sc of the previous row and 3 ch*, the row ends with sc, going into the 3rd ch of the previous row.
- Next comes the repetition of the 2nd and 3rd rows.
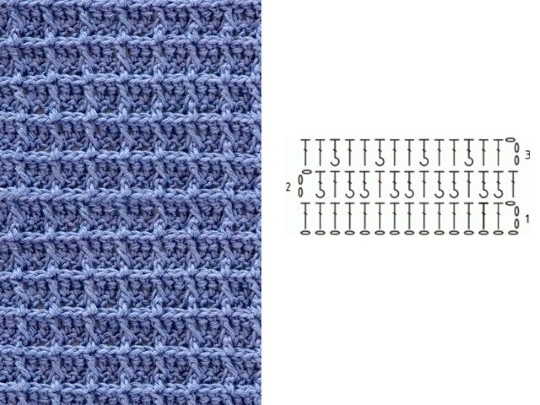
Simple dense patterns
This type of knitting is completely opposite to the elaborate constructions of openwork patterns. Dense patterns are formed from sl st. or half st., being similar in their construction to a fabric made with knitting needles.
The colored reverse side and the edge twisted into a knitted knit from half-columns on the near half-loop look identical to it. Sweaters, gloves, winter hats and socks are made from dense patterns.
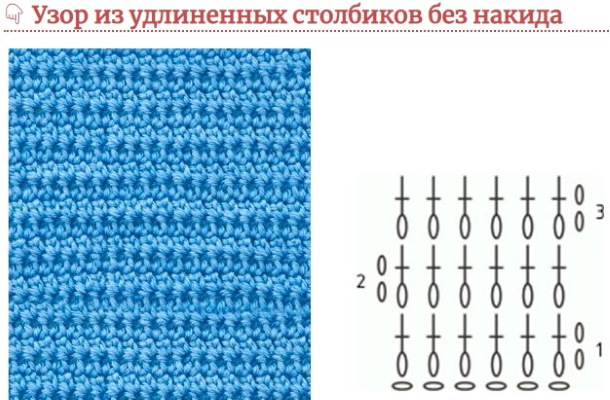
For a dense pattern of sc, the required number of ch is formed, the first sc is carried out through the 2nd loop from the hook. The 1st row begins with a lifting ch, then to the end of the row follows a rapport of *sc only on one side of the loop*. The 2nd row begins the same way, here *sc goes on both sides of the loop* from *to*. Subsequent rows are knitted identically to the 2nd.
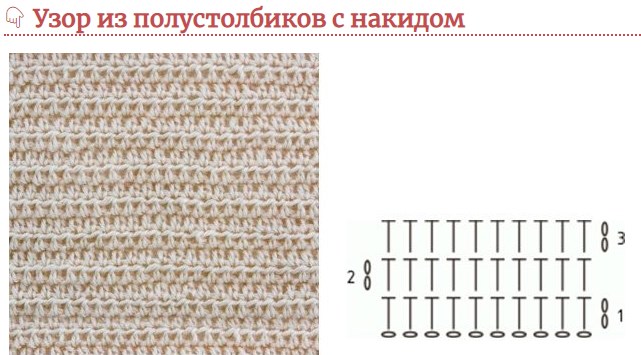
The pattern with extended sc has greater elasticity and small gaps, after forming the required number of VP, 2 VP are made and the 1st sc is carried out in the 3rd loop from the hook.
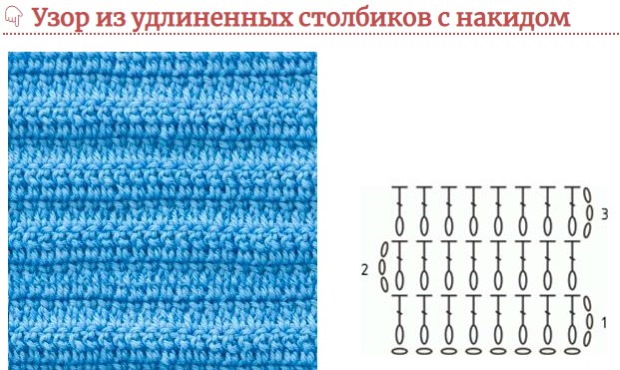
There should be 2 loops ready on the hook, the column is finished by passing the thread through them. Then there is a column per loop, the 1st row ends with 2 in p. p., the 2nd and subsequent rows are knitted identically with alternating knitting directions.
The Bosnian pattern is famous for its increased density, stretching only in length. It is formed from ordinary half-st., attached to the walls of the typesetting row far from the binder, while the first half-st. is made for each of the walls of the initial loop of the previous row. V. p. p. is not made.
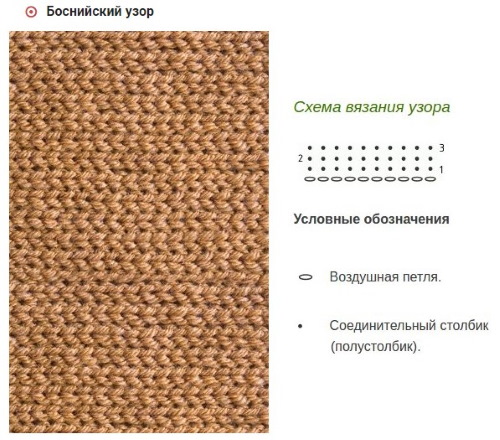
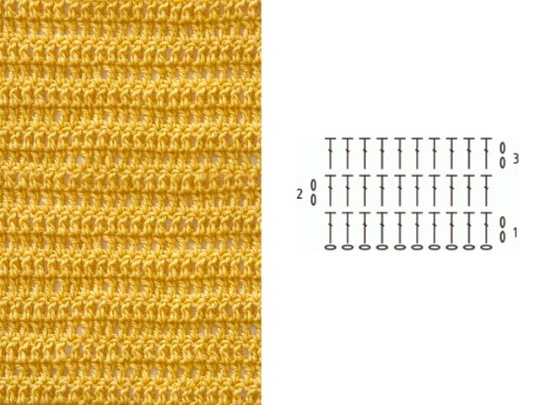
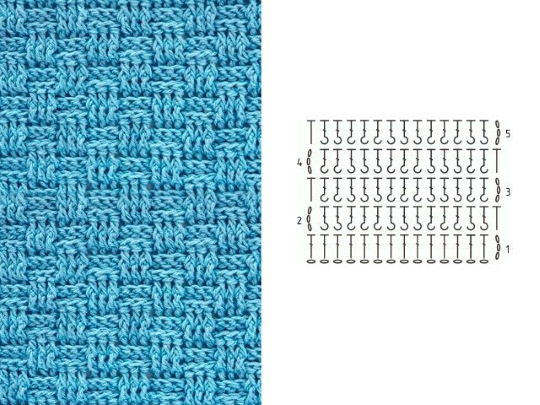
With the high density of rice paddies, this simple pattern is not rigid, with its help they create such warm clothes for winter as hats, dresses, skirts and sweaters. Rice paddies are created from sc and dc, the number of loops collected should be divisible by 2, not counting 1 loop for symmetry and 2 lifting loops that begin the 1st row.
After 2 ch p p, until the end of the row there is a rapport of *sc, dc in the 3rd loop from the hook*. The row ends with dc through the last loop. 2 ch p p also begin the 2nd row, followed by a rapport of *passage into the loop dc, sc and dc*, through the last loop of the row there is a sc. The subsequent rows are knitted identically to the 2nd.
Easy crochet patterns
Despite the ease of production from simple patterns, many items of clothing and everyday life are created or decorated with them.
A simple lush pattern forms a dense fabric that retains its shape well; this is how purses, slippers and handbags are knitted. It is connected from elongated half-st. with n., which are made in the initial chain ch. The 1st st. with n. passes through the 4th loop from the hook, a yarn over is made and the tool is passed through the loop.
It is necessary to grab the operational thread and pull it through p. = 3 p. on the tool. VP passes through 1 of them and a yarn over is performed, st. is finished by knitting 2 p. on the hook. This pattern is distinguished by the fact that after forming an additional VP, all 3 loops are knitted at once.
To create a sample of a lush pattern, you should dial a chain of the required number of VP, which should be divisible by 2, not counting 1 loop for symmetry and 3 lifting VP:
- The 1st row begins with 3 lifting ch, followed by a rapport of *2 extended half sts with n. in the 5th in a row from the hook ch for both its walls and skip 1 ch of the original chain*. The row ends with a passage of an extended half st. in the last loop of the chain.
- The beginning of the 2nd row is laid from 3 lifting ch, *2 extended half-st. with n. through the arch in the middle of 2 columns of the previous row*. The row ends with 1 half-st. with n. in the lifting ch of the previous row.
- The following rows are knitted identically to the 2nd.
The ornate crochet pattern is made from lush sts, made from 2 sts with n. The pattern sample is formed from the required number of VP, which should be divisible by 2, not counting 1 loop ensuring symmetry.

Knitting pattern:
- The 1st row begins with a lush st. in the 3rd loop from the hook, then a rapport of *ch and lush st. with n.* is knitted to the end.
- At the beginning of the 2nd row, 2 lifting ch are made, a lush st with n goes into the loop of the 1st lush st of the previous row. Begin *ch with a lush st with n into the loop of the next lush st of the previous row*. The following rows repeat the 2nd.
The double-sided multi-colored wave pattern requires 2 or more colors of yarn. This technique is mainly used for dresses, scarves, skirts and blankets, each section of the pattern lasts 17 loops and reaches a couple of rows in height. For the sample, you will need to dial a number of loops divisible by 17, not counting 1 lifting ch.
Knitting pattern:
- The 1st row begins with a lifting ch, continuing with *ch with sc in each of the loops of the previous row*.
- The 2nd row is knitted from 2 lifting ch and st. with n. in the 1st loop of the previous row.
- The ligature of 2 dc in one loop is repeated twice, a rapport begins from *skipping 1 st of the previous row and dc five times, skipping 1 loop of the previous row once and repeating 2 dc through 1 loop six times*, skipping 1 loop of the previous row is made, dc is repeated five times.
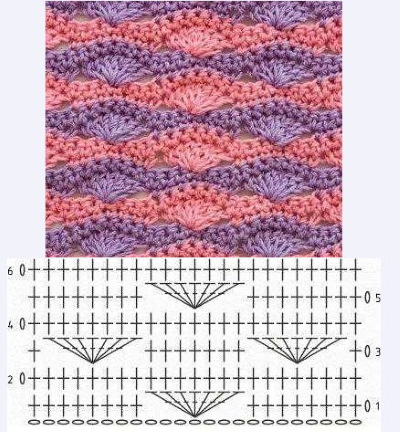
- Another 1 skip of the loop of the previous row is performed and 2 dc are repeated three times through 1 loop.
- The next 2 rows are knitted identically to the 1st and 2nd, but with a different color.
Shells
This technique combines durability with openwork pretentiousness, with its help both dresses and blouses are made. It is often combined with other patterns, things made only from "shells" look no less good. The sample will require a chain of VP in a number divisible by 8, not counting 6 loops that provide symmetry and 3 lifting VP.
Knitting pattern:
- At the beginning of the 1st row, 5 chain loops are skipped, followed by a rapport of *7 dc, skip 2 chain loops, sc, 3 lifting ch, skip 1 chain loop, another sc and skip 2 chain loops*. The row ends with 7 dc through 1 loop, skip 2 chain loops and 1 dc the last chain loop.
- The 2nd row begins with 2 lifting ch and continues with 3 ch, sc through the middle loop of 7 dc of the previous row and a rapport of *3 ch, dc through the arch of 3 ch of the previous row, 2 ch, dc through an identical arch, 3 ch and sc through the middle loop of 7 dc of the previous row*. The end of the row will be 2 ch and dc through the ch p p of the previous row.
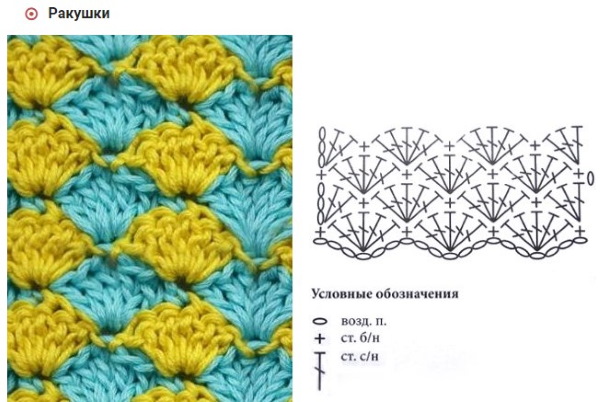
- The 3rd row is knitted from 2 lifting ch, 2 dc through the loop of the outermost column of the previous row, sc going through the arch of 2 ch of the previous row, a composition of *3 ch, sc through the arch of 3 ch of the previous row, 7 dc through the arch of 2 ch between the columns of dc of the previous row*, 3 ch, sc in the arch of 3 ch and 3 dc in the ch p p of the previous row.
- The 4th row begins with 2 lifting ch and 2 more ch, continuing with dc through the arch of 3 ch of the previous row, 2 ch, dc through the same arch, *3 ch, sc through the middle loop of 7 dc of the previous row, 3 ch, dc through the arch of 3 ch of the previous row, 2 ch, dc through the same arch*, 2 ch and dc into lifting ch.
- The 5th row is formed from 2 lifting ch and the rapport *7 dc through the arch of 2 ch between dc of the previous row, with a sc through the arch of 3 ch of the previous row, 3 ch and sc through the arch of 3 ch of the previous row*. After them, 7 dc are knitted, passing through the arch of 2 ch between dc of the previous row. The row ends with a dc through the lifting ch of the previous row.
- The following rows are a sequence of repeats from rows 2 through 5.
Openwork patterns
Similar knitting patterns are used to create such elegant things as napkins, tablecloths, skirts and shawls; openwork patterns are extraordinary, being an ornament in themselves.
The pattern of air arches is strong enough to make warm tunics or sweaters from it. At the same time, it is easy to master, the rapport of this pattern includes a fivefold repeat of 5 ch. For the sample, you will need a chain of 16 ch, not counting 3 ch. p. p.
Knitting pattern:
- The 1st row begins with a dc in the 4th loop from the tool, continuing with 2 ch and a double repeat of the rapport with *skipping 2 loops, making a dc in each of the 3 following loops of the previous row and 2 ch*. The row ends by skipping 2 loops and knitting a dc in each of the 2 following loops of the previous row.
- The 2nd row goes, like all the following ones, in the opposite direction from the previous row. It consists of ch, skip dc, and pass 5 fan dc on a free basis through the 1st arch of the previous row, skip dc, pass sc into the next dc from the previous row and a double rapport of *skip dc.
Also carry out 5 fan dc on a free basis through the 1st arch of the previous row, skip dc and pass sc through the next dc of the previous row*.
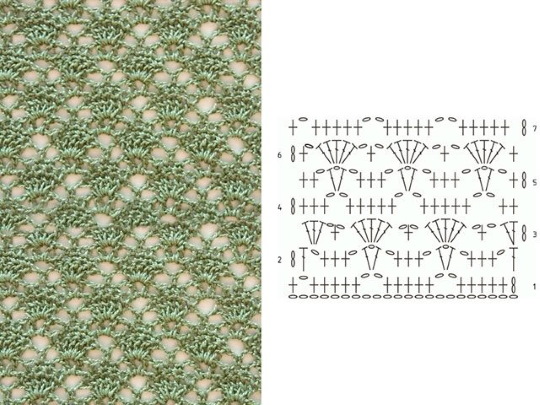
- The 3rd row begins with 4 ch, skipping dc of the previous row and knitting dc in each of the next 3 dc of the previous row. The ligature continues with a double rapport of *2 ch, skipping dc, sc, dc and knitting dc in each of the next 3 dc of the previous row*, ch, skipping dc and dc in ch of the previous row.
- The 4th row is formed from 3 ch, 2 fan-type dc in the 1st dc, skipping ch and dc, continuing with sc in the next dc of the previous row, with a double rapport of *skipping dc.
Perform 5 fan-type dc on a loose basis into the next arch of the previous row, skip dc and make a sc into the next dc of the previous row* and skip dc. The ligature ends with 3 fan-type dc into the next arch of the previous row.
- The 5th row is knitted identically to the 1st row.
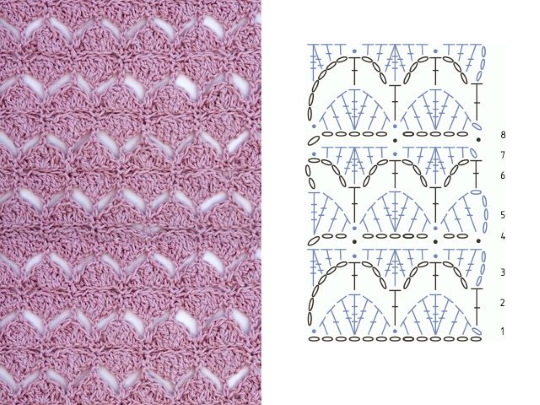
The sophisticated lace rings that look complicated only seem so and are easy to master even for a beginner. The sample will require a chain of 45 VP, not counting 3 VP.
Knitting pattern:
- The 1st row begins with a ch, continuing with a fan-type dc in the 7th ch from the tool, a three-fold rapport of *9 ch, a connecting dc in the 2nd of them, another 3 ch.
Knit 8 dc into the resulting ring, 4 of which should be connected to 6 ch of the previous row by means of a connecting loop, ch, skipping 5 ch of the previous row, fan-type dc through the next ch of the previous row*, and finish with ch, skipping ch of the previous row and knitting dc into ch of the previous row.
- At the beginning of the 2nd row 4 ch and skip ch of the previous row, it continues with sc through the next ch of the previous row, ch, skip ch of the previous row, fan-type sc through the arch of the previous row, ch, three-fold rapport from *sc in ch of the previous row.
Next, 9 dc through the ring of the previous row, sc through the ch of the same row, ch, fan dc through the arch of the previous row and ch*. The row ends by skipping the ch of the previous row and dc through the next ch of the previous row.
- The following rows repeat the alternation of the 1st and 2nd rows.
The cone pattern is suitable for warm seasons, with its help they create shawls, boleros, vests. The essence of cones is in joint knitting of 3 unfinished st. with n.
For the sample you will need a chain of 13 ch, not counting one ch:
- The 1st row begins with sc through the 2nd ch from the hook, continuing with a double rapport of *7 ch, skipping 5 ch and sc through the next ch.
- At the beginning of the 2nd row, 5 ch are made, sc is carried out through the arch of the previous row, then 2 more ch are made. In the next sc of the previous row, a bump is knitted, then 2 ch, sc through the arch of the previous row, 2 more ch and dc through sc of the previous row.
- The 3rd row begins with 6 ch, sl st is knitted into the sc of the previous row, then 7 ch, sl st through the sc of the previous row, 3 ch and sl st into 3 ch of the previous row.
- The 4th row is formed from ch, sc through sc of the previous row, continuing it with 2 ch, a bump in the next sc of the previous row, 2 more ch, sc through the arch of the previous row, 2 ch, a bump in the next sc of the previous row, 2 ch and sc through sc of the previous row.
- The 5th row is knitted identically to the 1st row.
Relief patterns
The basis for forming relief patterns is the alternation of different types of columns. Thanks to this technique, you can make warm things with a thick cover and protruding patterns on it. These relief patterns are also used to decorate other things.
A waffle pattern similar to notebook cells with raised borders in the sample will require a chain of vp, whose number must be divisible by 3, not counting the 2 loops that form symmetry:
- The 1st row is made from dc, with the 1st of them knitted into the 5th loop from the hook.
- The 2nd row begins with 3 lifting ch and a relief dc before work, continuing with a composition of *dc and 2 dc of relief type before work* and dc through the lifting ch of the previous row.
- The 3rd row is knitted from 3 lifting ch, a rapport of *2 dc, relief dc from the front side* and 2 dc at the end.
- The subsequent rows are an alternation of the 2nd and 3rd rows.
The rapport of the corn kernel-looking knitting pattern with the corresponding name contains 3 sts + 1.
- The 1st row is made from 3 lifting VP, knitting st. with n. with each of the loops of the original chain.
- The 2nd row begins with the tool going behind the base of the last dc, continuing with sc, half st, 3 dc and a rapport of *skipping 2 sts and knitting sc on the base of the next one, half st and 3 dc* from *to*.
- The following rows are an alternation of the 1st and 2nd rows.
A simple crochet braid is formed from st. relief type, creating a pattern similar to threads in the fabric. The pattern rapport is 4 sts in width and 6 sts in height.
The control sample will require a chain of ch, the number of which must be divisible by 6, not counting 3 edge lifting loops and 2 symmetry-forming loops:
- The 1st row begins with knitting a dc into the 4th loop from the hook, then knit *dc into st.* from *to*.
- The 2nd row is made from 3 lifting ch, 2 relief sts with sl st on the front side, a rapport of *3 relief sts with sl st on the back side and 3 relief sts with sl st in front of the work*, 3 relief sts with sl st behind the work, 2 relief sts with sl st on the front side and half sts with sl st through the ch of the previous row.
- At the beginning of the 3rd row, make 3 lifting ch, continuing it with 2 relief sts with n. from the back side, 3 relief sts with n. from the front side and a rapport of *3 relief sts with n. behind the work and 3 in front of the work*. The row ends with 2 relief sts with n. from the back side and half sts with n. through the ch of the previous row.
- The 4th row is knitted in the same way as the previous one.
- The 5th is identical to the 2nd row.
- The rest of the ligature is repeated from the 2nd row.
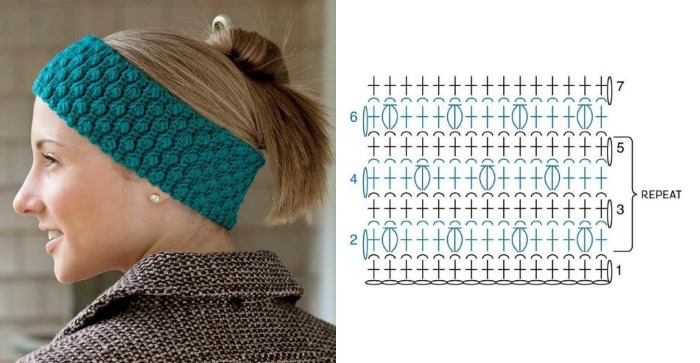
Headband
Crochet for beginners also includes headwear, an elegant headband is popular in all seasons.
It is mainly worn in spring and autumn, but winter ear warmers and light summer versions of the product, which help cool down by fixing the hair, are also widely used.
Warm headbands are usually made wider, using wool with acrylic, in most cases linen or cotton summer ones are narrower, but the type and material of this thing are not limited by anything. Headbands can serve as an independent decoration, a seasonal item of clothing or an addition to the image.
One of the simplest common models of the product for a head circumference of 55 to 58 cm will require a chain of 88 ch, not counting 1 ch. p. p.:
- The 1st row begins with knitting 1 sc in each of the first 38 loops, then the 39th loop is marked with a marker, from which the next 12 loops are knitted with sl sts. The marker is inserted into the last one, the remaining 38 loops are also knitted with sc.
- The 2nd and subsequent 18 rows are knitted identically to the 1st, except that they begin with a ch, and when creating sc, the hook is pulled only behind the back walls of the loops. The last loop of each of these rows should be knitted behind both walls, this will provide the bandage with even edges. For a greater width of the product, you can increase the number of rows.
- The edges of the bandage are connected by means of connecting columns. Having folded them, you should grab the thread and pass it through 3 loops, of which 2 are loops of the outer rows and 1 is a loop on the tool. The remaining sections of the edges are knitted in an identical manner, you should get a neat convex seam on one side.
Silky semi-woolen or woolen yarn of about 3.5 mm thickness with a corresponding hook is preferred.
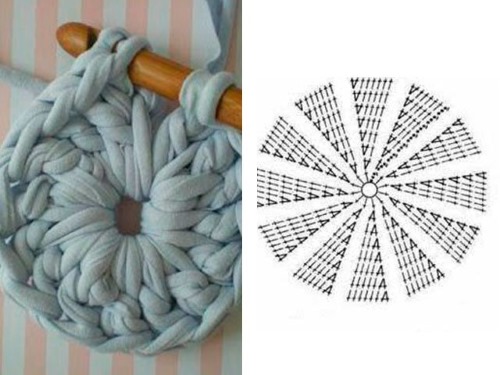
Potholders
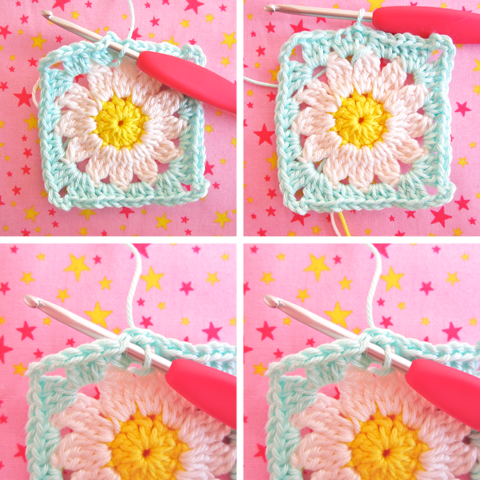
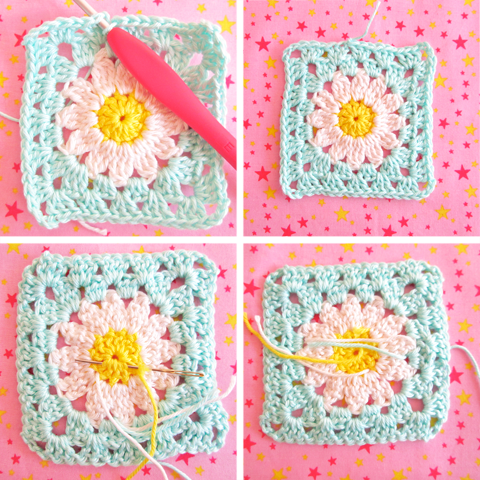
These handmade decorations are good for practicing the ability to knit horizontally and vertically with the same density and maintaining uniform tension of the thread. Beginners will find it useful to practice creating round, square-type fabrics, forming even loops.
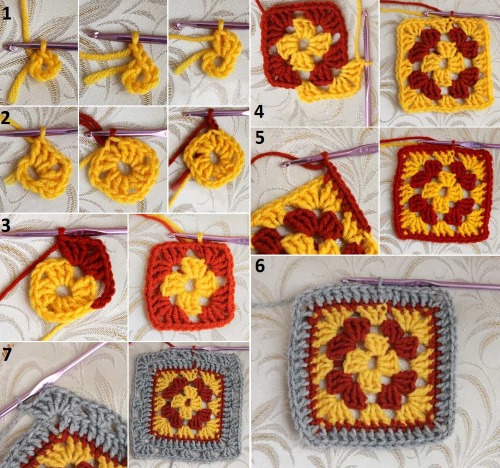
For a simple square potholder you will need:
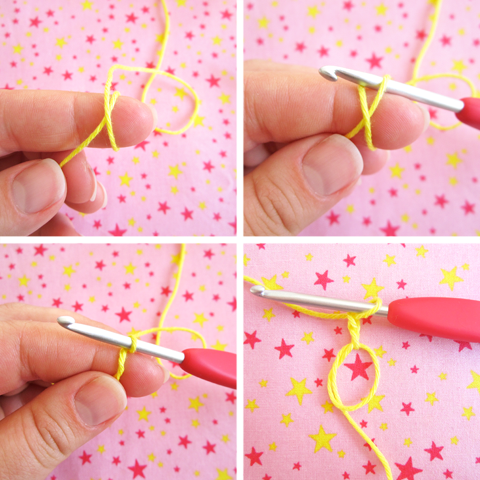
- Make a chain of 3 VP, closing it with the 4th, this will be the base of the center of the product.
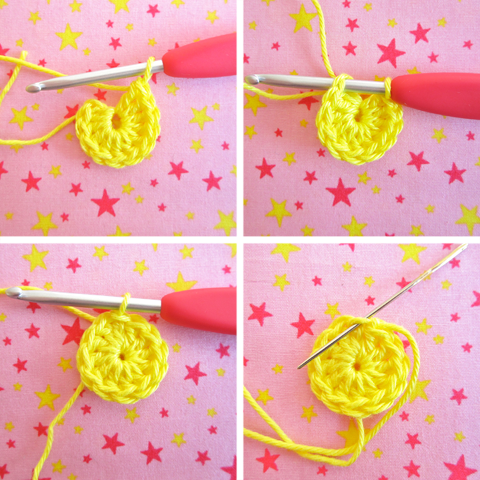
- Above each of the VP, knit 2 sc, this continues for 2 rows. In total, there should be 12 loops. At this stage, a marker is usually threaded into every 3rd of them, which will indicate the corners.
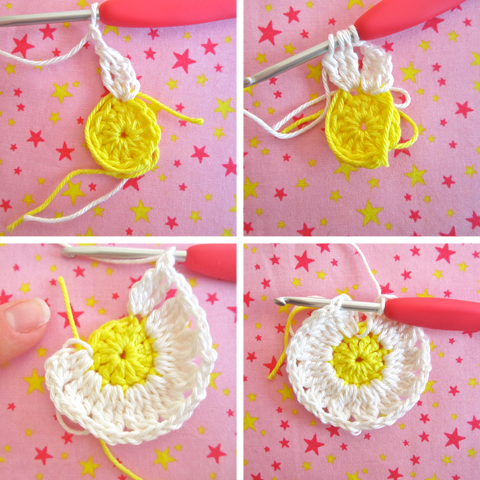
- Next, the rows are knitted in a circle using any of the loop knitting methods; with each loop at the corner, 3 new ones are made by inserting the tool three times with knitting columns with n.
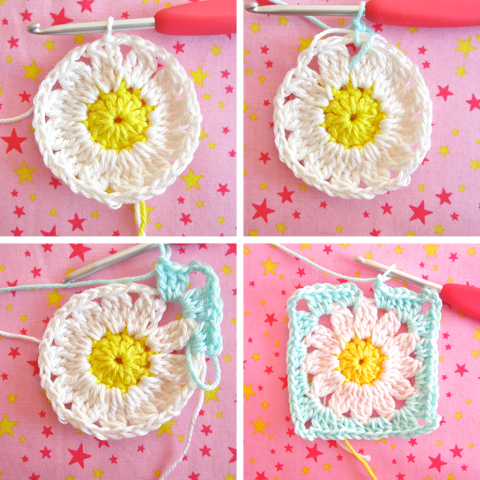
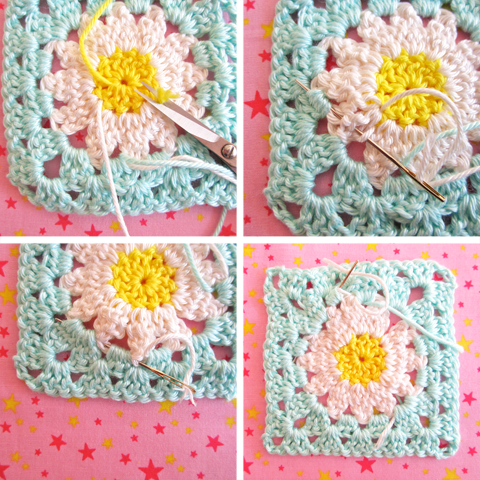
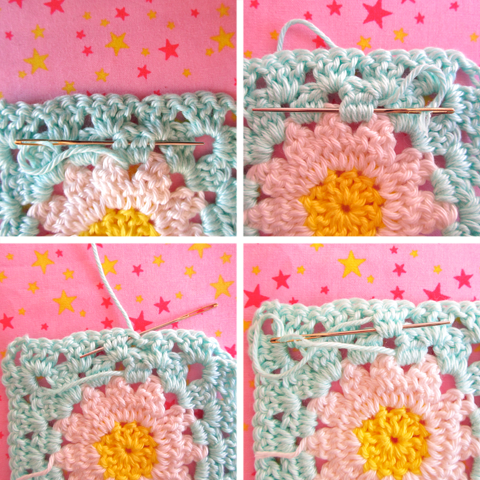
- Knitting gives freedom to experiment with its pattern and the colors used in it, continuing to the desired size.
- The potholder ends with a chain of VP, the last of which is tied by turning the yarn back to the corner of the product.
Slippers
Crochet for beginners can be used in everyday life, so you can make comfortable knitted slippers - slippers. They are worn at home, used instead of warming socks and as a protective layer in shoes against chafing. Usually, slippers are knitted from elongated sc, using thick sock, wool or semi-woolen yarn.
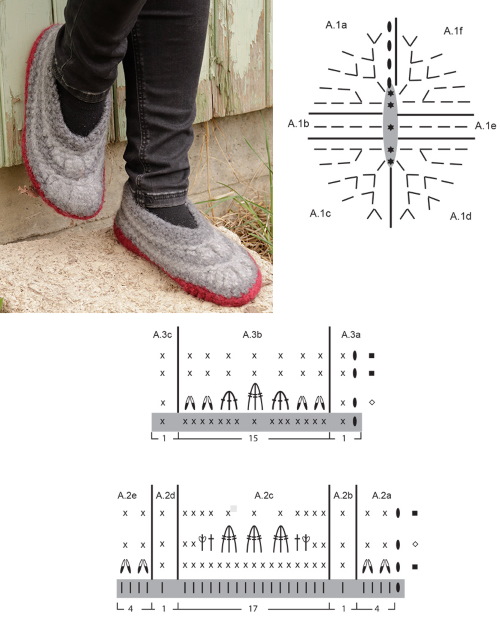
Knitting pattern:
- The product begins with a toe knitted in a circle, 6 sc are knitted into a sliding loop, then the threads are pulled together. 2 sc are made through each of the loops, in subsequent circles they are knitted as you like, except for identical positions in adjacent rows, with uneven sc the toe turns into a polyhedron. This part of the sock is finished when it reaches the circumference of the foot, usually 14 rows.
- The foot is knitted next - the toe is folded in half and the work continues with turning rows upwards. When the foot is knitted to the thread, it is time to add 2 sc to the first loops of each row, so the sock will become higher and will sit more firmly on the foot.
- The angle of the heel of the foot should not be sharp, a couple of rows before its end, the center of the fabric is marked, where 6-8 sts. are made without knitting through one.
- The work is turned inside out, the back halves are connected, after which the socks are turned inside out and the top is tied using sc. If the toes are separated from the foot or if their size is small, the product can be additionally tied with 1 more next to it, skipping several columns.
The most suitable material for knitting would be thick woolen threads.
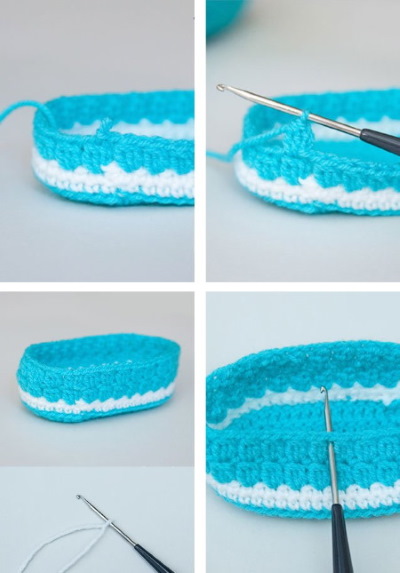
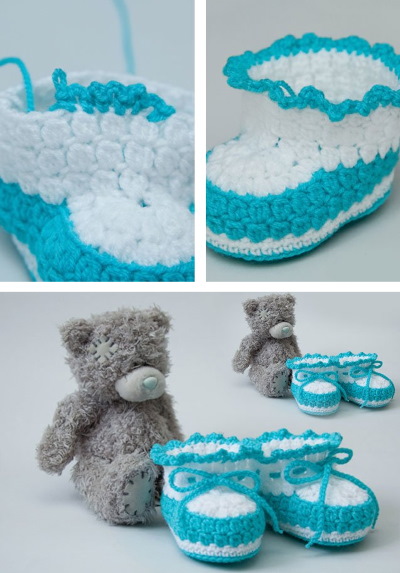
Booties for children
Babies are too young to wear shoes, but their feet also need warmth, which is where booties come in handy. They go on top of socks and tights, and can be decorated with ribbons and patterns. The sole of this item is about 9 cm, and you will need two-color acrylic yarn about 2.5 mm in diameter. The bootie pattern requires a chain of 15 ch.
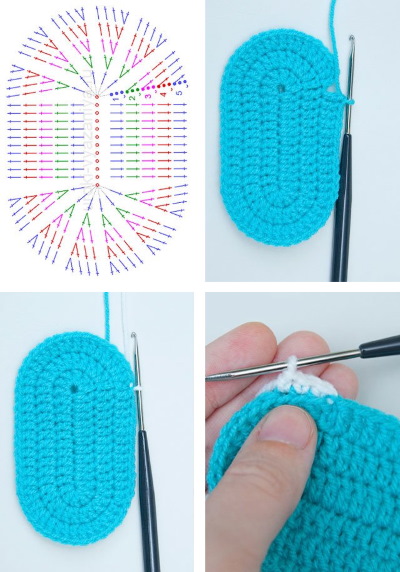
Knitting pattern:
- The 1st row begins with 2 dc in the 4th loop from the hook, in the next 10 loops knit 1 dc. This stage is finished by knitting 6 dc in the outer loop, turning the knitting for symmetrical knitting of dc in the next 10 loops. In the 4th of the initial loops with 2 dc, at the same time knit 3 more dc, the row is finished with a sl st in the 3rd ch.
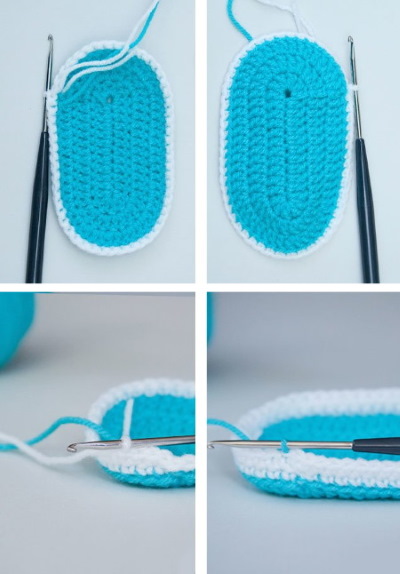
- The 2nd row begins with 3 ch p p, knitting dc into their base loop. In the next 2 loops, knit 2 dc, and in 10 loops after them, 1 dc. Then follow 6 more loops with knitting 2 dc into each, ten loops with knitting 1 dc and 2 dc into each of the 3 end loops. The row ends with a sl st of 3 ch p p.
- Row 3 begins with 3 ch sl sts and dc sl sts into their base loop, continuing with dc sl sts into next loop, 2 dc sl sts into loop after that, dc sl sts into next, 2 dc sl sts into loop after those, and dc sl sts into next 11 loops.
- They are followed by a rapport of *2 dc in the next loop and dc in the next one*, repeated 5 times. Ten loops after them are knitted with dc, after which comes the same rapport this time three times and a sl st in 3 ch p from a different color.

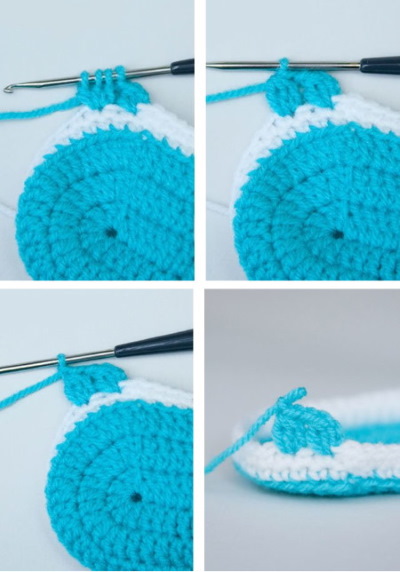
- The second color is also used in the 4th row, which begins with a ch through which a sc is drawn, in the following loops, 1 sc is knitted for each of their walls farthest from the knitting one, a total of 56 columns should come out. The row ends with a sl st of the first color through its first sc. In the following rows, non-lifting loops are used.
- The 5th row begins with a hook through the base loop and forming a sc, in each next loop also crochet a sc, in total there should be 56 of them. The row ends with a sl st through its 1st sc.
- Row 6 starts identically to row 5 except for the color of the 2 loops on the tool, which are made with the second color thread. In the loop after them, a sc is knitted with 2 loops of the first color.
Through the next loop passes a sc with 2 loops of the second color, alternating the color of the loops on the hook when forming a sc in each loop continues to the end of the row. It ends with a sl st of the first color through its 1st sc.
- The 7th row is knitted with the first color, consisting of sc through each of its loops, in total there should be 56 columns. The row is closed with the second color in its 1st sc.
- Row 8 continues with the second color, consisting of sc through each loop and closing with a sl st of the first color into its 1st sc.
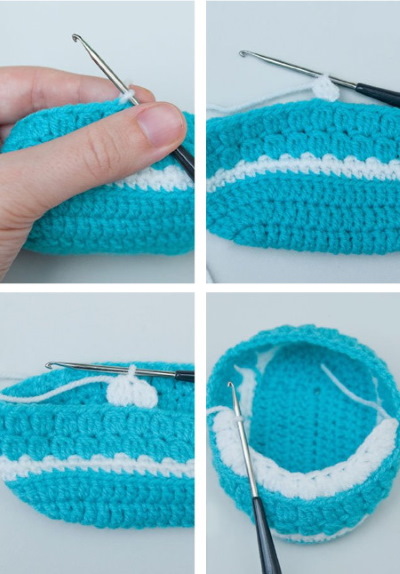
- Continuing the 1st color, the 9th row begins with passing the hook through the base loop and forming a sc, in the loops after which another 17 sc are made. In the loop after them, a half-sc is made, *in the loop next a sc, after them, the loops with untied sc are repeated twice and there are 3 loops knitted together*, the composition is repeated 9 more times. Thus, 20 loops are transformed into 10.
In the loop after them, knit a dc, followed by a loop with a half dc, then make one sc in each of the last 14 loops of the row, ending with a sl st in its 1st sc.
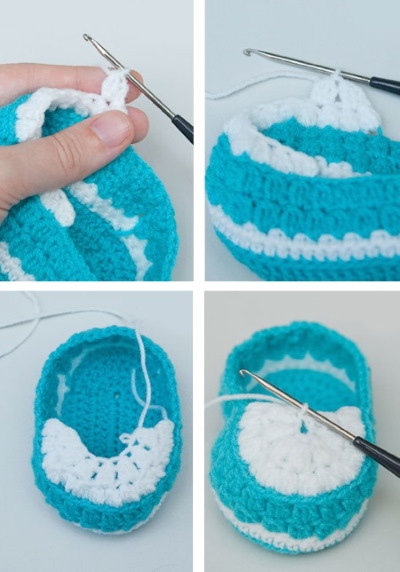
- The 10th row is knitted identically to the 9th, starting with 18 loops with sc in each of them. Then knitting is done as follows: on top of the half-dc of the previous row, a half-dc is made, on top of the dc, respectively, a dc, in 5 loops after them, 2 dc are knitted with a common top.
Then again dc into the loop over dc of the previous row and also half dc over half dc and then. After the next 14 loops, 1 sc is knitted, the row ends with a sl st into its 1st sc.
- The 11th row begins with 18 loops with 18 sc respectively, in the loop after which there is a half-dc, then a loop with a dc. In 5 loops after them, 5 dc are made, which are not completely knitted to form a common top.

You should pass the hook through 6 loops, which should be knitted at one time, in the loop after them a dc is made and in half dc in the next one. Then 14 loops are knitted with 14 sc respectively, the row ends with a sl st in its 1st sc.
- Row 12 goes in a circle, 1 sc goes through each of the loops. In total, there should be 37 sc, the 12th row of booties ends with a sl st in your 1st sc.
- The next 8 rows are knitted identically to the 12th row.
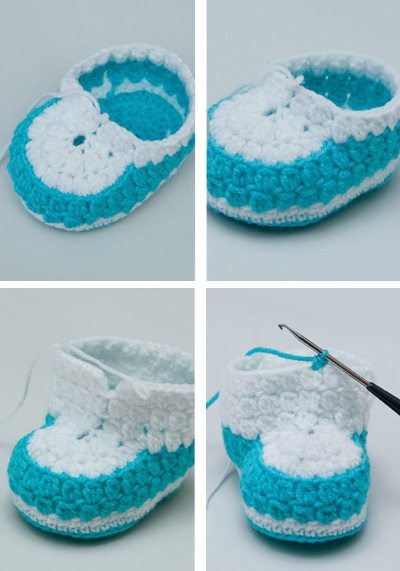
- After them, the knitting is turned and a row is made of an even number of loops with sc, the number of which should be 38. To achieve an even number of loops, 2 sc are made in one of them. This row ends with a sl st of the second color in its 1st sc.
- Next comes the repetition of knitting rows 4 through 8, after which 2 more rows of the first color are knitted.
The first bootie is ready, the second one is knitted identically.
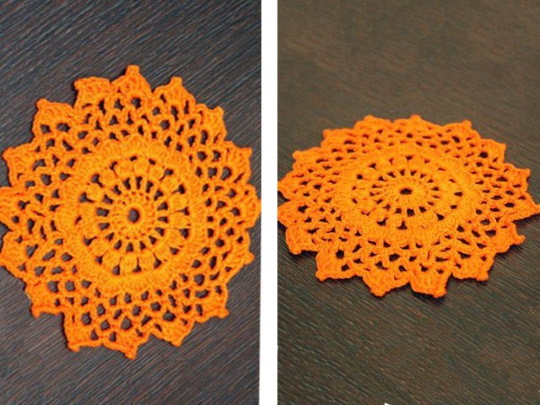
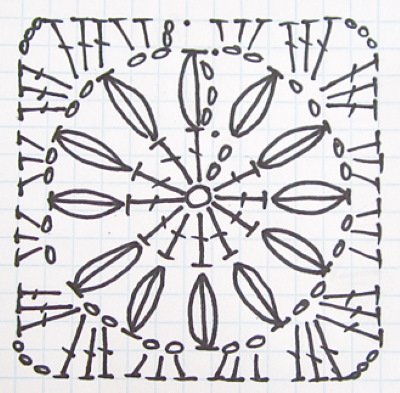
Plain napkins
Napkins that emphasize the decorativeness of the service are taken out on the occasion of special events, they can be used to decorate vases with flowers, and they are also offered as a touching gift. At the beginning of practice, you should knit an intuitively accessible pattern of a more ordinary nature with simple st. with no more than 2 n.
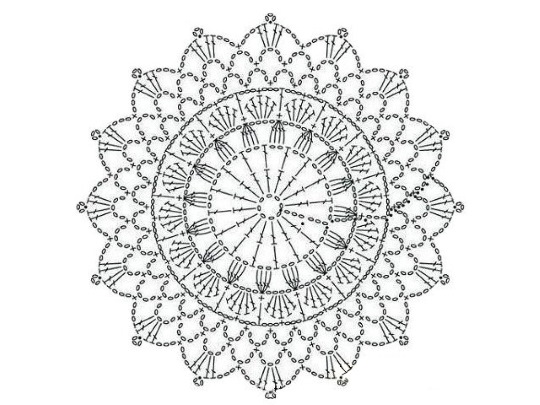
An example of creating a simple napkin:
- The napkin is knitted from the center, for it a chain of VP is formed, from which a ring is made by knitting a connecting half st.
- In the next row, dial the number of VP indicated in the diagram, after which knit the columns and other elements of the pattern. After this, the row is completed by knitting the resulting circle with a chain of 3 VP.
- Knitting continues counterclockwise according to the pattern diagram.
- The last outer row is made using picot.
Amigurumi for Beginners
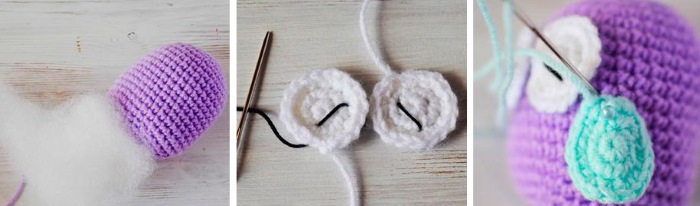
Crochet for beginners allows you to experiment with different techniques and art directions. In the Japanese craft of amigurumi, compound knitting in a spiral is used without connecting the circles to each other, this is how clothes, soft toys, souvenirs and accessories are made.
The contents of the products are usually such materials as holofiber, synthetic fluff, wool pon and the like. The narrower areas are stuffed with crushed plastic, the item is painted and a nose, eyes and other elements are sewn to it.
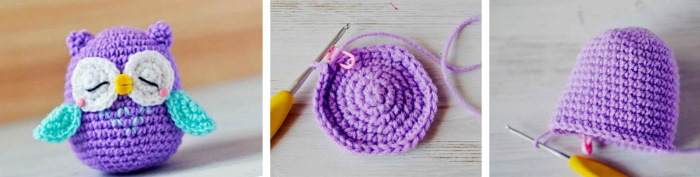
In most cases, amigurumi knits small items, although there are exceptions. Beginners can practice on owls, you will need acrylic yarn 2 mm thick in pink, black, white, yellow and green colors.
First, the head and body are knitted in yellow and green, the sample will require 12 ch:
- The 1st row is green, it starts with 12 sc. The knitting is turned, after which another 12 sc are made.
- In rows 2 through 5, 24 sc are also knitted, then the thread is changed to yellow.
- 24 sc are knitted in the 6th and 7th rows.
- In the 8th row, the pattern of *3 sc and increase* is repeated six times.
- The 9th row is knitted from 30 sc, then the thread is changed to green.
- The 10th row is made from a six-fold rapport *4 sc and increases*. From the 11th to the 16th rows, yellow and green threads alternate.
- The yellow 11th row is formed from 36 sc.
- In the 12th row there are also 36 sc.
- Row 13 consists of 36 sc.
- The 14th is formed from a six-fold rapport *4 sc and decrease*.
- In the 15th row *3 sc with decrease* are repeated six times.
- Row 16 consists of a six-fold rapport *2 sc and decrease*. The fabric is filled with padding polyester for shape.
- The 17th row is made from a six-fold rapport of *sc and decreases*.
- Row 18 is made from a six-fold decrease.
- In the 19th row the loops are closed.
In knitting eyes, 2 identical components are made, each consisting of:
- Black 1 starts with 2 ch, through the second loop from the hook 5 sc are carried out.
- White row 2 is knitted from a sixfold increase.
- Yellow kr 3 is made from six times repeated *sc and increase*. The knitting is closed with the remainder of the thread intended for sewing.
When creating green wings, 2 identical elements are also knitted, the knitting pattern includes:
- 1st row, starting with 2 ch, through the 2nd loop from the hook, knit 5 sc.
- Row 2, which is a six-fold increase.
- Row 3 consists of a 6-time repeat of *sc and increase*. Knitting is closed with a piece of thread for sewing.
The pink paws are knitted identically to the wings and eyes, for one you will need:
- 2 ch and 5 sc through the 2nd loop from the tool in the 1st row.
- Rapport from a six-fold increase in the 2nd row.
- Triple rapport *sc and 3 ch* with sl st at the end in the 3rd row. Close the knitting with the remaining thread for sewing.
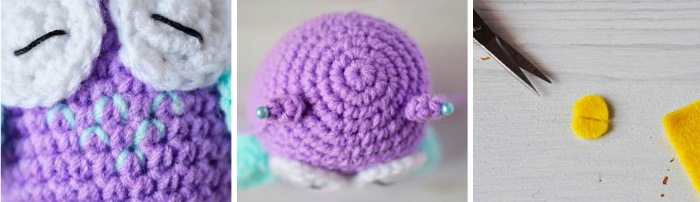
The last component of the owl is the pink beak:
- In the 1st row, 6 ch are made.
- In the 2nd 10 sc.
- The 3rd is knitted from 3 sl sts. A thread is also left for sewing.
The final stage is assembly:
- The eyes are sewn to the torso 3 rows below the top.
- The wings are attached to the body at the sides and 5 rows below the eyes.
- The paws are attached to the bottom.
- Cut off pieces of 3 threads, 18 cm each, then divide them in half. Each thread is folded in half, evenly attached to the left or right upper corner of the head.
- The beak is located in the lower opening of the eyes.
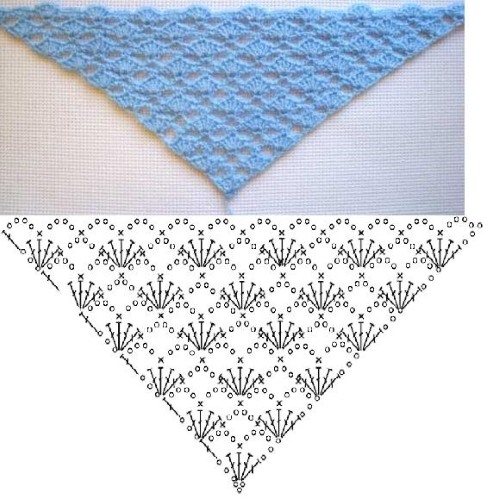
Capes and shawls for women
Women's shawls and capes can be made from various patterns separately or with additional decorations and edgings. The instructions describe the process of creating an openwork airy shawl, for which you will need 2 skeins of gray yarn with a high content of angora, pink mohair-acrylic material for edging and tool No. 5.5.
The item is knitted from the center of the triangle base, first you need to dial 10 VP:
- The 1st row is knitted from 3 ch, making 19 sts with n in a circle of 10 ch. Knitting is turned over.
- The 2nd row begins with 3 ch, after which a dc is knitted into each of the 1st row dc. Turn the knitting over.
- The 3rd row consists of 3 ch, in the dc of the previous row with ch as a divider, dc is knitted. The knitting is turned over.
- After 3 ch in the 4th row follow 10 ch and sc through the 2nd arch, double *5 ch and sc through the arch*, another 10 ch and sc in the arch, then the row is knitted in the same order back to front. The work is turned over.
- In the 5th row after 3 initial ch, 10 sc are knitted into 10 ch of the previous row, double *5 ch with sc into the arch* and another 10 sc into 10 ch of the previous row. After this, the 5th row, like the 4th, is knitted in mirror order. The knitting is turned.
- The 6th row begins with 3 ch, followed by knitting dc in each dc of the previous row, double *5 ch and sc through the arch*, 10 dc in 10 ch of the previous row and all elements of the row in reverse order. Turn the work.
- In the 7th row, first 3 ch are knitted, then *sc and ch as a divider*, repeating from *to*.
- The subsequent rows repeat the knitting pattern from 1st to 7th, repeating until the desired shawl size is reached.
The binding is done with pink yarn in 3 rows:
- In the 1st row, form a rapport from *st., ch, skip stitch, st.*
- In the 2nd, knit check marks from 2 dc into the window.
- In the 3rd row, make 5 tbsp through each of the check marks.
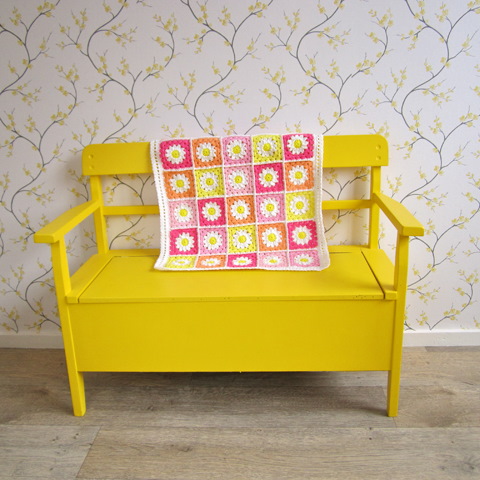
Blankets
Crocheting for beginners can include the practice of creating one of the simplest things - a blanket. For this soft and cozy multi-colored product, you will need cotton threads of light green, gray, purple, brick, white, turquoise and red colors in a total amount of about one and a half thousand meters.
A variety of shades will make the bedspread more elegant, and you can also use your own thread options. You will also need scissors, a #6 hook, and a needle to darn the ends. Each stitch of the blanket in question is by default carried through both loops. The dimensions given are approximate and the correspondence of the product to them depends on the knitting density.


The sample product will require a chain of 130 ch:
- Row 1 begins with 2 dc through the 4th loop from the hook, continuing with a pattern of *skip 2 loops and 3 dc into the next loop* from *to*. Knitting is turned.
- After 3 ch at the beginning of the 2nd row there is a rapport of *3 dc, performed between the combinations of 3 dc of the previous row*, continuing from *to*. The row ends with dc through the final ch, a turn is performed.
- 3 ch in the 3rd row are preceded by 2 dc between the 1st and 3rd dc of the previous row, after which *3 dc between the three dc of the previous row* are made until the end of the row. The row ends with a ch and a turn of knitting.
- The sequence of the first 3 rows is repeated from the 4th to the 71st row. The 72nd is the 2nd row. For every 6 rows one color is used, followed by 3 white rows, after which the color changes.
To finish the piece, white threads are attached to the st in the final loop of row 72, after which the perimeter of the blanket is evenly tied with sc with an invisible fastening at the end.
Floor mats
The main distinguishing feature of the rugs, in addition to the pattern, is their color scheme. A good choice for floor rugs would be yarn in classic contrasting shades or a combination of bright and dark tones.In knitting rugs, mainly tape, acrylic, semi-woolen and thick cotton threads are used, the optimal hook size is from 4 to 12.
The rug can also be made from plastic bags, jute twine, polyester cord or old knitwear. These items are knitted from sc and dc, the technique of hooking only one side of the loop walls is often used, this creates beautiful seams.
To create a simple rectangular rug, you will need to make a chain of the desired length of the product:
- In the 1st row, 1 dc is knitted into each VP.
- In the 2nd row, sc are knitted through the near half loop, then the work is turned.
- The 3rd row consists of sc, knitted through both walls of the loop.
- The 4th row is knitted identically to the 2nd.
- In the 5th row, sc is carried out behind the far half loop.
- The sequence is repeated in subsequent rows.
Knitting seems difficult to master only at first glance. Having learned to read patterns and having received a basic level of practice, beginners will be able to make clothes, soft toys and household items from fabric using a hook. For those who have mastered this art, there are no barriers to creating things or decorations for them from patterns.
Videos about crochet
Crochet for Beginners:
Are you explaining the tray to yourself?
Can you tell me what kind of yarn is used to knit the rugs in the last photo?
Please tell me how to care for such products?