Making clothes with your own hands allows you to implement creative ideas and create original things. With the help of simple knitwear patterns, you can sew a fashionable children's hat, in which the child will feel comfortable and stylish.
Necessary materials and tools
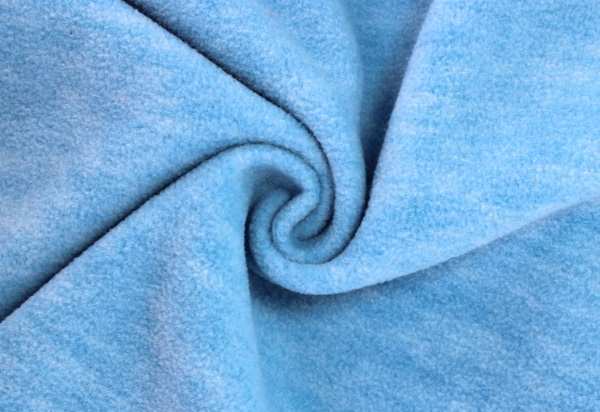
The main thing in sewing a children's hat is choosing high-quality material in an impressive color.
For one headdress you will need only 25 cm of knitwear and the following accessories:
- sewing threads of matching color;
- tailor's needles with a round eye;
- chalk or pencil for cutting;
- scissors;
- needle;
- sewing machine.
When choosing knitwear, you can pay attention to the following recommendations:
- If you are working with a simple sewing machine, you should choose thicker fabrics. For example, fleece, ribana, footer with lycra or fleece.
- For sewing on a coverstitch machine, you can use thin fabrics (kulirka or interlock).
- Fabric from unnecessary knitted T-shirts and jumpers is suitable for making children's products;
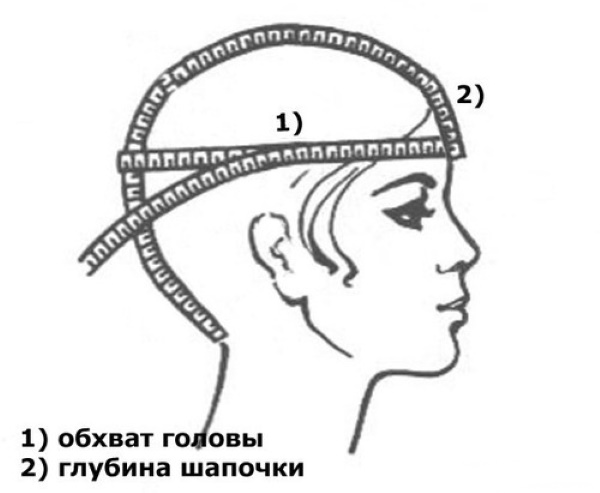
Rules for taking measurements
A knitted hat for a child is sewn according to 2 main measurements. These are the head circumference and the depth (or height) of the product. For a hat with ties that covers the ears, you also need to know the measurements of the side depth of the hat.
The main measurements and measuring technology are given in the following table:
| Name of the measurement | How to measure |
| Head volume | Place the measuring tape above the ears at eyebrow level and at the back at the most convex part of the back of the head. |
| Depth of the cap | Measure the distance up the forehead from the crown to the point between the eyebrows, back to the base of the skull and on the sides to the edge of the earlobe. |
| Rear width | Measure the distance from the earlobe to the back center line at the base of the skull. |
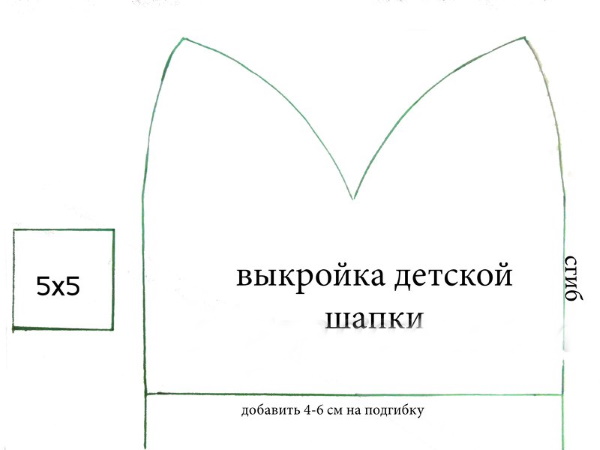
To create a hat pattern, use any pattern from a sewing magazine as a basis or print out a ready-made diagram. You can also trace the contours of another children's hat and add seam allowances.
Simple version of the product
Before cutting, it is recommended to iron the fabric. If the knitwear has a pattern, the pattern should be positioned so that the objects are placed in the center or symmetrically relative to the center line.
A knitted hat for a child, the pattern of which is constructed in just 10 minutes, can be single-layer or with a lining.
First, you need to decide on the size of the hat: measure the circumference of your head and choose the desired height of the product.
Next, to construct the pattern you need:
- Divide the head circumference measurement by 4 and make a deduction for the stretch of the product (for dense fabrics, subtract 0.5 cm, for thinner and more elastic fabrics - 1 cm).
- On a sheet of paper, draw a rectangle with the following parameters: the width is equal to a quarter of the head circumference, taking into account the necessary deductions, the length is equal to the height of the hat with an addition of 5 cm for the lapel (optional).
- On the left side, step back 2.5 cm from the corner to the left, and down ¼ of the height of the hat. Connect the dots, getting a dart.
- Round off the upper left corner of the rectangle.
- The resulting piece is ¼ of the hat.
Knitted hat for a child, simple model pattern. - To create half of the hat pattern, place the resulting piece on a sheet of paper with a fold so that the side line with the dart coincides with the fold line, trace the template and cut out.
Preparing fabric for cutting
The length of the fabric cut for the hat depends on how it will be cut:
- If the product is single-layer, then a fabric size equal to 1 length of the hat with an allowance for the lapel will be sufficient.
- For a two-layer model without a seam on the bottom fold, you will need double the length of fabric.
- If the hat is double-sided and made of knitwear of different colors, you need to take 2 pieces of fabric, the length of which is equal to one size of the hat.
Sequence of actions
The main characteristic of knitted fabric is its elasticity. It can stretch in one direction or two. When cutting out items, pay attention to the main direction of stretching and place the pattern strictly perpendicular to the direction of the stretch line.
For correct cutting it is necessary:
- Fold the piece of fabric across the stretch line with the right side facing inward.
- Place the hat pattern, trace it with chalk or pencil and cut out the resulting pieces, leaving 1 cm seam allowances.
- When cutting out two-layer items, the fabric must be folded crosswise and 2 pieces must be cut out separately with a fold at the bottom.
- To sew a hat with a lining, cut out 4 identical pieces or 2 pieces with a side fold.
Sewing
A knitted hat for a child has a simple pattern that even an inexperienced craftswoman can handle. Sewing a hat takes no more than 30 minutes.
To complete the work you need:
- Place the cut out pieces right sides together and pin the edges together.
- Sew the edges on a machine and overcast them with an overlock or a special machine stitch.
- To ensure even seams, iron the product.
- Sew the darts with one line. Carefully match the previously sewn seams so that the front side has a beautiful intersection of lines.
- Finish the edges of the dart with an overlock.
- Overlock the bottom of the hat and fold it inward by 2-2.5 cm. Pin the hem and sew the edge on the machine, stepping back 1.5 cm from the fold.
Beanie hat
To make a hat with a turn-up on the crown, you will need to sew only 3 seams. The work time is 10 minutes. To cut the hat, you need to put the fabric in front of you and put aside along the stretch line the size equal to the head circumference and subtract 4 cm for tension. Measure 55 cm in height and cut out the detail.
The nuances of making a beanie hat:
- First, you need to fold the rectangle in half, perpendicular to the stretch line, align the side cuts and pin them together.
- Next, sew a straight machine stitch along the edge, leaving an opening (5 cm long) in the seam for turning the garment inside out later.
- The next step allows you to create a turn-up on the top of the head. To do this, you need to place the stitched piece in front of you vertically, take the upper right corner and match it with the lower left corner of the rectangle. Then take the upper left corner and match it with the lower right corner.
- The bottom cut will have 4 layers of fabric. The middle 2 layers need to be slightly shifted inward and the 2 outer layers pinned together.
- Next, you need to start sewing the pinned edges on the machine. Having reached the opposite edge, you need to do the following: gradually begin to straighten the folded edges and continue sewing in a circle. As a result, the machine stitch will be laid along the entire lower circle.
- After sewing, the product must be turned inside out. The opening must be sewn up from the front side with a blind stitch or stitched on a machine.
With lining
A hat with a lining is made of knitted material of the top and lining fabric. If you plan to wear a hat with a lapel, then the color of the lining should be chosen so that it harmonizes with the main color of the hat. To sew, you need to make a pattern or use a ready-made printed scheme. A hat with a lining can have a classic cut, a beanie shape, or a model with triangular ears.

To sew a hat with a lining, you need to do the following:
- Cut out 2 pieces from the main and lining fabric.
- Turn the base of the hat inside out, stitch the back seam and darts.
- On the lining piece, make a back seam and a front dart. Leave the middle darts unsewn.
- Place the lining piece into the base piece. The right sides of both pieces should be facing each other.
- Sew the bottom edges with an overlock stitch.
- Turn the hat right side out through the opening in the lining. Sew the opening with a blind stitch.
Double sided
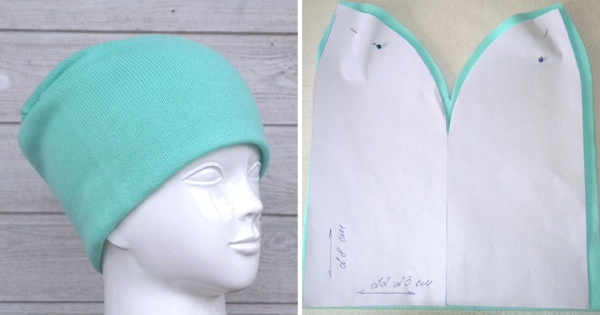
A knitted hat for a child (the pattern and cutting diagram are presented later in the article) can be sewn from one piece of material and look absolutely identical inside and out. Before sewing, you need to make a pattern.

To do this you need:
- Take a sheet of paper folded in half and set aside from the fold a value equal to ¼ of the length of the head circumference, and at the top measure the length of the hat and build a rectangle from the resulting points.
- Step back 2.5 cm from the fold line above and a distance equal to ¼ of the hat length below. Connect the resulting points and cut the corner along the line.
- On the other hand, smoothly round off the corner of the rectangle.
The resulting piece is a pattern for half of the hat. When cutting out from the bottom and left, it will have folds.
To cut and sew a hat, you need to do the following:
- Fold the fabric so that the fold lines on the fabric match the fold lines on the pattern, and cut out 1 whole hat piece with darts and seam allowances.
- Use a sewing machine to stitch the middle darts.
- Fold the piece in half with the right side facing inwards and stitch around with a continuous stitch. Leave an unsewn space of 4-5 cm for turning.
- Turn the hat inside out through the opening left and sew it up with a blind stitch.
In addition, you can sew a simple scarf from the same fabric with a button fastening. To do this, sew a rectangle of the desired length (so that it fits freely around the neck) from the inside along the perimeter on an overlock. Sew a loop of fabric on one narrow side. Then turn the product through the left opening and sew on a button.
With ears
The production of a model for a baby with ears does not have significant differences in sewing technology. The difference is that the pattern is not rounded, but has corners at the top in the form of ears.
The pattern of 1 half of the hat is a rectangle, the width of which is equal to the half-girth of the head minus 1.5-2 cm for the density of the fit. The length of the rectangle is determined by the height of the hat. To do this, you need to measure the distance from the line between the eyebrows to the back of the head and make an allowance for the ears and the lapel.
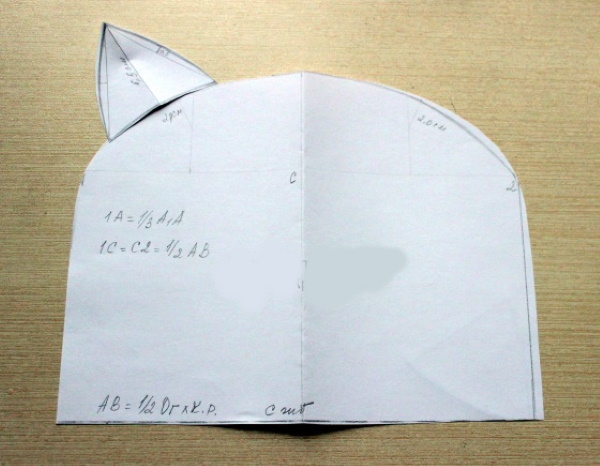
To sew a hat you need:
- From a vertical strip of fabric, cut out 1 whole piece of the hat with a fold.
- Cut out the piece, leaving seam allowances (1 cm).
- Machine stitch the side seams and turn the hat right side out.
- Place the hat in front of you, mark the central point on the top edge with chalk and measure equal segments of 3-4 cm in length from it on both sides.
- In the marked places, make folds 1.5 cm deep, with the folds directed towards the center line.
- Pin the folds and sew 2 securing stitches along the top edge where the folds are.
- Overlock the bottom of the product, fold it inward and sew a machine stitch in a circle at a distance of 1.5-2 cm from the bottom fold.
Another option for obtaining triangular ears is to make 2 symmetrically located darts in the upper part of the hat.
Fashionable models for girls
A knitted hat for a child (the pattern can be made using simple constructions described below) can have different colors and styles. Bright knitted fabrics make it easy to sew hats for little fashionistas for different occasions.
A charming hat with a bow is very easy to sew and looks elegant. To make it, you will need ribana knitwear with lycra.
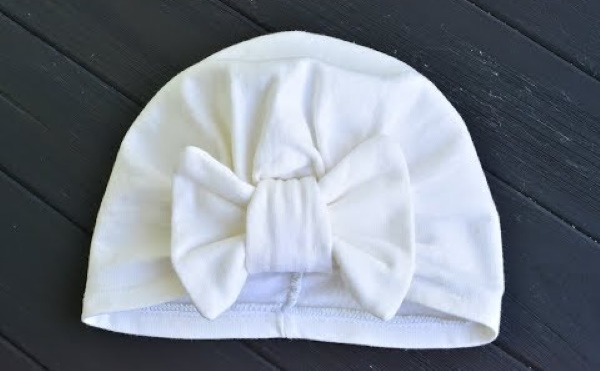
To sew a hat you need:
- Fold the fabric in half with the right sides facing inward.
- Cut out a rectangle. From the fold to the side, measure a distance equal to half the head circumference minus the fit density (from 2 to 6 cm).
- Measure up a distance equal to 2 hat lengths plus 15 cm for the bow. When sewing a hat for babies, the allowance for the bow should be reduced to 12-13 cm.
- Cut out a rectangle with seam allowances.
- Cut out a piece from which the middle of the bow is made, 9-10 cm long and 8 cm wide.
- Sew the longitudinal seam of the hat part and turn it so that it is in the middle. Sew the top edge, leave the threads about 10 cm long. Connect the corners of the rectangle by tying the threads together.
- Turn the product right side out.
- Measure the height of the bow from the stitched edge with the corners pulled together and make the appropriate marks on both sides.
- Sew the middle part of the bow from the inside and turn it inside out.
- Place the ends of the central part of the bow strip on the marks and secure it by throwing it over the top edge of the hat.
- Sew the ends of the strip into a fold on the inside of the hat. Gather the top of the hat into a bow.
- On the opposite side of the rectangle, cut off the corners, sew the seam, leaving a small opening for turning.
- Turn the garment inside out and sew up the opening with a blind stitch or machine stitch.
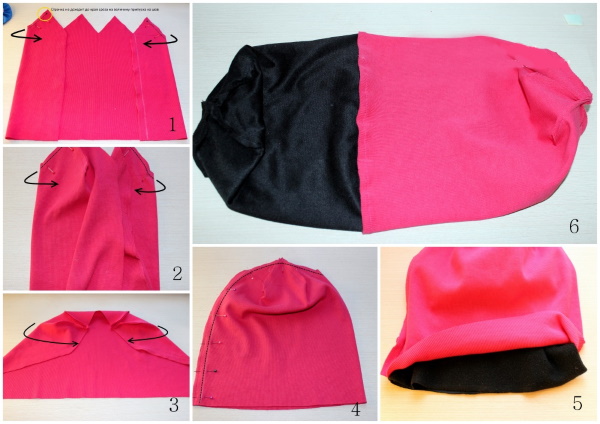
Another interesting option for decorating the top of a girl's hat in the form of corners folded toward the center is done as follows:
- First, you need to cut out a rectangular piece. Its length should be equal to the height of the hat with an allowance for decorative trim of about 12 cm, and the width should correspond to the head circumference minus 8-12 cm.
- Then you need to sew the longitudinal seam and place it in the center.
- Sew the top of the hat. Leave a 4 cm opening in the middle.
- Turn the piece right side out, straighten the corners and fold them toward the middle. Tuck the ends of the corners into the unstitched opening, pin them from the inside and sew the seam on the machine.
- Finish the bottom of the hat with an overlock stitch, fold it to the wrong side by 2 cm, secure with pins and machine stitch along the edge.
To diversify the models of knitted hats for girls, you can use various decorations.
These could be:
- knitted, jersey flowers;
- embroidery;
- applications, iron-on stickers;
- bows, lace.
- brooches, rhinestones, beads.
- bright badges, patches.
Various knitted hats can become a bright addition to everyday children's clothing. Any mother can sew a stylish hat for a child using a simple pattern and step-by-step description.
Video about sewing a hat from knitwear
How to sew a hat for a child: